Please note, Triggers is a premium feature. If you do not have Triggers, please speak to your Account Manager.
Overview
The purpose of this email automation process is to ensure that the mailings around your event (invitation, reminder, confirmation, and so on) all go out to the right people on the right day, automatically.
This article takes you through the process of setting up a series of emails around an event, which can be automatically sent out over time, to a filtered list of attendees.
Contents
Other resources you might be interested in:
Requirements in InterAction
Step 1: Create a mailing list for your event.
Step 2: Ensure that it has the following additional field as a bare minimum:
- 'RSVP' with Accept/Decline or Yes/No values
Step 3 (Optional): Below are optional additional fields you may wish to add to your RSVP forms:
- Any dietary requirements
- Choice of different workshops or other questions
- 'Attended' with 'Attended', 'Walk-in', 'No show' values
-
If you have Vuture's Event App, this will make the process much easier by decreasing any manual work).
- 'Website registration' with Yes value
- If you wish to embed a blank RSVP form on your organization's website, you might want to include 'Website registration' as a hidden form field with 'Yes' pre-checked.
- Some feedback questions covering the event, speakers, venue, or as appropriate.
Note: You might consider saving the above additional fields as part of your Events Marketing List template in InterAction, so that all fields are automatically available for future events.
Requirements in Vuture
Step 1: Create your campaign, starting with the Invitation email, linking to the RSVP Prefilled form and RSVP Blank form (if using both) and thank you pages for both Accept and Decline. Save and publish your work as you go.
For more information on setting up a basic event campaign, please click here. If you need help with adding the additional fields to forms and/or making them hidden, please also review the Using Forms with InterAction Help Desk Article.
Note - For the remaining 2-5 steps, feel free to update the language and style of the emails that work best for you, rather than simply copying the original Invitation email.
Step 2: Copy the finished Invitation email, adjust the wording to make it suit a Registration Confirmation email (“You are registered to attend …” instead of “You are invited”) and remove the Accept/Decline linked button and the Forward to a Colleague links. Rename this email as Registration Confirmation.
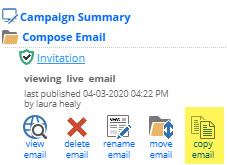
This email will be sent to those who have RSVP'd yes to your event, using a filter and Recurring Trigger.
Step 3: Copy the finished Invitation email again and adjust the wording to make it suit a Reminder email (for those people who were invited but who did not RSVP yet). Leave the buttons on the email. Rename it Reminder to Register.
This email will be sent to those who have yet to RSVP by a certain date/time.
Step 4: Copy the finished Invitation email again and adjust the wording to make it suit an Event Reminder (“We are looking forward to seeing you tomorrow”, instead of “You are invited”). Remove the Accept/Decline and Forward to a Colleague buttons. Rename the email Day Before Event Reminder.
This email will be sent to those who have RSVP'd yes to remind them that the event is tomorrow.
Step 5 (Optional): Finally copy the finished Invitation email one more time and edit the wording to make a Request for Feedback. Break the links to the RSVP form and use a Feedback link instead to a Feedback form. Rename the email Feedback Request or Thanks for Attending.
Note: This last step is easiest if you are using Vuture's Event App as all of the attendance additional fields will automatically write back to InterAction. Therefore, allowing you to eliminate the manual work of updating InterAction for each attendee and automatically sending a 'Thanks for Attending' email the day after the event takes place.
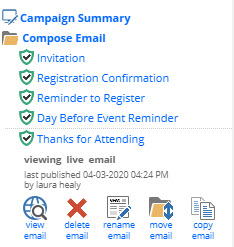
By the end, you should have the following 4-5 emails within the Compose Email folder:
Setting up Filters
At a bare minimum, you will need to set up the following filters in Vuture (you will only have to do this once for each campaign):
- RSVP = Yes (or Accept)
- RSVP = empty (no response)
Additionally, you may wish to setup a Filter for those who attended the event.
- Attended = Attended, as well as,
- OR Attended = Walk-in
Filtering your InterAction marketing lists using additional fields allows you to target contacts that meet specific criteria in your list; for example, to send a Confirmation email to everyone who has replied Accept or Yes for a particular event.
Instructions
Please follow the below instructions for each of these 3 filters - keeping in mind the third filter is optional (Attended).
To create the filters for your event you need to be in the Send Email screen, although you will not be sending anything immediately, and you need to have your Marketing list selected.
Click on the published Invitation in the Compose Email area and click on the "send email" icon (note the email must be published for this button to be visible).
Choose your list source, marketing list name and email type, as for a normal email send.
Then select on 'new filter'.
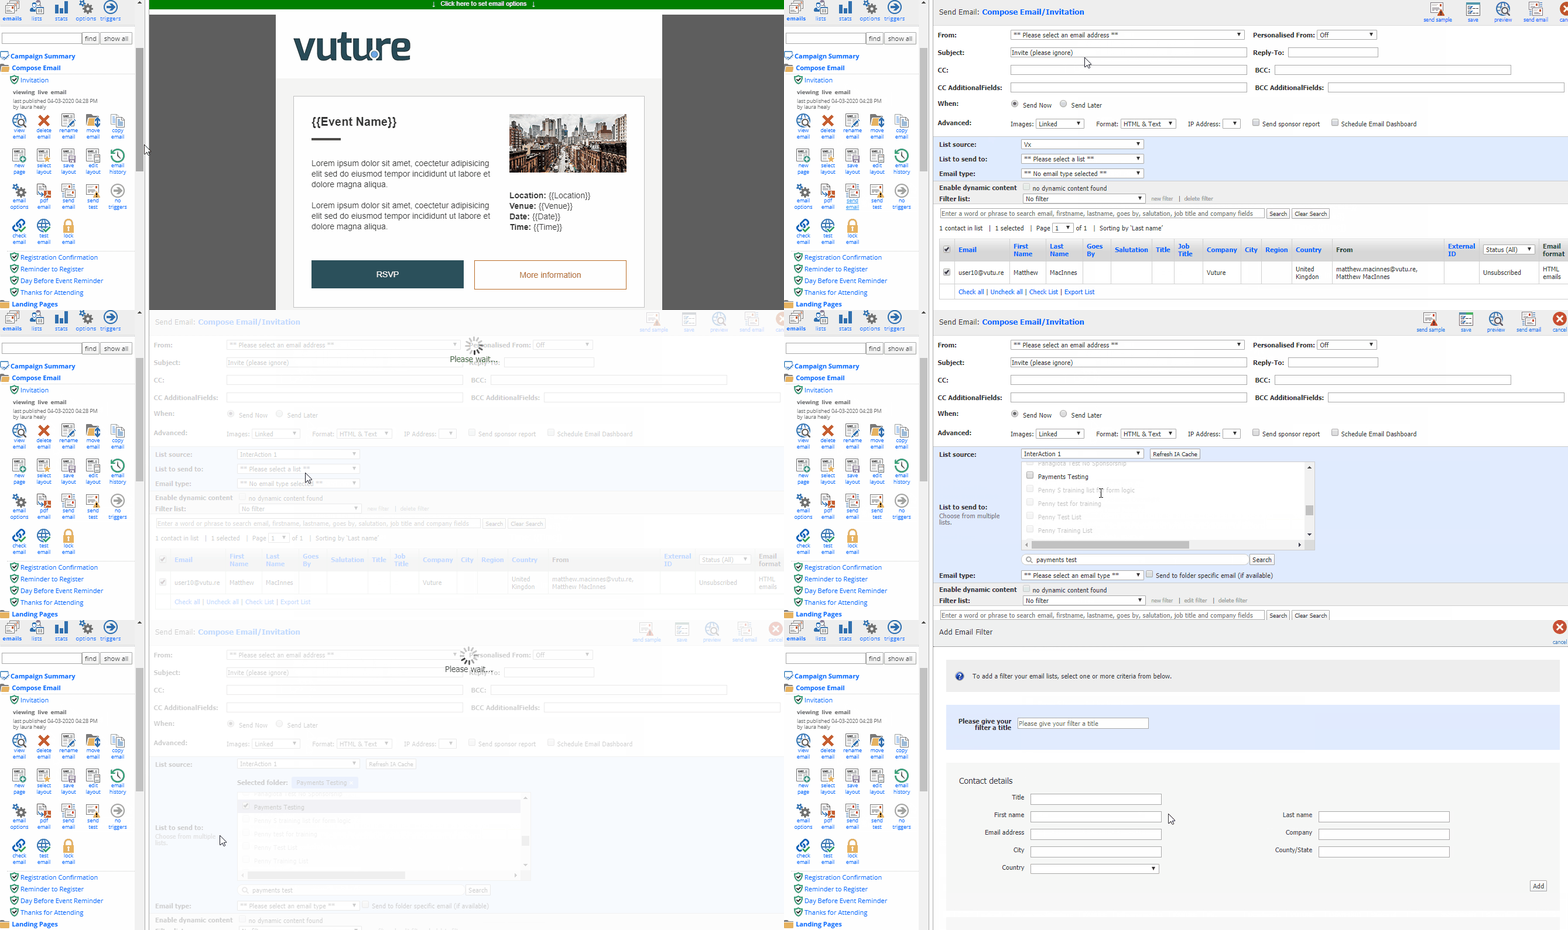
The first step is to give your filter a title. Best practice is to give each filter a unique name with the action the filter is taking to filter the list. For example, '[Name of Event] - RSVP is Yes'.
Setting up 'RSVP = Yes (or Accept)' Filter
Give your filter the title of '[Name of Event] - RSVP is Yes'.

Scroll down to the 'Additional Fields' section. Choose the same Marketing List that you'll be sending your Invitation to and where you're tracking RSVPs for this event. Select the RSVP Field. Keep the Value as 'is'. Select your 'Yes' value from the drop-down.
Click 'Add'.
Click 'Filter'.
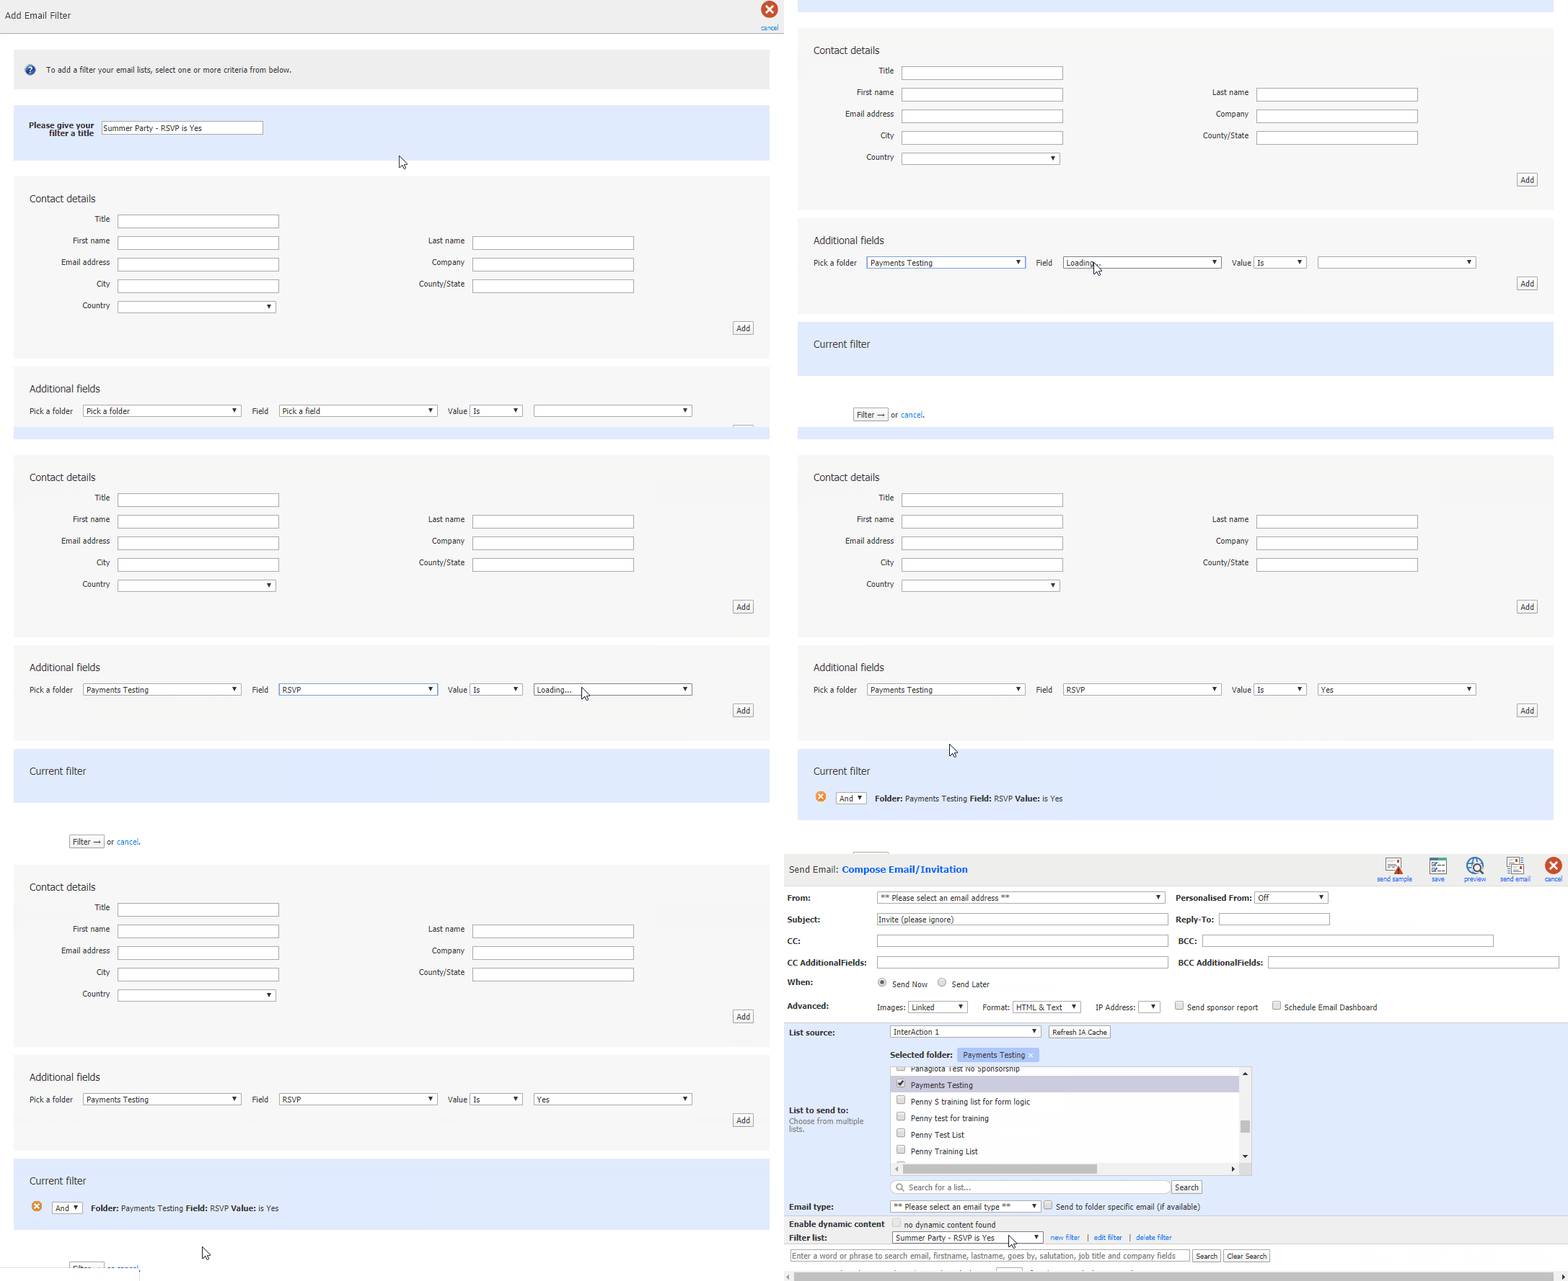
Setting up 'RSVP = empty (no response)' Filter
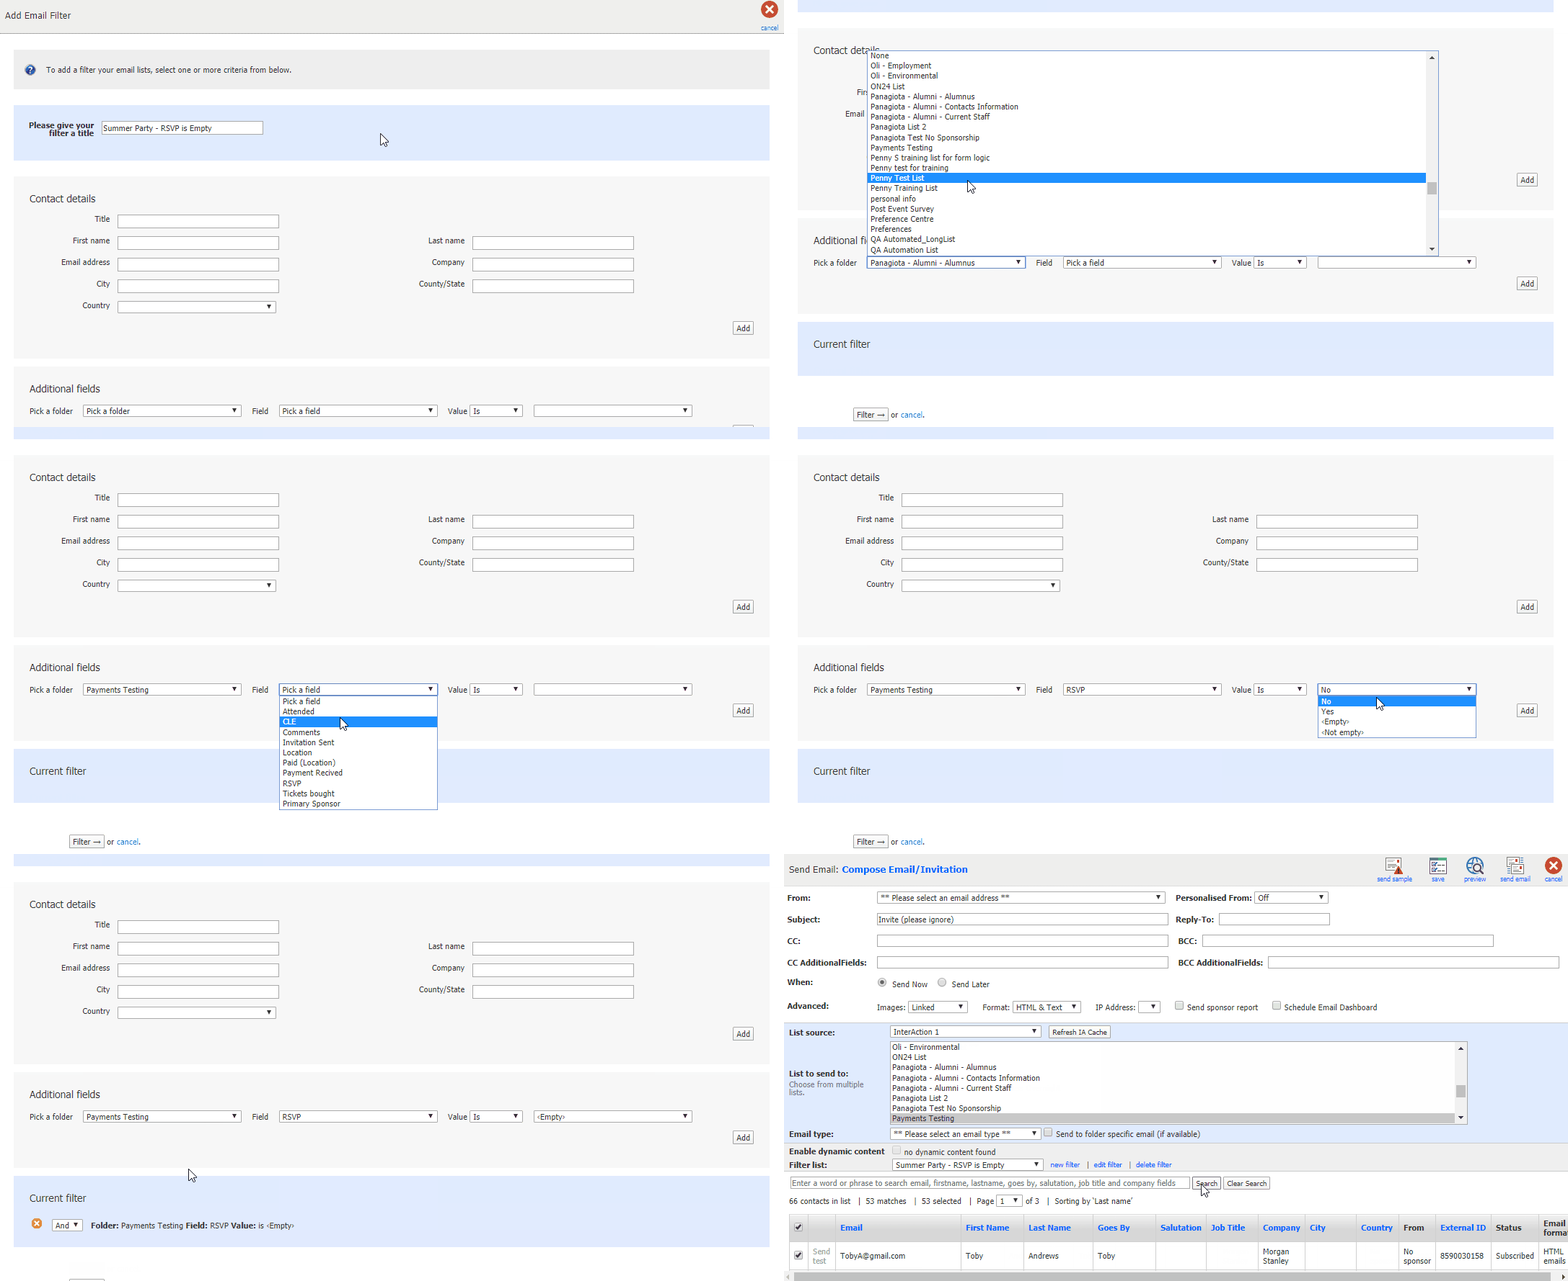
Give your filter the title of '[Name of Event] - RSVP is Empty'.

Scroll down to the 'Additional Fields' section. Choose the same Marketing List that you'll be sending your Invitation to and where you're tracking RSVPs for this event. Select the RSVP Field. Keep the Value as 'is'. Select '<Empty>' value from the drop-down.
Click 'Add'.
Click 'Filter'.
(Optional) Setting up 'Attended = Attended OR Attended = Walk-in' Filter
Note: This last step is easiest if you are using Vuture's Event App as all of the attendance additional fields will automatically write back to InterAction. Therefore, allowing you to eliminate the manual work of updating InterAction for each attendee and automatically sending a 'Thanks for Attending' email the day after the event takes place.
Give your filter the title of '[Name of Event] - Attended is Attended'.

Scroll down to the 'Additional Fields' section. Choose the same Marketing List that you'll be sending your Invitation to and where you're tracking RSVPs and who attended this event. Select the Attended Field. Keep the Value as 'is'. Select your 'Attended' value from the drop-down.
Click 'Add'.
Then choose 'Walk-in' for the value.
Click 'Add'.
Change both from 'AND' to 'OR' options.
Click 'Filter'.
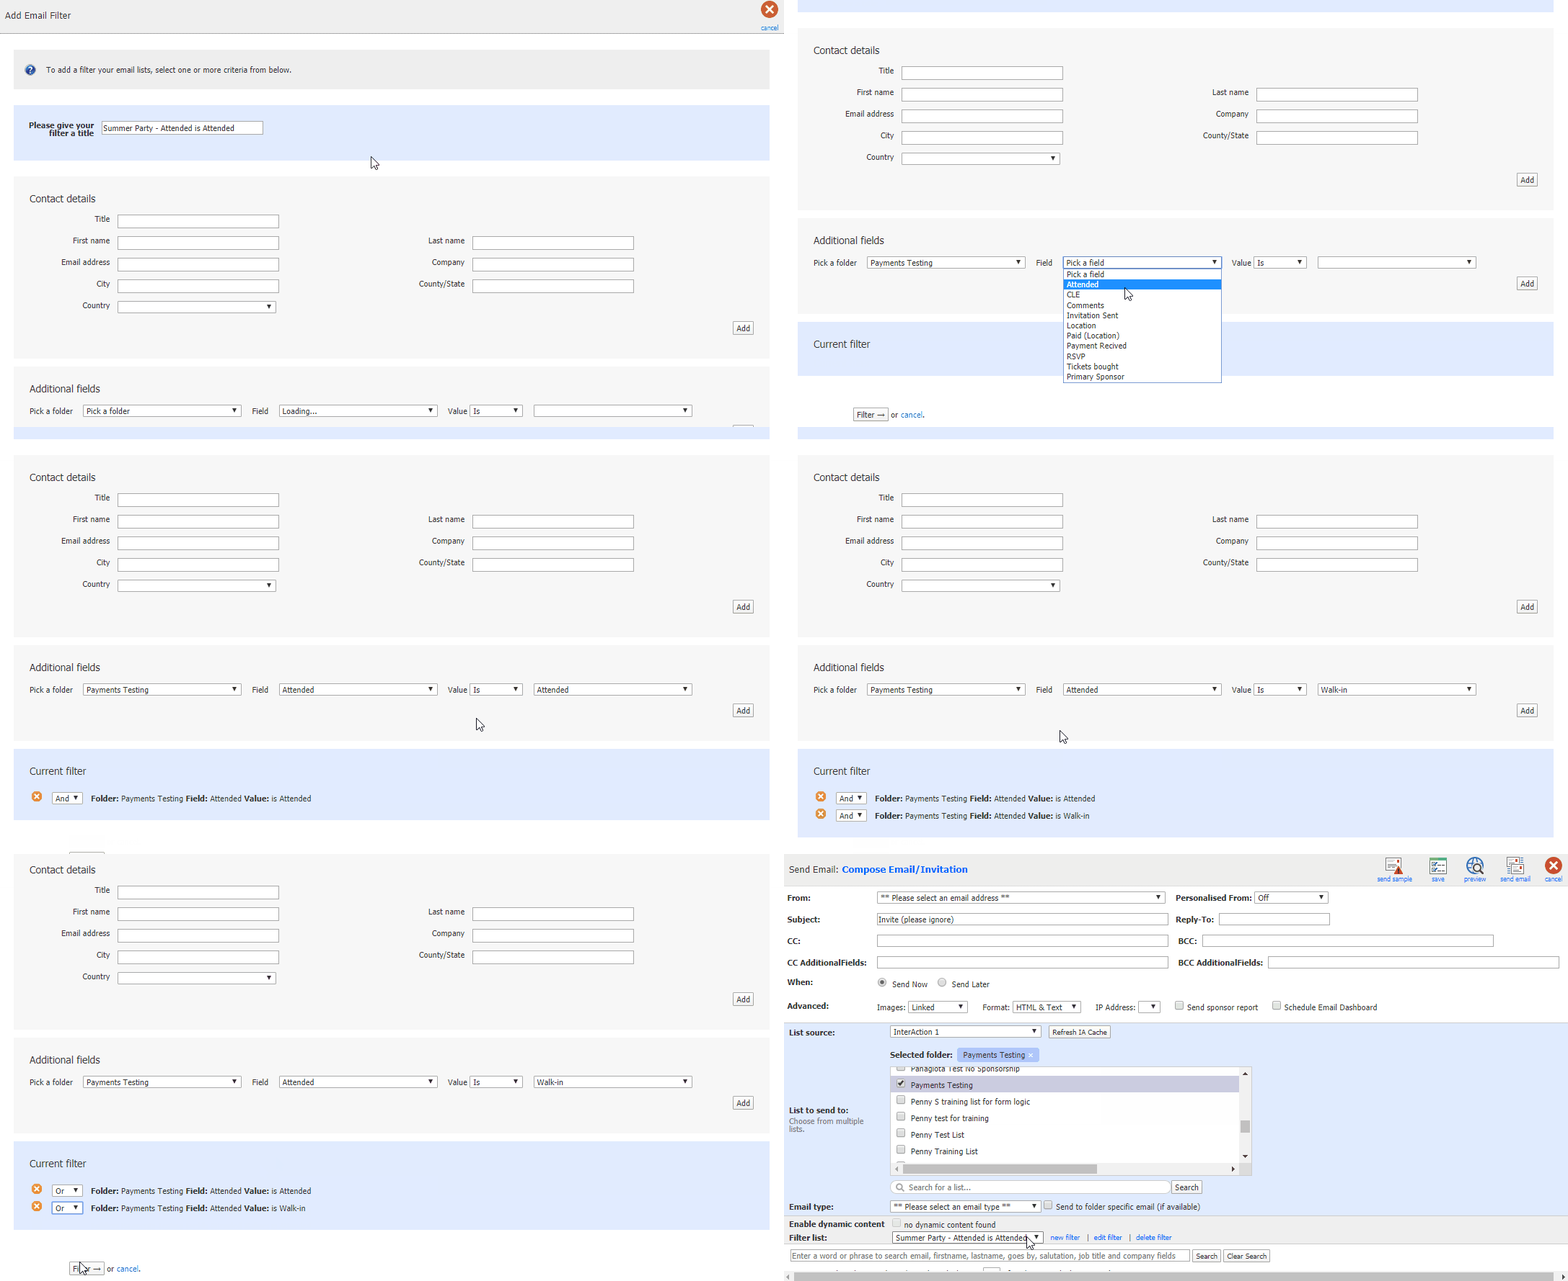
Note: For two values in the same additional field you need the Or option. For two values in different fields (e.g. City is London and RSVP is Accept) you need the And option.
Setting up your Triggers to Automate the Event Campaign
You may then setup your Triggers to Automate all of the below mailings in your event campaign:
Invitation
A Trigger is optional for sending this mailing. If you'd like to schedule it ahead of time, you may use the 'Date' Trigger. Otherwise, you may send this mailing manually to the whole list, in the normal Send Email process, once you have completed your testing.
For step by step instructions on using a Date Trigger to send your invitation, please click here.
Registration Confirmation
To automatically send contacts a Registration Confirmation email upon registering, you may use the 'Recurring' Trigger with the 'RSVP is Yes' filter.
For step by step instructions on using a 'Recurring' Trigger with the 'RSVP is Yes' filter you created, please click here.
Reminder to Register
You may wish to automatically send a Reminder to Register email to contacts who have not yet RSVP'd Yes to your event by a specific date. This can be done using a 'Date' Trigger and the 'RSVP is Empty' Filter.
For step by step instructions on using a 'Date' Trigger with the 'RSVP is Empty' filter you created, please click here.
Day Before the Event Reminder
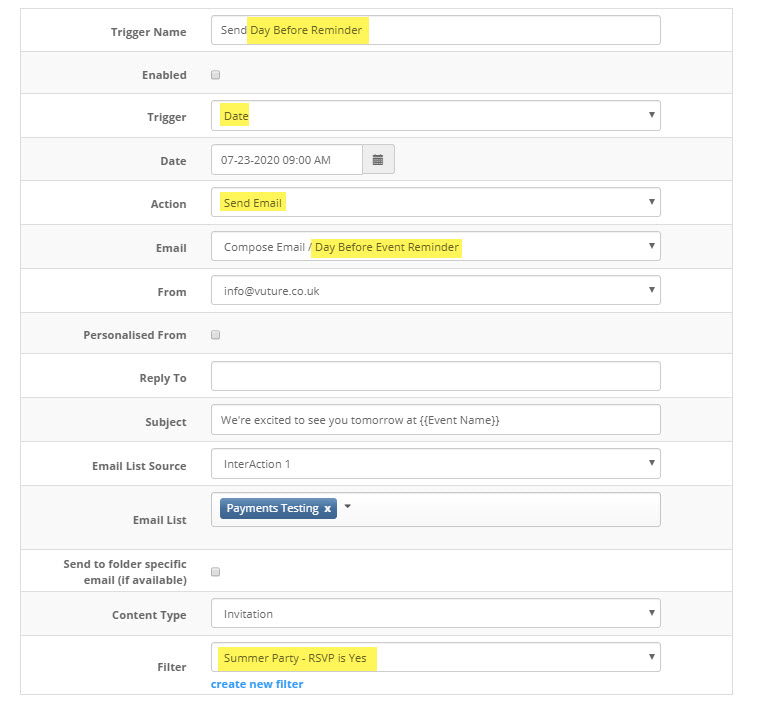
You may wish to remind those who have registered to the event that the event is tomorrow. This is also a great time to repeat any important information (i.e. time, location, directions, additional materials, etc.). This can be done using a 'Date' Trigger and the 'RSVP is Yes' Filter.
To create this Trigger, you could use the same step by step instructions as the 'Reminder to Register', but you would select the 'Day Before the Event Reminder' email to send. For the filter, you would choose 'RSVP is Yes' Filter instead of 'RSVP is Empty'.
Your Trigger would look something like this:
Thanks for Attending
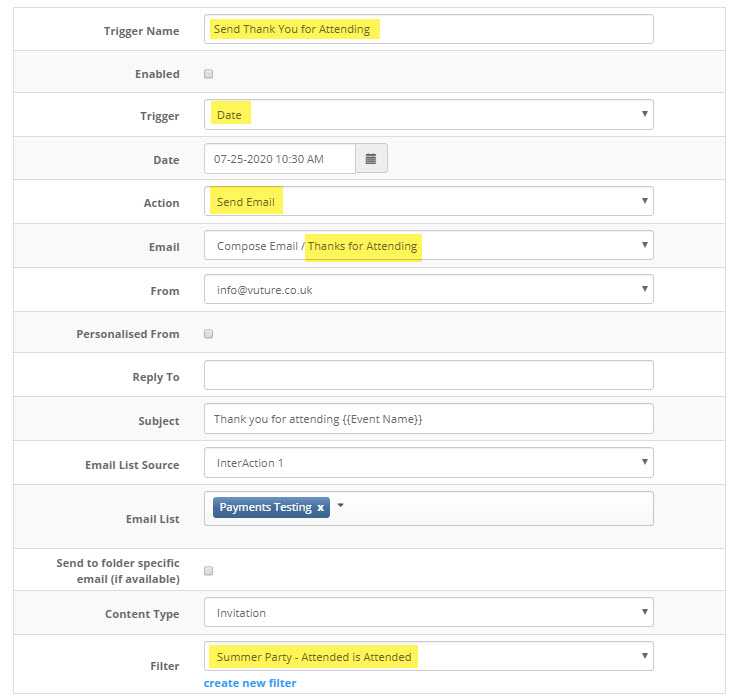
As a follow up to attending the event, you may wish to share event materials (i.e. Slide deck, survey, etc.). This can be done by using a 'Date' Trigger and the 'Attended is Attended + Walk-in' Filter.
The Attended additional field can either be manually populated in InterAction or for those with Vuture's Event App, this will write back automatically when you register attendees.
To create this Trigger, you could use the same step by step instructions as the 'Reminder to Register', but you would select the 'Thanks for Attending' email to send. For the filter, you would choose 'Attended is Attended + Walk-in' instead of 'RSVP is Empty'.
Your Trigger would look something like this:
Once done, your Trigger List could look like this:
