Introduction
Prerequisites and High Level Overview of Process
Registering and Authorising the Vuture Integration
Giving Permissions for the API to access Teams
The Webinar Setup Tool
Enable Teams for your Instance
Access the Setup Tool
Validate Token
Further Tasks: Activities
Tracking Attendance:
Scheduled Tasks
OAuth Token Refresh Task
For Client Admins - Giving Access to Vuture
For Client Admins: Granting Microsoft Teams Application Access for Vuture
Creating and Using a Teams Webinar
Introduction
The releases of the MS Teams/Vuture integration allows user to set up one or multi-webinars in Teams, invite contacts via Vuture emails, and record their RSVP responses and webinar attendance back into their CRM. The Teams integration will work for all CRMs with which Vuture integrates, and with standalone. However it is not possible to write back Activities to Contactease CRM or to the standalone Contacts module.
Prerequisites and High Level Overview of Process
The following is a brief overview of the steps required to enable the Teams Webinar integration with Vuture. Each numbered item is then covered separately.
-
This feature will work for all CRMs with which Vuture integrates except Fibre and legacy Salesforce. It is not possible to track attendance or write back activities to Contactease or Standalone.
-
Create Microsoft Entra registration - for client ID, secret ID, etcetera - do this once.
-
Add permissions in Microsoft and ask your IT admin person to grant permissions for the 9 items - do this once.
-
In Admin>System>Forms ensure that the Webinar Form Field setting is ticked for Microsoft Teams - do this once
-
For your end users, add Teams to Admin>Roles>Forms>Microsoft Teams Integration Webinar Id Field - do this once
-
Enter your firm’s details at the Webinar Set up Tool - do this once
-
Create a new Webinar and get the url and id - users will do this every time
-
Add the webinar to the Vuture form - users will do this every time
Registering and Authorising the Vuture Integration
This process is required once only for the Teams/ Vuture integration to work at your firm.
As a client administrator, I need to set up the Oauth credentials in the entra ID
Login to the Microsoft entra ID at entra.microsoft.com
Go to Applications > App registration. Click New Registration
Give the App a name (the example in the image below uses Vuture Test, clients could use Vuture Integration as an App name) and redirect URL as below and click Register
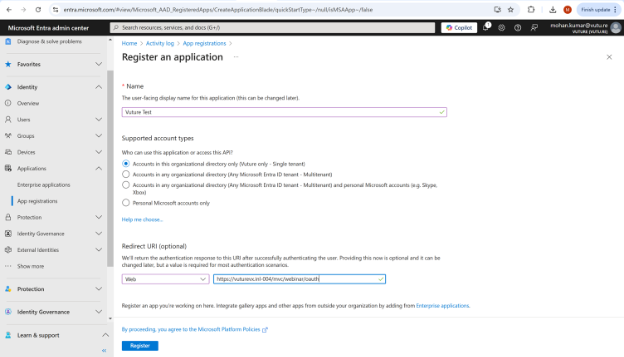
Note: In the image above there is an optional Redirect URL. The form text says:
Redirect URL (optional)
"We'll return the authentication response to this URL after successfully authenticating the user. Providing this now is optional and it can be changed later, but a value is required for most authentication scenarios."
To add a Redirect URL you should construct it like this:
Your Vuture base URL followed by /mvc/webinar/oauth
for example:
{base url}/mvc/webinar/oauth
Copy the client Id, Tenant Id. (You will need to input these in Vuture Webinar Set up Tool later.)
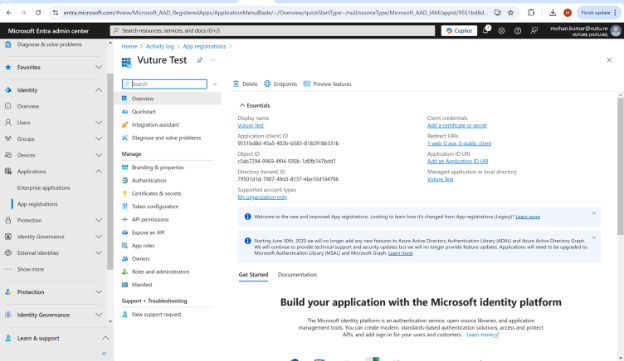
Go to Certificate & Secrets in the Manage menu on the left and create new Client secret
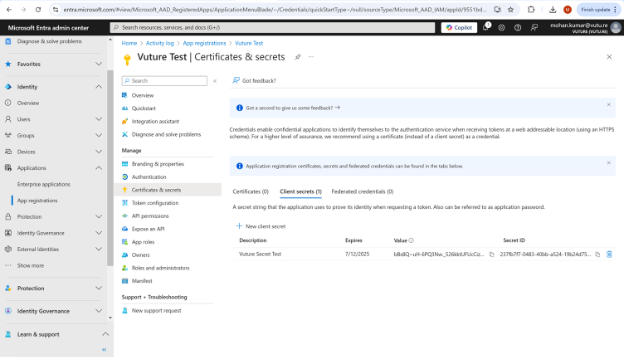
Copy the secret value. You will need this later to input into Vuture in the Webinar Setup Tool.
Giving Permissions for the API to access Teams
Go to API Permissions and create the 9 permissions listed below with the correct permission type.
Ask your firm’s IT admin to grant the OAuth application the following permissions:
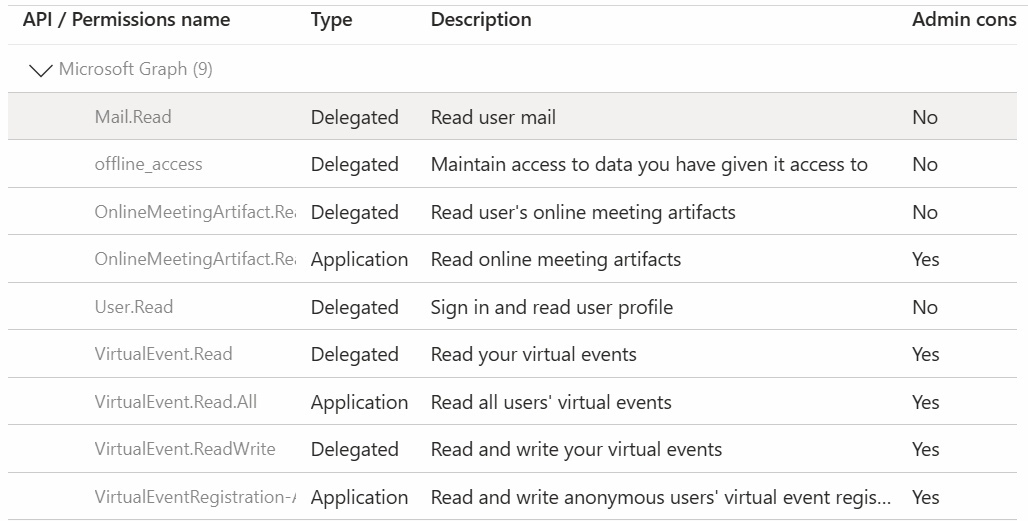
There is a document which describes why we need the 9 Permissions here.
The Webinar Setup Tool
The Setup Tool in Vuture provides a place to authorise your Teams account.
The Webinar Setup Tool was developed as a way to establish that webinars have been set up correctly in the Vuture instance, that all required integration data has been entered, and that the necessary processes have been enabled.
It was made available to clients, as a secure way of entering Client Key and Secret Key themselves. They do not have to share this information with Vuture staff.
Enable Teams for your Instance
Start by asking your CSM to enable Teams in your instance. They will need to navigate to Admin.System.Forms and check the box at Display Teams Integration Teams Id text field.
They will also need to enable Teams for your Role, at Admin>Roles>Forms>Microsoft Teams Integration Webinar Id Field
Access the Setup Tool
Once Teams has been enabled for your instance, it will appear as an option in the Set up Tool.
Navigate to Home.Admin.Webinar Setup
Selecting the webinar Vendor as Teams will display some useful information about the required areas for the configuration to work correctly. It will then ask the user to enter the Auth type, the API key and Secret key. On saving the entered information, the user will be able to validate that these fields are correct.
For Teams as the Vendor:

You will require:
Client Api Key - Retrieved from your app on the Microsoft site
Client Secret Key - Retrieved from your app on the Microsoft site
Tenant Id - Retrieved from your app on the Microsoft site
Enter as above and click Save. Once you have Saved, then click Authorize.
The Authorisation process uses the credentials you have just entered and makes a request to Microsoft to authorise the Vuture integration's access to your Teams platform. You may be redirected to a login page. If you are not the developer or administrator you can ignore this and close the page. If you are the administrator you can log in and authorise the integration yourself. This is a one time operation.
Validate Token
Once you have correctly authorised the integration, Validate Token can be used at any time to validate your credentials and ensure that the integration is set up correctly or to troubleshoot any issues in the future.
Further Tasks: Activities
(not for ContactEase or standalone)
Add an Attended Activity Type to the client's system in the Metadata Manager. If the client already has an Attended Activity Type entered in their config (for example, an InterAction client using the Events App) you will not need to add a new Activity Type unless the client wishes to differentiate between Event Attended and Webinar Attended.
Tracking Attendance:
It is only possible for Vuture to track (and write back activities for) attendees who register via a Vuture Form. Any users that register for the webinar directly through the webinar provider using a generic audience link, will not have an attendance activity written back to the CRM. Their attendance will be recorded in the webinar provider's reports.
Scheduled Tasks
All webinar tasks for recording webinar attendees have been combined under one task now. The task you need to ask your CSM to enable for attendees is at Admin.Services.WebinarEventProcessing Task. The default time for this task to run is 6am.
In addition, the CSM can set the OAuth Token Refresh Task.
OAuth Token Refresh Task
Enable RenewWebinarOAuthRefreshTokenTask to set the schedule for refreshing the API authorisation token. It defaults to Daily, which is fine.
Note: If you have more than one webinar provider integrated with Vuture, the new combined webinar task will run in sequence, one webinar provider at a time, to avoid overloading the system.
For Client Admins - Giving Access to Vuture
You will need to configure application access to virtual events for the above registered App to be used by the authorized users in the organization.
The OAuth app configured in Vuture has to be authorized by the below users who have given the application access.
For Client Admins: Granting Microsoft Teams Application Access for Vuture
This guide explains how a Microsoft 365 / Teams administrator can grant the Vuture Teams integration access to online meetings, webinars, or virtual events using a Microsoft Teams application access policy.
Application access policies are required when an application uses Microsoft Graph application permissions to access online meetings or virtual events on behalf of users. The policy controls which application IDs are allowed to access Teams meeting or virtual event data, and which users the application is allowed to act on behalf of.
For Microsoft’s reference documentation, see:
https://learn.microsoft.com/en-us/graph/cloud-communication-online-meeting-application-access-policy
Prerequisites
Before starting, make sure you have:
-
Microsoft Teams administrator permissions, or equivalent permissions to manage Teams policies.
-
PowerShell installed.
-
The Microsoft Teams PowerShell module installed.
-
The Vuture OAuth application client ID, also known as the Application ID.
-
The Microsoft Entra user object ID, user principal name, or group ID for the users or groups that should be authorised.
The Vuture OAuth app configured in Vuture must be authorised for the users who are granted access through this policy.
Important recommendation
There are three ways to grant the policy:
-
To individual users.
-
To a group.
-
Globally, across the whole tenant.
We recommend using either:
Avoid mixing global access with individual or group grants unless your Microsoft administrator has confirmed that this is required for your tenant.
Step 1: Install the Microsoft Teams PowerShell module
Run PowerShell as an administrator and install the Microsoft Teams module if it is not already installed.
Install-Module -Name MicrosoftTeams -Force -AllowClobber
Step 2: Connect to Microsoft Teams PowerShell
Connect using an account with the required Teams administrative permissions.
Connect-MicrosoftTeams
Step 3: Create the application access policy
Create a new application access policy and include the Vuture OAuth application client ID.
Replace <VUTURE_APPLICATION_CLIENT_ID> with the Application ID supplied for the Vuture OAuth app.
New-CsApplicationAccessPolicy `
-Identity "Vuture-Policy-TeamIntegration" `
-AppIds "<VUTURE_APPLICATION_CLIENT_ID>" `
-Description "Allow Vuture access to Teams for integration"
If more than one application ID needs to be included, separate the IDs with commas:
New-CsApplicationAccessPolicy `
-Identity "Vuture-Policy-TeamIntegration" `
-AppIds "<APP_ID_1>", "<APP_ID_2>" `
-Description "Allow Vuture access to Teams for integration"
Step 4: Grant the policy
Choose one of the following options.
Option A: Grant the policy to individual users
Use this option when only specific users should be authorised.
Replace <USER_OBJECT_ID_OR_UPN> with the user’s Microsoft Entra object ID or user principal name.
Grant-CsApplicationAccessPolicy `
-PolicyName "Vuture-Policy-TeamIntegration" `
-Identity "<USER_OBJECT_ID_OR_UPN>"
Example using a user principal name:
Grant-CsApplicationAccessPolicy `
-PolicyName "Vuture-Policy-TeamIntegration" `
-Identity "user.name@company.com"
Example using a Microsoft Entra object ID:
Grant-CsApplicationAccessPolicy `
-PolicyName "Vuture-Policy-TeamIntegration" `
-Identity "748d2cbb-3b55-40ed-8c34-2eae5932b22a"
Option B: Grant the policy to a group
Use this option when a defined group of users should be authorised.
First, obtain the Microsoft Entra group ID for the required group. The group ID must be used, not the group name.
Then run:
Grant-CsApplicationAccessPolicy `
-PolicyName "Vuture-Policy-TeamIntegration" `
-Group "<GROUP_ID>"
Example:
Grant-CsApplicationAccessPolicy `
-PolicyName "Vuture-Policy-TeamIntegration" `
-Group "xxxxxxxx-xxxx-xxxx-xxxx-xxxxxxxxxxxx"
Option C: Grant the policy to all users in the tenant
Use this option only if Vuture should be authorised for all users in the tenant.
Grant-CsApplicationAccessPolicy `
-PolicyName "Vuture-Policy-TeamIntegration" `
-Global
Step 5: Verify the policy
To view existing application access policies:
Get-CsApplicationAccessPolicy
To find users who have the Vuture application access policy assigned:
Get-CsOnlineUser -Filter {ApplicationAccessPolicy -eq "Vuture-Policy-TeamIntegration"} |
Select DisplayName, UserPrincipalName, ApplicationAccessPolicy, Identity
To check a specific user:
Get-CsOnlineUser -Identity "user.name@company.com" |
Select DisplayName, UserPrincipalName, ApplicationAccessPolicy
You can also check a specific user’s policy assignment with:
Get-CsUserPolicyAssignment `
-Identity "user.name@company.com" `
-PolicyType ApplicationAccessPolicy
To find groups that have the policy assigned:
Get-CsGroupPolicyAssignment -PolicyType ApplicationAccessPolicy |
Where-Object { $_.PolicyName -eq "Vuture-Policy-TeamIntegration" }
Removing or changing access
Remove the policy from an individual user
Grant-CsApplicationAccessPolicy `
-Identity "<USER_OBJECT_ID_OR_UPN>" `
-PolicyName $null
Remove the policy from a group
Remove-CsGroupPolicyAssignment `
-PolicyType ApplicationAccessPolicy `
-GroupId "<GROUP_ID>"
Remove the global tenant-wide grant
Grant-CsApplicationAccessPolicy `
-PolicyName $null `
-Global
Remove the custom application access policy
Only remove the policy after you have removed any user, group, or global assignments that use it.
Remove-CsApplicationAccessPolicy "Vuture-Policy-TeamIntegration"
Updating the application IDs in an existing policy
If the policy already exists and you need to add or change the application IDs, use Set-CsApplicationAccessPolicy.
Example:
Set-CsApplicationAccessPolicy `
-Identity "Vuture-Policy-TeamIntegration" `
-AppIds "<APP_ID_1>", "<APP_ID_2>"
Notes
-
Microsoft Teams application access policy changes can take up to 30 minutes to take effect.
-
The policy applies to the app IDs listed in the policy.
-
When the policy is granted to a user, the app can access supported online meeting and virtual event resources for that authorised user.
-
The user must still have the appropriate relationship to the Teams meeting or virtual event, for example being the organiser or co-organiser where required.
-
If the policy is missing or has not yet taken effect, Microsoft Graph API calls may return a Forbidden error with the message: No application access policy found for this app.
Creating and Using a Teams Webinar
The process to create a Teams webinar and add it to a Form in Vuture, ready for sending out, is covered in a separate document here.
