Keywords: Global variable, Container variable, Campaign variable, System variable, Dynamic variable, variable text
Overview
A variable is a centrally held piece of content which you can re-use across the system (e.g. a shared footer). This allows you to change the variable in one place and it automatically updates everywhere it is used.
Global or container variables are pieces of text, content or code that can be used either globally across all containers or just within a single container.
Campaign variables are pieces of text, content or code that are used just within a single campaign or template
System variables that can be used to insert content such as the date and the name or URL of the page
Dynamic variables will pick up their content from the contact record.
You can edit who can create or edit variables at the Admin.Roles.Admin.Variables. Anyone with access to edit a campaign can insert variables on the page.
Global and Container Variables can only be created and edited by a Super Admin but can be used by anyone with editing rights.
Important Notes: not all special characters can be used in variable names. The ampersand (&) for example can cause an issue when used in a variable name. The special characters which are safe to use are: @ # $ % * - _ +
In addition, Global variables within the System Container do not take precedence over Global container and sub-container variables in Admin>Containers and Users.
For example, a Global variable called 'Footer' is configured within the System container and a container called Internal Communications. Despite the same name, the 'Footer' Global variable contains differing text between System and Internal Communications.
In new campaigns created within the Internal Communications container, the Footer variable will feature the text contained within the Global Variables tab for the Internal Communications container, not the System Container.
Contents
Global/Container Variables
Creating Global and Container Variables
Global variables are available to all containers across the entire instance in every container.
Step by Step Instructions:
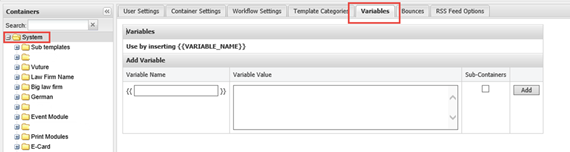
- Go to Admin>Containers & Users
- Select the root container you want to add the variable to
- Click on the Variables tab
- Give your variable a name under Variable Name
- Write or paste the html or other text into the Variable Value box
- Click on Sub-Containers
- Click on Add.
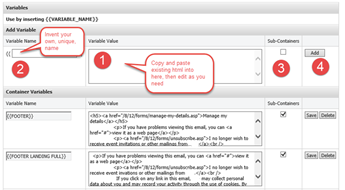
This will make this variable available across all containers.
If you want to create a container-specific variable.
Click on the container you want add the variable to.
Follow the above steps to create your variable.
Use a variable by inserting {{VARIABLE_NAME}} using the text editor anywhere in the content of an email or page.
Click "view page" to preview the variable being replaced.
Note: there is a configuration setting available that allows variable replacement to also take place when viewing content in the right hand editing window - please contact Vuture Support if you would like this enabled (Admin.System.EditOptions.Replace Variables)
Using a Global/Container Variable
Go to your working container and navigate to the mailing piece you are working on.
If, for example, you wanted to send out a mailing as if from the Berlin office you might need a footer with the Berlin office address in it, perhaps written in both German and English. Presuming you have created that footer Variable already, you only need to type the Berlin Variable Name into the footer area of your new campaign and click Update.
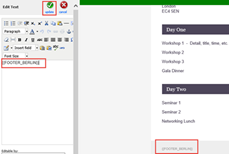
To test the Variable, use the View Email icon next to Publish Email. This gives you a preview of the way the finished page will look. You can go back and edit the Variable in Admin, as many times as you need.
Variables are available as Global (available throughout your Vuture platform and created and accessed via Admin, Variables tab) or as Campaign Variables, accessed via the Campaign Summary screen. The Campaign Summary screen is covered in the Basic User Guide.
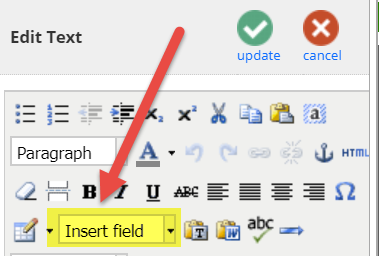
Adding container variables to the 'add field' drop down in your text editor
You can display your container variables into your text editor drop down menu. This is a feature that needs to be updated by your account manager or support. Admin.System.EditOptions.Show container variables in the text editor.
Campaign Variables
Creating Campaign Variables
Campaign variables are those you only want to re-use within a single email campaign and are used for content that you'll be repeating throughout an email campaign. For example, if this is an event, you may repeat the Event Name, Event Location, and Event Date in multiple areas of the campaign. Using a campaign variable will save you time typing out this content in multiple places. It will also save you the headache if the date changes (e.g. Winter Weather) and needs to be rescheduled.
Please note: You can save Campaign Variables with your Template and they will be immediately available from this screen when creating a new email campaign. To find out which step to do this when creating a Sub-Template, click here.
The easiest way to create, edit, and delete, campaign variables, is through the Campaign Summary Screen by following the below steps.
- Navigate to the email campaign you wish to add the campaign variable to
- Click on the "Campaign Summary Screen" above the Compose Email Folder
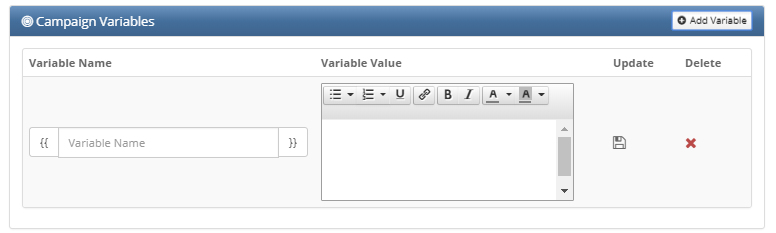
- Scroll down to the "Campaign Variables" section of the screen
- You'll see a list of variables that are already set up for that campaign, or you can create a new campaign variable.

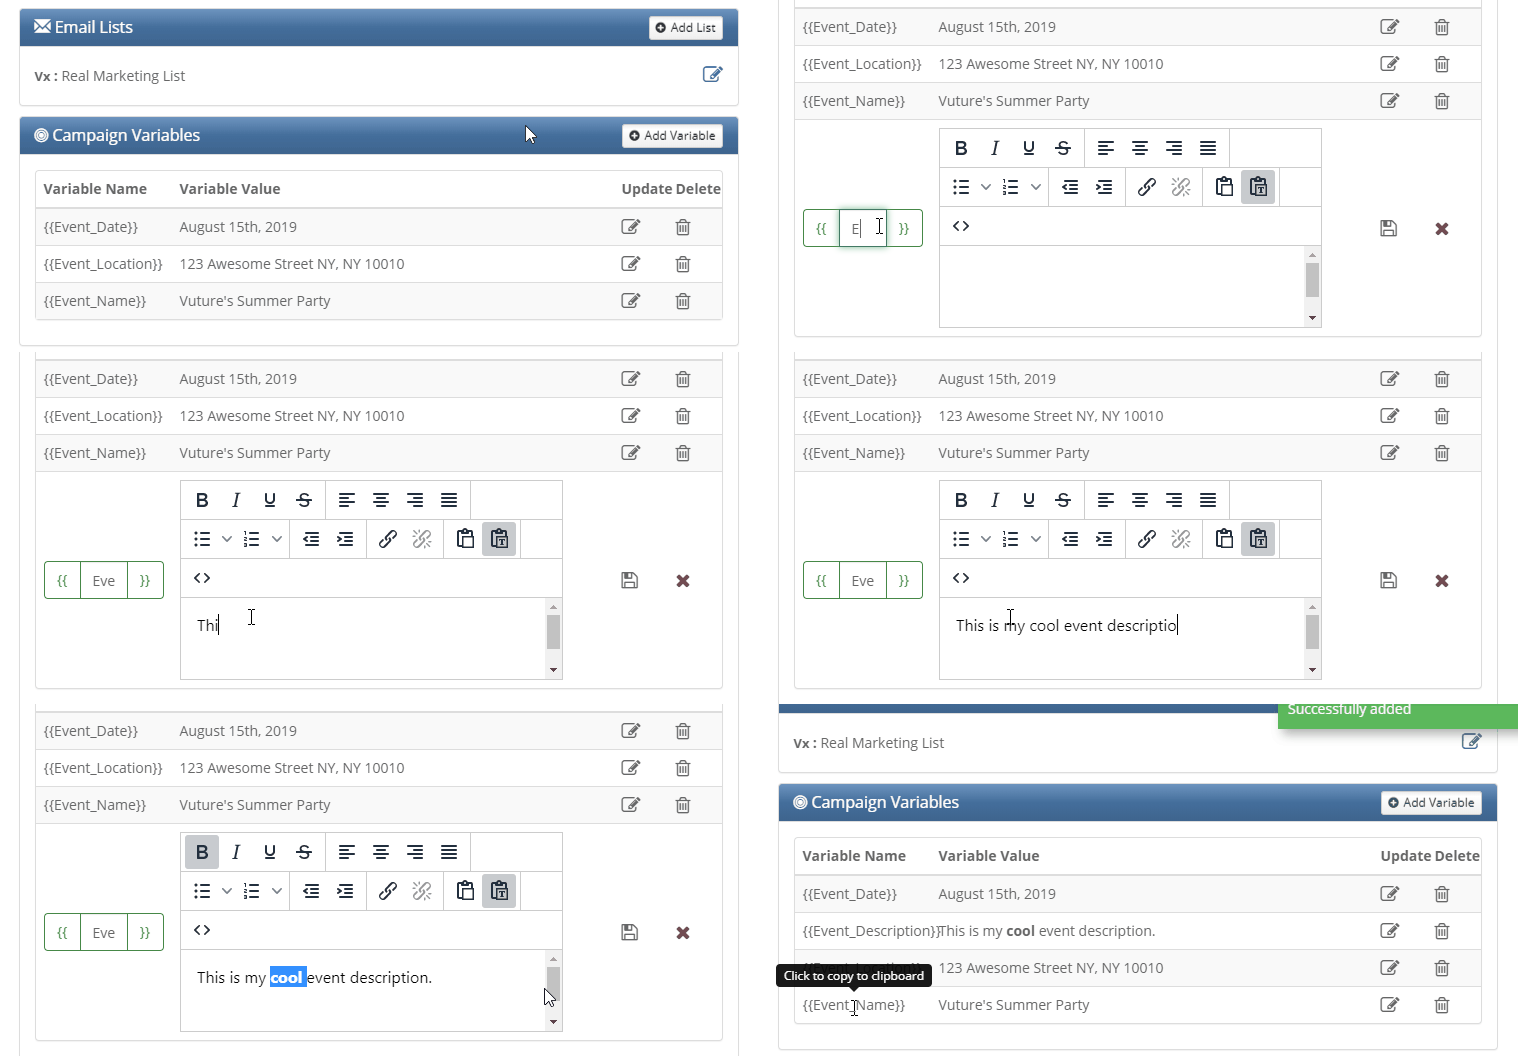
To Create a New Campaign Variable
- Click the "+Add Variable" button
- Type in your variable name and the content in the variable box then click the Save icon.
- You can then click on the Variable Name to copy it to your clipboard and use it throughout the email campaign.
Update for Fall 2019
We have made some improvements to the Campaign Variable colour picker; the icon size and the colours available. There is a brief video on this here.
To use a variable on an email or landing page insert it in the format {{VARIABLE_NAME}} using the text editor, where the word VARIABLE_NAME is replaced by the name of your variable.
Note that if a container variable exists with the same name then the campaign variable will override this.
To view the variable replacement working please click the "view email" or "view page" button.
Please contact Vuture Support or your Account Manager to enable access to Campaign Variables in the Campaign Summary Screen.
To Edit or Delete an existing Campaign Variable
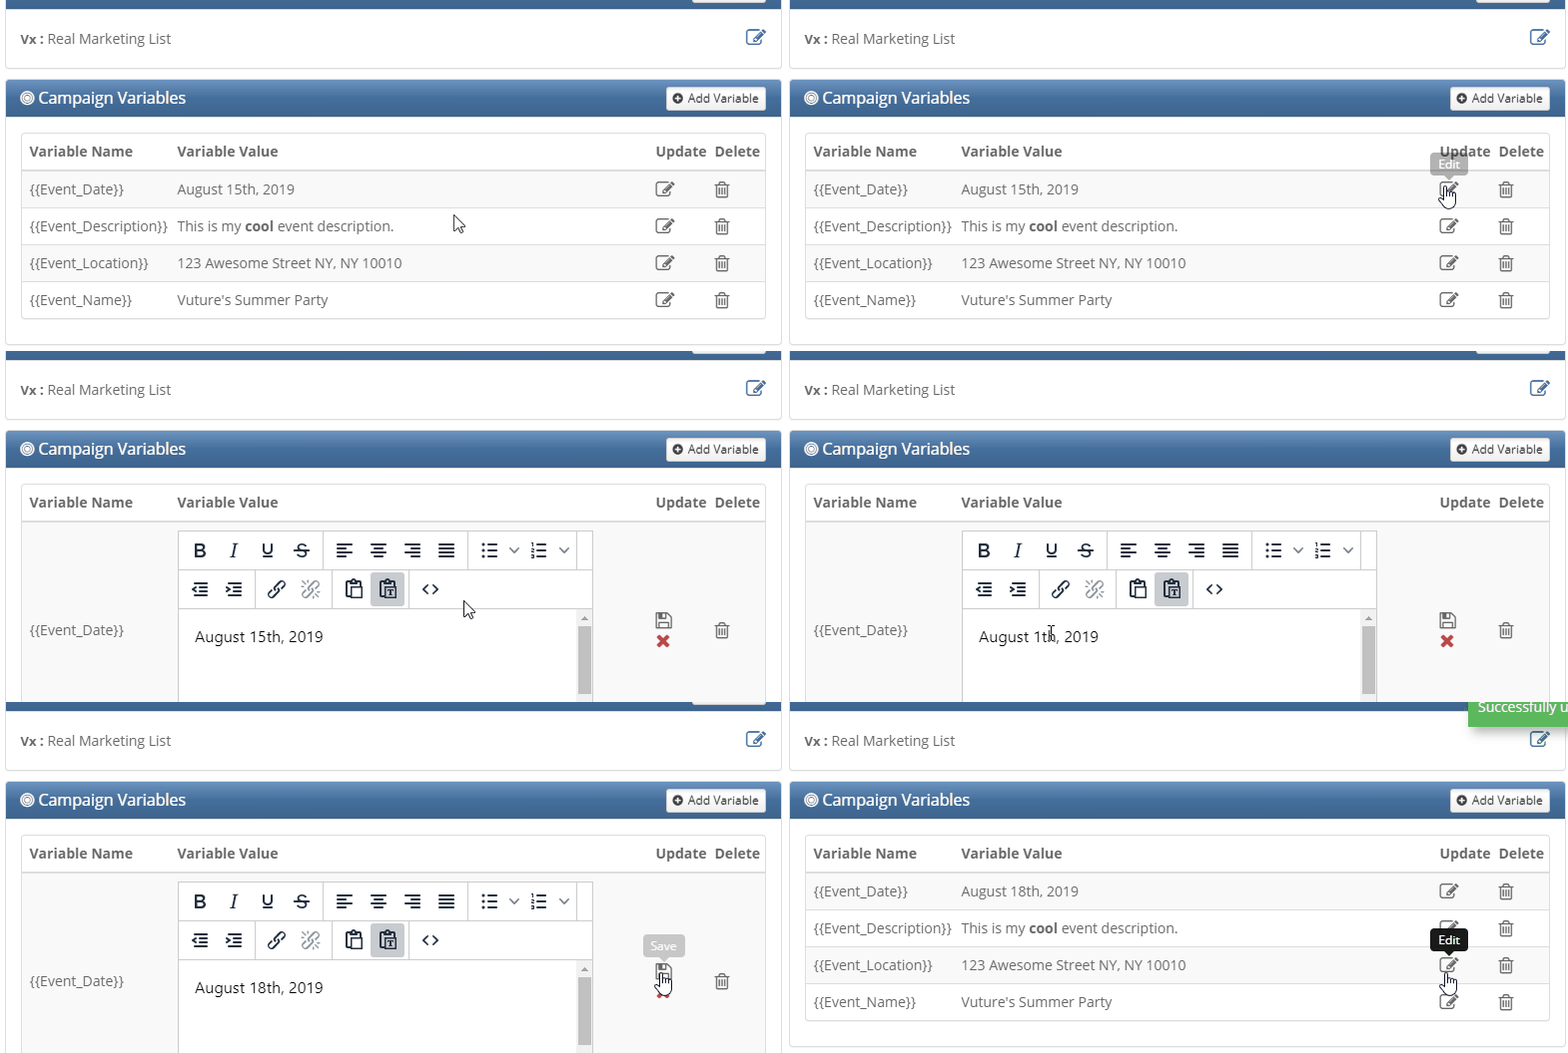
- To edit an existing Campaign Variable, click the "edit" icon next to the variable you wish to update. Make your changes, then click on the "save" icon. The value of this variable will now update wherever it is used in this email campaign.
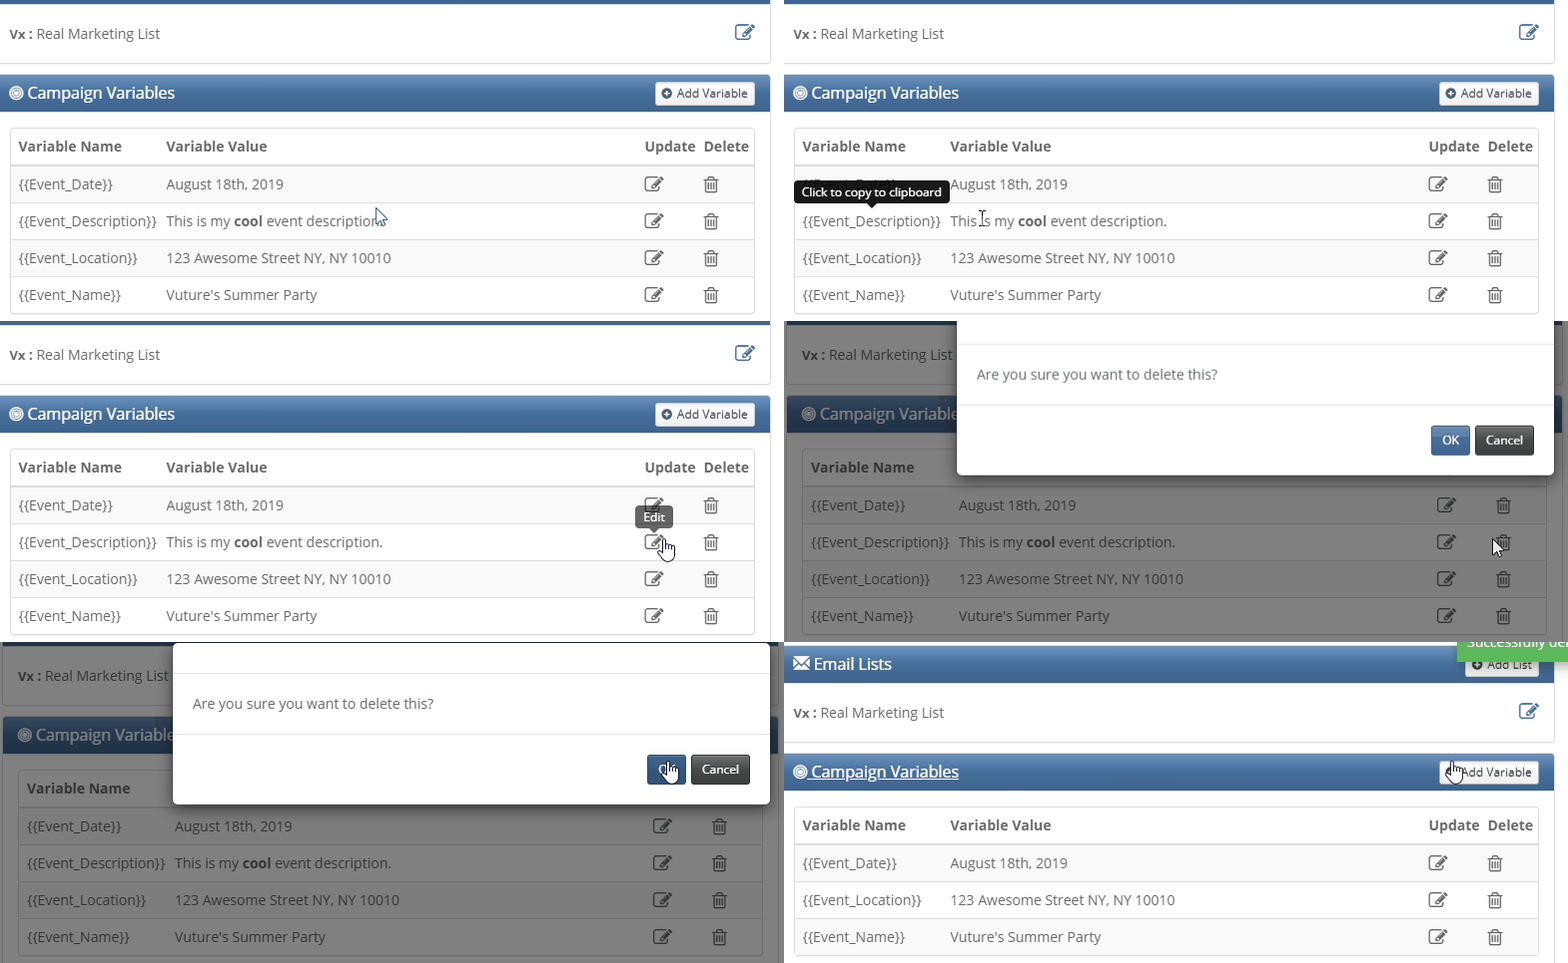
- To delete an existing Campaign Variable, click the "trash can" icon next to the variable you wish to delete.
Note: there is a configuration setting available that allows variable replacement to also take place when viewing content in the right hand editing window - please contact Vuture Support if you would like this enabled ("Admin.System.EditOptions.Replace Variables"). It carries a slight risk that users will then see the full text of all variables in the Text Editor and may attempt to change them.
Another important note to remember when editing campaign variables involves the application and removal of alignment settings, such as Justify, which are represented in the Campaign Variable Text Editor as the following buttons:

For example, an editor may apply the Justify button to the campaign variable text and then opt to remove it. However, disabling the button is not the only step necessary to remove the justification alignment setting.
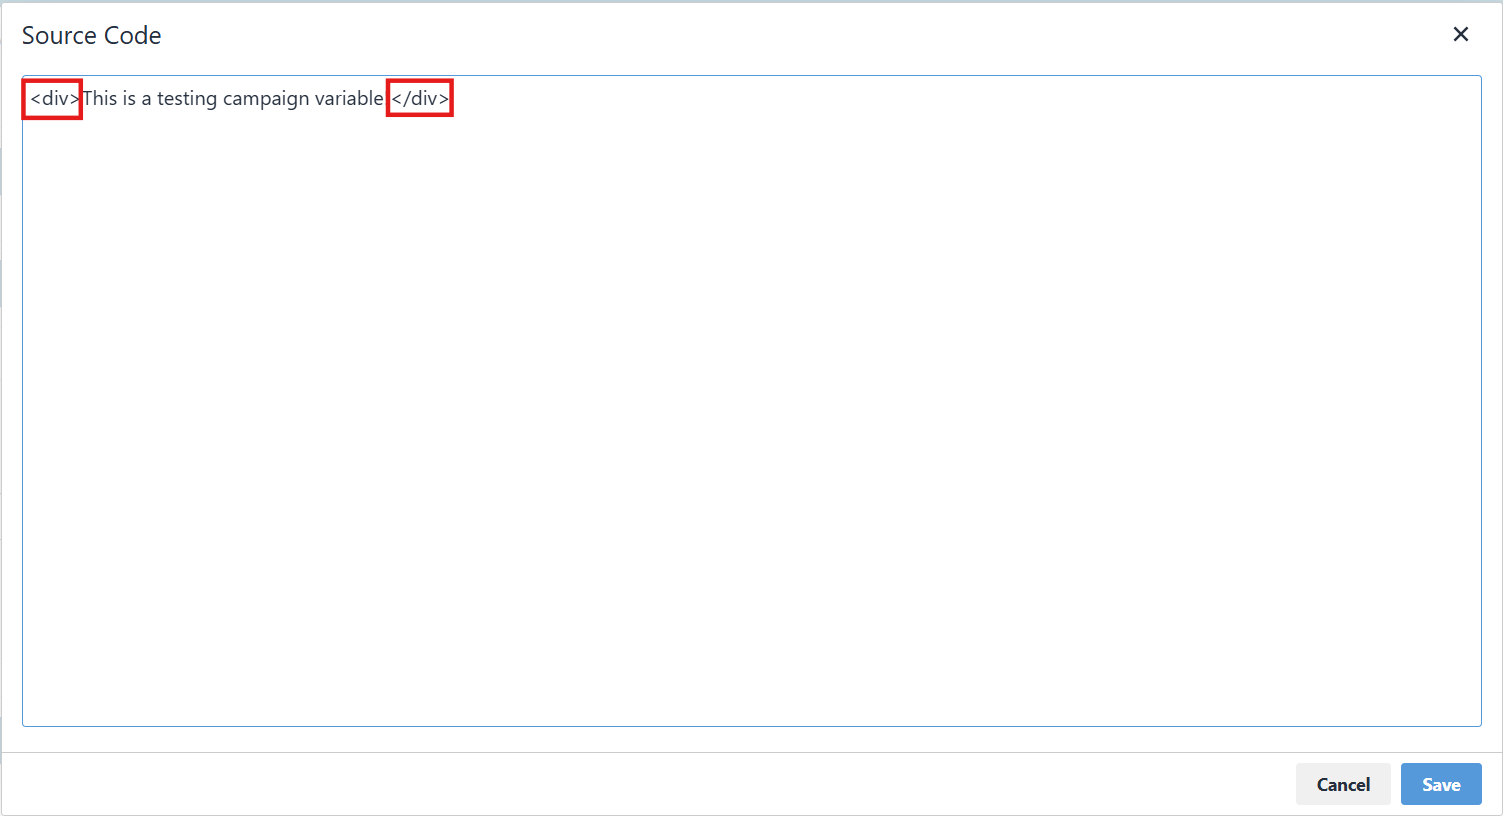
Once the alignment is disabled (no longer greyed), you will need to access the Source Code, and below is how it will appear on the Campaign Variable Text Editor:

Once it's selected, the following will appear, and you will need to remove the div tags as marked by the red outline. Then select the blue Save button:
How to Save Campaign Variables with Templates
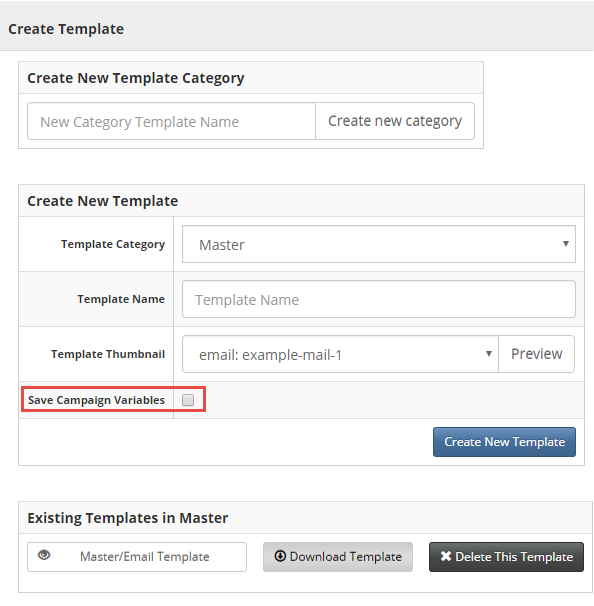
If you use Campaign Variables it is possible to save them with your templates. Note: When you use a template with saved variables to create a new campaign, the new campaign will have its variables pre-populated with the saved values so you will have to edit Dates and Locations to be the new values.
Tick the "Save Campaign Variables" checkbox from the Create Template screen when saving a the template.
Note this option is only visible if you have the Spacelab interface enabled and you have set up at least one Campaign Variable.
System Variables
The following system variables are available. They can be inserted in an email or landing page, or when creating a Send Email type of trigger.
These are variables that are automatically updated by the system so that the text is updated at the point of sending or when a landing page is viewed.
| {vx:Page Name} | Name of the page (suggestion: rename your page to be the subject line of the email and use this variable in the subject line section of the Send Email trigger) |
| {vx:Campaign Name} | Name of the email campaign (recently added) |
| {vx:Page Url} | Full URL of the page (same as the URL of the published page if you click "view page") - note this URL changes if the page or folder are renamed |
| {vx:Short Url} | Shortened URL of the page - note this URL never changes so can be used as a permanent link to the page |
| {Date} | Date in format: Day Full Month Year e.g. 03 January 2015 |
| {Day} | 2 digit day of the month e.g. 03 |
| {Month} | 2 digit month e.g. 01 |
| {MonthShort} | Shortened month e.g. Jan |
| {MonthLong} | Full month e.g. January |
| {Year} | 4 digit year e.g. 2015 |
Date variables can be combined to create the required date format, e.g.to use American-format short dates in your templates you can use {Month}/{Day}/{Year}
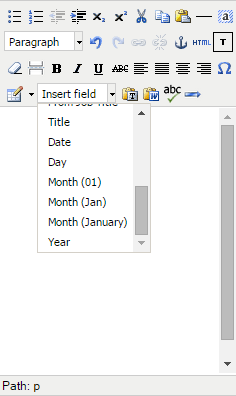
Date variables can be typed in directly or are available from the text editor personalisation field drop-down:
Dynamic Variables
Dynamic variables allow you to personalise the content of emails or landing pages for each contact. They work by storing the content to be displayed in variables and then dynamically deciding which variables to display depending on properties of the contact. This allows the system to pull in personalised content and replace the value of an InterAction additional field with content based on the value of that field for the contact.
To use this functionality please contact your Account Manager. They can enable it by checking the system configuration: "Admin.System.Emails.NestedVariableReplacement"
How to use
To understand how to use dynamic variables, see three examples below:
Example 1
A simple use case could be to add specific text into an email or landing page depending on the value of a specific IA additional field.
In this example we are going to display different content depending on whether the contact accepted or declined an event invitation by looking at the value of the RSVP additional field. (This could be an alternative to the typical process of searching your list for all those who RSVP'd Yes, creating a new list and sending them an email; then searching your list for all those who RSVP'd No, creating another new list and sending them a different email.)
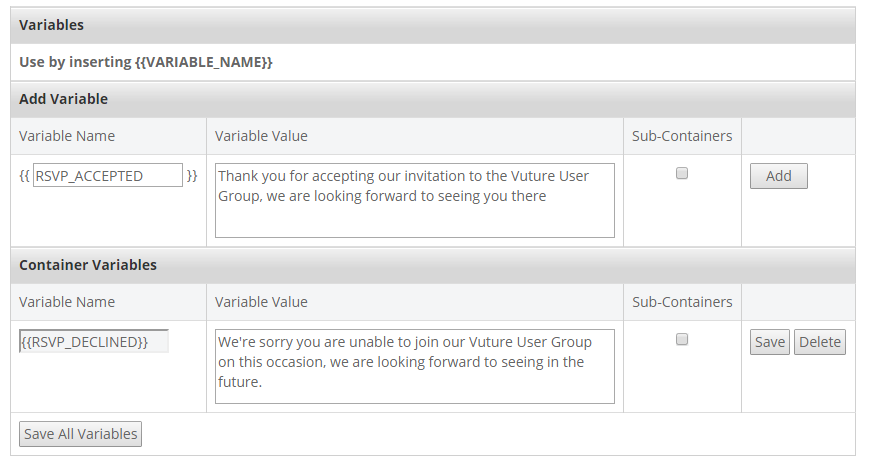
1. Create the two pieces of content using variables like this:
Go to “Admin.Containers and Users.Variables” and create a global or container-specific variable for each additional field option. In this example we are just using text but note that you can also use HTML in variables.
Name the variables so that they include the possible value of the additional field in the name. In this case our possible values are "Accepted" or "Declined" so we have called the variables "RSVP_ACCEPTED" and "RSVP_DECLINED" (variables are not case sensitive so it doesn't matter about casing).
2. Make a note of the Additional Field ID for the field you using - in this case the RSVP field. See this article on how to find an additional field id. In our example 858000000 is the additional field ID.
3. Insert {{RSVP_{IA:858000000}}} into an email or landing page.
4. When viewed by the contact this will then render to {{RSVP_Accepted}} or {{RSVP_Declined}} depending on the contact’s value in the specific field.
Subsequently, this will display the text value of the variable. In the case of {{RSVP_Accepted}} the recipient will see the following text “Thank you for accepting our invitation to the Vuture User Group, we are looking forward to seeing you there”
You can test this for a contact, before sending out your email, by using the Test Email or Test Page function.
Example 2
A more advanced use case could be to add specific sponsor information on an email or page which will vary, depending on each recipient’s sponsor. This example uses html. There is a further example at the foot of this page which uses plain text instead.
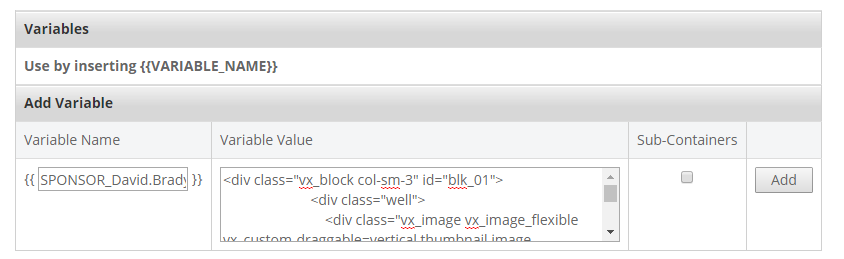
1. Go to “Admin.Containers and Users.Variables” and create a global or container-specific variable for each additional field option. In this example we are using HTML to include the sponsor's profile information.
- We are including in the variable name the email address for a specific sponsor. {{SPONSOR_David.Brady@vutu.re}}
- The variable value is the HTML of the sponsor’s profile or details (in this example it includes an image of David, his name and a short profile description)
<div class="vx_block col-sm-3" id="blk_01">
<div class="well">
<div class="vx_image vx_image_flexible vx_custom-draggable=vertical thumbnail image block_image" id="img_01">
<a href="#"> <img src="/Download/Image?strUrl=http%3a%2f%2f62.hannah.vuture.net%2f_images%2fdavid.jpg%3f1489575106&hash=hCTC5VmGwn0%2bMSD8uCb4ig%3d%3d" alt="image" style="" title="image" height="181" width="183"> </a>
</div>
<div>
<div class="vx_text title" id="txt_02"><h3>David A. Brady</h3></div>
<div class="vx_text info" id="txt_03"><p>David A. Brady Vuture CEO, leads the global business across our three operational centres in London, New York and Sydney. His focus is on creating exceptional client experiences building an extraordinary team of talent and for driving a culture based on creativity, daring and collaboration. <a href="https://www.linkedin.com/in/david-anthony-brady-106b358b/">Read more...</a></p></div>
</div>
</div>
</div>
2. Make a note of the Additional Field ID for the field you using - in this case it is a field with the primary sponsor's email address . See this article on how to find an additional field id. In our example, 89947335 is the additional field ID.
3. Insert {{SPONSOR_{IA:89947335}}} into an email or landing page.
4. When viewed by the contact this will then render to {{SPONSOR_David.Brady@vutu.re}}} depending on the contact’s value in the specific field.
Subsequently, this will display the value of the variable. In the case of {{{SPONSOR_David.Brady@vutu.re}}} the recipient will see David’s profile.
You can test this for a contact by using the Test Email or Test Page function.

Example 3, without the picture, no html
If you want to insert the full contact details of each sponsor, using fields which are not currently available in the drop down list of From fields (so first name, for example) you could create a global variable for each sponsor in plain text - no need for html. The process will be the same as above, but instead of html in the variable you could just add for each sponsor:
Best regards,
David
David Brady
CEO
email xyz.com
tel: 1234 1234
You can update the text formatting for Campaign or Container variables without manually adding HTML into the value box.
To do this, please ask your Account Manager to upgrade your version in "Admin.System.Versions.Variable Formatting Version" to 2. Please note, this is a system wide setting, changing this will affect all your Instance Users and any existing html in current variables will convert to formatted text. You will also need to have some brand colours selected under Edit.Options.brandcolours.
Once enabled you can Bold, Italicize and Underline text without using html. You can also add bullet points, hyperlinks or change the colours of the text or background. Note: Make sure the colours you choose are aligned to your firm's templates and brand colours.
Important Note: not all special characters can be used in variable names. The ampersand (&) for example can cause an issue when used in a variable name. The special characters which are safe to use are: @ # $ % * - _ +