This article introduces the new way we have developed to add webinar registration links to Vuture forms. Previously, it was possible to add one webinar at a time to a form and allow contacts to register to that webinar just by clicking Submit on the form.
It is now possible to add multiple webinars or a series of webinars to one Vuture form. Contacts can choose to register for one or more webinars, or either one from a choice of two webinars, depending on the selection you make which offers the user either check boxes or radio buttons.
There is no limit to the number of webinars you can put onto one form.
This change has also affected the way users will add single webinars, not just multi webinars or series.
Who is Affected by this Change?
All users who integrate webinars with Vuture forms; including single webinars as well as multi webinars or a series of webinars.
Which CRMs are Affected?
All CRMs and none (standalone).
Which Webinar Providers are Affected?
All the providers with which we integrate - Zoom, ON24, Webex and GoToWebinar.
Do I need to enable anything?
No, the new configuration is automatic for all our clients.
When will this change take place?
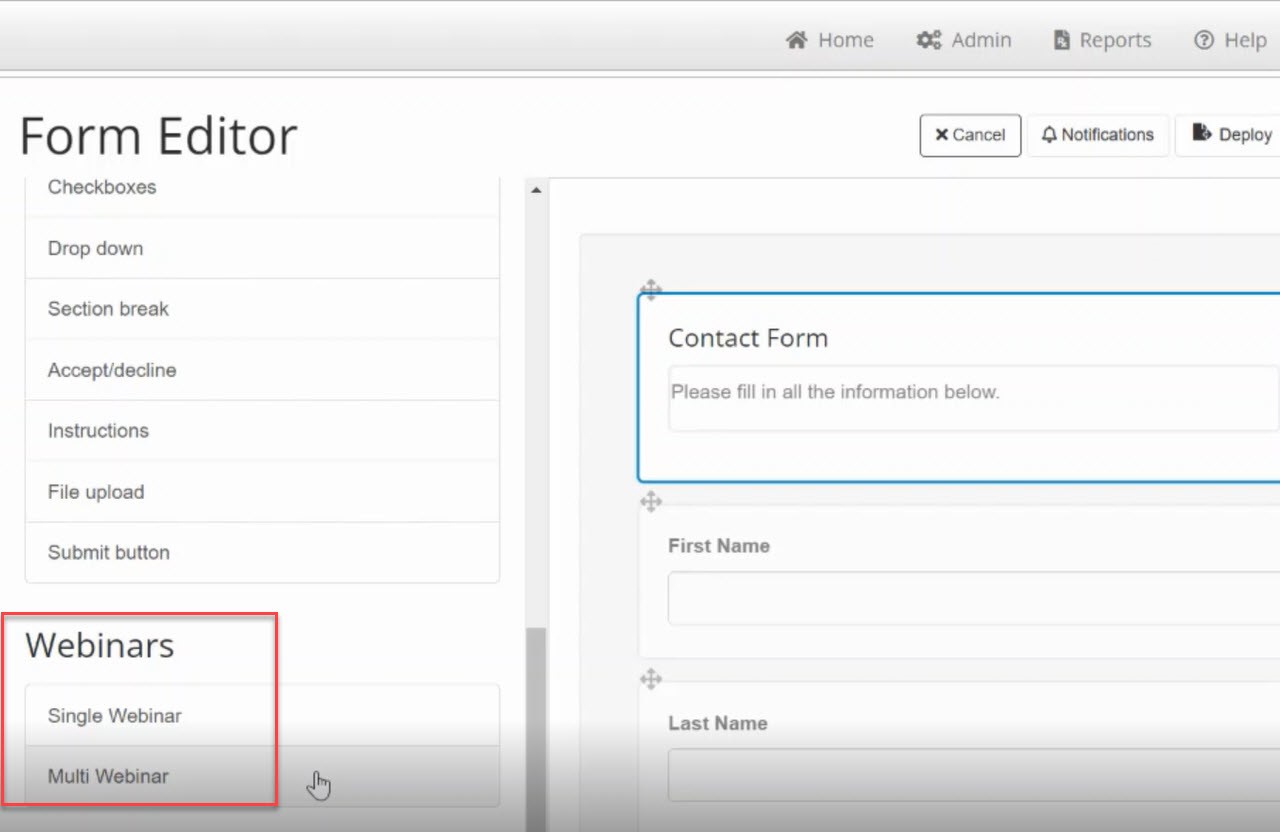
The rollout of this new functionality will start in mid-October 2021. The rollout may take a few days to reach your firm’s instance. You will know when it has reached your instance because if you create a new form and click on the Add a Field tab, scrolling down to the bottom of the tab, you will see the option to add either a single webinar or multi webinars, like this:
Why did Vuture do this?
Our clients have told us that they would like to be able to set up a webinar series and allow their contacts to register for either one or more than one webinars, via just one Vuture form.
We wanted to make this process as straightforward as possible.
How Does the New Process Work?
Important: Set up your webinar(s) in your chosen webinar provider first, so that you will have all the webinar ID numbers available. You will need those numbers in a moment.
The instructions below have been divided into:
- Single Webinar for standalone clients
- Single Webinar for all CRM clients
- Multi Webinar for all clients.
- Form Logic for managing RSVPs with multi webinars
- Open a Vuture form and click on Add a field tab and scroll down to the Webinars section.
- Decide whether you are working with a single webinar or a series of webinars. Select the appropriate option on the Vuture form.
Single Webinar for Standalone Clients Only
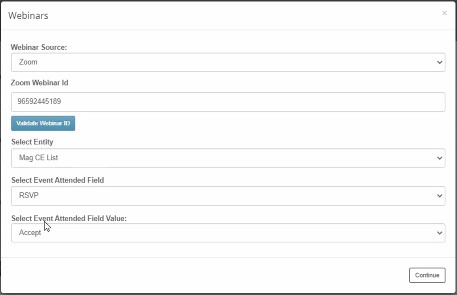
If you choose to add a single webinar, click on the Single Webinar option and you will then see the following:
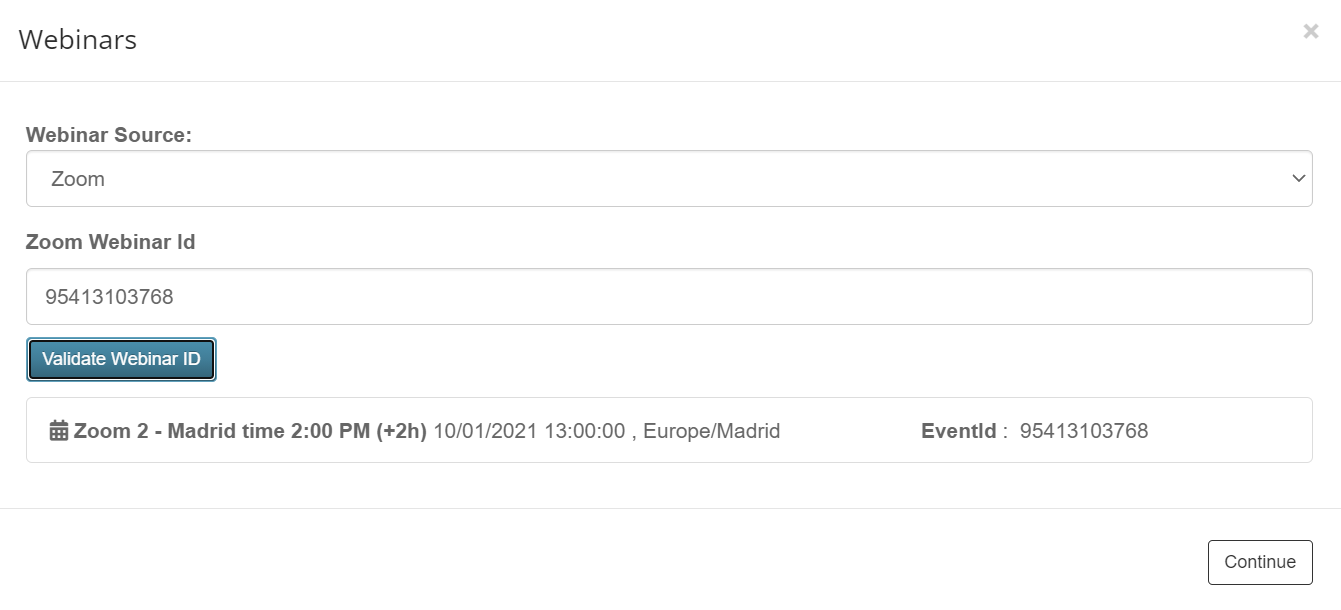
In the above image, the example provider is Zoom. Choose your webinar provider from the dropdown menu and enter the ID number. Click Validate to see the success message: “This webinar ID is valid”, and the name of the webinar - just to reassure you that you have selected the correct one.
Click to Close.
You will be returned to the form. There is no visible sign that the webinar registration link has been created. The system has added a hidden field to the form which will register your contacts to the webinar.
Note: If you attempt to add another webinar registration link to this form you will get a warning message:
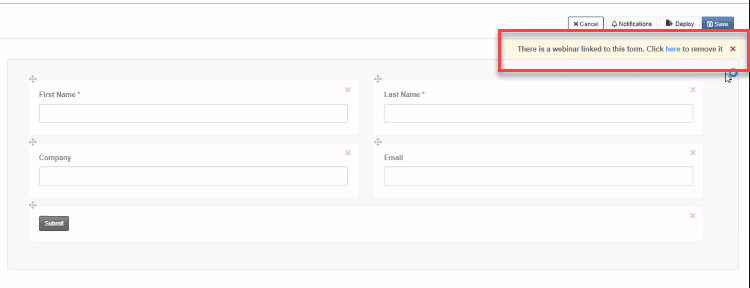
You will need to remove the previous webinar if you have copied an old form and want to re-use the form for a new webinar.
If the webinar is the one you have just added and you are happy to keep it, just click the x to close the warning message.
The action of submitting the form will register the contact to the correct webinar.
You can now add any other fields as you normally would, test the form and proceed with the event as previously.
Single Webinar for all CRM Clients
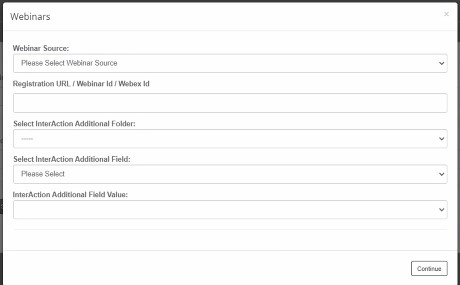
Select the Single Webinar option on the Vuture form. Depending on your CRM you will see an opportunity to complete the information which was previously placed in the Form: for example the list or campaign name, the Attended field name and the Attended value. The wording will vary depending on the CRM. The information required is the same as in the previous version when setting up a webinar on the Vuture form.
InterAction
ContactEase
DealCloud or Fibre
Select the marketing list, the entity, the additional field and the additional field value for Attended.
Dynamics
Select the webinar campaign, the entity, the additional field for Attended and the value for Attended.
Select the Webinar Source - Zoom, ON24, Webex or GoToWebinar.
Enter the webinar ID
Click Validate
Complete the other fields - selecting a list or campaign, the Attended field or entity as appropriate for your CRM, and its Attended value.
Click on Continue to close this screen.
(Tracking Attendance: It is only possible for Vuture to track (and write back activities for) attendees who register via a Vuture Form. Any users that register for the webinar directly through the webinar provider using a generic audience link, will not have an attendance activity written back to the crm. Their attendance will be recorded in the webinar provider's reports.)
You will be returned to the form. There is no visible sign that the single webinar registration link has been created. However, if you attempt to add another webinar registration link to this form you will get a warning message:
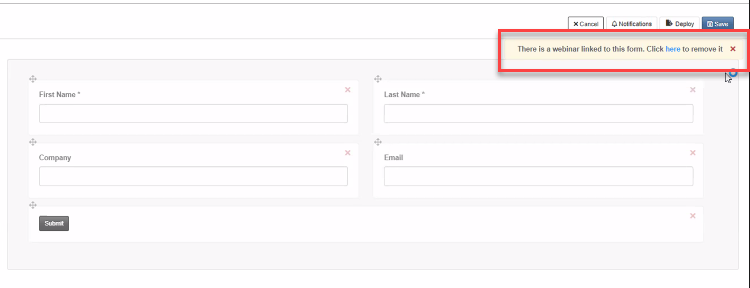
You will need to remove the previous webinar if you have copied an old form and want to re-use the form for a new webinar.
If the webinar is the one you have just added and you are happy to keep it, just click the x to close the warning message.
The action of a contact submitting the form will register that contact to the correct webinar.
Multi Webinars or Webinar Series for All Clients
Note: When creating your webinars, please bear in mind that the names or titles you give to your webinars will be carried over and displayed on your Vuture registration form. It will be helpful therefore to make the webinar titles short, descriptive, and unique where possible, for example by adding the date to the title.
If you first select the Multi Webinar option on the Vuture form tab you can then decide whether to allow your contacts to choose to attend just one of the webinars you are offering (for example, Monday OR Wednesday), or to attend more than one (for example, Monday AND Wednesday). This decision point is here:
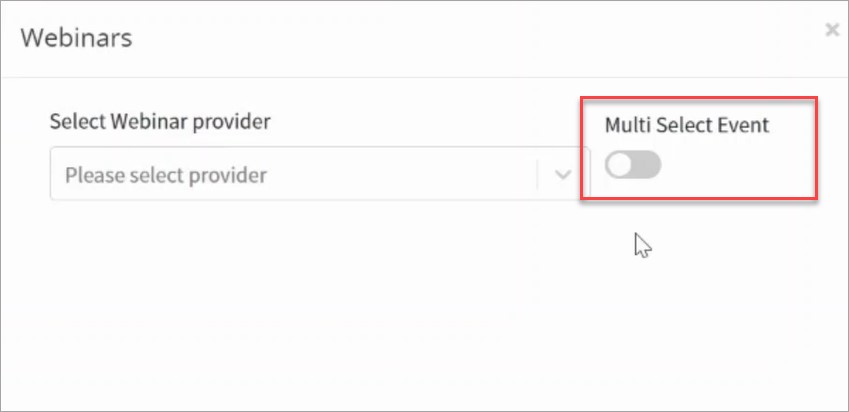
Choosing the Multi Select Event option will allow your contacts to choose more than one webinar in a series, so Monday and Wednesday’s webinar, for example. This equates to the check box option on Vuture forms.
Choosing not to use the Multi Select Event option will give your contacts radio buttons on the form - meaning they will only be able to select one of the webinars you add to the form, so Monday or Wednesday, for example.
1. Choose your Webinar provider and whether or not you want to offer the choice of only one webinar from a series of webinars, or more than one. If more than one, slide the Multi Select Event slider to On.
2. Enter the CRM folder name or campaign name or entity, as appropriate for your CRM, and the Attended additional field name and Attended value.

3. Enter the ID number of your webinar. (Zoom in the example above, but this could be ON24, Webex or GoToWebinar ID number). This will cause the Name of your webinar to appear on screen, allowing you to verify that it is the correct one:
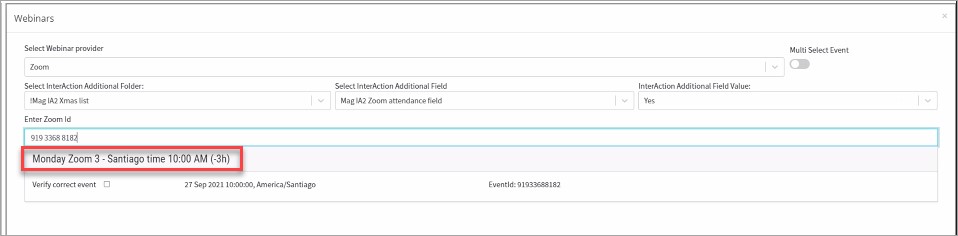
4. If you have entered the correct ID, click into the Verify correct event checkbox. This will clear the current ID number from the ID box, move the first webinar title down to begin forming a list, and allow you to enter the next number in the webinar series like this:
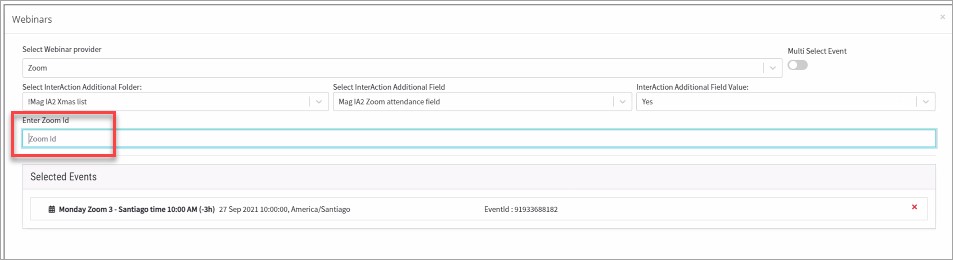
5. Enter the second ID. Click to Verify the second event.
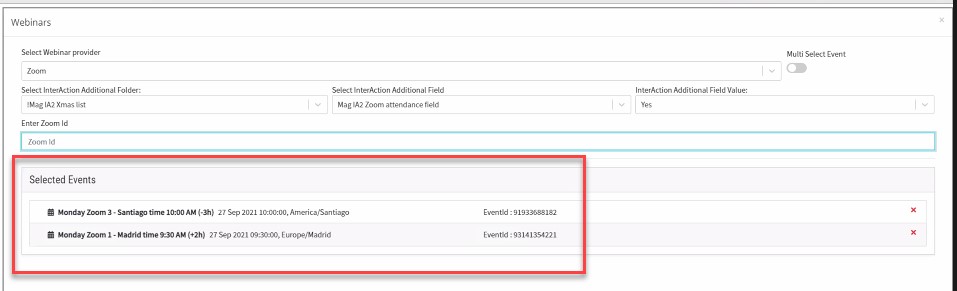
Note: You can select different Attended fields for each webinar if you choose. Ensure that you select the new mailing list, and don't forget to change the Attended field and the Attended value as well.
6. Continue to add webinar IDs until you have completed the series.
Important! Please ensure that you add all the webinars in this series or group of webinars, at this stage. Once you click Complete and return to the form you will not be able to go back and add another webinar to this series. You will, however, be able to add a new series of webinars to the form. To edit an existing series you would have to delete the webinars from your form and start again.
7. You will be returned to your form:
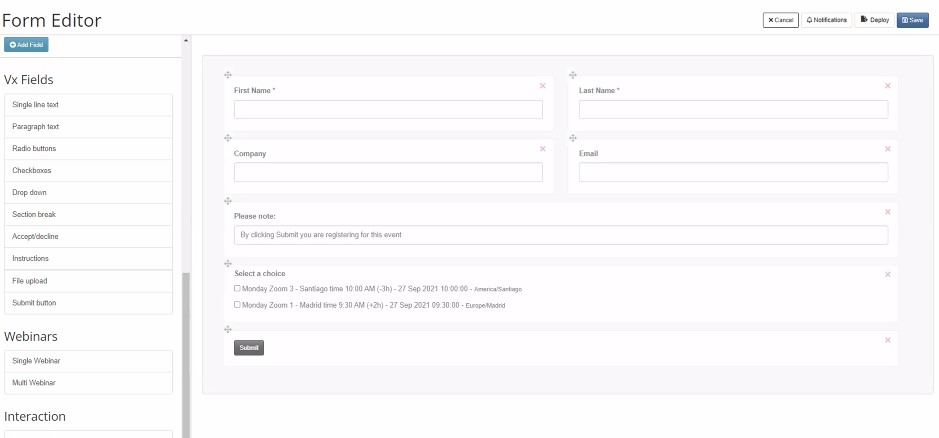
The example above is showing Checkboxes, so a contact could select to attend both events if they wished, in this example.
Edit Webinar Titles:
At this point you could edit the webinar names that are showing here, to tidy them up or clarify the wording for the contacts to see. Do this by editing the field Labels for each webinar. However, you cannot add another webinar to the series once you have returned to the form.
Remember: Once you are finished adding webinars and return to your form, you cannot go back to your list of webinars and add one more to the series, for example. You would have to delete the field entirely from your Vuture form, and start again from the beginning by clicking on Multi Webinar in the form tab. You can add more than one series to a form.
Managing Multiple RSVP responses using Form Logic to track multi-webinar registration
In this example scenario, you are mailing one list of contacts, offering them a selection of webinars to choose from. Contacts could select one or several, that is not important for this example. You want to track the RSVPs for each webinar separately in your CRM. InterAction users can have responses write back to a different list to the one emailed from. Users of other CRMs can have responses write back to different fields, but only on the same list that was emailed originally.
1. Make sure there is an RSVP field in each of your webinar-specific lists. Or you could add multiple RSVP fields to the same list - whichever works best for you.
2. Create your RSVP fields on the Vuture form as usual, making sure you make the fields hidden, and pre-check the value accepting the RSVP.
Hidden Fields / Make Hidden
We developed an additional method for hiding a form field because we want to use form logic to dictate which (of potentially several) hidden form fields writes back to CRM, specifically for webinars.
Previously, any field on a form which was pre-checked as Yes and then Hidden would write back to the CRM as a Yes. We used this function to add the value RSVP = Yes to CRMs, when clients responded to a webinar invitation. Vuture would write the Yes to the webinar provider, who would then send the confirmation email to the contact, and the action of submitting the form would write back to the hidden field in the CRM. This worked fine for single webinars but does not work for multi webinar registrations.
On the form, in Field Settings tab, you will now see a new option; in addition to Make hidden and read only, there is now Hide section for form logic.
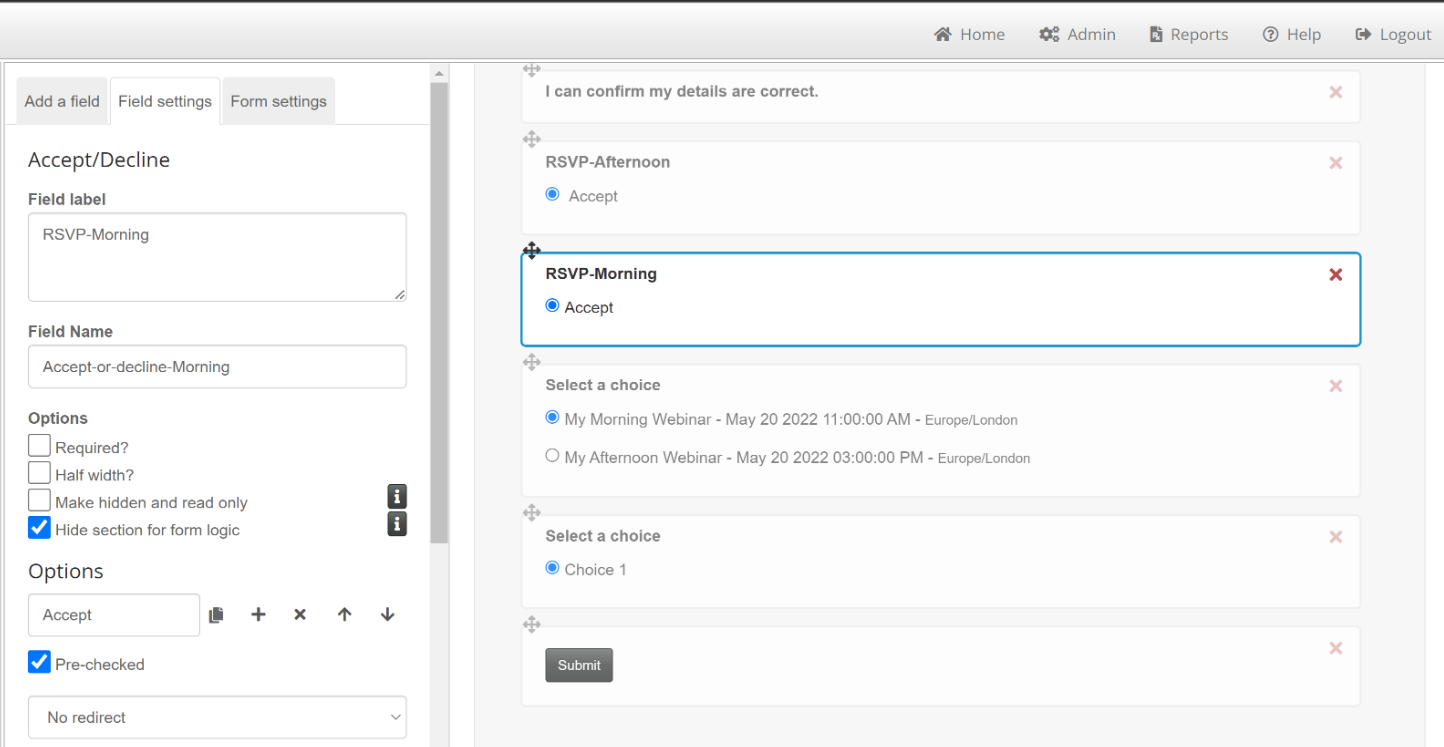
Clicking on the little i icons will give you the following information:
Make hidden and read only:
This is best practice for including a hidden single value into a form. It will convert the field into a simple text value, and will not respond to form logic. This is the previous behaviour of hiding a field on a form.
Hide section for form logic:
If you want to use form logic to dictate which, of multiple hidden values is included in the form, you can use this option.
When Would I Use Each Option?
Option 1 - Make Hidden and Read Only
Continue to use Make hidden and read only for any single field you wish to hide, unconnected with multi webinars. As one example, you could Make hidden and read only a date field which updates the date value in the CRM when a contact submits a form. Alternatively, if you are offering a single webinar registration to contacts, and you want to update the CRM with RSVP = Yes for every contact who Submits the form, you could add the RSVP field, prechecked as Yes, and Make hidden and read only.
Option 2 - Hide Section for Form Logic
Use Hide section for Form Logic for multiple RSVP fields when you are offering choices, or more than one webinar.
Should I Use Hide Section for Form Logic for In Person Events Too?
No, you should not use Hide section for form logic for In Person Events, only for webinars. For In Person Events you would typically create a mailing list and add the options for Event 1, Event 2 and so on. You would then put the separate RSVP fields on the form and allow the contact to make their choice, and Submit. The RSVPs would then write back to the CRM additional fields in the usual way. There is no need to hide them. The hidden fields are only necessary for the webinar process because the action of clicking Submit writes back to the webinar provider, not to the CRM - hence adding the hidden fields to write to the CRM as well is necessary.
Why is the previous "Make hidden" check box now saying "Make hidden and read only"?
It was always a read only field. The additional title is just making it clear that when you hide a field using the previous method of Make Hidden, that field is then a Read Only field. The recipient - even if they could see that field - could not change it.
The new method of hiding a field (Hide section for form logic) has to be capable of being dynamically updated by form logic so it cannot be a Read Only field. It will generally be hidden from the recipient however.
Warnings
1. If you are going to create a new field on your form, make sure that you select the correct checkbox type (Make hidden or Hide Section) and only select ONE of the two types. As you build your form, the form fields will change to the last checkbox you click, so if you first click Make Hidden then click Hide Section, the resulting form element will behave as Hide Section. If you first click Hide Section then Make Hidden, the resulting form element will behave as Make Hidden.
2. When using standalone and creating new RSVP fields (Accept-Decline) you should ensure that they have unique names so Accept-Decline-Morning or Accept-Decline-Afternoon for example. This is essential to prevent the form logic from simply picking the first field it encounters on the page.
RSVPs on the form
You will now have an RSVP for each individual webinar selection in your form. Each of those RSVPs points to its own event/session specific list.
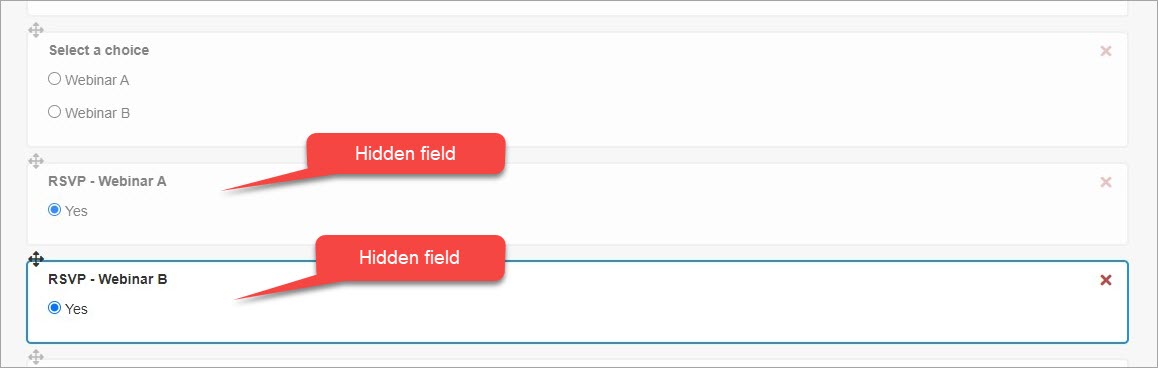
Now, we need to tell the form which values to write back. This will depend on which webinar the contact selects to attend.
If they select to attend webinar A, then we'll need to send back an RSVP Yes for webinar A. The same applies for any other webinar choices.
Therefore, you can apply some form logic to each of the new RSVP fields you have created. You can do this in the Add Conditional Rule field. It will look something like this:
Vx_Form_Webinar-selection == 'WebinarA Value'
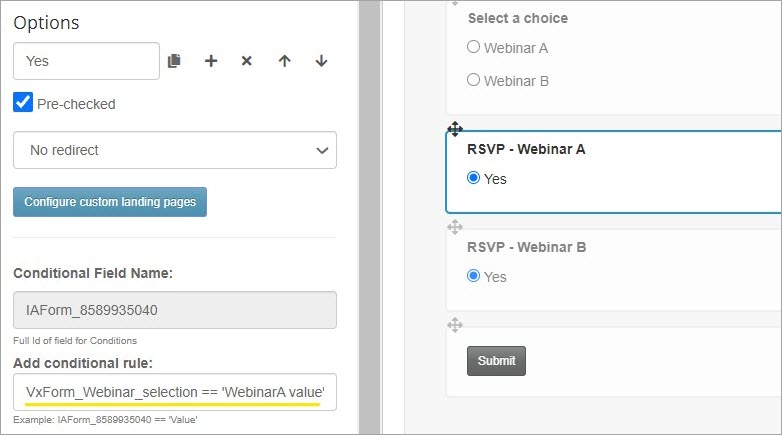
You will notice that an example is generated for you at the bottom of the field settings tab in the form editor. All you need to do is change the values to match the webinar selection to the RSVP.
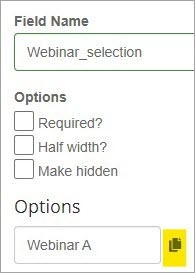
You can very easily copy the relevant webinar value by clicking on the copy icon next to the webinar field value. The icon is marked in yellow in the image below.
You have now linked your RSVP for webinar A to the relevant CRM list/field. You have also linked it to the webinar selection field in your form, so that it only writes back to your CRM when webinar A is selected by the contact.
You can now repeat this process for webinars B, C and so on.
FAQs
Q. What about confirmation emails with multi webinar series? How will they work?
A. We recommend that you use the vendor confirmation emails, not Vuture confirmations or notification template. Do NOT use the iCal feature in Vuture - it will not contain the unique joining link that each contact needs on the day. Contacts should use instead the iCal(s) from the vendor confirmation email.
Advise your contacts on the Thank You landing page to look out for the email from Zoom/ON24/Webex/GoToWebinar and click the link in that email to add the event to their calendar. Here is some sample text for the Thank You landing page:
“Look out for an email from Zoom/ON24/Webex/GotoWebinar that will arrive in your inbox shortly. Please follow the instructions to add these events to your calendar. It will also contain your unique joining link that you will need to be able to access the webinars on the day.”
Q. For a multiwebinar series, can I have the Attendance write back to different fields for different webinars?
A. Yes. InterAction users can have responses write back to a different list to the one emailed from. Users of other CRMs can have responses write back to different fields, but only on the same list that was emailed originally. Ensure that your list has an Attended field for each webinar in the series. When you are setting up the form, select the list, the field and the Attended value, then enter your webinar ID. For the next webinar in the series enter the list again, the second attended field and the Attended value. Repeat as necessary. Ensure that you select the new mailing list, and don't forget to change the Attended field and the Attended value as well.
