Keywords: Form Logic, limiting form submissions, event capacity, show hide fields, wait list
Overview
This article explains the specific structure of the Form Logic "Count" formula, which will show or hide a field and limit form submissions. Please see an example of this "Count" formula in action here.
Contents
Limit the Number of Registrations to an Event
One of the most useful applications of Form Logic is to restrict the number of registrants for an event. It allows you to set a 'cap' on an event (for example, 50 registrants). Once the capacity is reached, the RSVP field will be hidden and an 'Add to wait list?' field can be unhidden and displayed in its place.
How is this done?
Vuture uses a formula, in the conditional rule field, to count the number of acceptances on the RSVP field. That value can be compared to a known value, (for example, a total capacity). The result is then used to decide whether a field is displayed or hidden.
By using mathematical comparison operators (Greater than, Less than, Equal to), (>,<,=) or combinations of these (Greater than or equal to), (>=), Vuture makes a decision on what is hidden or unhidden on the form:
- The RSVP field can be displayed until a threshold number (capacity) is reached. Vuture will then hide the RSVP field, preventing further registration.
- An "Add to Waitlist" field can then be displayed instead, once the threshold number (capacity) has been exceeded, or equalled.
Let's Break Down the Count Formula into its parts
It is helpful to understand how the formula is written before it can be used in a conditional rule for a field.
IMPORTANT: The below Count Formula is for InterAction, but the same 'Count Logic' can be used for Vuture Standalone (vx Lists or Contacts Module), Salesforce, OnePlace, and Dynamics. The concept is exactly the same. The only difference is that you'll need to specify the list/campaign within the Count Formula for the CRMs mentioned. For this reason, we recommend reading this article, even if your CRM is not InterAction but one of the CRMs (or Standalone) mentioned above.
The Basic Count Formula
The Count Formula that we will start with is: {Count : 'all', Instance : '1', Field: '8589942047', Value : '8589954497'}
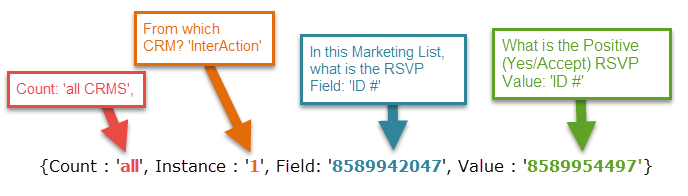
This formula is telling Vuture to "Count in InterAction the positive RSVP field values in a specific marketing list".
IMPORTANT, things to note:
- The RSVP Field ID, and Positive RSVP value will be specific to your marketing list.
- In some CRM, you may find that the Positive RSVP value is text rather than a number.
- Depending on your CRM, you can have an Instance# other than 1. For example, if you are using Vuture standalone, the Instance# would be 0 (zero). Please reach out to Vuture Support or your Vuture Client Success Manager if you are unsure. Once you have this number, it will never change, unless you switch CRMs.
Identify your 'Capacity'
Now, let's say you want to set a cap (or limit) on the number of registrants to this event. For example, maybe it is a VIP Dinner Party and you can only seat 6 people. Our capacity would be 6.
Adding in the Operators
Now that we better understand the Count Formula and have identified our capacity (or limit), we need to add in an operator (i.e. <, <=, >, >=).
By adding these operators at the end of the Count formula, it asks a question:
- Is the total number of the positive RSVP values (i.e. those who RSVP'd yes to the event) higher than or equal to (>=) a known value (i.e. the capacity)?
If the answer is “Yes”, you can choose that Vuture will display a field such as “This event is now fully booked, add me to a Waiting List.”
Putting it all Together
Now that we understand the basic principles of the Count Formula, the capacity (or limit), and the ability to add operators to ask a question... we can put this all together to:
- Show the RSVP Field until our capacity for the event is reached, and
- Show the 'Add to wait list' field in its place after the capacity is exceeded
For the examples below, we will use 6 as our capacity for the VIP Dinner Party.
Show the RSVP field until our capacity for the event is reached
On the RSVP field, the formula would be: {Count : 'all', Instance : '1', Field: '8589942047', Value : '8589954497'} < 6
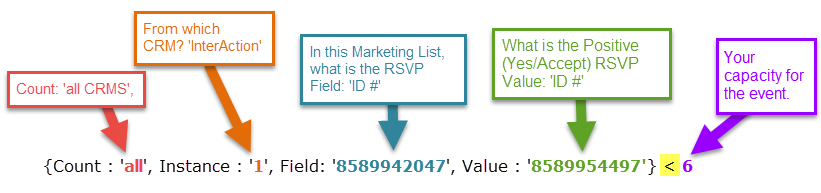
All we've done, is added our operator of "Less Than" (<) and our capacity of 6 to the end of the Count Formula. This then asks the following question:
Is the total number of the positive RSVP values (i.e. those who RSVP'd yes to the event) less than (<) 6 (our capacity)?
If yes, then show the RSVP field for people to register to the event. If the total number of the positive RSVP values is higher than 6 (our capacity), then, hide the RSVP field on the form.
Show the 'Add to wait list' field in its place after the capacity is exceeded
On the Wait List field, the formula would be: {Count : 'all', Instance : '1', Field: '8589942047', Value : '8589954497'} >= 6
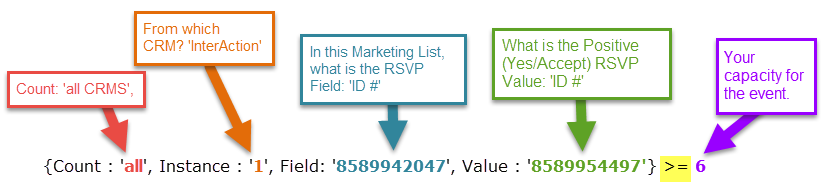
Here we have added our operator of "Greater than or equal to" (>=) and our capacity of 6 to the end of the Count Formula. This then asks the following question:
Is the total number of the positive RSVP values (i.e. those who RSVP'd yes to the event) greater than or equal to (>=) 6 (our capacity)?
If yes, then show the Wait List field for those to still express interest in the event. If the total number of the positive RSVP values is less than 6 (our capacity), then, hide the Wait List field on the form.
How to set up the Count Formula for your event
Please note: The below Count Formula description is for InterAction. If you are using Vuture Standalone, Salesforce, OnePlace, or Dynamics, please find details for your CRM-specific Count Formula below:
First, open up a new Plain Text document on your computer (i.e. Notepad).
IMPORTANT: Please do not use Microsoft Word as unintended code from Word may also be copied when pasting your code into Vuture.
Copy and paste the following into your Notepad:
Basic Count Formula:
{Count : 'all', Instance : '1', Field: '8589942047', Value : '8589954497'}
Show the RSVP field until our capacity for the event is reached
{Count : 'all', Instance : '1', Field: '8589942047', Value : '8589954497'} < 6
Show the 'Add to wait list' field in it's place after the capacity is exceeded
{Count : 'all', Instance : '1', Field: '8589942047', Value : '8589954497'} >= 6
Friendly Reminder: the values and the capacity in the Count Formulas above will need to be changed to the values of your marketing list.
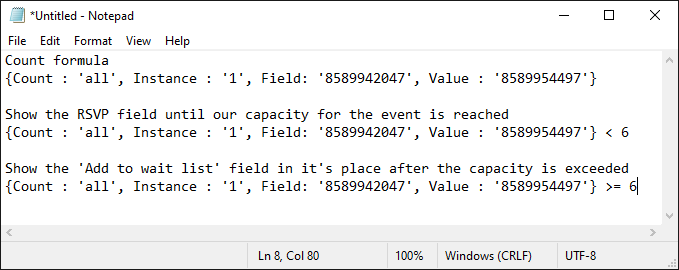
The below screenshot is an example of what you should have in your Notepad (or Plain Text document). You should amend the formulas with your specific values within your document. Once finished, you can then copy the formula from your Notepad, directly into the 'Add conditional rule' fields on your form.
How to change the values in the formula to match the values in your list
To find and change the values in the Count formula with the values on your list, please navigate to the appropriate Help Desk Article below, depending on your CRM / data source:
Please note: The Count Formula for Form Logic is currently compatible with InterAction, Dynamics, Salesforce, OnePlace, and Standalone (Vx Lists or Contacts Module).
Note: If you're creating a waitlist for resent emails we would advise creating the logic for the amount of spaces left to fill at the event.
