Overview
Form Logic allows you to build Vuture forms that react to your contacts’ responses, hiding and displaying later questions, depending on their response to earlier questions.
You create this behaviour by adding a Condition to the next field you want your contacts to see. The Condition ensures that they will only see that field if they respond in a specified way to the previous question.
For example, if a contact responds RSVP yes, they will see further questions, or when an event capacity is reached, the next view will be “Sorry the event is full”, or if a person has dietary requirements they will see the list of diet options to choose from.
Contents
Requirements
Prerequisites: You will need to have Forms v2 enabled in your system (your Client Success Manager can do this at "Admin.System.Versions.FormEditorVersion2") and for your role, as well as have "Admin.System.Forms.Force validation script" enabled, to see the extra boxes in the Form Editor. Please contact your account manager if you're unsure about your current settings.
Your browser can be Chrome, Firefox or IE. If you use Internet Explorer, ensure that it is version 9.0 or higher.
WARNING - When you are building forms using form logic, you will decide to display fields, or not, depending on the previous answer from the contact. You need to understand that, if you are working with a field that already has a value, and you choose not to display it, any value held in that field in Dynamics could be deleted on Form Submit.
For example: a contact already has Monday as a session choice in an additional field in Dynamics. On a subsequent form for the same event, the contact RSVPs "No" to this event. Therefore, by the logic established on the form, they will not see the session choices, even though Monday was prechecked. When the contact submits the form, the session choice in this related field on Dynamics will be deleted.
This behaviour only applies to fields which are brought forward onto a form from Dynamics and then subjected to form logic. All other Dynamics fields are not affected, including the ability to "hide" fields on forms.
Instructions - Showing another field when someone answers the first question
Please watch this video for a full overview of how this works with Dynamics:
Start in the usual way with the first question:
The following instructions gives the use case scenario of asking someone if they'd like to bring a guest to an event. If someone chooses, yes, the form will then ask what the guest's name is. This same logic would work for if someone RSVP'd yes, to then display a dietary preferences field, for example.
- Build a form (it can be Prefilled or Blank). The contact fields are typically on your form already, as part of your template. Campaign-specific questions such as: Would you like to Bring a Guest? Which Session Would You Like to Attend? or Dietary Requirements must be added as Dynamics Custom Fields.
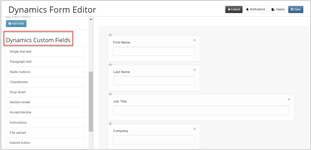
- Add a field to ask a question first – For example, “Are you bringing a guest?” and create values for the responses (Yes and No)
- Add the next question field you want to appear, depending on the answer to your first question. (In this example, we used 'Name of Guest' and 'Guest Job Title'). Ensure that you give each new field a unique name, preferably with no spaces. In the image below, I named the new fields BringingGuest, GuestName and GuestTitle. Your form will now look like this:
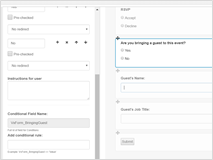
- Add the conditional rule for when these secondary Guest questions should appear. To build a conditional rule you need to first think about the statement in English and then assemble the elements you will need to build the conditional rule. In English this would say: If the recipient answers Yes to the question “Are you bringing a guest?” then show “What is the guest’s name?”.
The conditional rule for this would be:
VxForm_BringingGuest==’Yes’
Insert this into the 'Add conditional rule' box for the 'Guest’s Name' field.
Three Elements Required for the conditional rule above:
-
Conditional Field Name,
-
Operator (for example, '==')
- Response/Field Value
So the conditional rule is: Conditional Field Name == 'Response/Field Value'
Conditional Field Name == 'Response/Field Value'
Best Practice: It will help you to open Notebook and build your form logic statement in there. Copy it over into the correct Conditional Rule box when complete.
Do not use Word for this. It is possible, when copying and pasting from Word, that you may bring over unwanted elements from the text.
1. Finding the Conditional Field Name
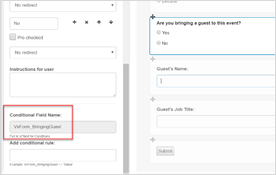
Each field has a conditional field name which is displayed in the Conditional Field Name box when you click on that field. See the image below:
2. Finding the Operator
Below is a list of commonly used terms. For the example in this article, to display another field when someone responds Yes to bringing a guest, you will use the "==" operator.
| Operator | Meaning |
| == | Equal to |
| != | Not equal to |
| < | Less than |
| <= | Less than or equal to |
| > | Greater than |
| >= | Greater than or equal to |
Important: The conditional rule must use the database value for the field, not what you write into the label for clients to see. For example, the question RSVP could have response values of Yes and No or Accept and Decline or even Yes thanks, I’ll be there and No thanks, not this time. For Dynamics, the database value of RSVP = Yes is actually ‘true’. When writing your conditional rule, you must use the database value. Do not use the label that the clients see on the form.
3. Finding the Response or Field Value
Using Copy and Paste
It is possible to use Inspect to find the field value, but we wanted to make the value easier to find, so we have now added a Copy and Paste function which you can use instead.
When you use the Copy option, Vuture will find and copy the hidden Value of the field to the clipboard. From there, you can paste it into your Conditional Rule.
The Copy option is under the little i in a circle, next to each field on the form:
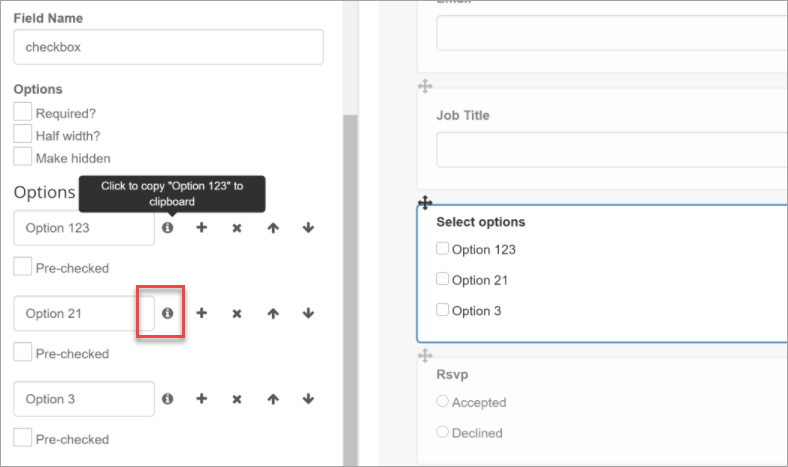
Please note that the Copy and Paste function is finding the hidden value of the field, which is not necessarily the same as the users of the form will see.
Finding the Field Value using the previous method of Inspect
If you prefer, in the form, first select the correct question and then right click your mouse. The last option in the drop-down menu is Inspect.
Click on Inspect.
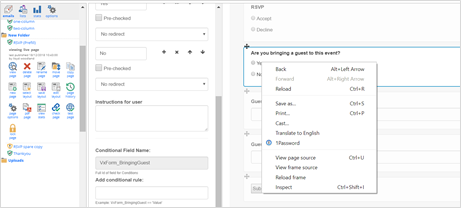
You will be able to see the underlying html on the page.
You may have to click on the right facing arrows to open up more text. In the image below, I clicked on two right facing arrow heads (ringed in red) to make them downward facing arrows and open up more text.
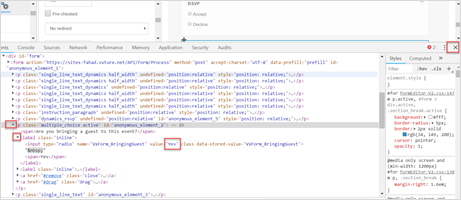
The value is given as value =Yes. You will need this value, in single, straight quotes.
Having identified and copied the value, use the little x at the top right to close the Inspect screen.
You now have all the elements you need to write the conditional rule into the second question Conditional Rule box:
Conditional Field Name == 'Response/Field Value'
VxForm_BringingGuest == 'Yes'
This means: If the 'Bringing a Guest?' question has the answer of Yes, show the second question (i.e. Guest's Name).
You would then copy and paste this same rule into the third question Conditional Rule box, 'Guest's Title'. This way, if someone answers 'Yes' to the 'Bringing a Guest?' question, both the 'Guest's Name' and 'Guest's Title' fields will display. If someone instead responded 'No' to the 'Bringing a Guest?' question, then these two fields would stay hidden.
To Test this:
Save your work, publish the form and do View Page.
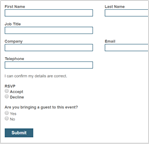
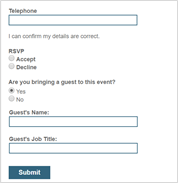
Answering Yes to the first question now generates the second and third questions:
Another Example
Here is an example form offering different language options:
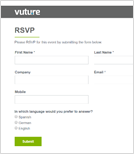
The field where you ask the contact "In which language would you prefer to answer?" is called Language in the Field Name. Each subsequent language option field has a conditional rule on it like this:
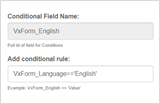
Each option just changes the language name, from English to Spanish and to German.
Instructions - Limiting Form Submissions with Dynamics
Please watch this video for a full overview of how this works with Dynamics:
To control the responses for your event by limiting form submissions, you will need to use the Count variable. You will count the Yes responses until they reach the capacity of your event. You will then switch out the RSVP question and replace it with “Sorry this event is full” or a similar message.
To limit form submissions:
- Create your RSVP field in the usual way.
- Open Notepad. You will find it very helpful to build your whole line of code in Notepad first because it is quite long, and you can’t see the entire line in the Conditional Rule box. Build the line in Notepad and then copy it into the Conditional Rule box. Note: do not use Word. Word can sometimes bring over additional, unwanted, elements when copied and pasted.
- You will need 5 elements:
- Your instance number
- The Dynamics campaign ID
- The Field Name
- The Response or Field value (example Yes or Accepted)
- The number of places at your event
- Copy the first line below onto your Notepad and replace all the elements in red with your own values as you find them. Instructions for how to find each element are further down in this article. You will need this line for the conditional rule for the RSVP question:
{ Count: 'all', Instance: '11', CampaignId: 'c4c01556-161a-e711-80d0-00155d010201', Field: 'RSVP', Value: 'true' } < 24
To make it easier for you to copy, please copy the text in the below code block.
{ Count: 'all', Instance: '11', CampaignId: 'c4c01556-161a-e711-80d0-00155d010201', Field: 'RSVP', Value: 'true' } < 24
- Copy the second line below onto your Notepad and replace all the elements in red with your own values as you find them. Notice that this code switches the <24 to be >=24 (switches from less than 24 to greater than or equal to 24)
{ Count: 'all', Instance: '11', CampaignId: 'c4c01556-161a-e711-80d0-00155d010201', Field: 'RSVP', Value: 'true' } >= 24
To make it easier for you to copy, please copy the text in the below code block.
{ Count: 'all', Instance: '11', CampaignId: 'c4c01556-161a-e711-80d0-00155d010201', Field: 'RSVP', Value: 'true' } >= 24
What do these two lines of code mean in English?
For an event limited to 24 attendees:
First, count the RSVP acceptances and keep the RSVP question visible as long as the number of accepts is less than 24. (<24). You will put this count Command into the RSVP conditional rule field.
{ Count: 'all', Instance: '11', CampaignId: 'c4c01556-161a-e711-80d0-00155d010201', Field: 'RSVP', Value: 'true' } < 24
Then, count the RSVP acceptances and make the Sorry message appear once the number of Accepts is equal to or greater than 24.(>=24) You will put this Count command into the Sorry message conditional rule field.
{ Count: 'all', Instance: '11', CampaignId: 'c4c01556-161a-e711-80d0-00155d010201', Field: 'RSVP', Value: 'true' } >= 24
To find the five elements for a Count command
Instance number
Your Instance number is the number of your MS Dynamics database, held in Vuture. It is typically a single number between 1 and 10 (held in Admin.External Systems) and your Client Success Manager or Support can tell you what it is. It will never change, unless you swap one crm for another crm, so you should only need to obtain the number once.
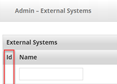

In this example the Instance number is 9.
Campaign ID
To find the campaign ID you will need to open a browser and type the following:
https://{Your Vuture URL}/mvc/webapi/dynamics/1/campaigns
You will find the result in the following format:
{
"name": "All Contact Campaign",
"campaignId": "c4c01556-161a-e711-80d0-00155d010201"
}
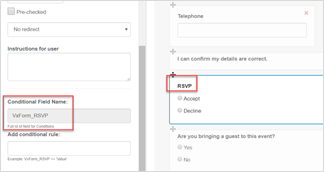
The Field Name
Each field has a conditional field name which is displayed in the Conditional Field Name box when you click on that field. See the image below:
The Response/Field Value
Update: We now offer a new, easier, way to find the hidden value of a field. There is an option to Copy and Paste the value of fields into the Conditional Rule statement.
When you use the Copy option, Vuture will find and copy the hidden Value of the field to the clipboard. From there, you can paste it into your Conditional Rule.
The Copy option is under the little i in a circle, next to each field:
Alternatively, you can still use the previous method to find the hidden value of a field, using Inspect.
In the form, first select the correct question and then right click your mouse. The last option in the drop-down menu is Inspect.
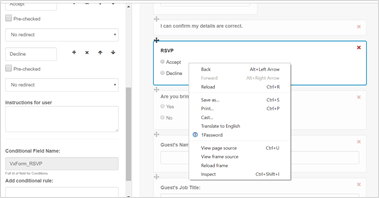
Click on Inspect.
You will now be able to see the underlying html on the page.
You may have to click on the right facing arrows to open up more text. In the image below, I clicked on a right facing arrow head (ringed in red) to make it a downward facing arrow and see more text.
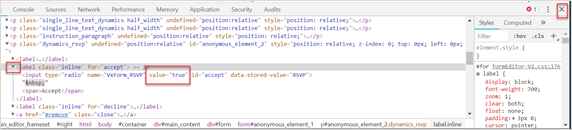
Having identified and copied the value into your Notepad, use the little x at the top right to close the Inspect screen.
The Capacity of your event
That is for you to decide. For testing purposes, when you first build this line, put the capacity to 1 in both lines. You can then view the form, complete the form and submit as a test and see the new message appear as if the capacity has been reached.
To Test This:
When you test the form and submit RSVP=Accept for an internal tester, keep an eye on the View Stats for the form, where you can see every form submission. Once you are finished testing, submit a Decline for the same people and this will reset the numbers for your event to zero. You can now edit the Form Logic on your form, where it says capacity is 1 or 2, and change it to the correct number of spaces at your event.
Common mistakes when writing conditional rules
If your conditions are not being met in the form (i.e. the secondary field is not hidden when it should be), you may have made one of the following common mistakes:
-
Case Sensitivity: Variables and function names are case sensitive. Please make sure you have added the correct name and/or field IDs and used the correct upper and lower case
-
Mismatching quotes, parenthesis and curly brackets: Make sure any statement which opens with a parenthesis, ends with a closing parenthesis. Count statements should be in single curly brackets.
-
Use the correct assignment operator. For example: '= >' is not the same as '> =' The first of these two examples is incorrect, and it will break the condition and consequently the form.
-
Extra commas, semicolons or other punctuation characters: Every character has an interpretation in Javascript, any unnecessary additions will modify your condition
-
Do not use inverted commas ( ’ ). Use single quotation marks ( ' ) in your condition. Make sure the mark is straight and isn't tilted or curvy in any way.
-
Do not use special characters in your crm field names.
Special characters are: "!"#$%&'()*+,-./:;<=>?@[\]^_`{|}~"
If you have a problem creating Form Logic, please contact Support.
