Reviewed Nov 2024.
This article is also available as a pdf; download it from the foot of this page.
Before following the below please make sure you have configured the following in Zoom:Zoom marketplace setup:
- Add app via this link https://marketplace.zoom.us/apps/fpm2MGjIRQKs-S1lh75s1g
- Ask an admin user with developer privileges to complete these steps (this will probably be the same person at your firm that set up the original integration).
- Ensure the admin user has ‘Marketplace’ permission.
- Ensure the admin user has the following ‘account role privileges’ turned on in Zoom you check using this link You can check here https://marketplace.zoom.us/apphelp/fpm2MGjIRQKs-S1lh75s1g
- User and Permission Management - Users
- Dashboard and Report - Usage reports
- Account Management - Recording management
NOTE: When the admin user is logged in as a Zoom user with the ‘Marketplace’ permission turned on, they will be able to check whether they have the correct Zoom Account Role Privileges for the app by entering this link into their browser - https://marketplace.zoom.us/apphelp/fpm2MGjIRQKs-S1lh75s1g.
How the integration works and use cases
The Vuture integration with Zoom will allow you to seamlessly add your webinar events to your Vuture campaigns, and also to write back attendance information to your CRM, once that event has concluded. Once the integration is set up, all you will need is a Webinar ID to add to your Vuture form.
The integration supports multiple webinars in a single email invite (including concurrent webinars), and we also have the ability for you to preview which webinar is being added to a campaign to ensure you add the correct webinar to the correct form.
We also offer support for Zoom’s On Demand recordings.
Adding a webinar
You add a webinar to a Vuture form by entering the Webinar ID. Vuture will then make a call to the Zoom APIs to get the details of the webinar event and display the details back to you This is so you can be sure that you are adding the correct webinar to your form. We will display the Webinar name, and the date/time it is scheduled for.
Registrations
You send the form out to your contacts, as part of your campaign. When a user submits the form, we will take the contact details they have entered and make a call to the Zoom APIs to register that user for the webinar event. We use the following fields by default, to achieve this:
- First Name
- Last Name
- Email
- Company
Once registered, your contact will receive a confirmation email, directly from Zoom, that will include their link to join the webinar.
Writing back attendance
Once the webinar event has concluded, Vuture will make a call to the Zoom APIs. We will pull back which contacts attended; which webinar they attended; and how long they spent in the webinar. We will use this information to create an activity in your CRM.
Please note that not all CRMs support these activities, so please check with your CSM for more details for your specific CRM.
We make this call using the webinar ID, the Zoom registrant ID and the contact’s email address.
On Demand Recordings
If you wish to make your webinar available to your contacts as a recording after the webinar has concluded, you will need to set up your webinar with On Demand recordings activated, and you will also need to check the ‘Approve On Demand Registration’ when activating your app.
Prerequisites
When you click on the Zoom for Vuture app in the marketplace you will be taken to the integrations landing page. Here you can fill in some details in order for a member of our Vuture Customer Success team to get in contact with you.
Alternatively you can contact your Vuture Customer Success Manager directly and ask for more details and pricing.
Once you have completed the sale with your CSM, they will configure your Vuture instance ready for you to activate the integration and you can begin the process.
Your CSM will enable Admin>System>Webinars>Zoom Marketplace OAuth2 Enabled
User access permissions
- You will need to be an Admin user for your Vuture instance in order to access the webinar set up tool.
- You will need to have the correct permissions in Zoom to be able to authenticate an app for your organisation (please contact the Zoom admin at your firm, or contact your Zoom Account Manager for more details on this)
- Please ensure you also have the Marketplace role turned on for your Zoom account. It can be found here https://zoom.us/role under 'Advanced Features'.
Authentication
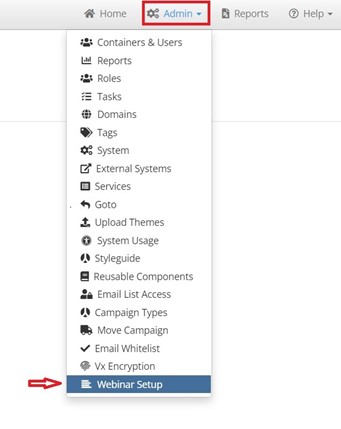
To set up and authenticate the app in your Vuture instance, from the Home Screen go to ‘Admin’ at the top of the page, and select ‘Webinar Set Up’ from the menu.
You will then be taken to the Webinar Setup Tool. Select Zoom from the list of vendors.

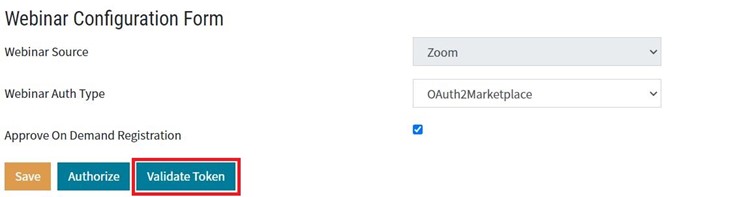
You will need to select the following values…
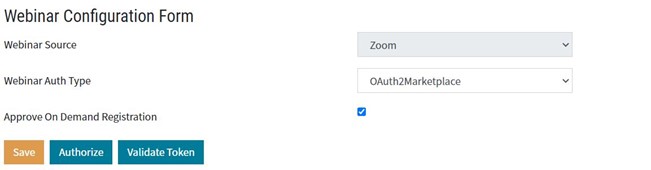
Webinar Source: Zoom
Webinar Auth Type: Oauth2Marketplace
Approve On demand Registration: Checkbox ticked (Optional. See note below)
The Approve On Demand Registration checkbox is used to approve any Zoom On Demand recording registrations automatically. This allows your contacts to use the original webinar invite link to access the on demand recordings of the webinars, whether they attended the live webinar or not, and without them having to complete another form.
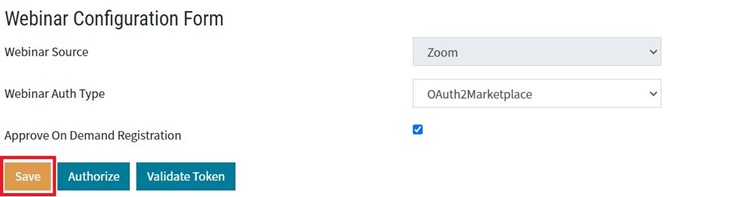
IMPORTANT NOTE: Once complete you must hit Save button before you attempt to Authorize.
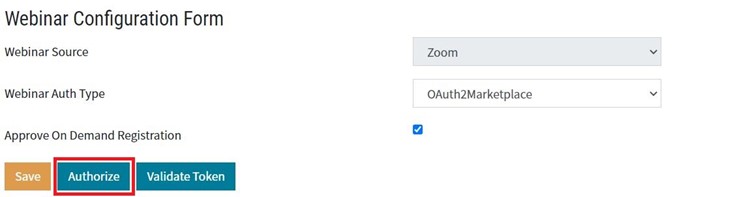
After saving, users will select the ‘Authorize’ button to be taken through to the Zoom marketplace authorization page and will be asked to log in. Again, please ensure you have the permissions to authenticate marketplace apps on your Zoom account. From here, you will be able to review the app details, and the scopes of the APIs that will be used, and then authorize the app.
Note:
If you Authenticate and you get the error "Redirect URL is required" please log out of Vuture and refresh the cache on your browser. Log back into the Zoom webinar setup in Vuture, re-click the Save button and continue the Authentication process. This should solve the problem.
Once completed successfully, you can then return to the Webinar Setup tool and click the ‘Validate Token’ button to check that the authorization was successful. If you get an error here please contact Vuture Support.
You are now ready to start adding webinars to your email campaigns.
Please see this article for a guide on adding your webinars to Vuture forms:
Adding single or multiple webinars to a Vuture form
Further Tasks:
Activities (not for ContactEase or the current Intapp OnePlace integration)
Add an Attended Activity Type to the client's system in the Metadata Manager. If the client already has an Attended Activity Type entered in their config (for example, an InterAction client using the Events App) you will not need to add a new Activity Type unless the client wishes to differentiate between Event Attended and Webinar Attended.
Tracking Attendance: It is only possible for Vuture to track (and write back activities for) attendees who register via a Vuture Form. Any users that register for the webinar directly through the webinar provider using a generic audience link, will not have an attendance activity written back to the crm. Their attendance will be recorded in the webinar provider's reports.
Note: it is not currently possible for the IA integration to have both Activity Types. However, if you already have Event Attended, the fact that it is a webinar can be made clear in the Activity Summary.
Scheduled Task
All webinar tasks for recording webinar attendees have been combined under one task now. You do not need to set up separate tasks for Zoom and Webex for example. The task you need to enable is at Admin.Services.WebinarEventProcessing Task. The default time for this task to run is 6am.
If you need help there is an article here covering how to enable Scheduled Tasks.
Note: If you have more than one webinar provider integrated with Vuture, the new combined webinar task will run in sequence, one webinar provider at a time, to avoid overloading the system.
Role
Edit the role at Admin.Roles.Forms.Zoom Integration Webinar Field. This will allow the users to see Zoom as a webinar provider on their Vuture forms.
Deauthorization
You can deauthorize the app at any time from the Zoom Marketplace. If you do this, Vuture will delete any sensitive data (as prescribed by Zoom) from the Vuture platform.
Data to be deleted will include:
- Any Webinar data and registrant IDs stored in Vuture
- Any API credentials stored as part of the authentication process
Please note: this process will not delete any information that has already been written to your CRM and it will not delete any of your contacts, lists, or campaigns from Vuture.
To deauthorize the app you must:
- Login to your Zoom Account and navigate to the Zoom App Marketplace.
- Click Manage >> Added Apps or search for the "Zoom for Vuture" app.
- Click the "Zoom for Vuture" app.
- Then click Remove.
Warning: Whilst this is not irreversible and you can reauthorize the app at any time, the data deleted from the Vuture platform will be irretrievable once the app has been deauthorized.