Contents
What are Notifications?
Notifications are automatically generated emails. They can be sent to an email recipient automatically when that person completes a form, based on their responses on the form.
They can be used to send a confirmation back to the form respondent confirming their details or providing additional information.
They can also be used to send details of the form respondent to specific email addresses such as the event organiser.
They can be triggered by any and all form responses, or you can add conditions to the notification so that they are only sent if a person Accepts an invitation for example.
Why use Notifications?
Notifications are useful to save time when running an event. Using notifications the event organiser does not have to trawl through the responses every day looking for RSVP = Accept and sending out a confirmation email manually. The notifications technology will do this for you.
They also give the client the reassurance that they are registered, long after they have seen the Thank You Accept landing page. This email arrives in their inbox and can be kept and referred to, unlike the landing page.
Requirements
Please ask your Account Manager to enable 'Admin.System.Forms.Enable form notifications'.
How to set up your email notification templates
Watch the video on how to create email notifications for when a contact RSVPs Yes:
Instructions:
- It is a good idea to build your main invitation email first. You can get all the details correct and the design signed off before you then make a copy of it to use as your notification email.
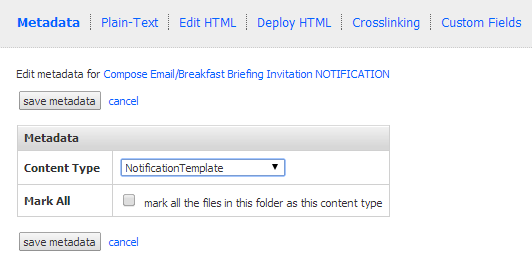
- Then you need to create your email notification template e.g. the confirmation email. These emails sit in the Compose Email folder like the others, but with a different content type of notification template. Create your notification by copying the original invitation, renaming the copy to Notification and changing the text to read "Thanks, you are registered" (for example). The rest of the invitation text with all the details of date, time, etc can be left in. Publish the copy and then click the ‘email options’ icon.
- Select ‘notification template’ in the drop-down menu under content type.
- Click ‘save metadata’.
- You will get a Successfully Saved message.
- Note: you can create as many of these emails as you need, for different options on your form for example.
- Create your Vx form as normal e.g. Registration or RSVP pre-filled.
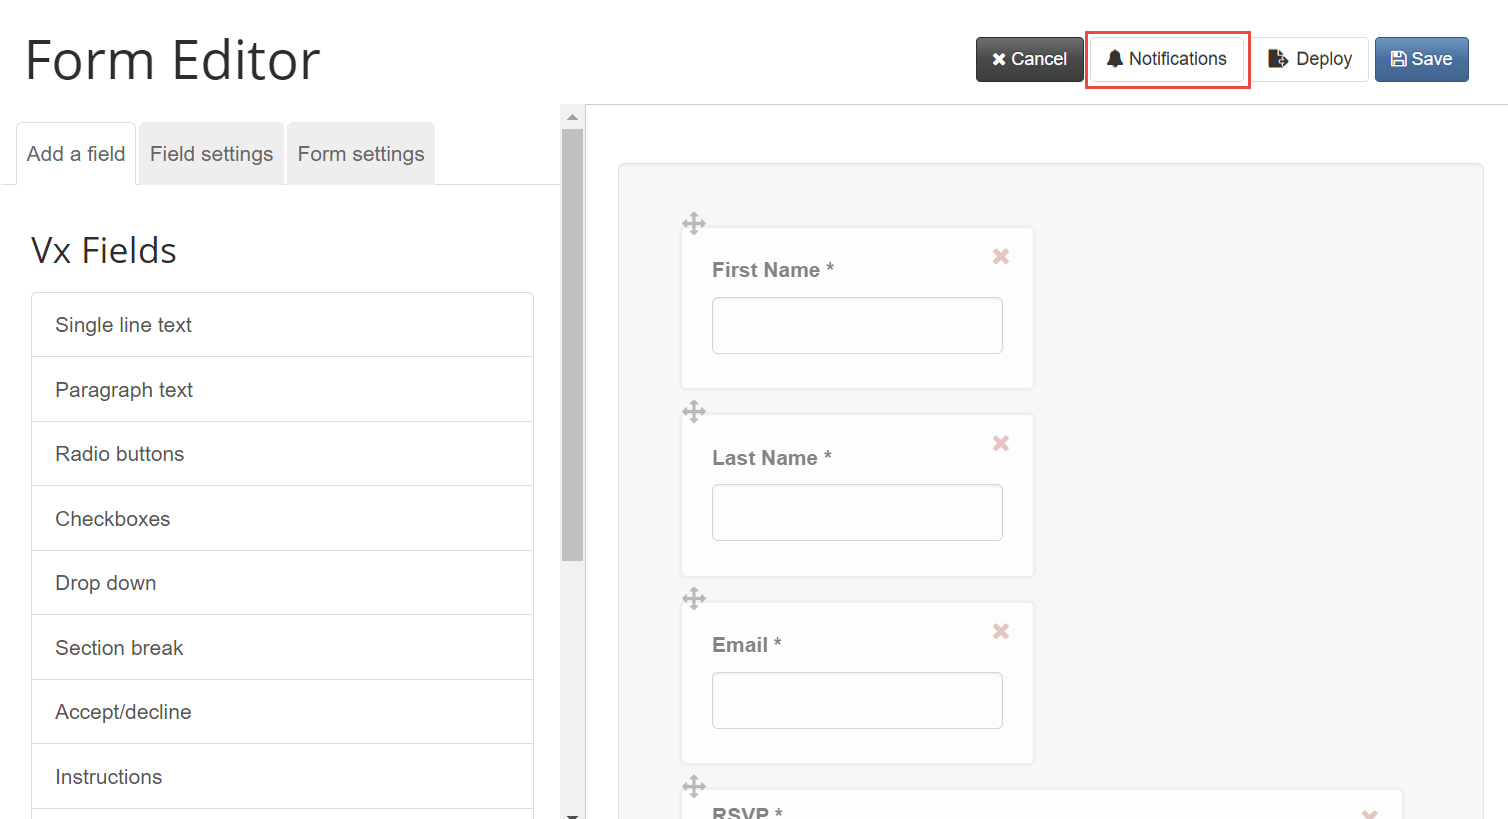
- Click into the form text boxes to view the ‘Form Editor’ page.
- In the ‘Form Settings’ tab, name the form e.g. Registration or RSVP pre-filled.
- Click on the ‘Notifications’ button in the top right-hand corner (this will also save the form). You will now be on the Notifications page where you can add / remove notifications. Note: if you cannot see the notifications icon in the top right corner, please let Support or your Vuture account manager know and they will switch on the option for you.
Creating the Notification parameters
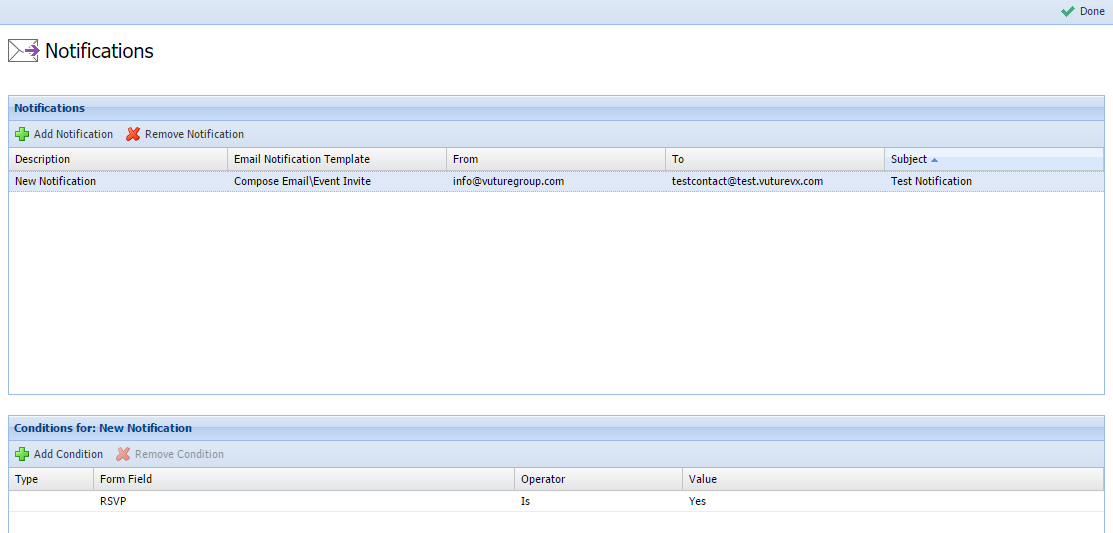
- Once in the notifications page, click ‘add notification’ and fill in the following fields:
- Description - e.g. Event acceptance notification or Event Registered Notification
- Email Notification Template - pick the email you want to use for the notification from the drop-down list (this list displays any notification email(s) you set up and saved earlier on)
- From - the email address you want the notification to come from. This should normally be the same as the From address on the invitation. You can also enter a display name by entering the email in the format: fromaddress@mycompany.com,Display Name
- Subject – insert the subject of the notification email e.g. Event (+ date) confirmation
- To - select ‘Form Submitter’ from the drop-down list to send the notification to the submitter of the form. Note: your form must have an email field. Alternatively you can enter an email address in this field if you want the notification to go to a specific email address. You can enter more than one email address here, separated by semi-colons.
- Once you have finished, click ‘update’ in the middle of the screen.
- Below the notifications, you will see the option to ‘add conditions’ to the notification/s.
Adding conditions to notifications
You can add one or more conditions to a notification. Note: if you do not add a condition, the notification email will be triggered by ANY form submission.
Click ‘add condition’ (once you have added the notification/s) and fill in the following fields:
- Form field - choose a field from the drop-down list e.g. RSVP
- Operator - choose the comparison you want to use between the form field and the value field:
- Contains = the form field contains the text in the value field
- Greater Than = the form field is greater than the value field (this must be a number)
- Is = the form field exactly matches the value field
- Is Not = the form field does not match the value field
- Less Than = The form field is less than the value field (this must be a number
- Is One Of = The form field is one of options selected.
- Is Not One Of = The form field is not one of the options selected.
- Value – the value to compare the form field to
- (For example, RSVP is Accept to only send the notification email to people who click on Accept.)
- Once you have finished, click Update in the centre of the screen and ‘done’ in the top right-hand corner.
- Note: you can add multiple conditions by selecting the type as ‘and’ / ‘or’ for each new condition.
Example of using IsOneOf and IsNotOneOff together to match certain values but not others:

Testing
- Fill in the form and submit, to ensure the notification email comes through to you straight away. You should still see the Thank you Accept landing page first, then receive the email.
- When it all works correctly, you are ready to send your email.
- Send the email (containing the form) to an internal test list.
If you are experiencing any issue with notifications make sure your form does not contain any invalid HTML (particularly if you have manually edited the HTML). You can do this by visiting the W3C HTML Validator at http://validator.w3.org and entering the URL of the form which you can get by clicking "view page" and copying the URL in your browser address bar. Please ensure all HTML validations errors are corrected and contact Vuture support if you still have problems.
1. My form notifications are not sending
Check the following:
- Form Notifications uses the email address field on your form to send the notification to the form submitter. If your form does not have an email address field on it (and you are using the Form Submitter option) then notifications will not be sent.
- Check that the form does not include invalid HTML.
- Reset the admin@vuture.co.uk user account as form notifications call the Vuture API using this account which must not be disabled or have the password reset
See Form Notifications Not Sending for more details on checking these issues
2. My form fields are not showing up when selecting conditions
If your form fields are not showing up when selecting conditions make sure you have saved your form (this is important if this is a newly created campaign or you have copied the form from another campaign). Do this by clicking on the form to edit, clicking the "Save" button in the top right and then publishing the page.
Also make sure your form does not contain any invalid HTML (particularly if you have manually edited the HTML). You can do this by visiting the W3C HTML Validator at http://validator.w3.org and entering the URL of the form which you can get by clicking "view page" and copying the URL in your browser address bar. Please ensure all HTML validations errors are corrected and contact Vuture support if you still have problems.
3. I am having trouble setting up multiple notifications based on checkbox fields
Make sure you are using the IsOneOf operator when using a form field that could return multiple values.
4. Can I personalise the email that the client receives?
Notifications can be personalised by inserting fields in the email that pull in individual form response values. Fields can be inserted into the email in the format #{VxForm_FieldName} where FieldName is the name of the field on the Vx form. These can be found in the form editor or viewed in the dropdown list of fields in the conditions editor. For example, if you have a field called Accept-or-Decline on your Vx form you can use the field #{VxForm_Accept-or-Decline} to display the response value in the email notification. This method will only work for non integrated CRM form submissions.
For full instructions on personalisation, see this Help Desk Article.
5. When I pick from the list of form fields when creating a form condition I am not seeing the correct field name?
The field name is pulled from the label that is entered when adding the field using the form editor. For example, you may have labelled your RSVP field as "Would you like to attend?". If you have, you will see that label when creating a condition, not the RSVP field name.
If the field is not given a label then the drop down list of fields will use the underlying field name which often looks like a code, eg "IAForm_1234567". To solve this issue, click on the form field in the form editor and make sure the field label is not blank. This method will display the additional field submissions when setting up using the Trigger functionality.
Notifications are automatic and get sent to the form submitter at the time of the submission.
6. What are the form notification field limits?
The From and To fields both have character limits of 300 characters.
The Subject field has a character limit of 200 characters
7. Using a comma in the field options section, is breaking notification rules. For example, if I try to send a notification, and set a rule so that it only sends if a particular option is selected, it does not work where that option has a comma in it. The example is for an RSVP response where the text is "Yes, I would love to attend".
The answer at the moment is to remove the comma from any possible response. The text in this example would then be "Yes I would love to attend". The problem in this case is the comma. It is a special character which is interfering with the code.
Another example could be a list of practice areas. If the notification depends on the option being selected being "Wills, Power of Attorney & Estate Planning" you would need to change the option to "Wills; Power of Attorney & Estate Planning" or "Wills - Power of Attorney - Estate Planning". So hyphens or semi colons will work, but commas will not.
