Overview
You might be using forms as a way for contacts to RSVP to events, provide preferences, to collect feedback, or to manage consent. In all of these cases, it's key to make sure you get the data management right. This article takes you through the key considerations for testing forms, and how best to go about it.
Contents
What do I need to test?
- Information in the form is feeding back to the correct list
- Custom fields are writing back to Vuture/CRM
- Information is being prefilled in the forms (where applicable)
- Prefilled form links to a blank version (where applicable)
- Blank form is linked to correct list
- Redirects are in place and are the correct links
- RSVP is being collected correctly
- RSVP writing back to the correct field
- Confirmation emails are set-up correctly
Testing strategy
Before you start testing, make sure you have a testing plan in place. What type of form is it? This will dictate which of the above you need to test.
For example, if it's a preference form you will need to check it prefills information, and writes back into the correct list and against the correct fields.
How to test
1. Information in the form is feeding back to the correct list
Test your prefilled form by sending yourself a Sample email that links through to the prefilled form and submit it. Then, test your blank form by clicking on view page and submitting the form.
Once submitted, you can jump into your list to check on whether the relevant information has fed back correctly. This step is only relevant where you have linked the form to a list, or want to update fields, e.g. sign-up page, preference form, event RSVP.
Go into your contact list in Vx, or your CRM and double check the correct fields have been updated with the correct information. Be careful to double check the values where they vary, i.e. RSVPs, preferences, dietary requirements.
2. Custom fields are writing back to Vuture/CRM
For Vx, it should be very clear whether your custom forms are writing back because the fields should show against contacts in the destination list. Similarly, for other CRM's you can simply check the linked list and see whether the correct information is writing into the fields you created for the form.
The exception to this is when you're writing back at the campaign level, in which case you'll need to refer back to the destination campaign/list in your CRM and check the particular activity, e.g. the event in question.
3. Information is being prefilled in the forms, where applicable.
To test this element, you'll need to send the form as a link to your email address. This will need to be a Sample email send, not a test. Provided the form is set up correctly, when you click on the link in the email, the form fields should be populated with the relevant information held against that contact.
4. Prefilled form links to a blank version (where applicable)
Where you're collecting information about contacts you don't have in your database, you'll need to have a blank form, or blank version of your form. If you're sending out an event invite, make sure you link to the blank version so contacts have something they can forward on to a friend/colleague.
5. Blank form is linked to correct list
For new contacts, you might be wanting to add them to a specific list in your CRM. To test this is working, firstly delete the test contact from your initial list. Next, click on view page and fill out the form. Check that the new contact information makes its way to the correct list.
6. Redirects are in place and are the correct links
You can add custom redirects to accept/decline fields, or radio buttons by clicking on the field and opening the redirect dropdown in field settings for a specific option:
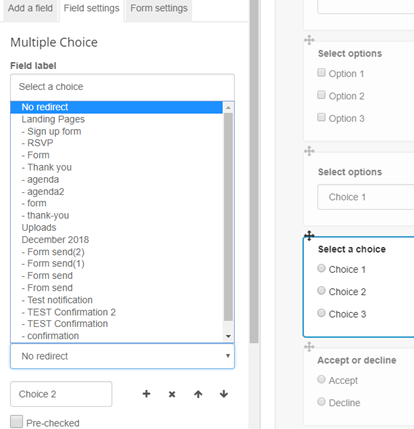
Make sure the correct redirects are selected. At this point, it's also worth checking there are no conflicting redirects set-up for other fields which might throw up an error.
Please note: You can only setup redirects for one field per form. For example, you cannot have a redirect on the RSVP field and on a radio field. It must be one or the other.
When the redirects all look correct, make sure to test all the options in both the prefilled and blank form. The prefilled form will need to be tested in a live email send. You can test each redirect from the same survey link in your email.
7. RSVP is being collected correctly
Submit a test for both prefilled and blank forms and check in the destination list in each case whether the correct positive/negative response (i.e. Accept/Decline) is fed back to the RSVP field.
8. Confirmation emails are set-up correctly
If you have setup confirmation emails, either via notifications or triggers, then you'll want to test and confirm that you are receiving your confirmation emails upon registering to an event.
Clearing your form
When you've done all your testing, and are happy with the form, you can clear out the test responsive so you're ready to go live.
To do this, select the page with your form on it and click view stats.
On the Statistics page there is an option at the bottom called Clear all form responses which will remove all form submissions to date from the Vuture database.
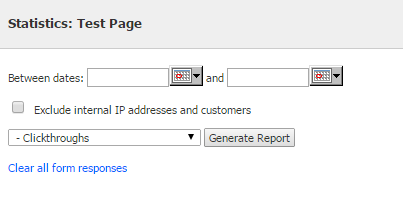
Note that there is no undo and that it will only remove data in Vuture and will not remove any data from your CRM.
If you don't see the Clear all form responses option then contact your Customer Success Manager to have it included in your role by adding the feature Admin.Roles.Emails.Clear all form responses.
