Overview
Vuture has an agreement with Stripe to allow you to use their facilities to take payment either by credit card or invoice.
Vuture's Stripe Integration allows Vuture clients to take payment for their events using Stripe's payment infrastructure. It can be made available to your firm’s clients from Vuture web sites and from the Email Module’s landing pages.
Note: the payments module is available for standalone, please contact your CSM for more details.
Contents
Introduction to Payments
Key Features
- Non-technical payment set up
- Variable rate Sales tax (or VAT) set by you, calculated automatically for your clients
- Integration with InterAction to record successful payments against your client records
- Function to capture names for tickets (useful if buying more than 1 ticket or buying tickets on behalf of someone else)
- Multiple currencies available, configurable for you
-
Multiple currencies available, configurable for you
Note: While you can configure the currency (e.g., Danish Krone), the Payments module user interface is currently hard-coded in English and cannot be localised to other languages.
- Completely branded for your firm
- US businesses can accept Visa, MasterCard, American Express, JCB, Discover, and Diners Club. Australian, Canadian, and European businesses can accept Visa, MasterCard, and American Express
Vuture Account Manager Actions
Your Vuture Account Manager will turn on the Payments integration by going to System.Payments, enabling Payments and adding the live and test Stripe secret keys that you provide to them (once you have set up an account with Stripe).
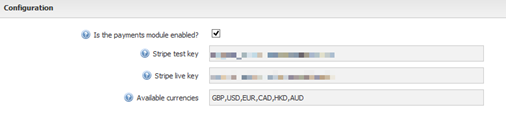
The list of available currencies can be modified to remove any currencies that are not required, or leave the default setting which allows: GBP, USD, EUR, CAD, HKD & AUD.
Please contact Vuture Support if you have additional currency requirements.
Setting up a Payments Page
Setting up an email campaign with a payment option mirrors your usual process for creating a Vuture email. The Vuture user will set up, for example:
An Invitation to an event where payment is required, and a form, for example, RSVP or Registration. Submitting the RSVP form will link to a Payments Page.
A Payments Page will be pre-populated with information set via Vuture Admin. Your clients will be able to select tickets, with different values, if required. They will then see a Thank you page and receive a receipt email. Finally, an InterAction Activity will be added to their contact record, indicating a successful payment made.
You will first need to set up a Stripe account for your firm by visiting https://stripe.com and then provide your Vuture Account Manager with the Live and Test secret keys that Stripe will give you.
Creating the Payments Page
There are two sets of actions for the creation of a Payments Page, handled by the Vuture User and the Vuture Admin User with the Account Manager.
Vuture User will:
Create the Invitation, the RSVP Forms and the new Landing Page for Payments.
Vuture Admin User will:
- Create an account in Stripe and let the Account Manager know the Live and Test Stripe secret keys
- Choose the appropriate currency(ies) to be available
- Select the Tax rate
- Specify the name and the email address the receipt will come from
- Provide site footer copy and the text for the Successful Payment message as well as the Who to Contact when experiencing difficulties

This detail will all be added on your behalf in the Vuture Admin tab at Admin.System.Payments by your Account Manager, when they switch on the Payments integration.
If you need to change the footer information in the future (for example if you have a new company HQ address) you can ask your Account Manager to go to Admin.System.Payments. From here they can edit a variety of configs including:
Receipt From address
Receipt From name
Site footer text
Receipt footer text
Success message text - including who to contact if client has problems with the payment.
Important when changing footers or other configs: If any changes are made to these config settings, it is necessary to Save the config page before leaving the Admin area. It is also necessary to then go to the Payments page in the campaign and resave that page with a Publish. If these two areas are not saved again any changes (for example to a footer address) will not be visible.
Linking your Payments Page
- Create an email Invitation to your event – as usual.
- Include a Register button or other link to a Registration form – as usual.
- On the RSVP Prefill registration form, the RSVP Accept option, that normally redirects to the Thank You Accept landing page, will redirect to the Payment page instead.
- Repeat for the RSVP Blank form.
- The RSVP Decline option can redirect to the standard Thank You Decline page for both forms.
Your clients who accept will see a Stripe-generated Thank You page later in this process, after they have paid.
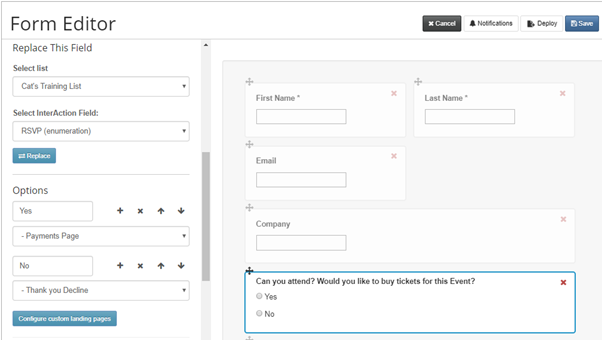
- To create the Payments Page, use a Payments Page from the Landing Pages folder or, if none is present, copy any landing page in the current container and, using the Page Options icon, change the content type to Payments Page then click Save Metadata.
- You will rename the newly-created page.
In the example below, a copy of the RSVP Prefill page is being re-purposed as the new Payments Page.
Setting Options Part 1
When you open the new Payments Page (by clicking on it in the Landing Pages folder), some of the options may have been pre-set for you by the Admin user/Account Manager (Tax levels, currencies, receipt From name).
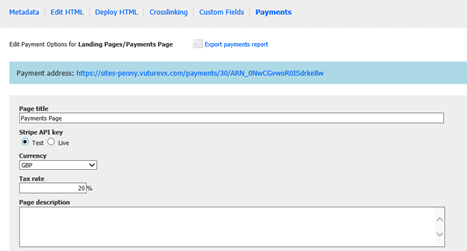
Export payments report option
Will show you a list of all the people who have paid, and all the people who have asked to pay by invoice (if you have allowed that option)
Payment URL address
Testing the process. Ensure you have the Test option selected. Click on the link to follow the process with a test credit card (Test/fake credit card numbers are available on p15 of this guide)
Send in an email as a link. For example, if the attorneys want to Offer a discounted rate, save a copy version of this page with a lower cost and give them the URL for them to send out to their clients
Page Title: Will show to the end client, so choose the name of the event as a title, not “Payments Page”
Stripe API key: Allows you to test your page using the Test option before switching to Live
Currency: Can be changed on this page. The list of available currencies can be changed in Admin by your Account Manager
Tax rate: Can be changed in Admin by your Account Manager
Payment Instructions: Whatever you type in will appear above the ticket costs and quantities
Setting Options Part 2
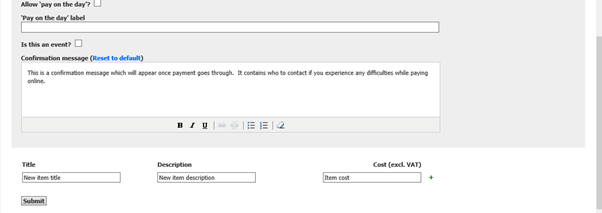
Alternative payment method: Choosing to check the Alternative payment method? box is optional. The label could be “Pay by Invoice” or “Pay on the day” or something else, depending on what you are prepared to allow your clients to do, for example, ‘Please Invoice me’
**Note on invoice handling:**
- If a user selects an alternative payment method such as “Pay by Invoice,” the system does not generate or send an actual invoice via Stripe. Instead:
- The system sends an automated email to the payer confirming that their invoice request has been received
- The request is recorded and visible in the Export Payments Report (e.g., marked as “Invoice”)
- Stripe is not used for invoice generation or delivery in this scenario
- Any follow-up actions, such as issuing and sending the actual invoice document, must be handled manually by your organisation’s finance team.
Is this an event? Check the Is this an event? box if it is an event (you could be paying for a book otherwise, for example).
If it is an event, Stripe will add an extra page to the process allowing you to name the ticket holders. This will be useful if a person is buying tickets on behalf of others. Note that the activity will write back ONLY to the person buying the tickets. This process will not create the other named individuals as attendees in the database.
Confirmation message: The Confirmation message could be: “Thanks. Your payment is confirmed. You will receive an email shortly.”
CRM instance: The instance is your CRM, and the Activity selection allows you to choose an Activity Type to be applied to everyone who pays for an event. For example Vx-Payment Received
Title: Is what your client is buying, so Event Ticket for example
Description: Could be Full Price. Enter the cost without £ or $ or other symbols
Max Qty: The maximum number of tickets any one person may buy
List and Additional Field: allow you to update IA with the payment details for each client
When finished, click Submit.
Note: You can click the URL at the top of the page to preview it.
Previewing your Event Payments Page
In preview, depending on what you have entered, your page will look something like this:
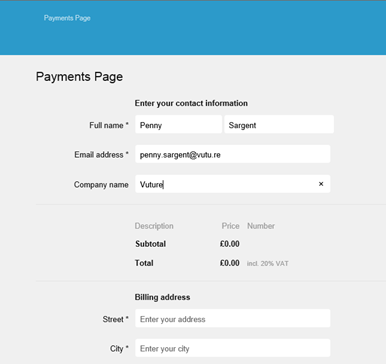
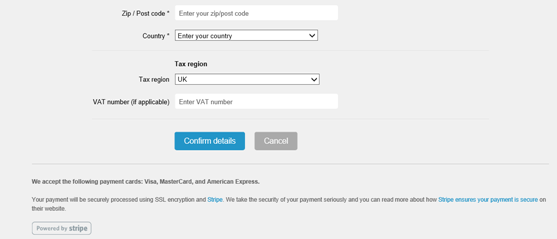
Linking to Accept option
You now need to link up your Payments Page to your RSVP form, using the Accept redirect option. The Decline redirect option can still go to the Decline thank you page.
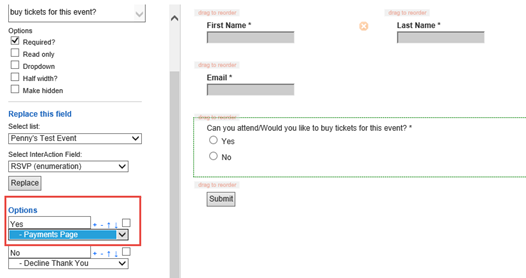
Note: when you are using a Blank Form, you need to link that to the Payments Page, in the same way.
Payment Discount Codes – Vuture actions
This is a new feature of the Payment system which allows Vuture clients the ability to create discount codes for use by their customers. How to enable/disable discount settings.
Your Account Manager will turn on the discount setting by going to “Admin.System.Payments” and enabling the discount settings.
How to add/edit discounts
To access Payment Discount Management, in your campaign Go to Options and select Payment Discounts
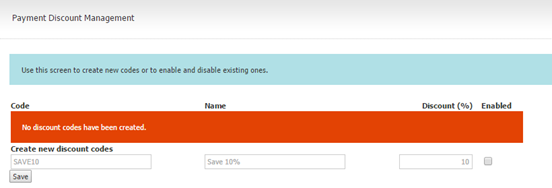
To add a new discount, input the code, the name of your promotion, the amount you want to discount and if you want it to be enabled or not, then click Save.
Note: The discount must be from 0 to 100 or the code will not be allowed.

Once you have added a discount you can edit the name or the amount and whether it is enabled.
Payment Discount Codes – Customer actions
Customers can use a discount code by first reaching the confirmation screen as shown below:
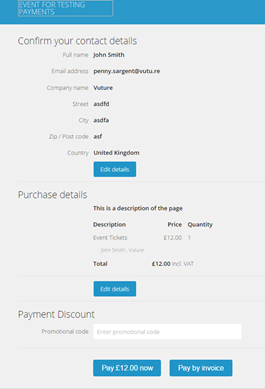
Entering the Discount code in the promotional code box and then clicking on the Pay £xxx now button will refresh the page and show the new amount to pay.
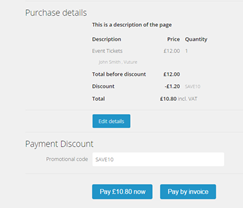
Disabled or incorrect Discount Codes
If a customer enters a code that has been disabled or doesn’t exist, then an error message appears and the customer will have to enter a new code or perhaps continue without a code.
100% discounts and payments below the minimum Stripe amount.
To make the final payment free, when creating the discount code, in the ‘Discount (%)’ field, type in ‘100’.
In the client’s confirmation screen, when that discount code is entered, the two pay buttons will be replaced with one button marked Complete.
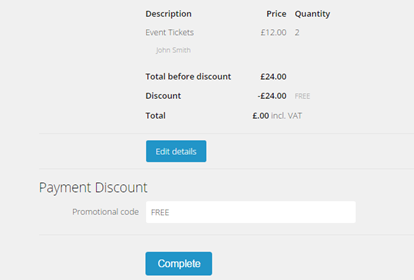
The Complete button also appears when the final total is below the minimum amount you can charge with Stripe.
To see the minimum amount you can charge with Stripe, click this link: https://support.stripe.com/questions/what-is-the-minimum-amount-i-can-charge-with-stripe
The clients’ view will be something like this:
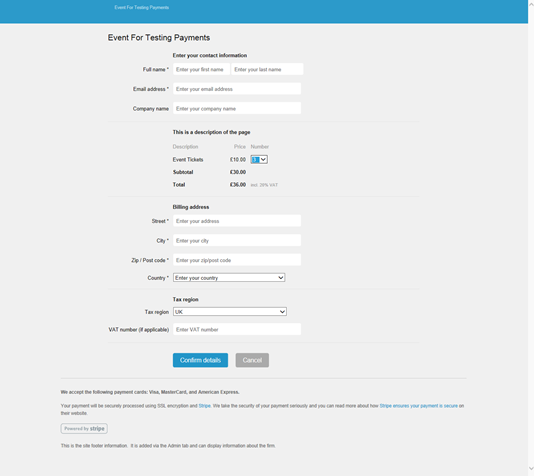
Your Clients’ View 2 – Edit names of ticket holders
Having completed the form, if you selected Is this an Event? = Yes, the firm’s client will see something like this image below. If a secretary is buying tickets “on behalf of” they can edit the Name at this point:
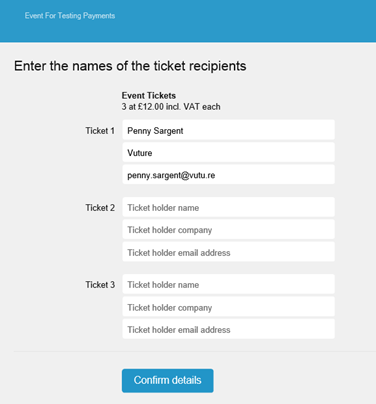
Having completed the names, your firm’s client will see something like this image below – if you have selected No Discounts.
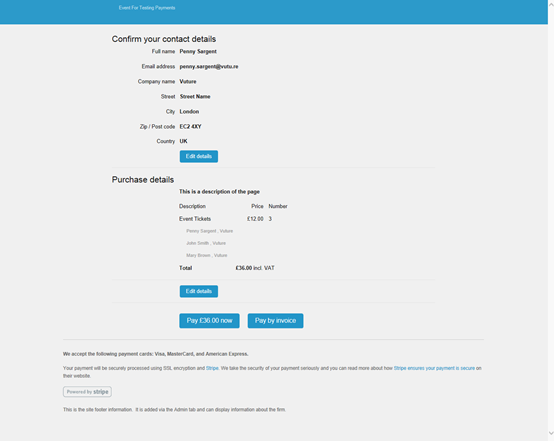
Note: In the example page above, Penny Sargent is named as the person buying the tickets, and she has named Penny Sargent, John Smith and Mary Brown as attendees. These additional names are for reference only and will not be added to the crm as contacts. The only contact who will be updated in the crm is the Penny Sargent contact, with a Paid Activity.
The Pay by invoice option will depend on whether you have checked that box to allow it. You could, alternatively, have had a Pay at the Door option instead. If the client chooses to Pay Now they will see a new screen.
Your Clients’ View 4 – The payment card page
The payment card page:
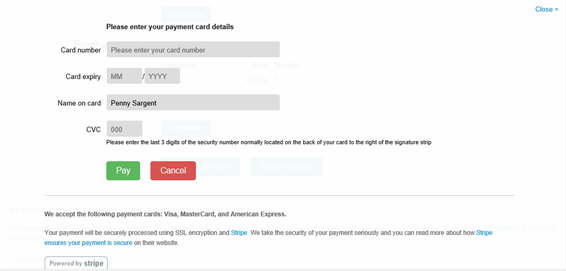
card numbers are given in the table below, and are also available from Stripe at https://stripe.com/docs/testing#how-do-i-test-sending-transfers. Once on this page, scroll down to the section headed Which card numbers should I use for testing?
For the sections marked Card expiry, Name on card and CVC, invent your own fake details, ensuring the date of expiry is in the future.
Special testing credit and debit card numbers, supplied by Stripe, for you to use when testing the Stripe functionality.
You will need to enter your own, invented, number for Expiry Date and cvc code.
For this testing process, ensure the Test option the Payment Page is checked, not Live. Change the option to Live once you are ready to publish finally and email out to clients.
|
Number
|
Type
|
|
5200828282828210
Transfer will succeed.
|
MasterCard debit.
|
|
4000056655665556
Transfer will succeed.
|
Visa debit.
|
|
4000056655665564
Transfer will fail with a could_not_process code.
|
Visa debit.
|
Your Clients’ view 5 – Successful payments page
A successful payment will result in a page like this:
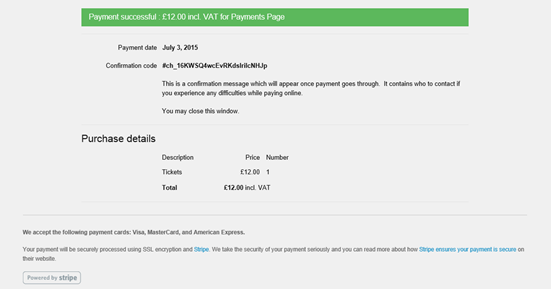
You can see now where the payment confirmation message appears. If the client had chosen the Pay by Invoice option, the following screen would have appeared:
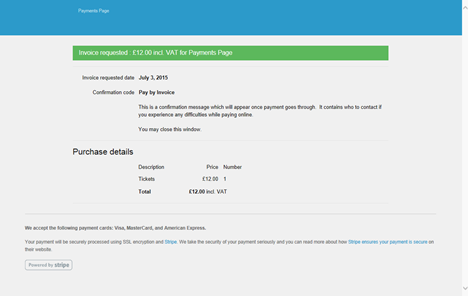
The Invoice Requested will appear in the Export Payments Report which can be shared with your Finance team for them to generate an invoice and mail out.
Refunds and cancellations
Refunds are handled through Stripe. If a person requests a refund, your firm’s Stripe Administrator should log into your Stripe account. Go to the Dashboard, find the person, find the payment they made and click the Refund button to the right of their name.
