Contents
-
ReCAPTCHA Process Updated
-
Recap - What is CAPTCHA?
-
Recap - What is ReCAPTCHA?
-
Prerequisites for users to implement the more secure ReCAPTCHA - now without Vuture team assistance and no need to access HTML
-
Process to secure a Vuture form:
-
1. Obtain Keys from your Google Admin Console
-
Why do we recommend Version 2?
-
2. Adding the CAPTCHA to your Vuture form
-
FAQs
-
3. Alternate Form Configuration for Alumni and Preference Manager sites only
-
Replacing the Site Key
-
Adding a Form Name
Overview
Following client requests, we have added a new option for completing the ReCAPTCHA set up process. This means that clients can now complete the entire process themselves, without asking for assistance from Support or their CSM. This process is described step by step below.
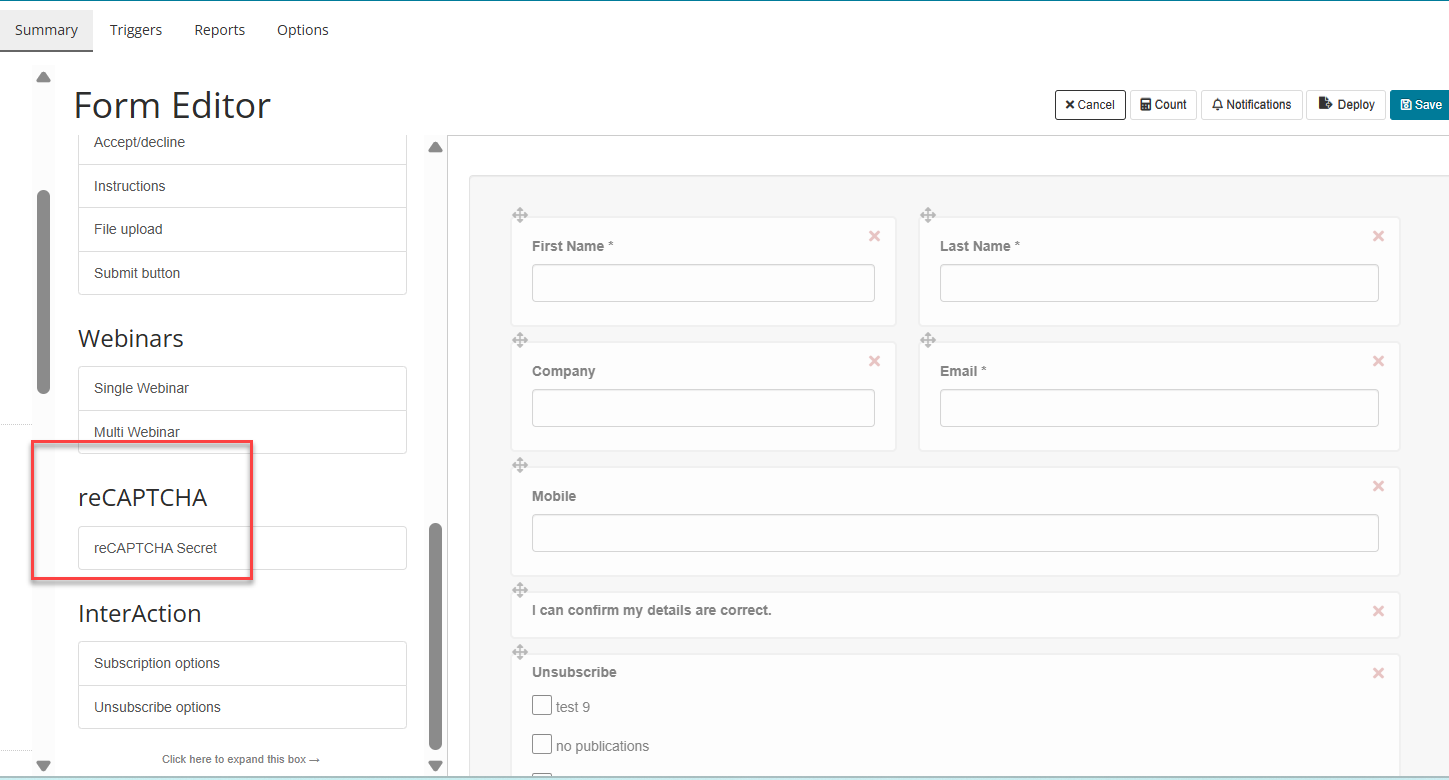
Once released and deployed to your instance, the feature adds a new section called ReCAPTCHA to your Form Editor, on the left hand side.
(If the new form section is unavailable, ask your CSM to check that it has been enabled for your Role at Admin>Roles>Forms>Allow Recaptcha secrets ).
Recap - What is CAPTCHA?
CAPTCHA stands for "Completely Automated Public Turing test to tell Computers and Humans Apart". It is a type of challenge request used to identify whether a user is a human or a computer.
Recap - What is ReCAPTCHA?
ReCAPTCHA is developed by Google. It is an easy to use CAPTCHA solution.
There are two different options for ReCAPTCHA available to protect your Vuture form submissions:
-
Basic ReCAPTCHA
There is a description of the original Option 1 implementation here: https://support.vutu.re/s/article/360020562017-Form-ReCAPTCHA
This method is suitable for any user who has access and is confident in editing the html on a form or page.
-
More secure ReCAPTCHA
This is the newer, more secure option which was previously only configurable by your Customer Success Manager but which we have now changed to make it completely available to Vuture users to implement if you wish, and with no need to access the HTML. If you wish to continue having the option only configurable by your CSM, do not enable the new Role and your users will not see the option appear on Forms.
The more secure solution is a server side implementation of Google's easy to use CAPTCHA solution called reCAPTCHA . It cannot be bypassed by sending form submissions straight to the server, a method commonly used by spam bots.
When set up, this implementation will discard any form submission not accompanied by a valid reCAPTCHA token.
Checking the legitimacy of a form response will be handled by Vuture. When a response is received by our system its reCAPTCHA token is verified by Google. Only submissions bearing a valid token are processed.
Prerequisites for users to implement the more secure ReCAPTCHA - now without Vuture team assistance and no need to access HTML
-
Ask your CSM to ensure that Spam Checking has been enabled in Admin>System>Forms>Enable Spam Checking.
-
You need any Vuture form, and a Google Account to obtain the secret key and site key
-
Ask your CSM to ensure that ReCAPTCHA on forms is enabled for your Role at Admin>Roles>Forms>Allow ReCAPTCHA secret
Process to secure a Vuture form:
1. Obtain Keys from your Google Admin Console
Head over to the page below and click on “Admin Console” in the top right:
https://www.google.com/recaptcha/intro/v3.html
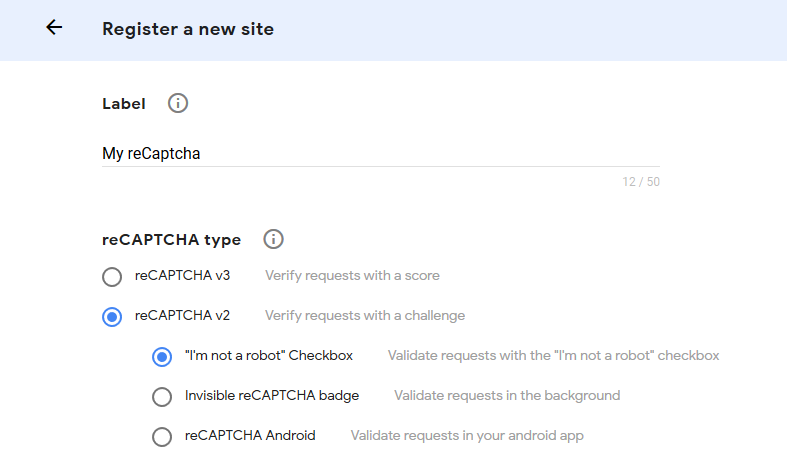
If it's your first reCAPTCHA you will see register a new site in the top left. Give the reCAPTCHA a "Label” (Label is not important but make it informative and unique if possible) and select “reCAPTCHA v2” then the “I’m not a robot” Checkbox. Example in the image below:
Note: Use v2 not v3.
Why do we recommend Version 2?
The main difference between reCAPTCHA v2 and v3 is that v2 requires users to complete a visual challenge (e.g. selecting images) to prove they’re human.
reCAPTCHA v3 operates mostly in the background, assigning a reCAPTCHA score to user interactions to determine whether they’re human or bot. In cases where the system is unsure or detects suspicious traffic, users will still have to perform manual tasks such as clicking on images. Plus, scores need to be evaluated by a human.
Vuture continues to monitor the security landscape and will provide updates on any changes to reCAPTCHA processes if and when they happen, including changing our recommendation of v2 to v3 or other.
Enter the form domains for the CAPTCHA to protect.
Note: The form domain is not the same as the site domain. It is important that you protect the form domain. You can find this form domain by clicking "view page" on your Vuture form and copying the first part of the URL, up to and including the .com or .net part. You can add the platform domain alongside the vanity URL which will avoid any error message
Example form domains:
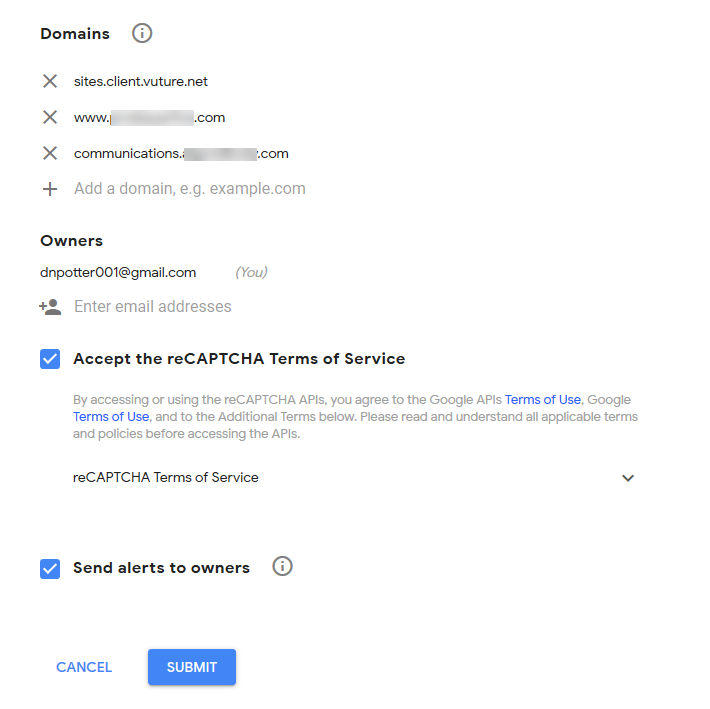
Then accept the terms of service and click Submit.
Obtaining the Site Key and Secret Key
Copy your site key and secret key into a text document or Notepad. You'll need them later. If you lose them, you can find them in the Admin Console settings in the Google Admin Console.
2. Adding the CAPTCHA to your Vuture form
In your Form Editor on the left there will be a new section called reCAPTCHA.
(If unavailable, ask your CSM to check that it has been enabled for your Role at Admin>Roles>Forms>Allow Recaptcha secrets ).
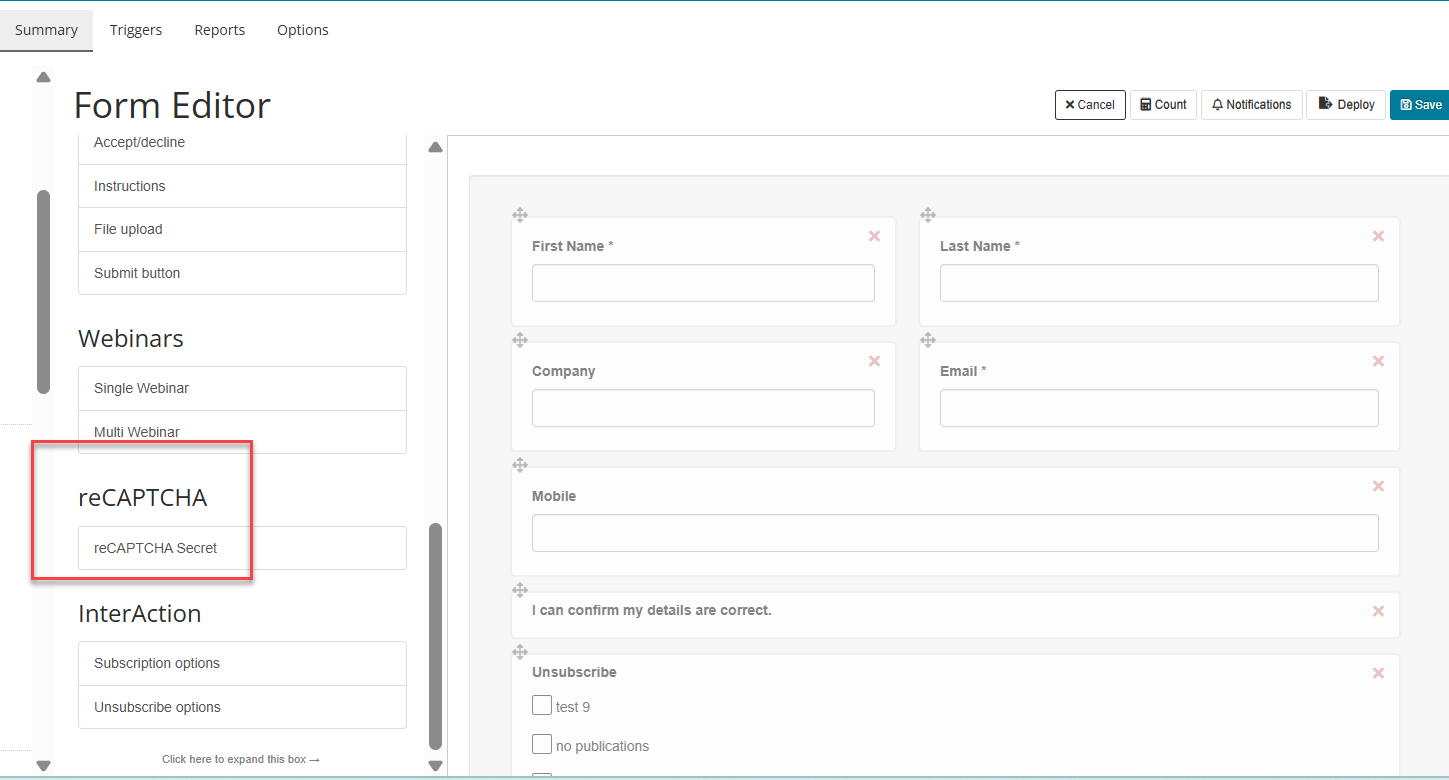
Click on the ReCAPTCHA Secret field and a new modal (dialogue box) will appear:
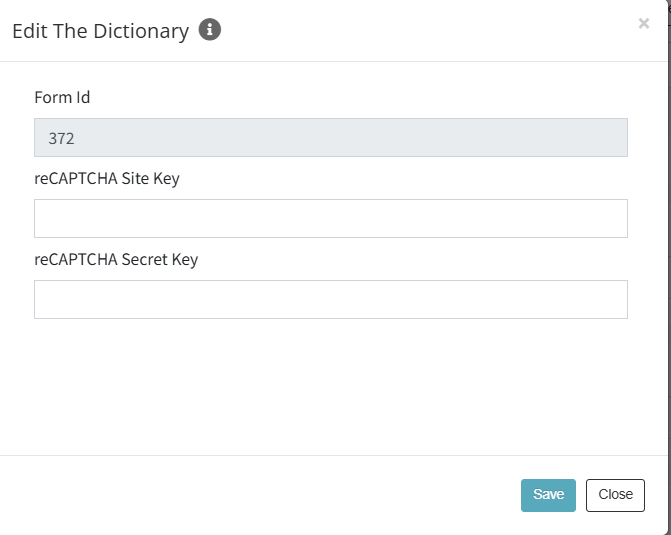
Enter the Site Key and Secret Key values and click on Save to Save the pop up.
Note: The Form ID will be pre-populated on the modal and the field will be greyed out to prevent users from saving an empty form id into the database.
Publish the form and then View the form. The reCAPTCHA will be visible on the form.
NOTE: It may have an apparent “error” on the page like this:
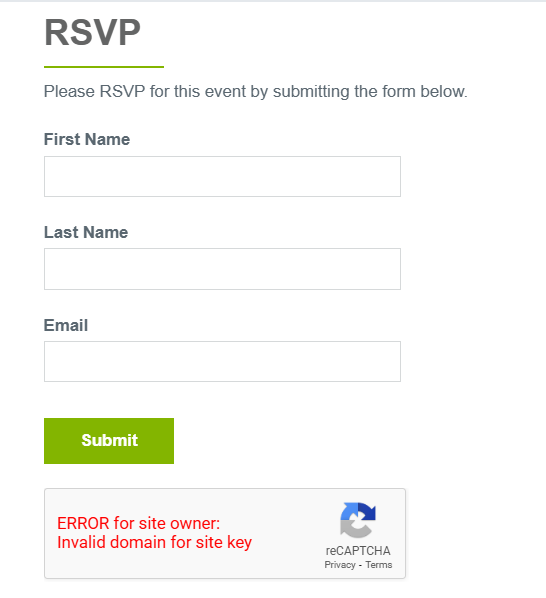
You can safely ignore this; do a View Page. You will see the error message has gone and the checkbox is displayed.
When a contact attempts to complete the form they will be challenged to complete the puzzle and click Verify. Once successfully completed they can click Submit to submit the form.
FAQs
Q. Do I need to complete this process each time I create a new form?
A. Not every form will need a challenge if you don’t want to include one. If you do want to place a challenge on a new form, you will need to click on ReCAPTCHA in the form edit screen and add the stored keys to the modal.
Q. Do I need to create a new Secret key for every separate campaign or form?
A. No. You can use the same keys each time for every form on your instance. You will not need to go back to the Google screen and create new keys. If you have lost the notepad page where you stored the keys you can copy them from the modal from a previous form or go back to your Google screen and find them in the Google Admin console.
Q. I have lost my notepad where I stored my keys. What should I do?
A. You can go back to Google admin and generate new keys following the same process. Previously-created forms with earlier keys will still continue to work.
Q. Will this revised process affect any forms where I already have a ReCAPTCHA challenge? For example, my firm’s Preference Manager form?
A. No it will not. You can add new Secret Keys to any form yourself. This will not affect previously-stored Keys.
Q. Why am I not seeing the 9 boxes with pictures challenge?
A This is a decision coming from Google, not Vuture. It is not possible to preview. If the system is reasonably confident that the user is a human, the checkbox displayed will look like this:
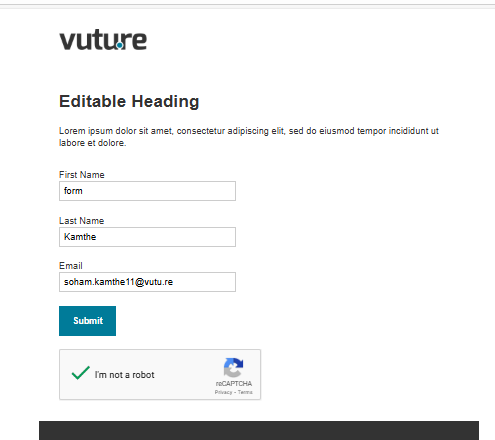
If there is any doubt about whether the user may be a bot (multiple very rapid clicks for example), then the full photo challenge will be displayed like this:
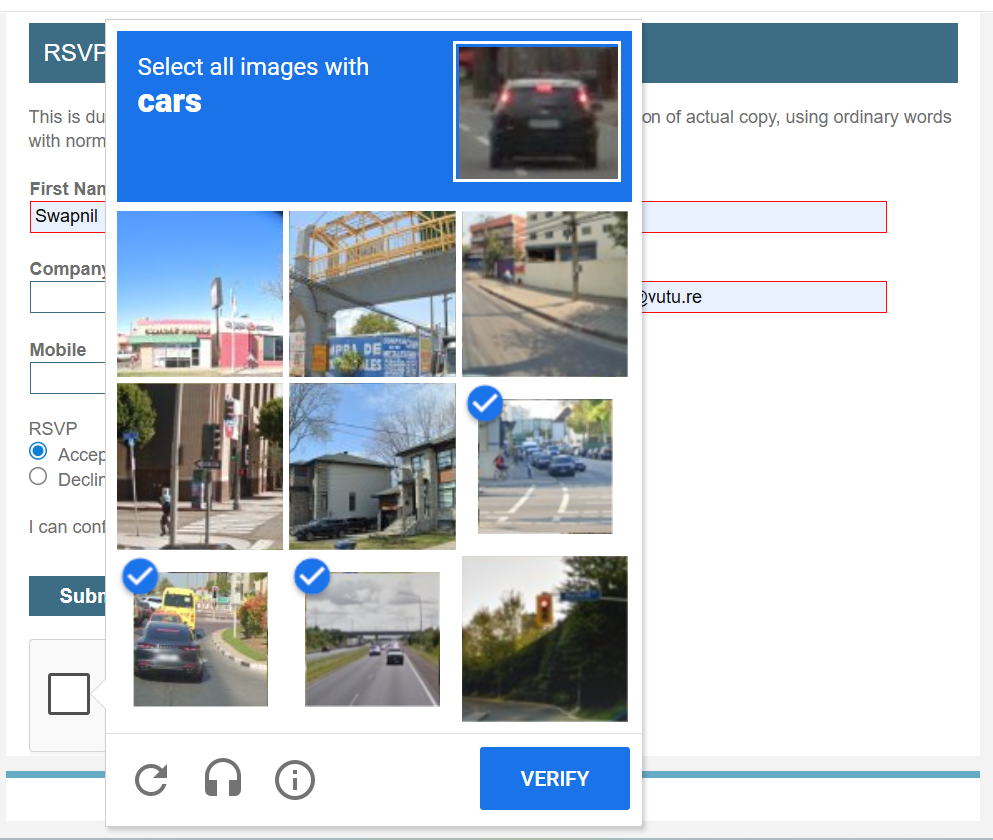
This choice is not something that Vuture can affect.
-
Alternate Form Configuration for Alumni and Preference Manager sites only
Currently CAPTCHA works for Register and Update Profile forms for both Preference Manager and Alumni forms. Setting it up for these forms is slightly different because you will have to create your own form ID.
Go to the page which contains the form you want to protect. Click on Page Options > Edit HTML and copy the following line of HTML into the head of your html document.
<script src="https://www.google.com/recaptcha/api.js"" async defer></script>
Press Ctrl + F and search the page for "#include". There will be multiple occurrences of this on the page. Search for the one associated with the form on which you wish to implement reCAPTCHA.
For an alumni registration form the line looks like this:
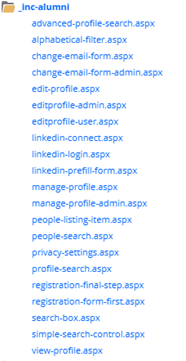
<!--#include file="../_inc-alumni/registration-form-first.aspx"-->
Open the file from the left-hand side folder list. For this example, the file “registration-form-first.aspx” is in the “_inc-alumni” folder. This can be seen below:
Replacing the Site Key
Search the page using Ctrl + F for “</form>”. Before this HTML tag, paste the following two lines, replacing the site key with your key from earlier.
<div class="g-recaptcha" data-sitekey="your_site_key"></div>
Adding a Form Name
Add a value to the input tag, making a note of it. This value is your name for the form. In this case it cannot be a number because it could conflict with pre-existing forms already using this number. In the example below we have used Alumni-example as the value.
<input value="alumni-example" type="hidden" name="_formId" id="_formId" class="form-control">
