Please note that the process of adding the reCAPTCHA has been simplified and can be found in the link here.
--
About
Server side reCAPTCHA works with Vuture’s other methods of spam prevention which are form rules and allowed referrer, for example. It needs to be configured, using a Google Account, on any form of your choice.
Prerequisites for Vuture Admin to set this up
- Access to Admin.System
- Access to Edit HTML on Vuture forms
- Enable Spam Checking in Admin > System > Forms > Enable Spam Checking.
- You need any Vuture form and a Google Account. The Google Account is obtained by the client. They will provide the secret and site keys.
How to Set up ReCAPTCHA
1. Obtain Keys
Instruct the client to go to their Google Admin Console
Head over to the page below and click on “Admin Console” in the top right:
https://www.google.com/recaptcha/intro/v3.html
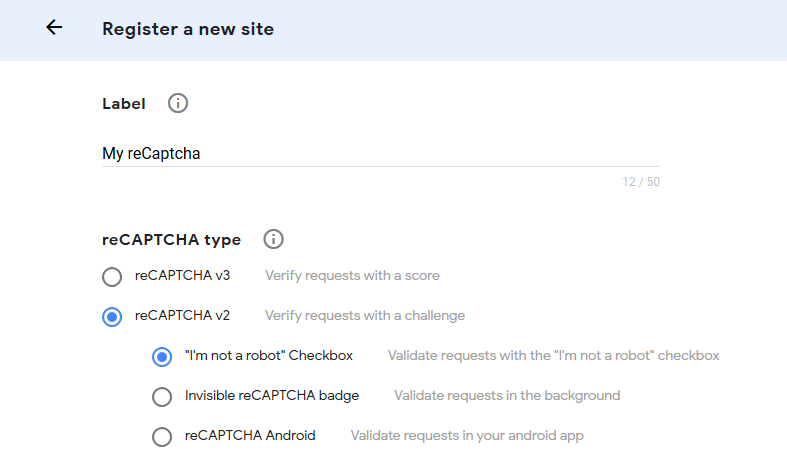
If it's their first reCaptcha they will see register a new site in the top left. Give the reCaptcha a "Label” and select “reCaptcha v2” then the “I’m not a robot” Checkbox. Example image below:
Note: Use v2 not v3. Version 2 is more secure.
Enter the form domains for the captcha to protect.
Note: The form domain is the not the same as the site domain. It is important that you protect the form domain. You can find this form domain by clicking "view page" on your Vuture form and copying the first part of the URL, up to and including the .com or .net part. You can add the platform domain alongside the vanity URLwhich will avoid any error message
Example form domains:
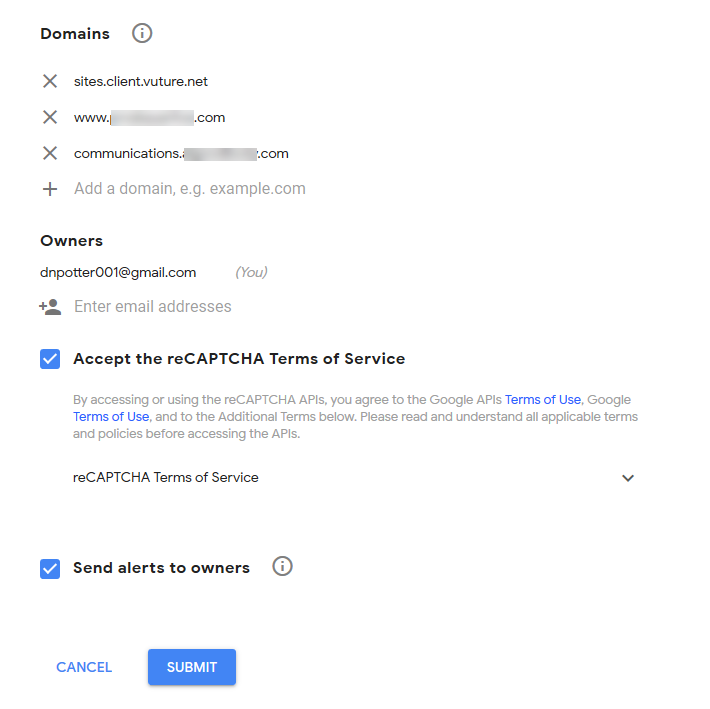
Then accept the terms of service and click Submit.
Copy your site key and secret key into a text document or Notepad. You'll need them later. If you lose them, you can find them in the Admin Console settings in the Google Admin Console.
2a. Form Configuration in Vuture
The steps below mimic those found in this example: https://developers.google.com/recaptcha/docs/display#auto_render
Go to your Vuture form > Page Options > Edit HTML and copy the following line of HTML into the head of your html document.
Search the page using Ctrl + F for “</form>”. Before this HTML tag, paste the following line, replacing the site key with your key from earlier.
<div class="g-recaptcha" data-sitekey="your_site_key"></div>
Press Ctrl + F and search the page for "_formID". Make note of the value - typically any integer. An example of this would be:
<input type="hidden" name="_formId" id="_formId" value="4" class="form-control" />
Important: Please make doubly sure that there are no duplicate _formId fields on the form.
2b. Alternate Form Configuration for Alumni and Preference Manager
Currently reCaptcha works for register and update profile forms for both Preference Manager and Alumni forms. Setting it up for these forms is slightly different to the method described in 2a above because you will have to create your own form ID.
Go to your page which contains the form you want to protect. Click on > Page Options > Edit HTML and copy the following line of HTML into the head of your html document.
Press Ctrl + F and search the page for "#include". There will be multiple occurrences of this on the page. Search for the one associated with the form on which you wish to implement reCaptcha.
For an alumni registration form the line looks like this:
<!--#include file="../_inc-alumni/registration-form-first.aspx"-->
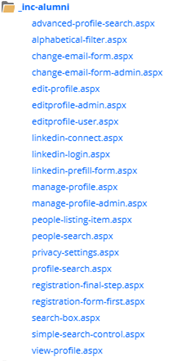
Open the file from the left-hand side folder list. For this example, the file “registration-form-first.aspx” is in the “_inc-alumni” folder. This can be seen below:
Search the page using Ctrl + F for “</form>”. Before this HTML tag, paste the following two lines, replacing the site key with your key from earlier.
<div class="g-recaptcha" data-sitekey="your_site_key"></div>
Add a value to the input tag, making a note of it. This value is your name for the form. In this case it cannot be a number because it could conflict with pre-existing forms already using this number. In the example below we have used Alumni-example as the value.
<input value="alumni-example" type="hidden" name="_formId" id="_formId" class="form-control">
3. System Configuration - for Vuture Forms and for Alumni / Preference Manager
Head over to Admin > System > Forms. Scroll to the bottom to find reCaptcha Secrets.
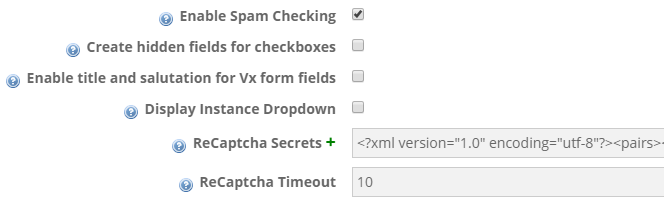
If you haven’t already, check on Enable Spam Checking.
You can also set a timeout for Google API reCaptcha requests. This time is given in seconds. If the ReCAPTCHA takes longer than 10 seconds to reply, it will fail. This is extremely rare.
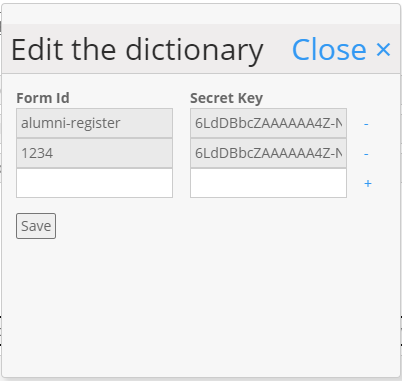
Click on the text field next to “ReCaptcha Secrets” to open the dictionary (example image below).
Input your form ID value (either the integer for Vuture forms, or the value chosen by you if you are working with Alumni forms.) Enter the reCaptcha secret key from earlier. In the example below, two different forms have been protected - one with a form ID value of an integer and one from Alumni with a name.
Additional Security for Websites Only
In addition to setting up reCaptcha, we have added a form field. This form field will invalidate the submissions coming from spammers who might have a copy of the form. Going forward we will be using this as an additional spam protection as it is effective and has shown to stop the spammers.
This applies only for websites and not for email forms.
The following field needs to be added to all the forms in websites that is making a call to /API/AlumniRegisterProfile.
<textarea name="VxForm_FirstSecondName" class="hidden"></textarea>
The following files need to be modified to have the <textarea> field.
\_inc-alumni\edit-profile-image.aspx
\_inc-alumni\edit-subscriptions-services.aspx
\_inc-alumni\edit-subscriptions-types.aspx
\_inc-alumni\edit-subscriptions.aspx
\_inc-alumni\editprofile-user.aspx
\_inc-alumni\privacy-settings.aspx
\_inc-alumni\registration-final-step.aspx
\_inc-alumni\registration-form-first-v2.aspx
\_inc-alumni\registration-form-first.aspx
We can do a search in notepad++ for API/AlumniRegisterProfile in the website folders and the field can be added if required.
Click save on the pop-up window and then save on the form setting. ReCaptcha is now set up on your form or forms.
Note: For Alumni site reCaptcha to work you will need to re-deploy your Alumni site. This is currently a manual process completed by the DevOps team.
Note: If configuration changes are made after deployment then the site's App Pool must be restarted. You can do this simply by changing anything in the web.config file found at the top of the left panel. Just add some spaces or a return character and click save.
