Overview
The ability to filter your email lists using additional fields is a useful feature that allows you to target contacts that meet specific criteria in your list. An example of this would be sending event reminder emails to everyone who has RSVP'd Yes for a particular event.
Contents
Prerequisites
Vuture will filter your lists on any field which you have included on the RSVP form such as Accept/Decline, or the Contact fields such as City.
Note: To create a filter, you need to first create the form, add the fields such as Accept/Decline and Save the form. Then open it in View Page. Complete the form yourself and Submit. This will write a value to the View Stats page for this form. The fields you will require for filtering are dynamically generated by this process.
Creating Filters
To create a filter for your mailing list you need to be in the email campaign in Vuture.
- Click on the email you wish to send and click on the "send email" icon. (Note the email must be published for this icon to be visible). The Send Email screen will open, as shown below:
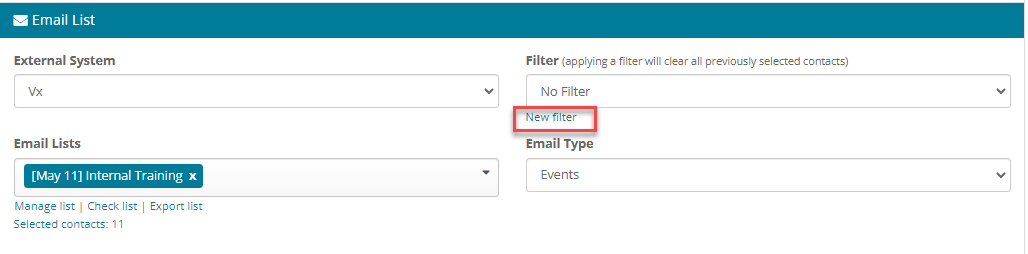
- Choose your list first.
- To create a new filter, click on "new filter" underneath the filter list drop-down.
The Add Email filter page will open.
- The first step is to give your filter a title.
Best Practice: Give your filter a name which includes the name of the event and what it is filtering for. Example: Event Campaign August 2024 RSVP is EMPTY. This will make it easier to identify the filter when you come to use and re-use it. Filters can be visible across the container and this means a brief title such as “RSVP is Yes” could be confusing.
Use Cases:
Container or Campaign Filters?
Choose whether you are creating a filter which should be visible in just this campaign or across the entire container. There is a Filter Type drop down option (ringed in red below) which defaults to Campaign Filter, meaning the filter you are about to build will only apply to this campaign. If you wish, you can switch this to Container Filter. Container Filter will pick up options from other campaigns in the container and allow you to filter on fields in other Campaigns in the same container.

For Vx Standalone or using the Contacts Module, the filter is created in the Form Submissions section.
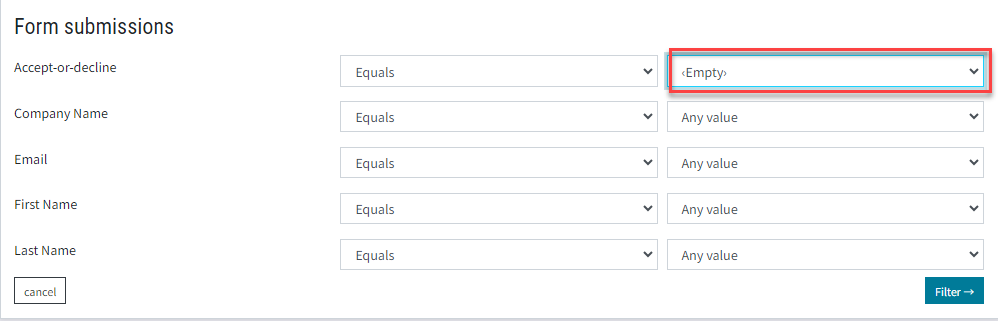
In the image above, the Accept-or-Decline field has been selected to be Equals <Empty> (used to send a reminder to register email). Alternative comparison operators are Equals, Not, More than or Less Than as well a value and the Values may be Any Value, Accept – for people who have responded positively, <Empty> .or <Not Empty>.
- To finish, and filter the list, click on "Filter>" at the bottom right of the screen.
The send email page will now open, with your new filter selected.
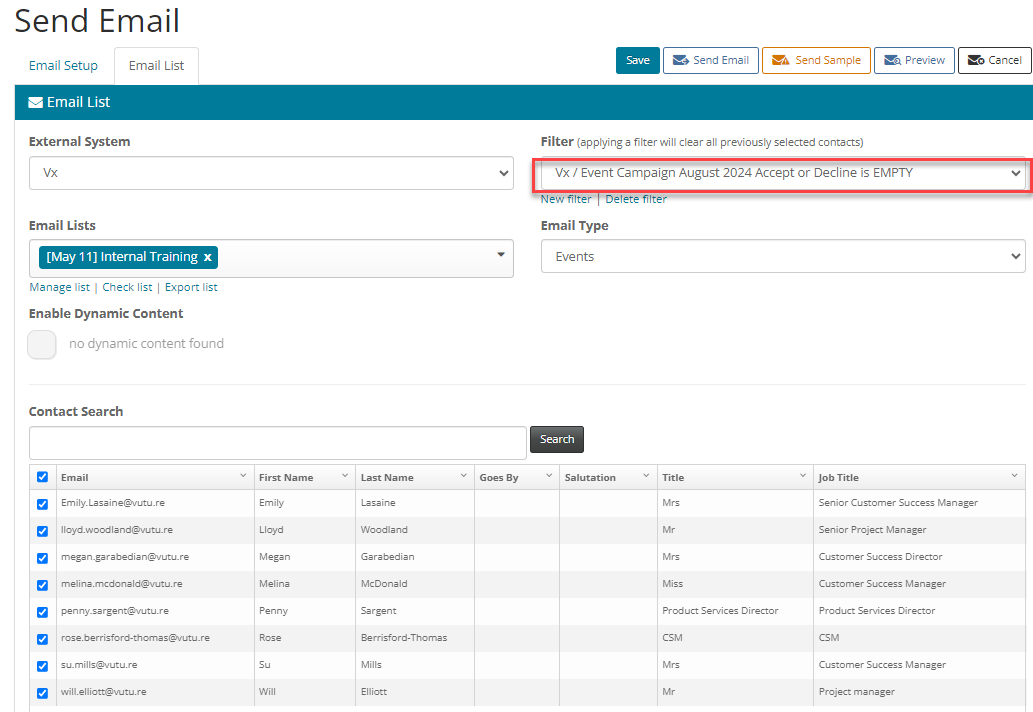
Note: It is not currently possible to edit existing filters. If you are unsure whether an existing filter is the right one for your purposes, it will be safest to create a new one. This is another good reason for giving new filters a full title.
To Delete a filter
In the send screen when you select a List to send to, the filters will be visible in the Filter lists drop down. Click to select the desired filter to be removed and click the delete filter blue link.
Limitations on additional field filters
Note: Filtering on different values for the same additional field works by using "OR" logic but filtering on different additional fields only works by using "AND" logic.
Send Later and Filters
Send later does all the processing of the list, personalisation, de-dupe, suppression etc. when you click send. It then puts it in a queue to actually be delivered at the scheduled send time. This means that any filter you may be using will be applied at the time of setting up the Send Later, not at the time of actual send.
If you want everything to run at a specific time in the future, then using a Trigger will let you do that. Create a triggered send for a specified time in the future and all the processing will happen at that time.
Please click here to view more information on Triggers.
