This article focuses on the new Wizard we have developed to make adding Form Logic to your forms much quicker and easier than previously. The contents of this article are as follows:
Recap on Requirements to Enable Form Logic on your Forms
Introduction to the Form Logic Wizard
How to Use the Form Logic Wizard
Top Tip for Testing - Counting
New for May 2023 - Autogenerate the Count Variable
Manually Generating the Count Variable using the Form Logic Wizard
FAQs
Recap on requirements to enable Form Logic on your forms
You will need to ask your Customer Success Manager to enable the following on your system:
- Have Forms v2 enabled in your system via "Admin.System.Versions.FormEditorVersion2"
- Have Forms v2 enabled for your Role in "Admin.Roles.Forms.Form Editor Version 2"
- Have "Admin.Roles.Forms.Show generate form logic button" enabled for your Role.
- Have "Admin.System.Forms.Force validation script" enabled to see the Conditional Rule boxes in the Form Editor.
- Have "Admin.System.Forms.Form Logic Wizard Enabled" in your instance.
Your browser can be Chrome, Firefox or IE. If you use Internet Explorer, ensure that it is version 9.0 or higher.
There are 4 "How To" videos, linked to the foot of this page. Watch them in order to see the way Form Logic Wizard works.
Introduction to the Wizard
The Form Logic Wizard has been designed to help users write conditional logic instructions on forms. It removes the need for users to check for extra spaces, put brackets in the correct place or concern themselves with formatting the instructions. It does this by creating the logic for you, based on your choices of mailing list and form field, and then inserting the logic into the chosen field on the form.
Note: We have not changed Form Logic or the way in which logic conditions work. We have only added a wizard to write the logic conditions for you.
In the initial release of this feature there are two options:
1. Show a second field based on the response to the first field; this will cover scenarios such as RSVPs, food choices, and location or event choices; and
2. Show a second field based on the count of responses to the first field. This will cover limiting form submissions.
Note: Remember, when testing this feature, you need to work with RSVPs that have been submitted via a Vuture form. It is not possible for Vuture to count RSVPs that have been entered directly into the CRM.
-----------------------------------------------------------------------------------------------------------------
How to Use the Form Logic Wizard
Example scenario: Show a second field only if the first field has a certain value.
For example, if the response to the question; “Have you any dietary restrictions?” is Yes, then show the second field; “Please give further details”.
You want the first field to always be visible, but the visibility of the second field should depend on the first field’s response. There is a video showing you how to do this, linked to the foot of this page. It is video 1.
Watch all the videos, in numerical order, to see the full range of Form Logic Wizard at the moment.
Step by Step
- Add both fields to your CRM and then to your form and Save the form.

- You want the first field (the dietary restrictions question in this example) to always show, so no Form Logic is required.
For the second field, which is the conditional field, you will need the wizard to create some conditional Form Logic.
Select the second field by clicking into it, and then scroll down to the Add Conditional Rule area.
Below the Conditional Rule box is a new Generate Form Logic button:

- Click on Generate Form Logic.
The resulting screen asks you to choose one of two options:

For this first scenario (Show a second field only if the first field has a certain value) you need to choose Form Field.
Then select the correct first field from the drop down list (the dietary restrictions question in this example), plus the Operator (for example “is”), and the value, which is Yes; like this:

(Note: if the field does not exist on the form, you will get an error message. Return to your form and ensure that the field has been added, and the form saved.)
Click Save, and you will be returned to your form, with the Conditional Logic completed for you, in the box.

Save the form again.
You should now Publish the form, and Publish Now, before using View Page to test the form.
Here is a .gif of a test form, working:

Edit the condition: Once the Wizard has written the code for you, you can go into the resulting line of code and edit if you wish.
Second Example Scenario: Event with Limited Spaces
You have an event with 10 spaces. You would like the RSVP field to appear until the Yes responses reach 10. After that you would like a Sorry message to appear. (Note: This does not have to be a Sorry message. It could be an alternative date offering, a Wait List, or any other field you like.)
In your campaign, navigate to the RSVP form. Add both the RSVP field to the form and the Sorry message field. Save the form.
For this example you will need the Wizard to write some Conditional Form Logic for you and place it on both fields:
1. To show the RSVP field up to and including the maximum capacity of your event, and then
2. To hide the RSVP field and show the Sorry message instead, once the event capacity is reached.
- Click on the RSVP field and scroll down to Generate Form Logic

- Click on Generate Form Logic.
- Select the Count of responses in your form option:
- Use the drop down list selectors to choose your CRM or list source, the list name, the RSVP field and the value you are counting (Yes). In the example below it is specified that the Count should be “Less than 10” because there are 9 spaces available.

Save your work on this page and then Save the form again.
You now need the Wizard to add some conditional Form Logic to the Sorry message.
- In the form, click on the Sorry field
- Scroll down to the Add Conditional Rule box
- Click on Generate Form Logic
- Choose “Count of responses in your form”
- This time, you want the Sorry message to appear if the count of RSVP=Yes is more than 10. Like this:
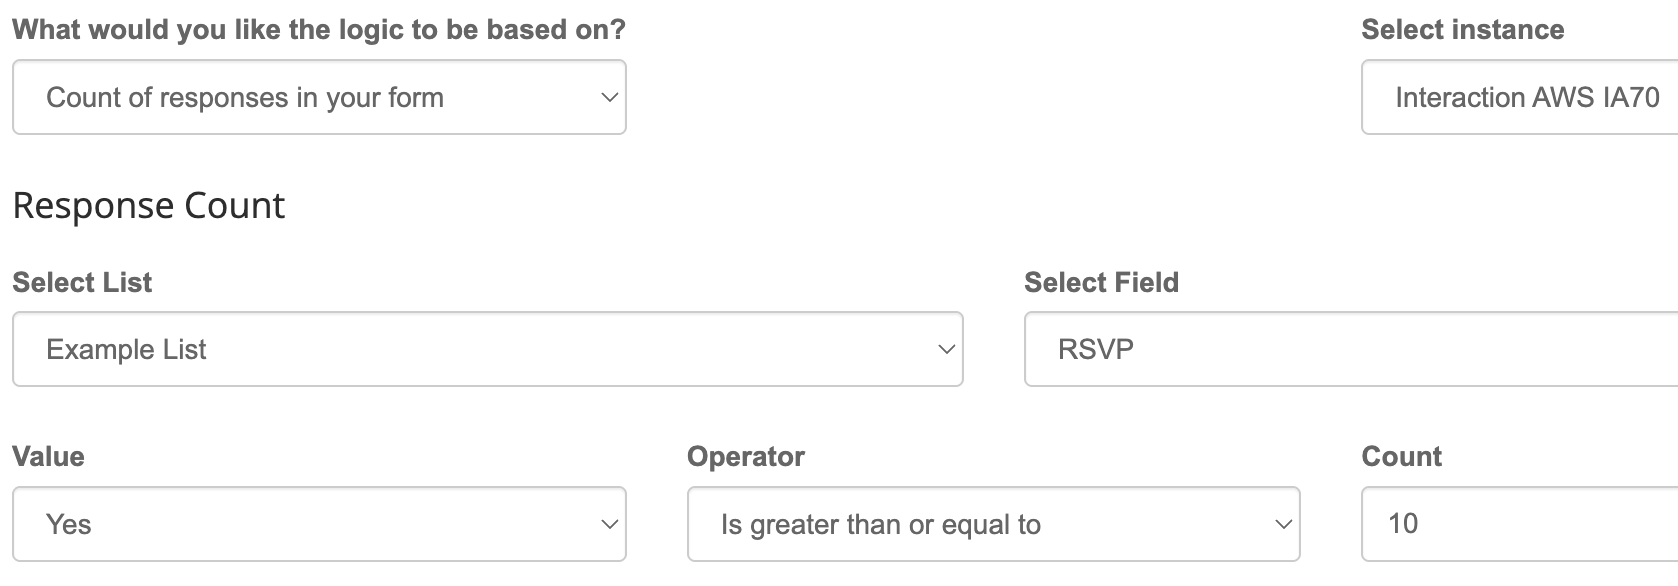
- Save your work and Save the form.
Here is a view of the form in the campaign, with both fields showing.

If I Publish and Publish Now, and then View Page, the form displays only the RSVP field:

I know that 8 people have actually signed up to this event on my test list, so if I change the capacity to 8 in both places in the Form Logic (RSVP should be visible if the Yes number is less than or equal to 8 and the Sorry message should be visible if the Yes number is greater than 8) I will see the Sorry message instead:

Top Tip for Testing - Counting
When testing your form logic, it is useful to know how many RSVPs have been received already (perhaps during the testing process, RSVPs made by your internal team).
To keep an eye on this number, it is recommended that you add a simple Count of the RSVPs received as Yes to the first page of your form. This could be a temporary measure and you could delete the line once you are ready to send out the form, or you could add the Count to any page of the campaign and add a sentence for clients to see. For example: "We have capacity for X attendees at this event. We have received X responses so far".
In our example form, we have added a count of RSVPs to the text box at the top of the page like this:

When saved and Viewed, the form looks like this:

That number will change dynamically if you submit another RSVP yes via the Vuture form and then View this form again. In this way, you can keep an eye on the test RSVPs and understand the real totals, for testing.
New for May 2023 - Autogenerate the Count Variable
We are releasing a Count Variable Generator which will make it quick and easy to generate the Count variable. There is an article describing this here.
Manually Generating the Count Variable using the Form Logic Wizard
To manually generate the Count logic for yourself and place it anywhere on the form you like:
On the form, select the RSVP field.
Click on the Generate Form Logic button.
Select Count of responses in your form
Enter the data source, the event list name, the RSVP field, the value Yes and the operator Equals and then any number you like (you will delete that number in a moment)

Save and return to your form.
The line of code in your Add conditional rule box will now look something like this:

Copy the line of code up until the second curly bracket; that is, NOT the ===0 (or whichever number you chose).

Save your form.
Paste the copied code line onto the top of the first page of your form. (Your Field ID and Value ID will be different).

You can now return to the form and build and test your Form Logic as you wish. This simple Count formula will allow you to monitor as the RSVP Yes numbers increase.
FAQs
Q. I have used the Generate Form Logic button and I can now see a line of code in the Conditional Form Logic box. Can I edit that code or add to it?
A. Yes. Once you have used the Form Logic wizard to generate the Conditional Form Logic for you, you can then go into that field and add to the Form Logic if you wish, or edit it. If you change your mind it is easy to generate new Form Logic again. Remember to Save the form.
Q. I have the wizard enabled on my instance. Can I still write the conditional form logic myself instead of using the wizard?
A. Yes you can. Simply write the logic into the box as before instead of using the Generate button. Or, if you use the wizard to write the logic for you, you can then go into that box and edit, or add to, the logic if you wish.
Q. If a capacity is set and a contact accepts the invite, it will add to the count. What happens if that same contact then returns to the form later and cancels/declines the invite? It will update their status in CRM, but does the logic know to delete the original "accept" response from the count?
A. Yes it will.
Q. With the new Form Logic Wizard, if a contact submits an RSVP form multiple times, reflected in the 'view stats', will this be recorded as a duplicate form submission count via Form Logic or is the count based on a single form submission?
A. Nothing has changed with the Wizard. It uses the count field which will only count a particular contact once (no matter how many times they submit) looking at the most recent submission to see if they accepted or declined.
Q. When using Form Logic with Upper Sigma (or any CRM) does the form need a list associated with it?
A. Yes, the form would need to be associated with a list. Because the form logic counts each response against a certain list, if the form isn't associated with a list, the count would always be '0'.
