Overview
You may wish to divide your ContactEase marketing list into subcategories, for example, to track RSVPs. By doing so you are enabling an additional list to be available in Vuture when sending an email.
Contents
How to use categories to filter in ContactEase
When creating an event campaign in Vuture, you'll want to create a subcategory for "RSVP" with the options of "Yes" (or "Accept") and "No" (or "Decline"). Please see example of this below in ContactEase:
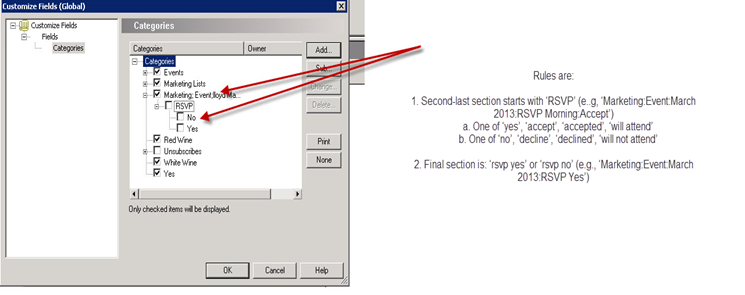
Once your contacts have submitted their RSVPs through the RSVP Form (i.e. Prefilled or Blank), they will be added to either the "Yes" or the "No" subcategory of RSVP respectively.
When sending an email in Vuture you will then find two separate email lists for each of the categories (yes/accept and no/decline). For example, in the screenshot below, you'll see for the "Vuture Test List 1" category, there is a subcategory of RSVP, and "RSVP: Yes" and "RSVP: No".
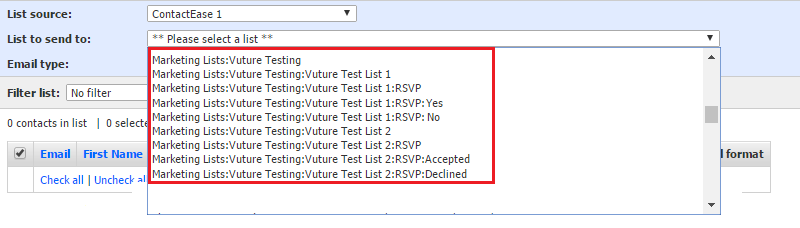
Selecting the "Vuture Test List 1:RSVP: Yes" category, will allow you to send a day before the event reminder email to only those who RSVP'd "Yes".
On the other hand, if you wanted to send an email to those who declined your RSVP, you could select the "Vuture Test List 1:RSVP: No" category for your send. This would send an email only to those who RSVP'd No to your event.
