This article will walk you through how to use the Form Logic "Count" formula to count registrations and then limit registrations for an event. It is for users of InterAction. Form logic will allow you to
Count the registrations as they come in,
Show the RSVP field until you reach Capacity, and then
Display the alternative, which can be a Sorry message or a Wait List message.
Important - If you have not already done so, please review this Help Desk Article first, An Explanation of how the Form logic Count formula is used to limit registrations. This will help to better understand the step by step process in this article.
Contents
Step by Step Setup Guide
Step 1 - Create a new InterAction Marketing List for your event with the following InterAction additional fields as a bare minimum:
- RSVP field, as either an enumeration field type or a Boolean field type:
- Enumeration - In InterAction the RSVP field should have values of "Yes" or "Accept" and "No" or "Decline". This is not necessarily what the clients will see on the form. You can change the form to read "Yes I will be delighted to attend" and "No sorry I can't make it this time" or any other wording you wish to use; as long as the IA values are Yes/No etc.
- Boolean - The RSVP field should have values of "Yes" and "No". The note about the wording on the form applies here too.
- optional - A Wait List Boolean* field, with values of "Yes" and "No"
*Note on Field types in InterAction: A Boolean field is one with either/or values, so Yes/No for example. An Enumeration field is one which has a list of possible values, so Monday/Tuesday/Wednesday/Thursday for example.
Step 2 - Create your RSVP Prefilled and RSVP Blank forms as you normally would, following all best practice recommendations. Include your RSVP additional field and any other additional fields on these forms.
You may wish to only show the RSVP additional field and keep any other additional fields hidden until someone responds to the RSVP field as Yes or Accept. You can find out more on how to do this with form logic here.
Complete your RSVP form setup before continuing on to Step 3.
Step 3 - Add either a "wait list" additional field to your RSVP forms (Prefilled and Blank) or text that reads something like "This event is now full and we are no longer accepting registrations."
This is entirely up to you on which option you'd like to display once the capacity for your event has been reached. Please follow the instructions below for whichever option you decide.
Option 1. Wait List Additional Field
- Make sure that this additional field has been created for your marketing list and is a Boolean field type in InterAction.
- Add it to your RSVP form(s) as for any other additional field and make it Required on the form.
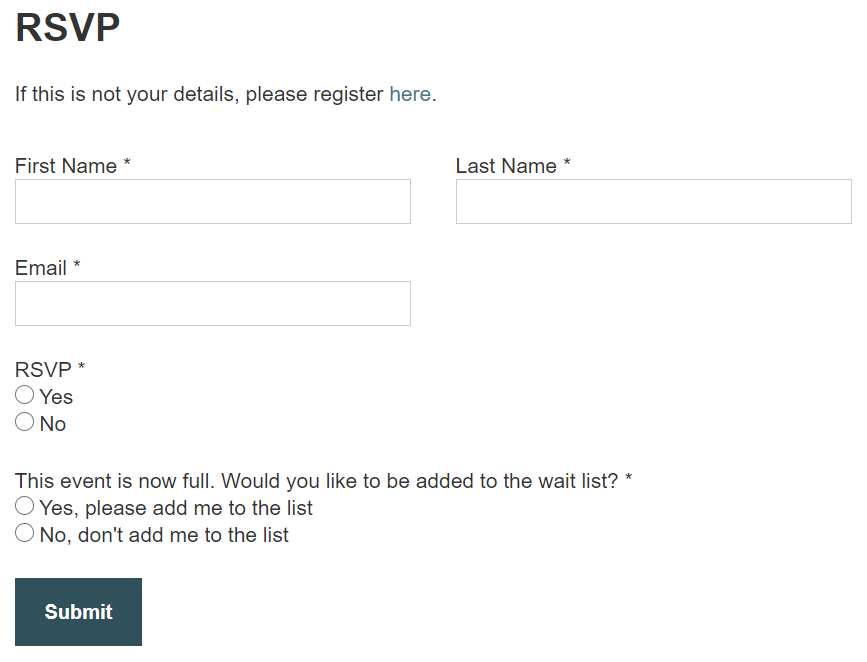
- You could use language like, "This event is now full. Would you like to be added to the wait list?".
Below is an example of a RSVP Form with the 'Wait List' additional field option.
Option 2 - No Wait List - "This Event is Full" Text
- Add the "Instructions" field, under Vx Fields to your form.
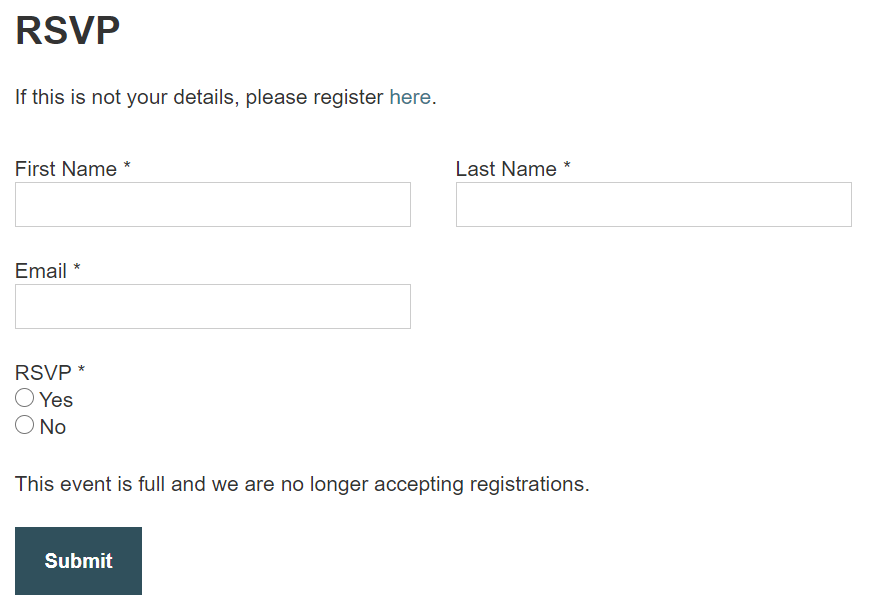
- You could use language like, "This event is full and we are no longer accepting registrations.".
Below is an example of a RSVP Form with the 'Event is Full' text.
Step 4 - Copy and paste the following Count Formula into a Plain Text document on your computer (e.g. Notepad).
Important - Please do not use Microsoft Word as unintended code from Word may be copied into the backend when pasting your code into Vuture. This could then cause the Form Logic to not render correctly on your form.
Example of a Basic Count Formula: (your Field ID and Value ID will be different)
{Count : 'all', Instance : '1', Field: '8589942047', Value : '8589954497'}
Example of Show the RSVP field, until our capacity for the event is reached:
{Count : 'all', Instance : '1', Field: '8589942047', Value : '8589954497'} < 6
Show the 'Add to wait list' field or 'Event is Full Text' in its place after the capacity is exceeded:
{Count : 'all', Instance : '1', Field: '8589942047', Value : '8589954497'} >= 6
Friendly Reminder that the values and the capacity in the Count Formulas above, will need to be updated to the values from your marketing list.
Step 5 - Change the values of the Count Formulas to match those in your InterAction Marketing List.
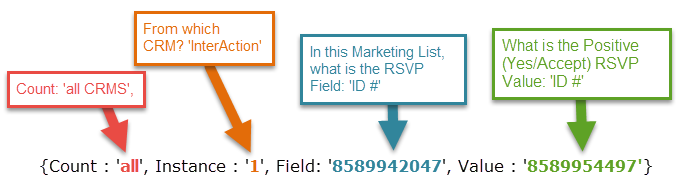
Below is a reminder of the break down for our basic Count Formula. If you have not already, please review this Help Desk Article which explains in further detail how the Count Formula works.
Please follow the below instructions on where to find these values to update them in your Notepad or plain text document. These values should be updated for all 3 Count Formulas mentioned in Step 4.
- Count = Keep the 'all' as is
- Instance ID = If you have more than one InterAction instance integrated with Vuture, please contact your Customer Success Manager to confirm your Instance ID number. Otherwise, keep '1' for the Instance.
- Field = This is the RSVP Field ID for this specific InterAction Marketing list. Please follow the full instructions below to find this ID #.
- Value = This is the positive RSVP field value (i.e. Yes or Accept) ID for this specific InterAction Marketing List. Please follow the full instructions below to find this ID #.
How to find the RSVP Field ID
- Navigate to your RSVP Form and click any field to get into the Form Editor.
- Within the Form Editor, click on your RSVP field.
- Copy the ID from the Field Name. This is your RSVP Field ID.
See animated GIF below showing steps 1-3.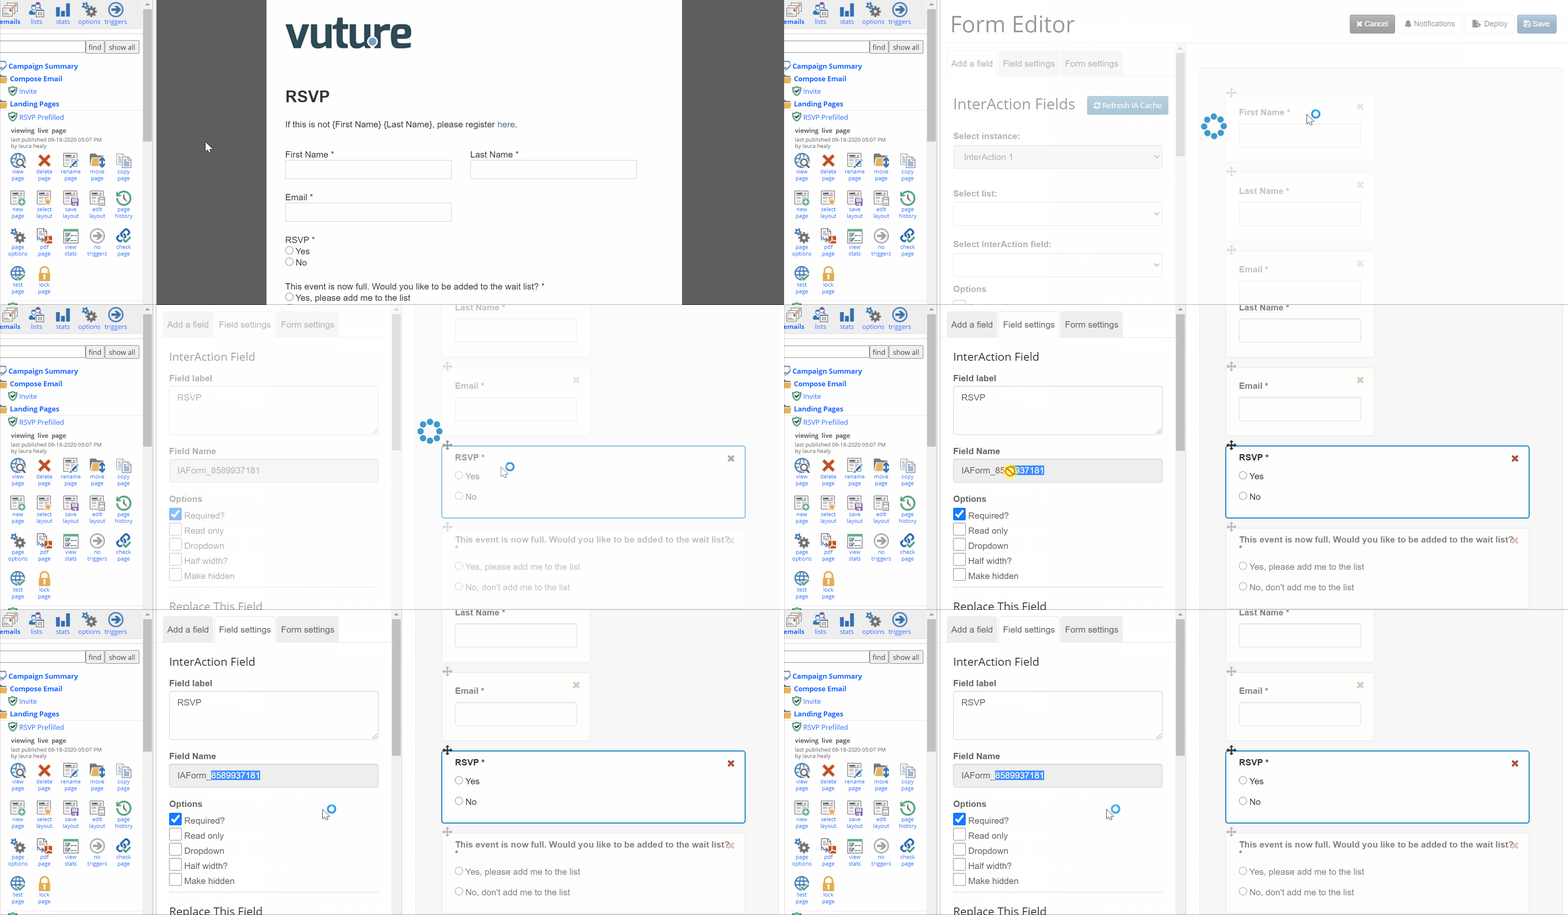
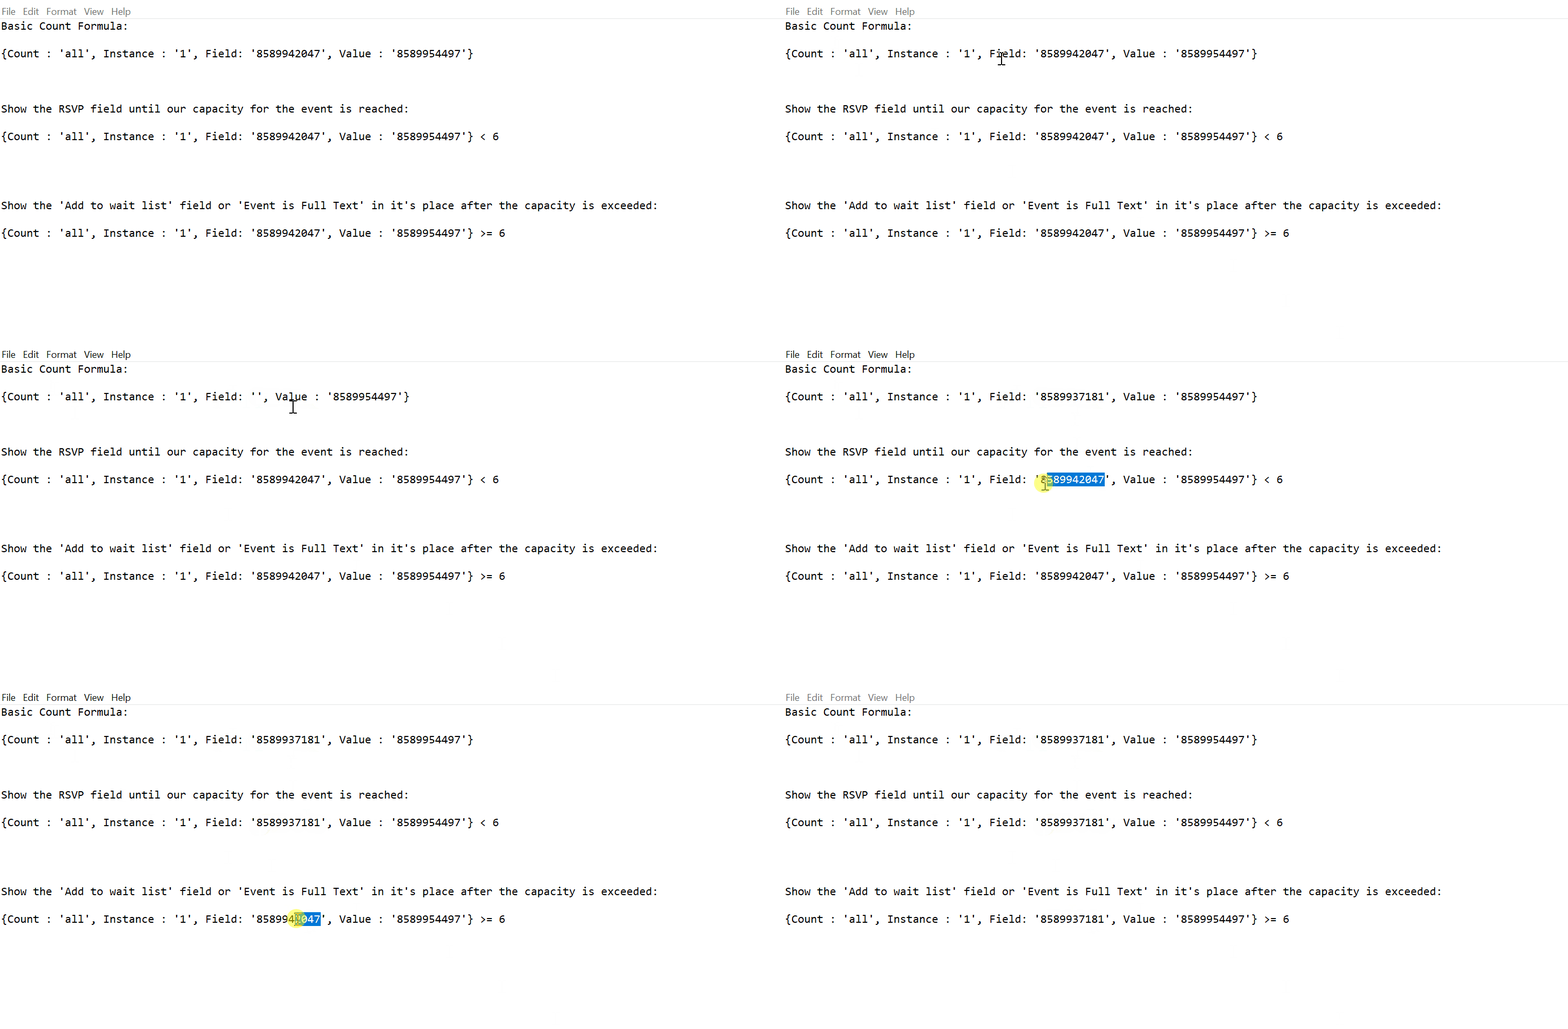
Once you have the RSVP Field ID, navigate back to your Notepad or Plain text document and replace the existing Field ID # (for example, 8589942047) in all 3 Count formulas with the one you just copied. See Animated GIF below for clarification.
 How to find the positive RSVP Field Value ID
For a Boolean RSVP field:
For Boolean fields, the positive RSVP Field Value will always be '1' and the negative value will always be '0'. For this reason, enter '1' as your positive RSVP Field Value ID in the Count Formula.
If using an Enumeration field there is a Copy and Paste option described below:
Using Copy and Paste instead of Inspect
New Method: To Find the Yes Value Using Copy and Paste instead of Inspect
We wanted to make it easier for users to create Form Logic statements or Conditional Rules. Now, instead of using "Inspect" to study the underlying html of the form, there is an option to Copy and Paste the value of fields into the Conditional Rule statement.
When you use the Copy option, Vuture will find and copy the hidden Value of the field to the clipboard. From there, you can Paste it into your Conditional Rule.
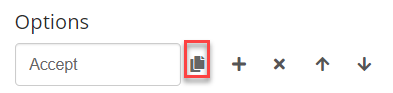
The Copy option is under the two pages icon, next to each field:
Please note, it is the "hidden value" that the feature is copying. This is not necessarily the same as the words that the client will see.
Alternatively, finding the Yes value using "inspect"
- Navigate back to your Form Editor with the RSVP field selected (where you left off when finding your RSVP Field ID).
- Then, right click directly on the "Yes" value of the RSVP and click on "Inspect" in the tool-tip drop-down.
- Look for the words value="", which should be right above where you clicked on your "Yes" value.
- Now, your value="" will be followed by a number ID (i.e. value="8589940014"). Copy whatever is in the open parenthesis after the value. This is your positive RSVP Field Value ID.
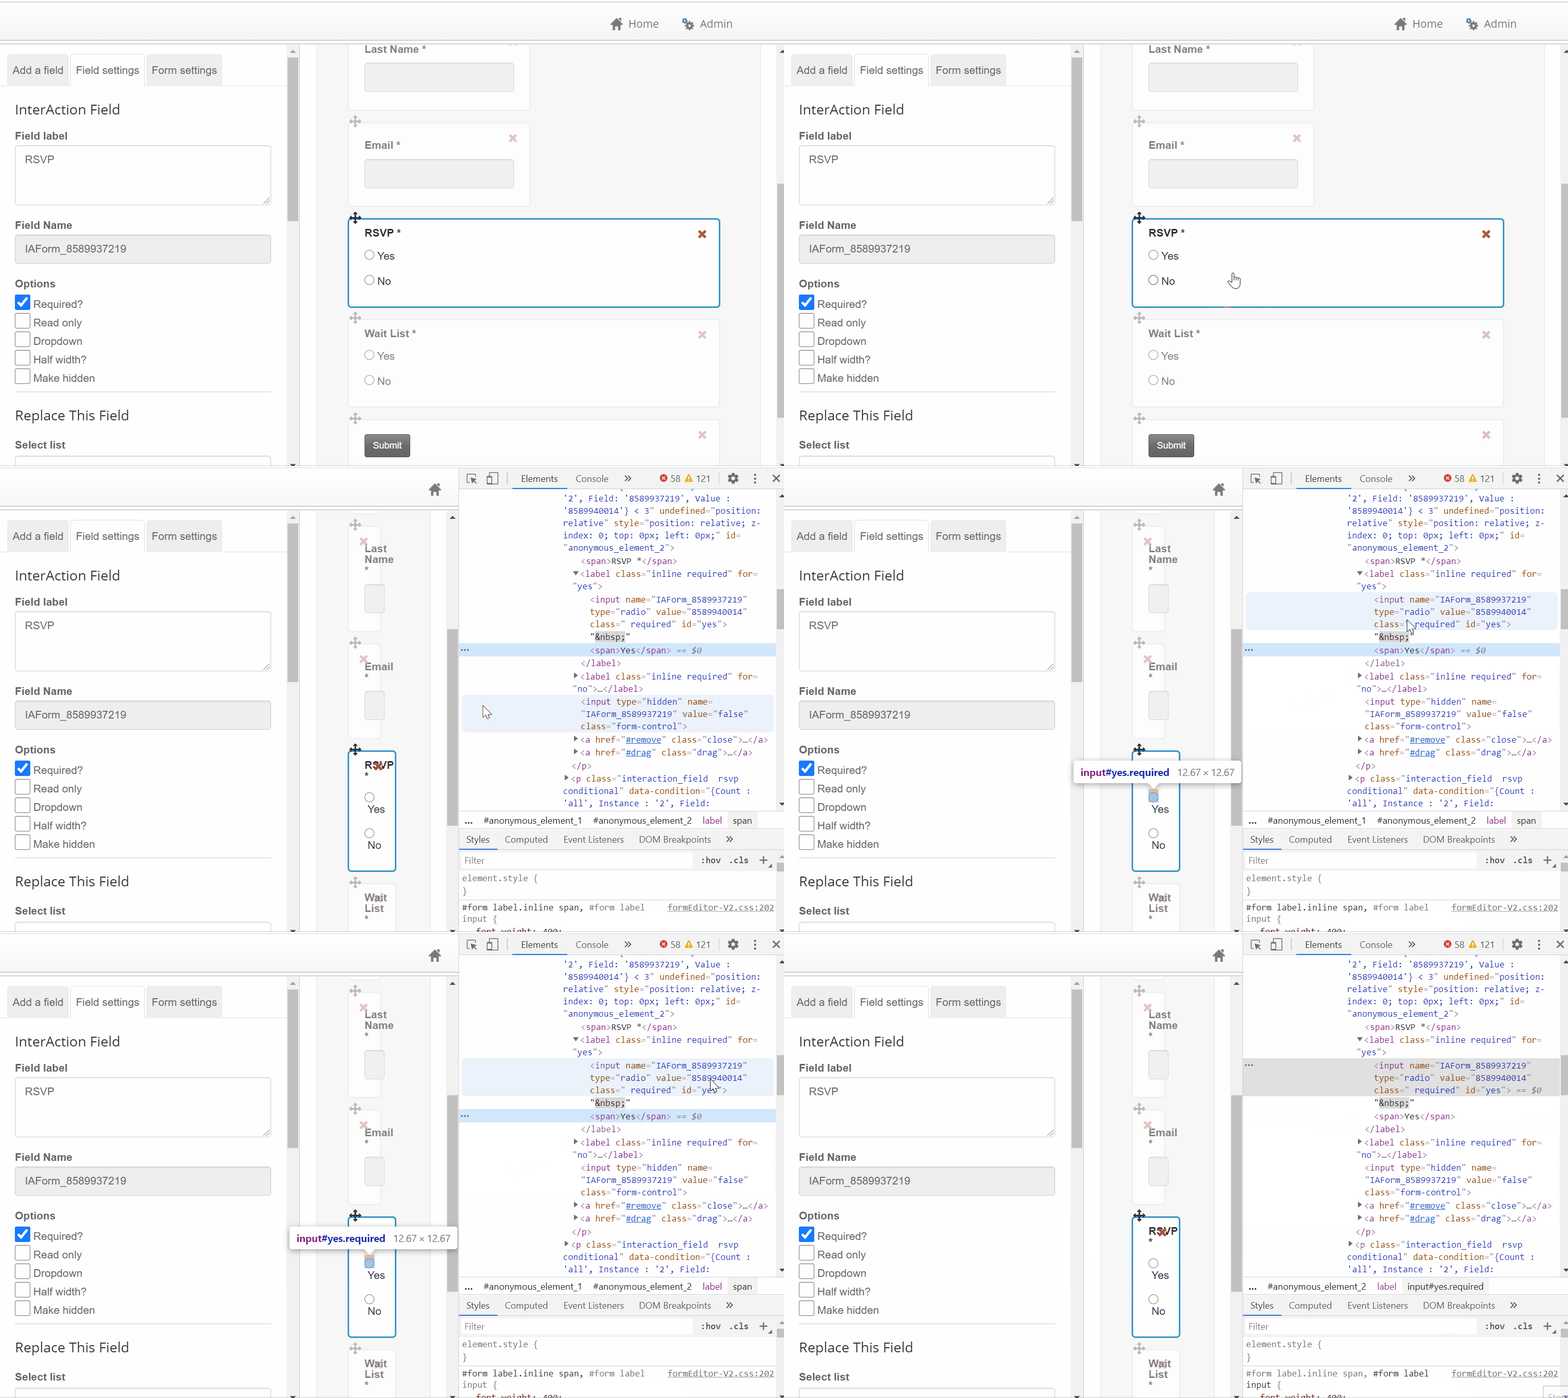
See animated GIF below showing steps 1-4.
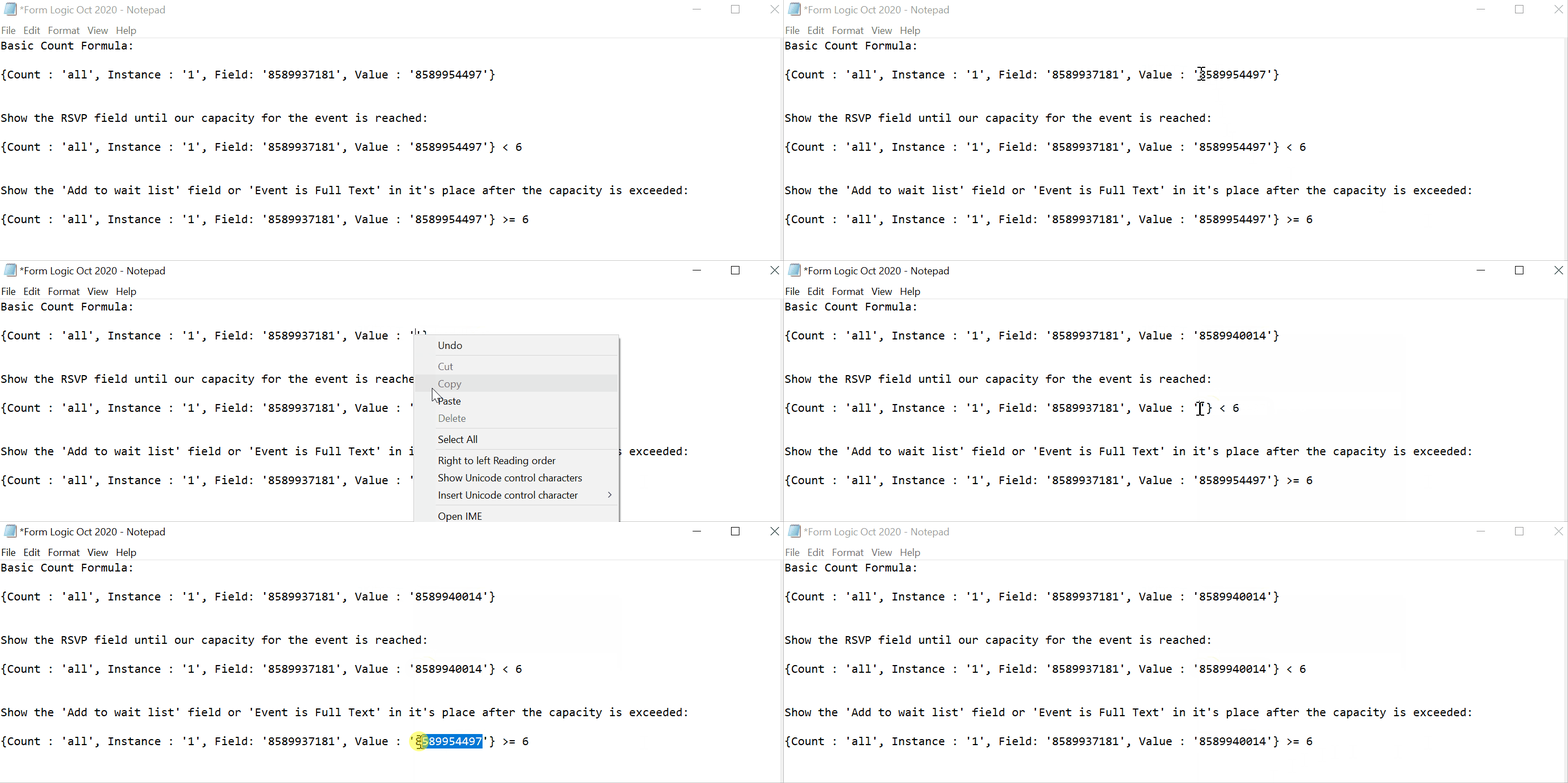
Once you have the RSVP Field Value ID, navigate back to your Notepad or Plain text document and replace the existing Value ID # (8589954497) in all 3 Count formulas with '1' if using a Boolean field or the number you just copied if using an enumeration field for your RSVP. See Animated GIF below for clarification.
Step 6 - Decide on your event capacity for this event (i.e. how many people can RSVP Yes to this event).
For example, if your capacity for this event is 30 people, you would change the last number of your two Count Formulas from 6 to 30 in your Notepad or Plain Text document. See examples below.
Show the RSVP field until our capacity for the event is reached:
{Count : 'all', Instance : '1', Field: '8589937181', Value : '8589940014'} < 30
This will show the RSVP field until more than 30 people have registered to the event. After the capacity is reached, the RSVP field will be hidden.
Show the 'Add to wait list' field or 'Event is Full Text' in its place after the capacity is exceeded:
{Count : 'all', Instance : '1', Field: '8589937181', Value : '8589940014'} >= 30
This will hide the Wait List field or Event is Full Text until 30 or more people have registered to the event. After the capacity has been exceeded, the Wait List field or the "Event is Full" text will be visible on the form(s).
Best Practice Tip - You will want to change this to a lower number for testing (e.g. 3) then change it to your desired cap number, after you have confirmed your logic is working as expected in testing.
Step 7 - Copy and paste your Count Formula into the Conditional Rule boxes on your RSVP Prefilled form and your RSVP Blank form.
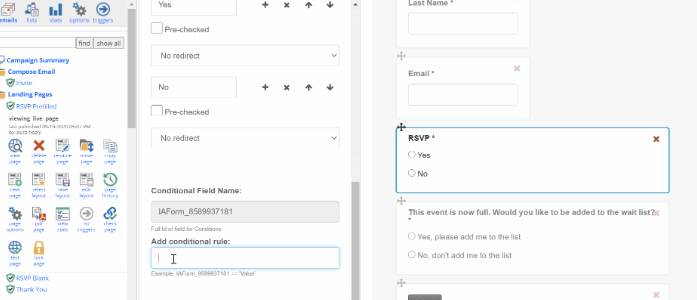
Apply Count Formula to the RSVP field
- First, copy the formula for "Show the RSVP field until our capacity for the event is reached" from your NotePad or Plain Text document.
- Then, within the Form Editor, click on your RSVP Field.
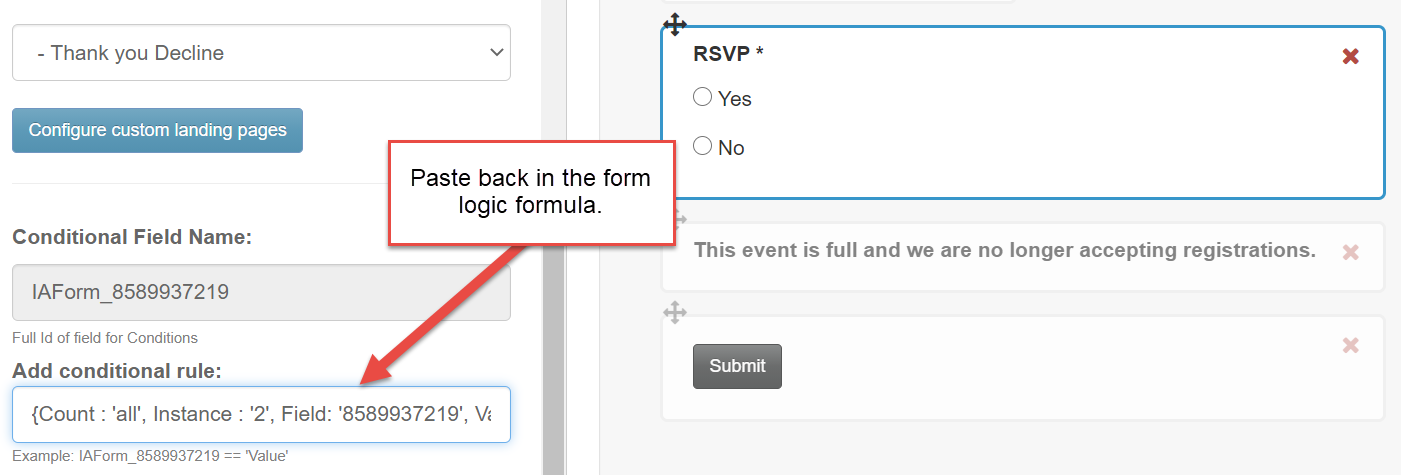
- Scroll down until you see the Add conditional rule box.
- Paste in the Count Formula.
Apply Count Formula to the 'Wait List' field or 'Event is Full' text
- First, copy the formula for "Show the 'Add to wait list' field or 'Event is Full Text' in its place after the capacity is exceeded" from your NotePad or Plain Text document.
- Then, within the Form Editor, click on either your 'Wait List' field or your 'Event is Full' instructions field.
- Scroll down until you see the Add conditional rule box.
- Paste in this Count Formula.
See animated GIF below for clarification.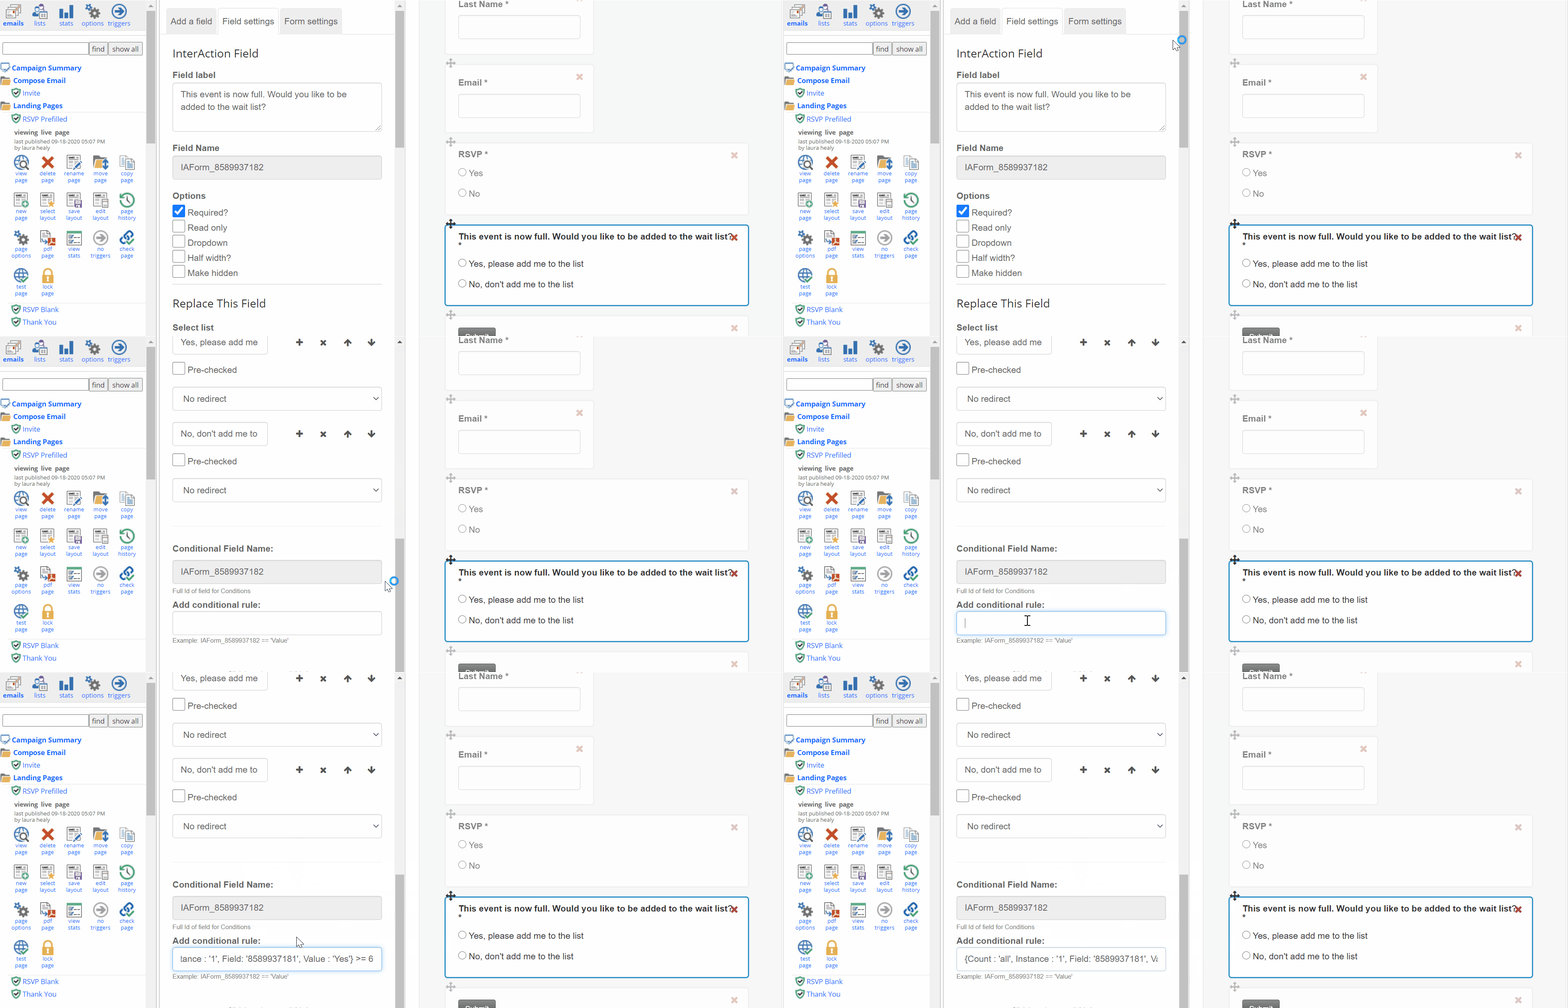
Save your RSVP Form and make sure these same steps are completed for both the RSVP Prefilled and RSVP Blank form.
Then Publish > Publish Now.
Testing
Send a Sample email with link to form(s)
Important Note about Testing: When building forms with Count Variables and InterAction, you do need to send a sample email to yourself, that links to the RSVP form, to test it. You can't just use View Page.
Use the Send Sample functionality, to send yourself the invitation with a link to the RSVP Prefilled Form. Then, submit the Prefilled RSVP form with a RSVP as "Yes". Ask your colleagues to do the same until you hit your cap (we recommend setting your cap to 3 or 4 for testing), with at least one colleague testing the RSVP Blank Form.
Note: As long as the Count Formula form logic is applied to both your RSVP Prefilled and RSVP Blank Forms, the count formula will take into account RSVP submissions from both forms to reach the capacity you have set for the event.
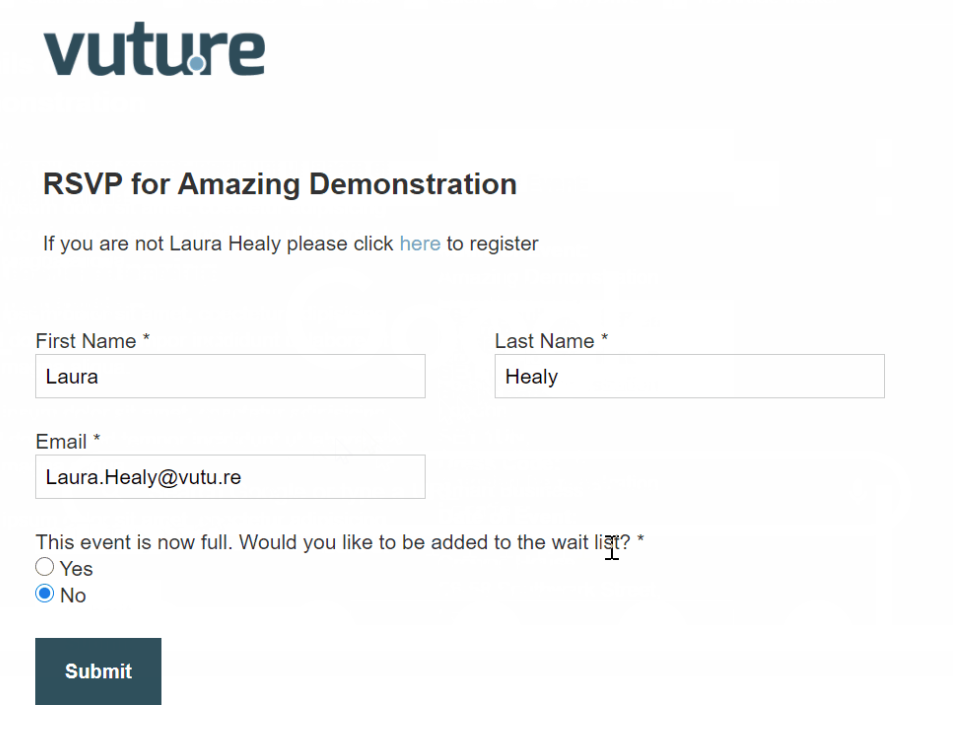
Once you reach your cap, you should then see the waitlist field or waitlist text appear and the RSVP field will be hidden. This will verify that your form logic is set up correctly. Please see animated GIF displaying the cap being reached with the waitlist field.
Resetting the Logic for your Live Event
IMPORTANT: You cannot just reset/update any RSVP responses in InterAction. If you do that, InterAction will appear as if the testing users have declined, but the Vuture database will count them as Accepted and this will affect the total numbers permitted to sign up for your event. To reset your capped numbers, you must follow the instructions in either Option 1 or Option 2 below.
Option 1: Change the RSVPs from Yes to No to reset the logic
From our testing, we now have a few test submissions that are being counted in the form logic. We will need to reset these back to zero, by changing the RSVP for those who tested the form(s) from Yes to No. To do this we can use the Preview as Contact feature.
First, we'll need to temporarily remove the form logic count formula from the Conditional Rule Box on the RSVP field, then publish the RSVP Prefilled form.
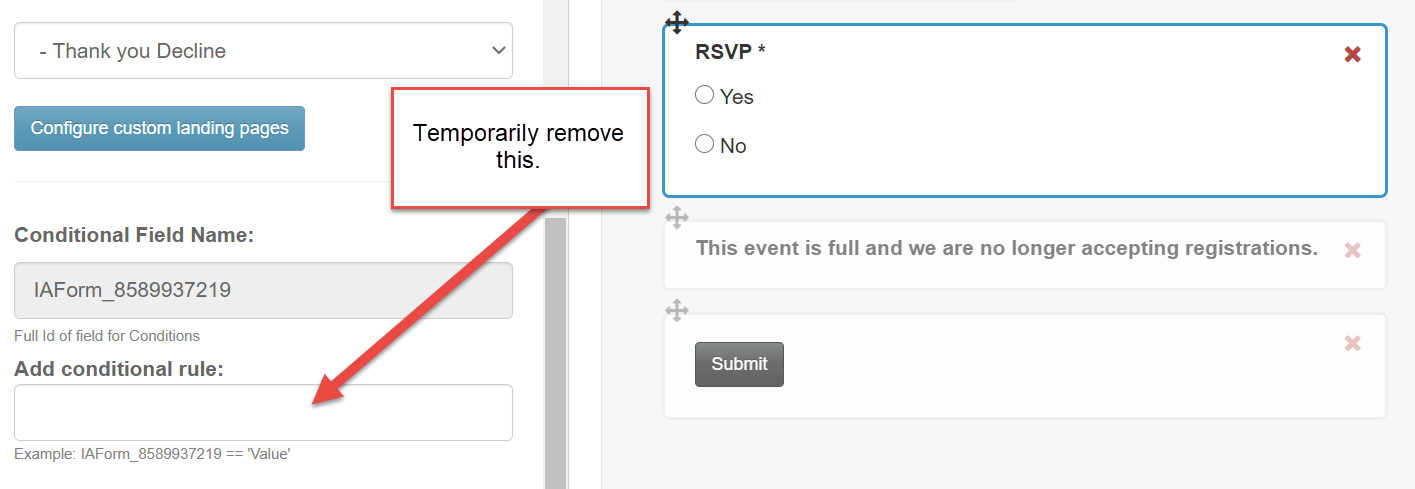
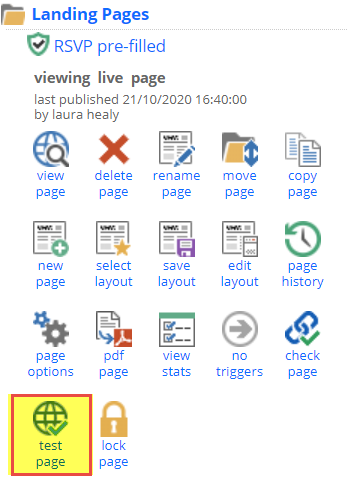
Next, click on the Test page icon to bring up the Preview as Contact feature.
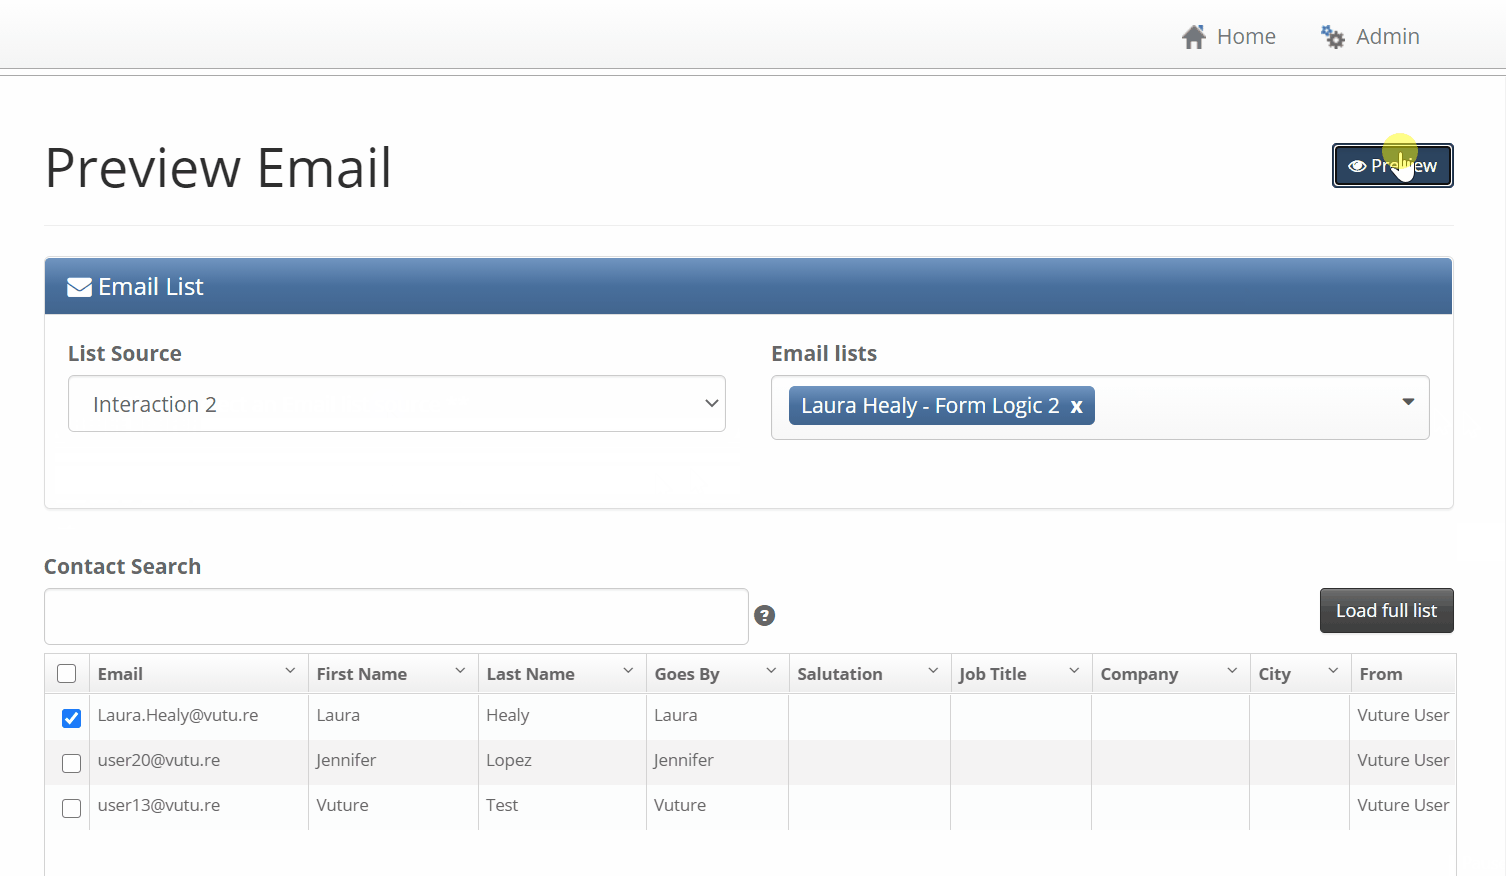
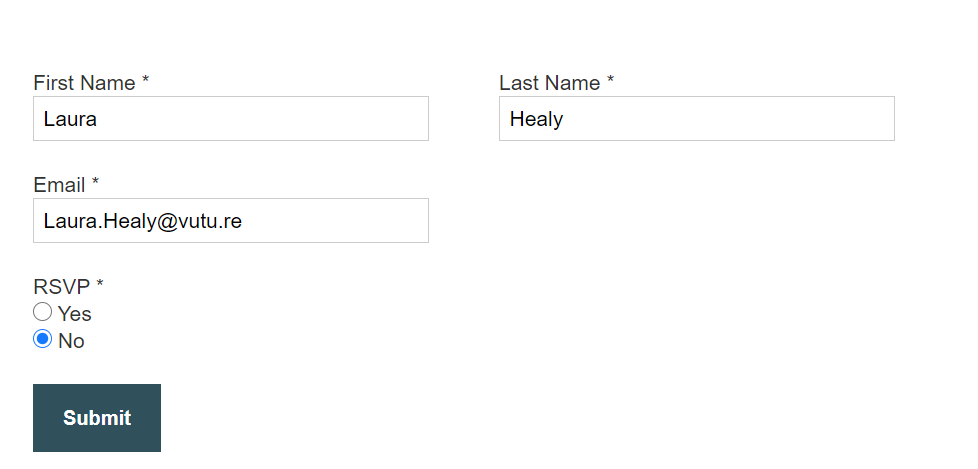
Next, select your List Source of InterAction, the Marketing List you used for your RSVP Field, and select the contact who tested the RSVP Form(s) from the list (you or your internal colleague), then click "Preview". You will then need to change their RSVP from Yes to No and resubmit the form. This will need to be done for each colleague who helped you test your form logic. Please see animated GIF showing this process below.
Then, paste back in the form logic formula into the Conditional Rule Box on the RSVP field, then publish the RSVP Prefilled form.
Publish the form.
Lastly, click through to the Prefilled RSVP Form from your Send Sample email again and you should now see that the RSVP field is visible again and the waitlist field/text is hidden again. This confirms to you that the number has been reset.
IMPORTANT - If you changed your capacity to a smaller number for testing (i.e. 3), remember to change it back now to your actual capacity (i.e. 30). Do this first by updating the capacity in your NotePad or plain text document. Then copy and paste into the Conditional Rule boxes for your RSVP Prefilled and RSVP Blank forms (refer to steps 6 & 7 again if you are unsure). Then publish your RSVP Prefilled and RSVP Blank forms again.
Option 2: Add your internal Testing number to your Total Capacity
Alternatively, you could simply adjust your capacity by increasing it to include your internal testing numbers.
For example, during testing, you may have set your capacity to 3 and had 3 colleagues submit your forms with RSVP as Yes to make sure the RSVP field hides and the waitlist text/field is displayed. For your live event, your capacity will be 30 registrants. You can now adjust the capacity in your form logic to 33. This then means that 30 additional registrants can submit their RSVP through your prefilled and blank RSVP forms.
Testing Capacity: 3
+ Live Capacity: 30
= Total Capacity: 33
So, we would adjust the following formulas on our RSVP Prefilled and RSVP Blank Forms to be the following:
Show the RSVP field until our capacity for the event is reached:
{Count : 'all', Instance : '1', Field: '8589937181', Value : '8589940014'} < 33
This will show the RSVP field until more than 33 people have registered to the event. After the capacity is reached, the RSVP field will be hidden.
Show the 'Add to wait list' field or 'Event is Full Text' in it's place after the capacity is exceeded:
{Count : 'all', Instance : '1', Field: '8589937181', Value : '8589940014'} >= 33
This will hide the Wait List field or Event is Full Text until 33 or more people have registered to the event. After the capacity has been exceeded, the Wait List field or Event is Full Text will be visible on the form(s).
Lastly, remember to publish your RSVP Prefilled and RSVP Blank forms.
FAQs
Q. Can deleting RSVPs in IA, alter the count of RSVPs that the RSVP form recognizes for the count logic?
A. No. It is not possible to make adjustments in IA and have that feed back to the form logic. All of the "resetting of the form logic" must be done in Vuture to reset the count formula. This means that, as you test your form, the count will increase as your testers RSVP. To mitigate this, simply increase the available spaces in your event. If 5 people test-RSVP as Yes, you could increase your event spaces from 50 to 55 when you go live with the form. This will effectively dis-count the 5 test responses.
Q. Does the form logic also count registrants who are manually input into InterAction?
A. No, the form logic only counts Vuture form submissions, and it combines submissions from multiple forms (i.e., RSVP Prefill and RSVP Blank). If InterAction was to be called each time the form was viewed, this would cause a long wait time for the count to load.
Other Articles You May Be Interested In
What is Form Logic?
Troubleshooting Form Logic
