Overview
In preparation for your Alumni Site launch, you'll want to be sure to have good quality data to send your welcome email inviting Alumni to the site. To do this, we must confirm which email address the Alumni would like to use for their login and to receive alumni communications. Most often, Alumni will want to use a personal email address as opposed to their work email address.
Having good quality data is crucial to a successful Alumni Site launch. It helps save you time having to correct many outdated email addresses post-launch and ensures that your Alumni can complete their registration to access the Alumni Site.
This article will take you through how to get good quality data in InterAction for the launch of your Alumni Site using the Vuture Email Module and Triggers.
Put together a Marketing List in IA of the contacts you wish to invite to your Alumni Site
In InterAction, create a marketing list for your invitees to the Alumni Site. This list could be called "Alumni Site Pre-launch" or whatever you prefer. This list should have the following two additional fields:
- "Opt-in" with values of "Yes" or "No" (boolean)
- "Preferred Email Address" as a text field (text)
Add any contacts you wish to invite to the Alumni Site to this list.
Create an email campaign
In Vuture, create a new email campaign in a Container called "Alumni Pre-Launch". This email campaign could be called "Alumni Site Pre-launch Email Confirmation" or whatever you prefer.
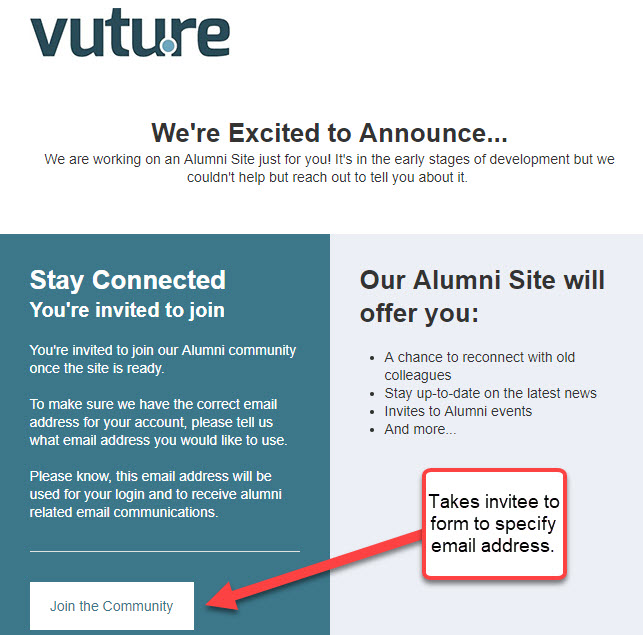
Create a new email in the Compose Email Folder and name it "Alumni Email Confirmation". You may then build out the layout to your brand's specification. Be sure to include language about the upcoming Alumni Site, why you want them to take part, and what they need to do (i.e. opt in to take part and tell us their preferred email address).
Below is an example for inspiration. However, the exact language and offering should be agreed on as a firm.
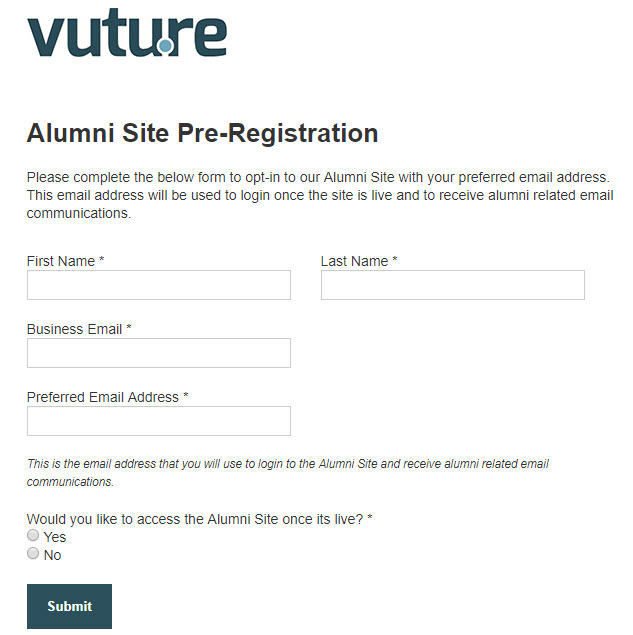
Create a pre-filled form for the contact to confirm their preferred email address and opt-in to the Alumni Site. You'll want to include the First Name, Last Name, and Business Email (i.e. email) fields, as required and read only. This allows Vuture to do a search on the last name and business email address to amend the contact record.
In addition to this, you'll want to use the two IA additional fields that were created in the first step, "Opt-in" (boolean) and "Preferred Email Address" (text). We recommend adding some language about what the preferred email address is, such as "This is the email address that you will use to login to the Alumni Site and receive Alumni related email communications". (See screenshot below as an example).
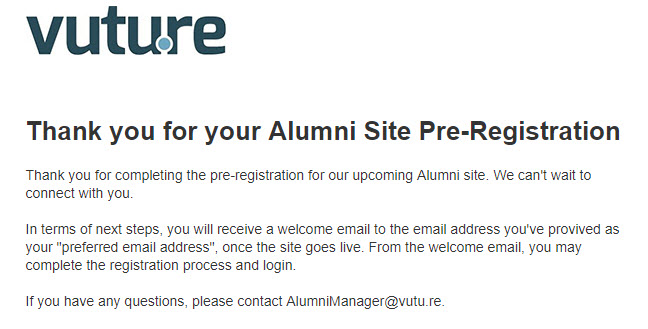
Please also create a Thank You page for the contact to land on once submitting this form. You may wish to include next steps on what will happen next.
(See screenshot below as an example).
Send / Automate your email
Before sending your email, we always recommend testing your email with an internal IA marketing list and Send Sample. This helps to ensure your form is set up correctly and everything is writing back to InterAction in the way you would expect it to. For more information on how to use Send Sample, please click here.
Once you've tested your email and form, you are now able to send the "Alumni Email Confirmation" email to everyone on the "Alumni Site Pre-launch" IA Marketing List.
Next, you'll want to setup a "Form Not Submitted" Trigger for a specific date and time. This will allow Vuture to send a copy of the "Alumni Email Confirmation" to anyone on the original "Alumni Site Pre-launch" IA Marketing list who did not submit the form by this date/time. We recommend setting this to a week after the first email was sent.
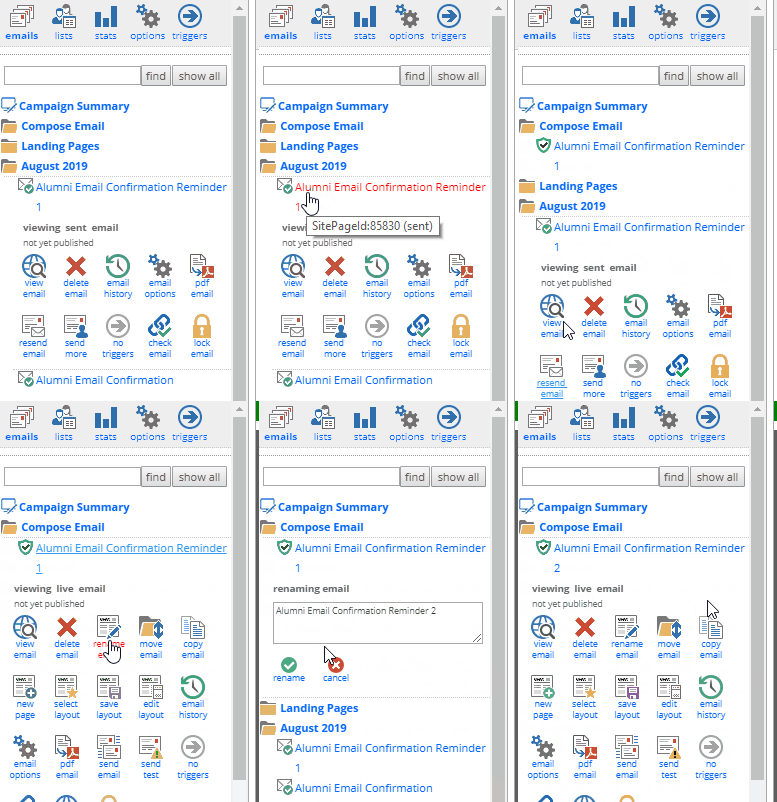
To do this, you'll need to go into your send folder (e.g. August 2019) and click on "resend" for your "Alumni Email Confirmation". This will put a copy of your sent email into the "Compose Email Folder". Rename this email to "Alumni Email Confirmation Reminder 1".
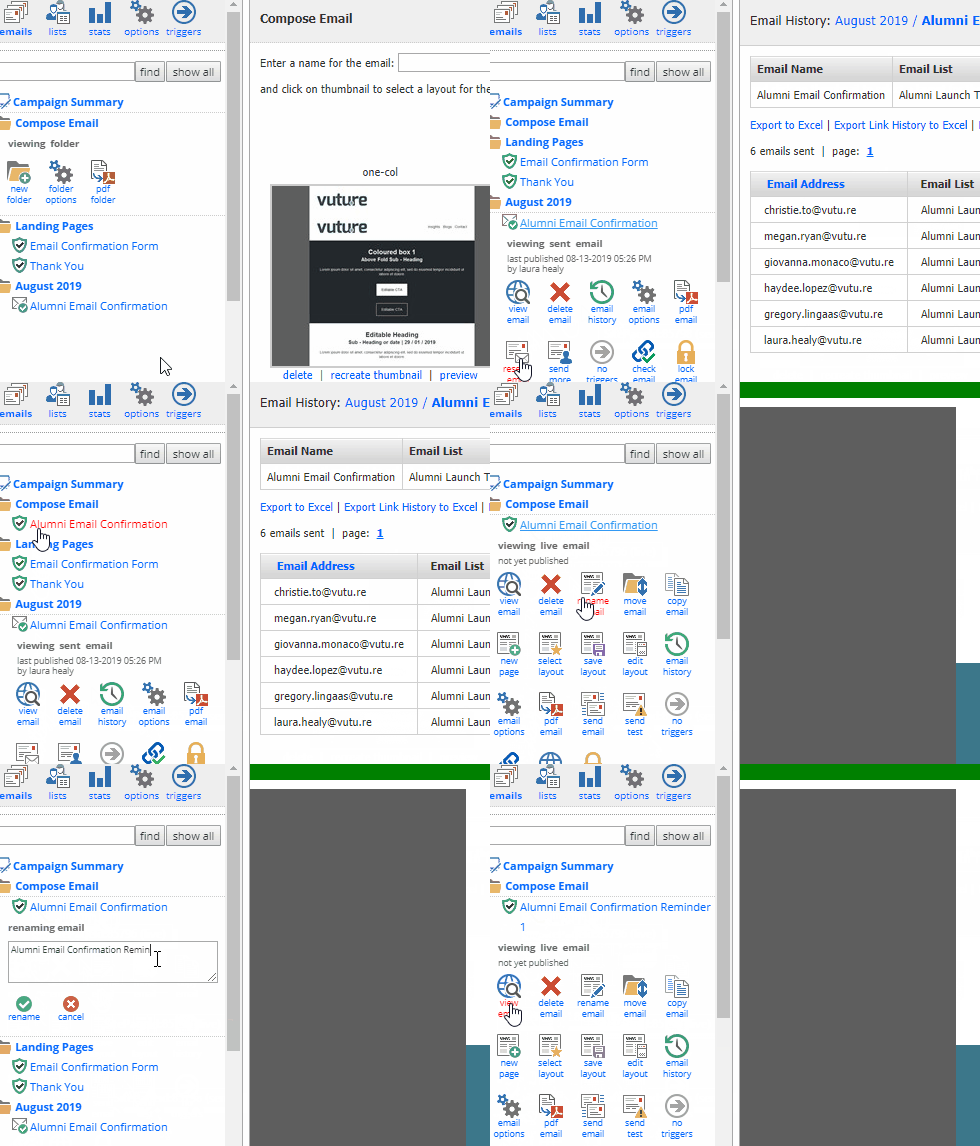
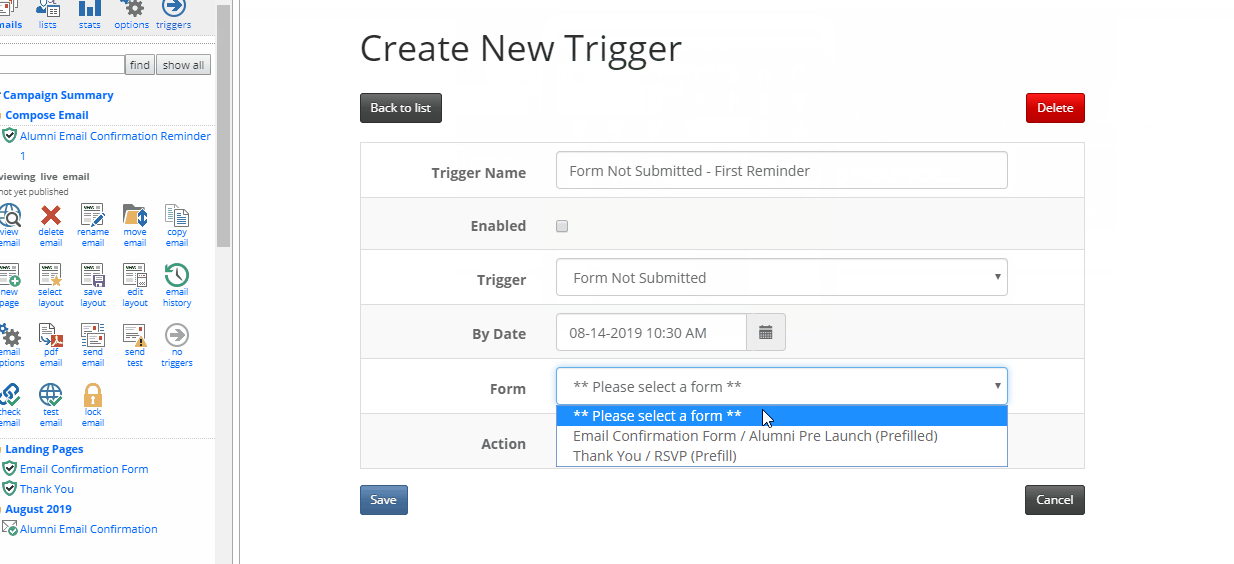
Now, its time to set up the "Form Not Submitted" Trigger. Click on the "Triggers" icon to bring you to the Triggers screen. Click on "Add New Trigger", then follow the instructions below. Please also see the GIF below for a visual.
- Name your trigger something like "Form Not Submitted - Reminder 1"
- Leave Enabled unchecked for now
- Select the Trigger of "Form Not Submitted"
- By Date - Select the date and time you wish to send this reminder email. We recommend 1 week from the time the original email was sent
- Action is "Send Email to Matches"
- Leave "Wait" set to "None"
- Choose the email we just created "Alumni Email Confirmation Reminder 1" from the drop-down. This is the email in the "Compose Email Folder", not the one we previously sent in the send folder (e.g. August 2019)
- Choose your From address
- Leave "Personalised From" unchecked
- Optional to enter in a Reply To address
- Enter in your Subject line
- Choose the same list you used to send your original mailing
- Select your Content Type
- Click "Save"
- You will now be taken back to the Trigger List Screen. Then check "Enabled" next to your trigger.
Vuture will now send this Reminder 1 email out to anyone who did not submit the form by the specified date/time.
You'll want to repeat this process of creating a new "Form Not Submitted" Trigger once more as a final reminder. In the end, if someone did not submit the form, they would have had three chances to do so:
- The original email you sent
- Reminder 1
- Reminder 2
We recommend sending Reminder 2, one week after Reminder 1. You'll need to follow very similar steps to above:
To do this, you'll need to go into your send folder (e.g. August 2019) and click on "resend" for your "Alumni Email Confirmation Reminder 1". This will put a copy of your sent email into the "Compose Email Folder". Rename this email to "Alumni Email Confirmation Reminder 2".
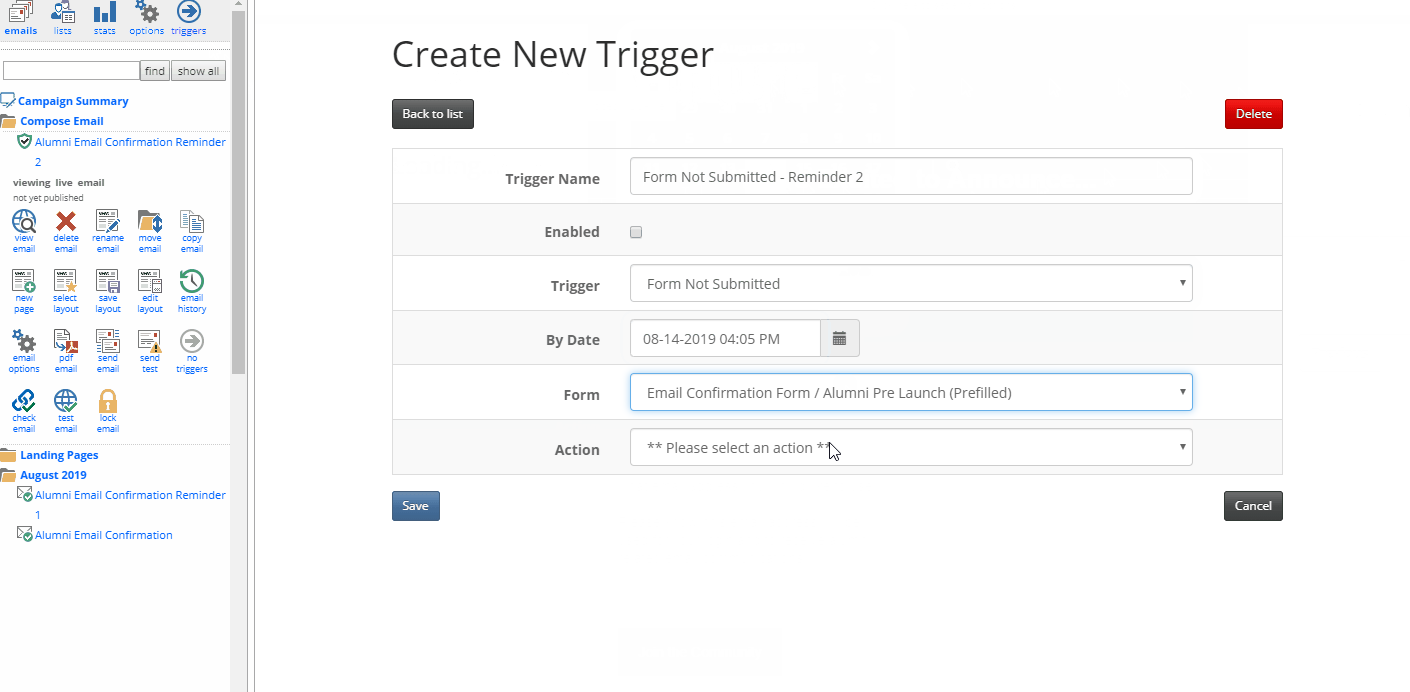
Now, its time to set up the "Form Not Submitted" Trigger. Click on the "Triggers" icon to bring you to the Triggers screen. Click on "Add New Trigger", then follow the instructions below. Please also see the GIF below for a visual.
- Name your trigger something like "Form Not Submitted - Reminder 2"
- Leave Enabled unchecked for now
- Select the Trigger of "Form Not Submitted"
- By Date - Select the date and time you wish to send this reminder email. We recommend 1 week from the time the Reminder 1 email was sent
- Action is "Send Email to Matches"
- Leave "Wait" set to "None"
- Choose the email we just created "Alumni Email Confirmation Reminder 2" from the drop-down. This is the email in the "Compose Email Folder", not the one we previously sent in the send folder (e.g. August 2019)
- Choose your From address
- Leave "Personalised From" unchecked
- Optional to enter in a Reply To address
- Enter in your Subject line
- Choose the same list you used to send your original mailing and Reminder 1 to
- Select your Content Type
- Click "Save"
- You will now be taken back to the Trigger List Screen. Then check "Enabled" next to your new trigger for Reminder 2.
Vuture will now send this Reminder 2 email out to anyone who did not submit the form by the specified date/time.
Collect preferred email address data for each contact
For all contacts who have submitted the form, we recommend taking their preferred email address and adding it as a folder-specific email address to the Alumni Folder in InterAction that will be used for the integration with the Alumni Site. If you are unsure of this folder, please contact your Project Manager and they will be able to advise you on next steps.
To find the preferred email address, you may either find this information in Vuture or in InterAction.
Vuture
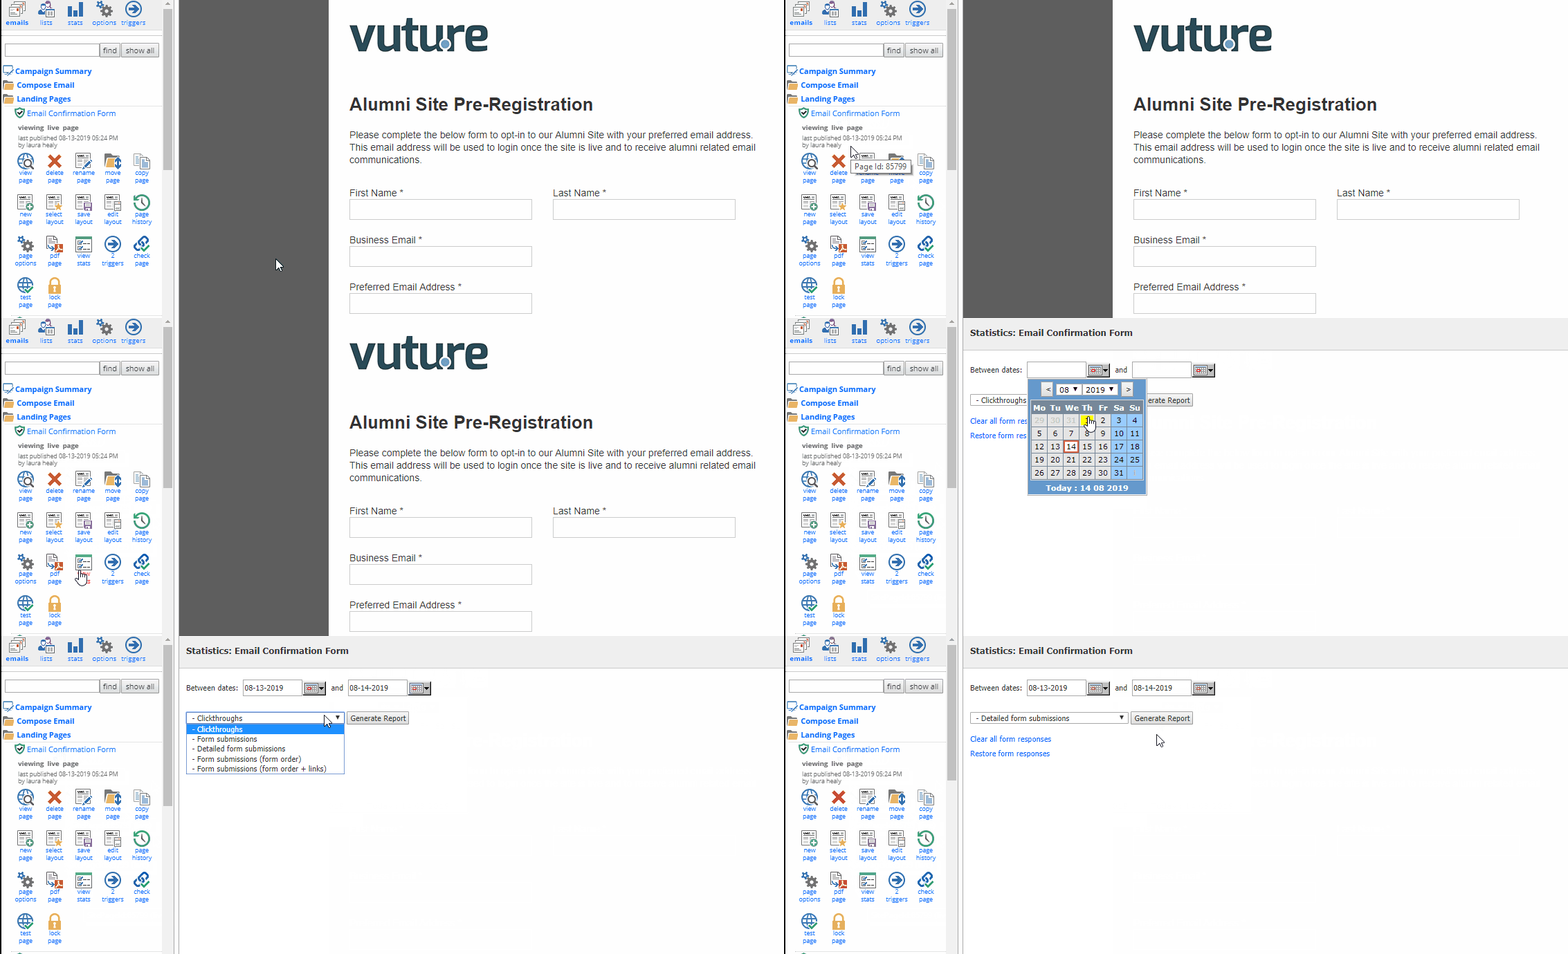
In Vuture, navigate to the "Email Confirmation Form" in your "Alumni Pre Launch" email campaign. Click the "view stats" icon. Select your start date (when you sent the original email) and your end date (today's date). Then choose "Detailed form submissions" from the drop-down and click on "Generate Report". This will download a CSV file with a log of all form submissions in the time frame that you set. You'll see each contact's preferred email address under the "Preferred Email Address" column.
InterAction
In InterAction, the preferred email address value will have written back to the "Preferred Email Address" text additional field for the "Alumni Site Pre-launch" Marketing List. This additional field will be filled in for each contact that submitted the form. You will also see their "Opt-in" status for the "Opt-in" additional field we created and included on the form.
For anyone who did not submit the form, it is not recommended to add them to the Alumni Folder in IA, until you have confirmation of their opt-in and preferred email address.
Other considerations:
- You may want to send an announcement email of the launch to those who did not confirm their email address prior to the launch. You can include a link to the Alumni Site with instructions on how to register / what to expect.
- You may want to send a couple of emails to contacts who have confirmed their email address prior to the launch, to help ramp up the excitement for launch day. You may also want to let them know what they can expect, like a welcome email to complete their registration on launch day. The welcome email will be sent to the email address they provided.