Keywords: ON24, webinar, connector crms
Please note: This is a premium feature. Please see your Client Success Manager for details.
Overview
This article provides you with instructions on how to use Vuture forms with ON24 to register clients to your webinars and write back RSVP and Attendance information to your CRM.
Contents
Requirements and Actions
|
Prerequisite
|
Who to Action
|
|
To begin setup, please provide your Customer Success Manager with the following, which you can obtain from ON24:
- ON24 Client ID
- ON24 Integration Service Event Key
- Ask ON24 to enable the feed (partner30) for testing purposes. Please let your Customer Success Manager know once this has been enabled on ON24's side.
|
Client
|
- Enter the Client ID into 'Admin.System.Forms.ON24 Integration Service Event Client Id'
- Enter the Key into 'Admin.System.Forms.ON24 Integration Service Event Key'
|
Vuture
|
|
Add an Attended Activity Type to the client's system in the Metadata Manager. (For Vuture, see at the end of this table for an image of the Metadata Manager.) Note: The current ContactEase and Intapp OnePlace integrations do not include Activities.
|
Vuture
|
|
Forms
Check the box for 'Admin.System.Forms.Display ON24 Integration URL text field' and check that the client is on Form Editor v2.
Roles
The feature must be enabled for each role who should have access to the functionality.
Enable this for at least 'Vuture Admin' and 'Super Admin' via 'Admin.Roles.Forms.ON24 Integration'.
|
Vuture
|
|
Scheduled Task
Enable the ON24 Event Processing Task (this will write back the attendee data to the CRM). Ask the client their preference for what time they'd like the task to run. We recommend once per day outside peak hours but at a time you know the client's CRM will be available.
You can set this schedule at "Admin.Services.ON24EventProcessingTask".
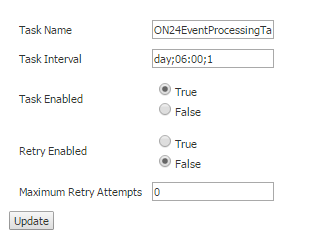
Task interval of "day;06:00;1" means run once per day at 6am.
For pm use the 24 hour clock e.g. 4pm is 16:00.
To run twice per day, "hour:06:00;12" would run every 12 hours at 6am and 6pm. Set "Task Enabled" to "true" and "Retry Enabled" to "False".
The time zone of the task interval must be set based on the client's server location.
|
Vuture
|
|
Optional
When creating the RSVP Form, in the Settings tab, name the form with the campaign name or Event name instead of just RSVP Prefill - this will aid reporting later.
|
Client
|
|
Optional
When creating the RSVP Form, if you are using the Attended additional field, you will be adding List name , Attended field name and the Attended value on the Settings tab of the form.
|
Client
|
The Metadata Manager allows Vuture to map various CRM field names and CRM activity names to standard fields in the Vuture database. It is not required for users of InterAction and Salesforce/OnePlace - their activities are hard coded and by default the activity will be writing back. The current ContactEase and Intapp OnePlace integrations do not include activities.
(For InterAction, One Place and Salesforce CRM users, ask the client to give you the ID of the activity type they would like to use for Webinar Attended and enter this in the config at admin.system.[crmname].Attended activity type id)
For Dynamics, Fibre and DealCloud only, the CSM must configure the Vuture WebinarEventAttended activity, in order to record the activity in the CRM. You could map the Vuture activity WebinarEventAttended to the client's Event Attended activity, if the client already has that activity type in their CRM, but you could also use Webinar Attended if the client sets it up in the CRM first.
For ContactEase, you will have to "Enable Webinars" in the Metadata Manager. Follow the ContactEase-specific instructions below.
The process to configure the activity varies slightly, between Dynamics and the "connector CRMs" (DealCloud and Fibre). For Dynamics, there is no mapping process. Please follow the appropriate step by step guide for your CRM below:
Step by Step Instructions for CSMs working with Dynamics Clients
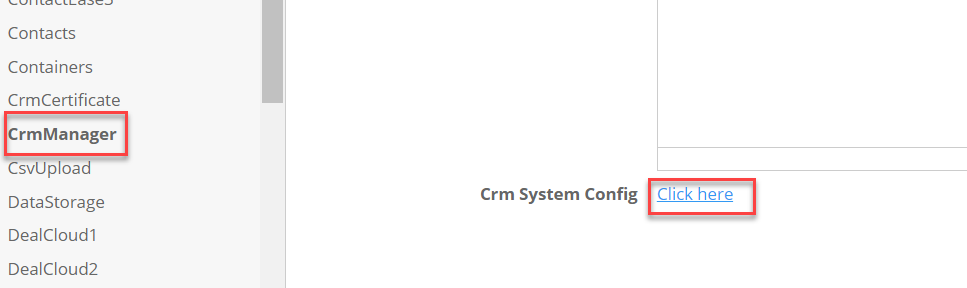
1. To access the Metadata Manager navigate to Admin.System.CrmManager and click on Click Here:
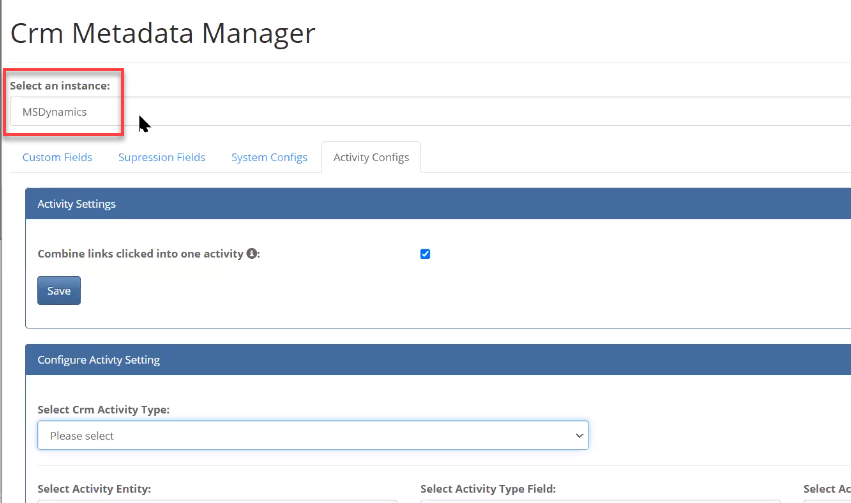
2. Select the CRM you are connecting to:
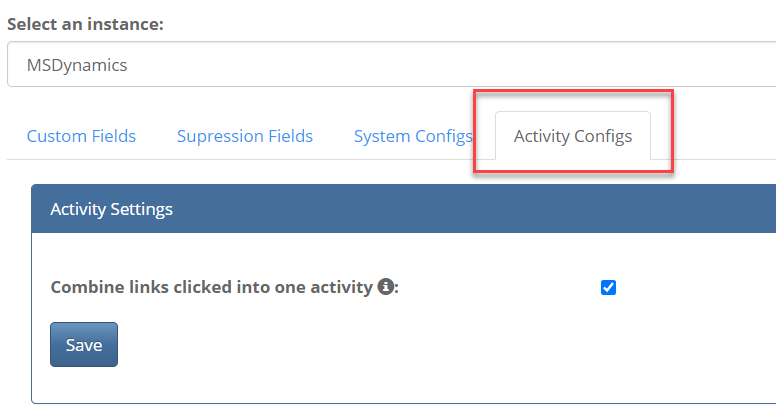
3. Select the Activity Configs tab:
4. Scroll down to the first dropdown list and select WebinarEventAttended:
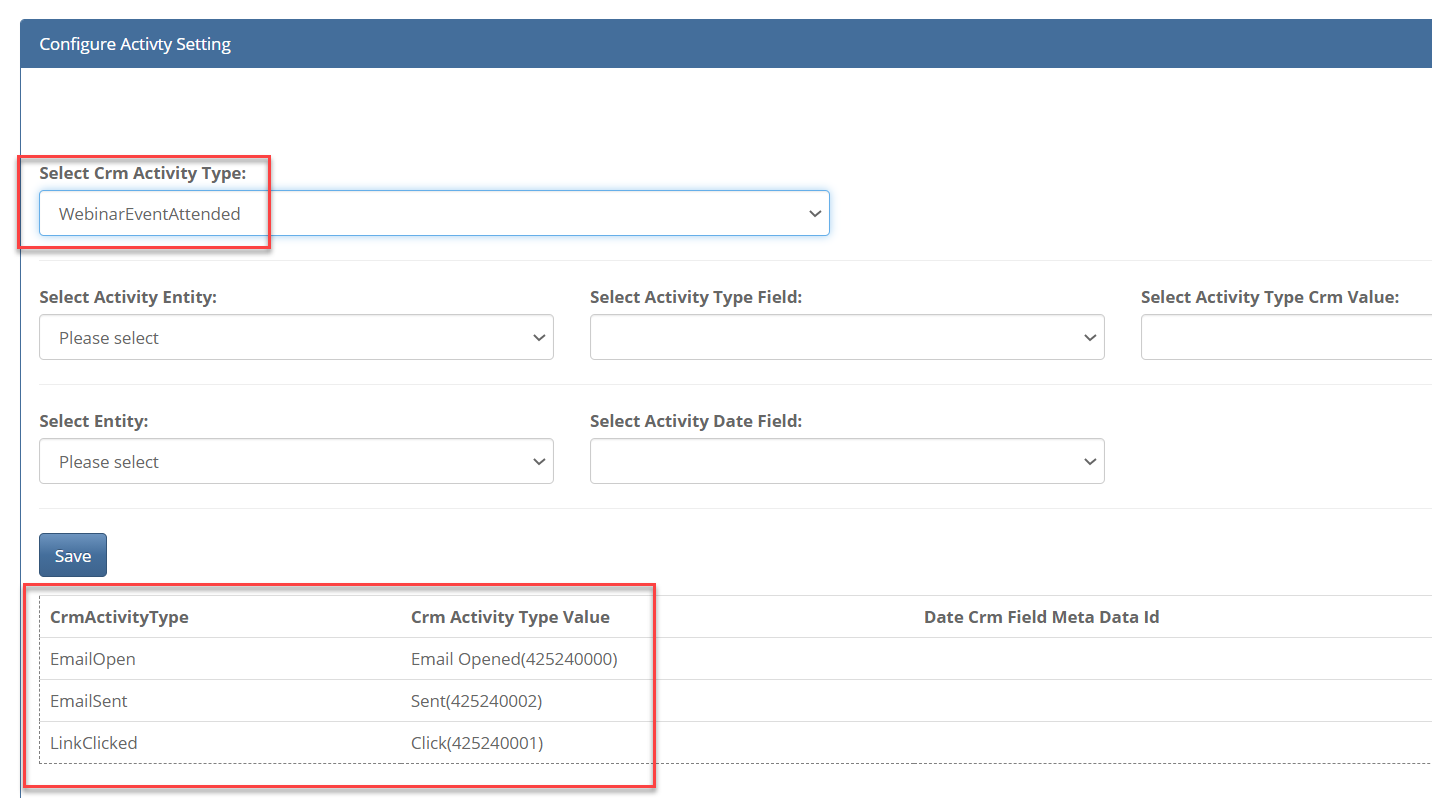
Note in the image above, there are just 3 activities currently mapped between this particular Dynamics CRM and Vuture.
5. Click on Save:
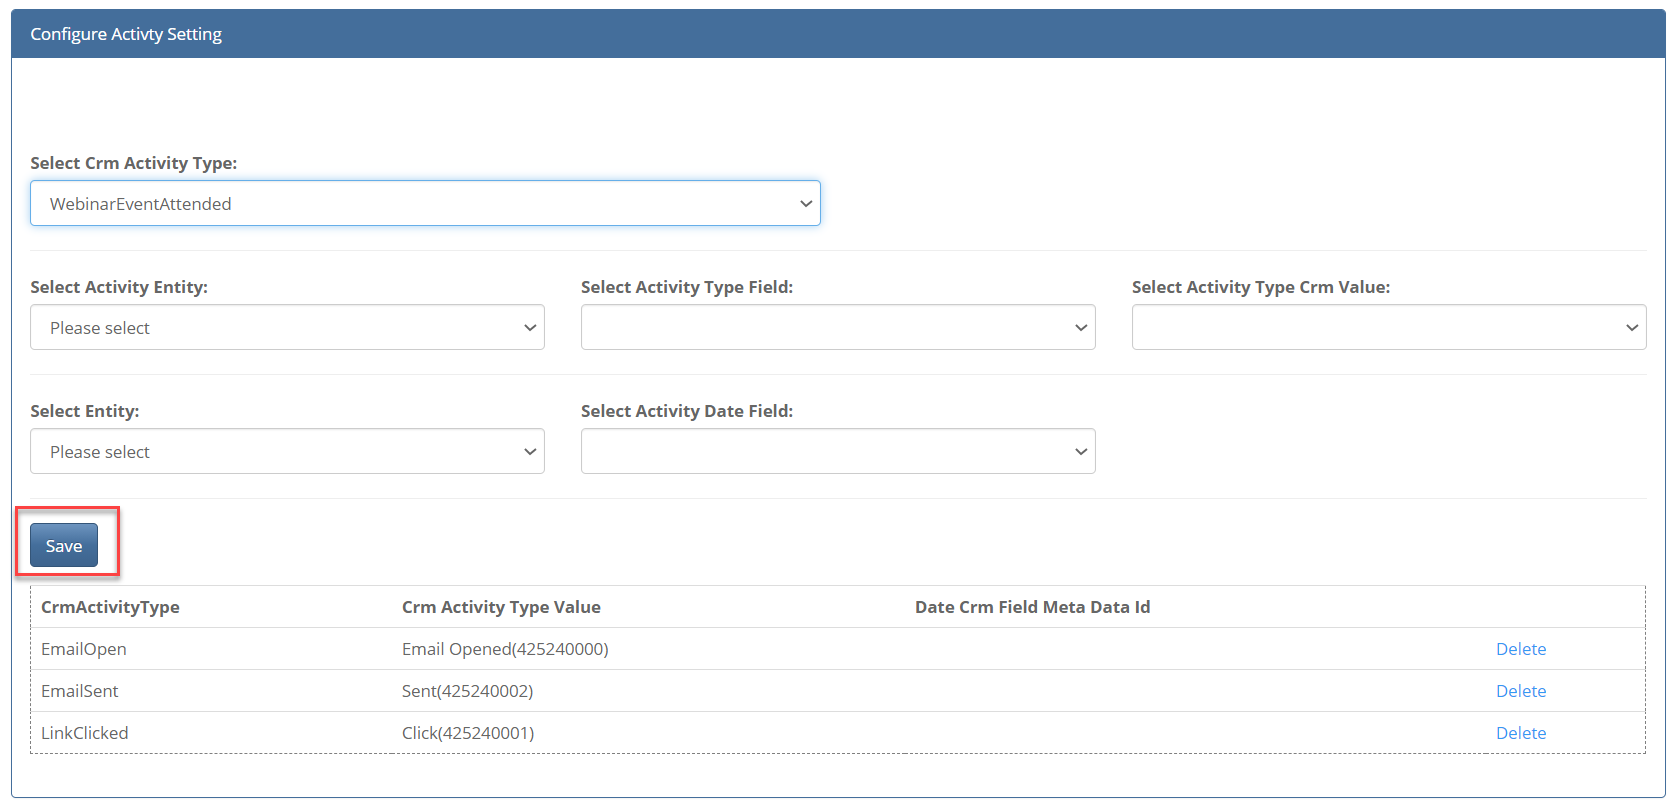
Note that for Dynamics you do not need to select an Activity Entity or Type. Just leave these 5 boxes blank and click Save.
In the image below you will see the Successfully saved message has appeared and the WebinarEventAttended activity has been added to the list of activities:
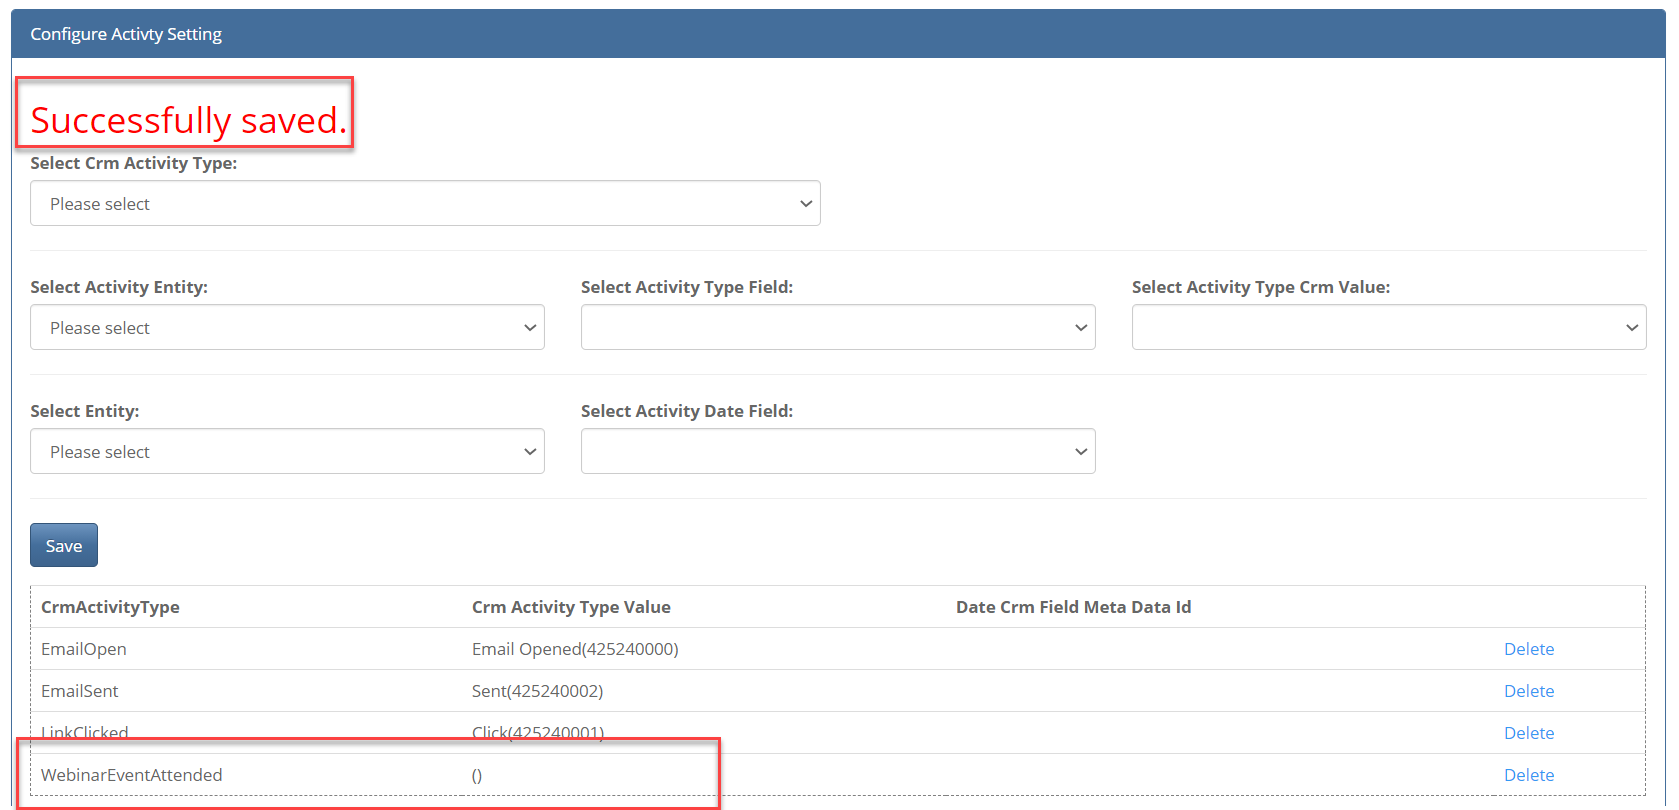
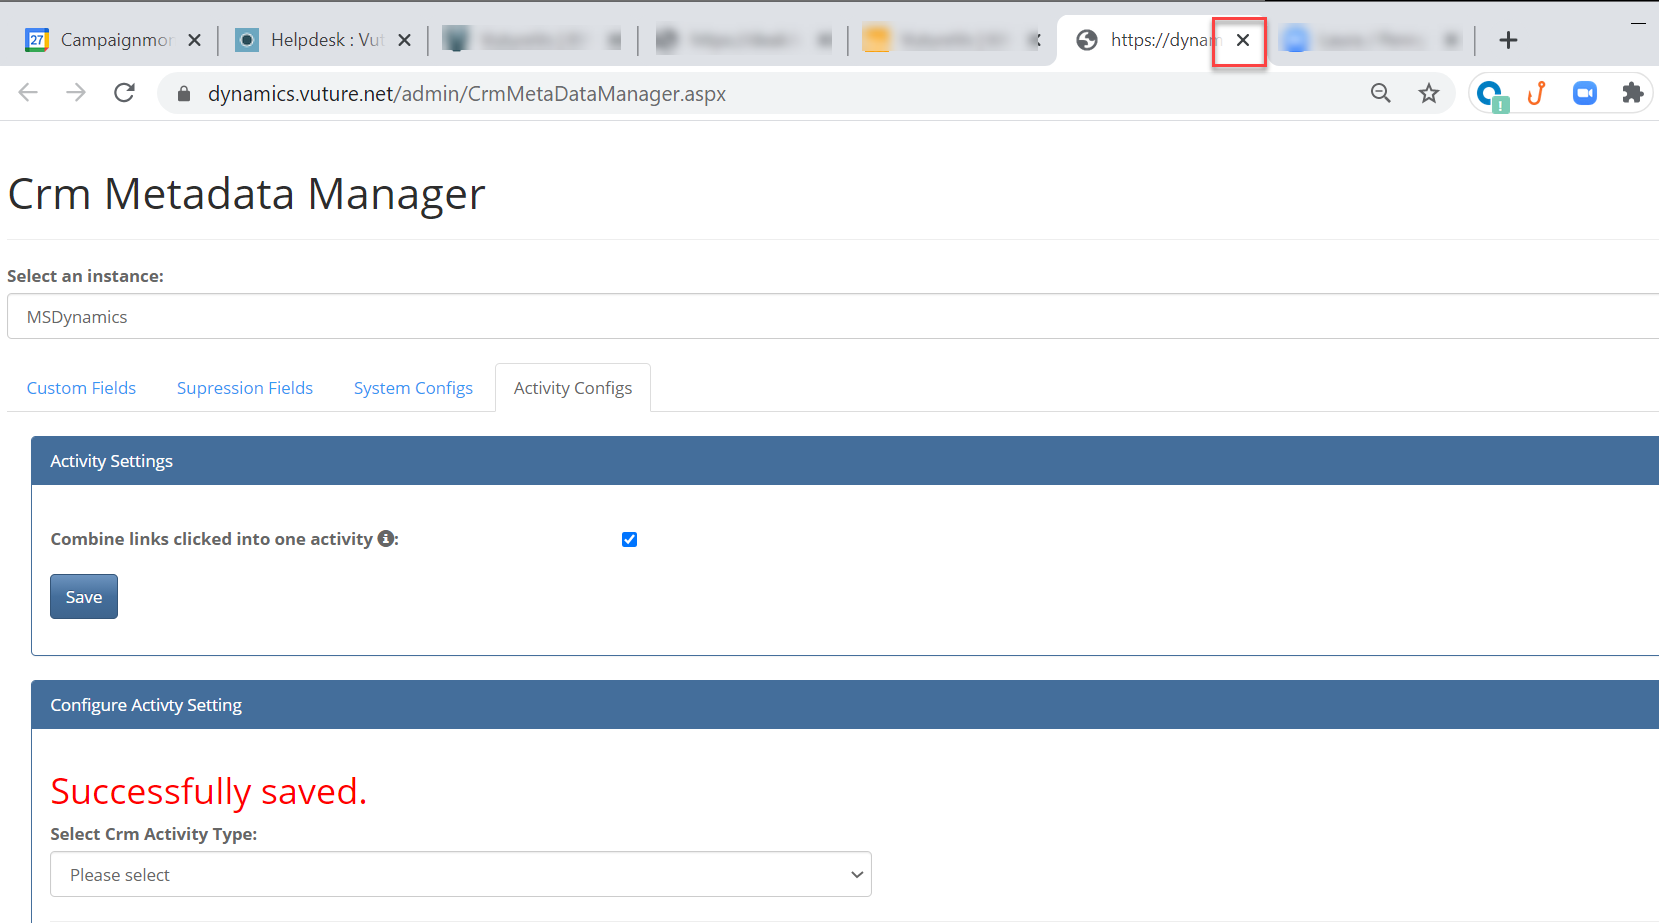
This is all you need to do for Dynamics in the CRM Metadata Manager. You can now leave the Metadata Manager by closing the tab as in the image below:
Step by Step Instructions for CSMs working with DealCloud or Fibre Clients
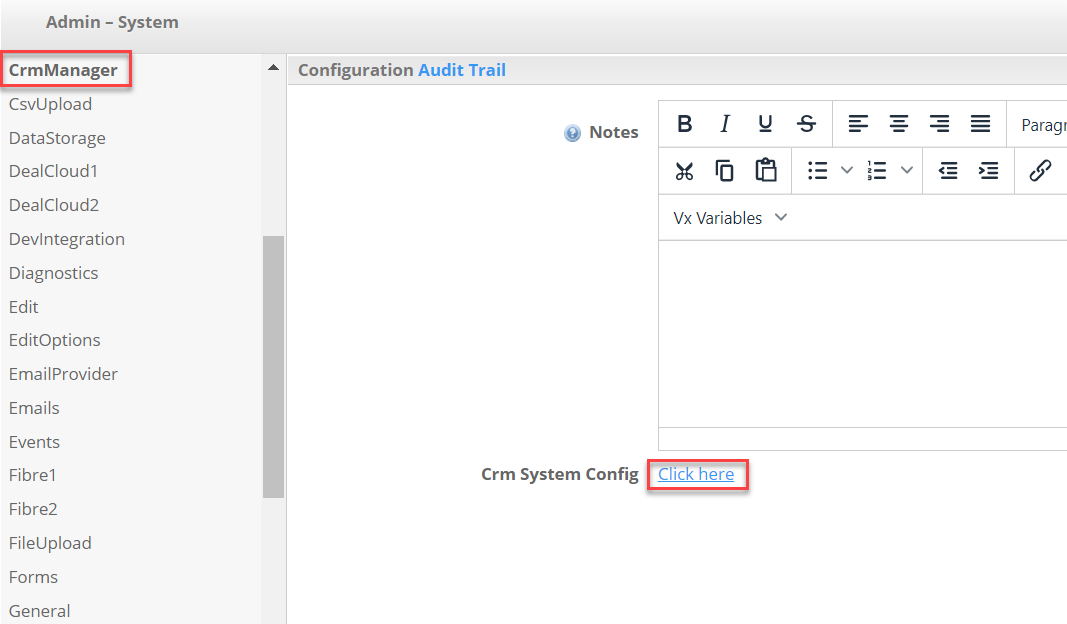
1. Navigate to the CRM Metadata Manager at Admin.System.CrmManager and select Click here:
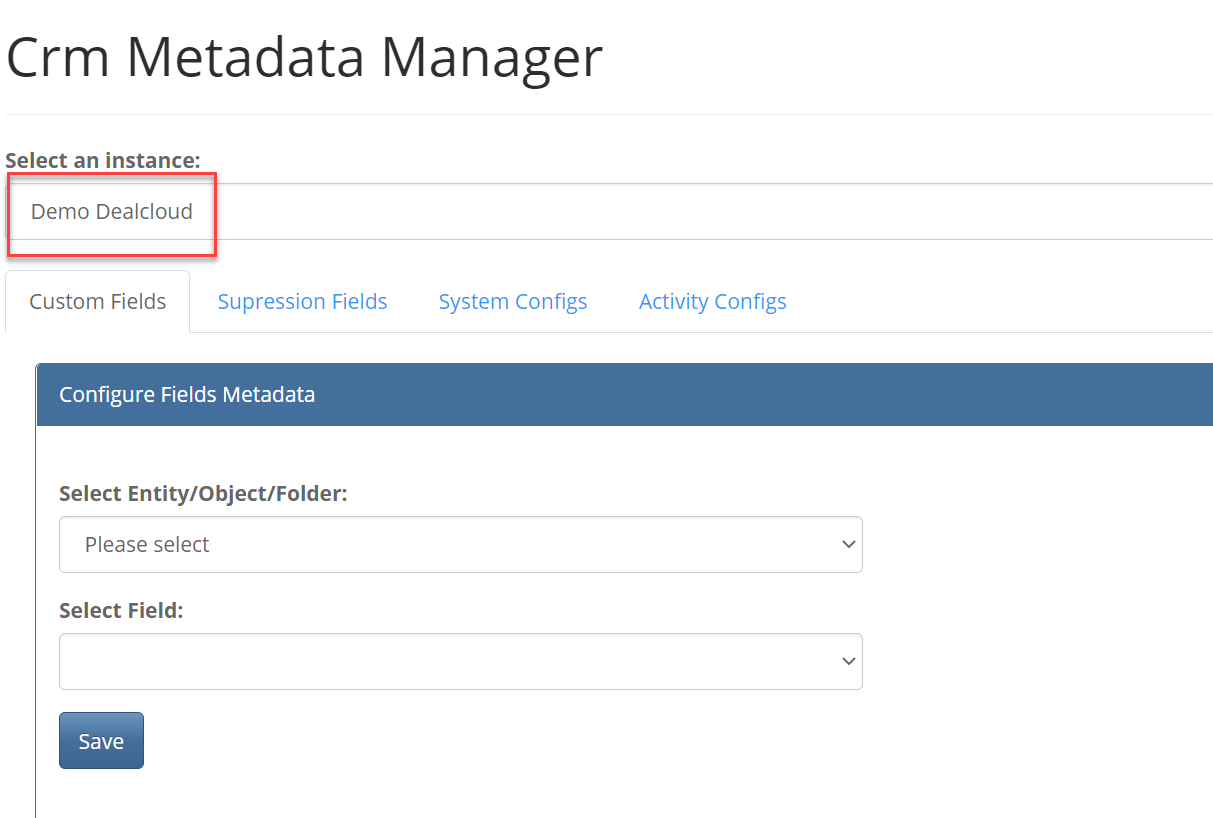
2. Select the CRM to which this Vuture instance is connected. In this example I am using DealCloud but the process would be exactly the same for Fibre:
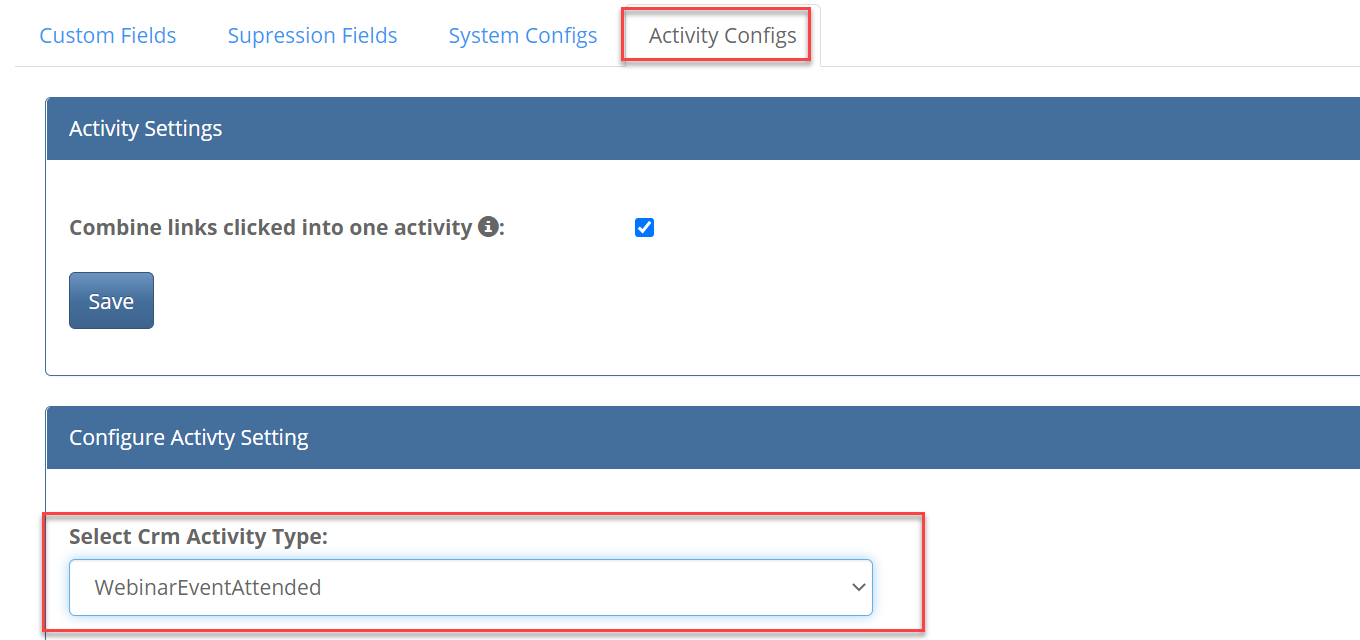
3. In the Activity Configs tab, scroll down to Configure Activity Setting drop down list and select WebinarEventAttended:
4. You now need to choose the activity type to map this to.
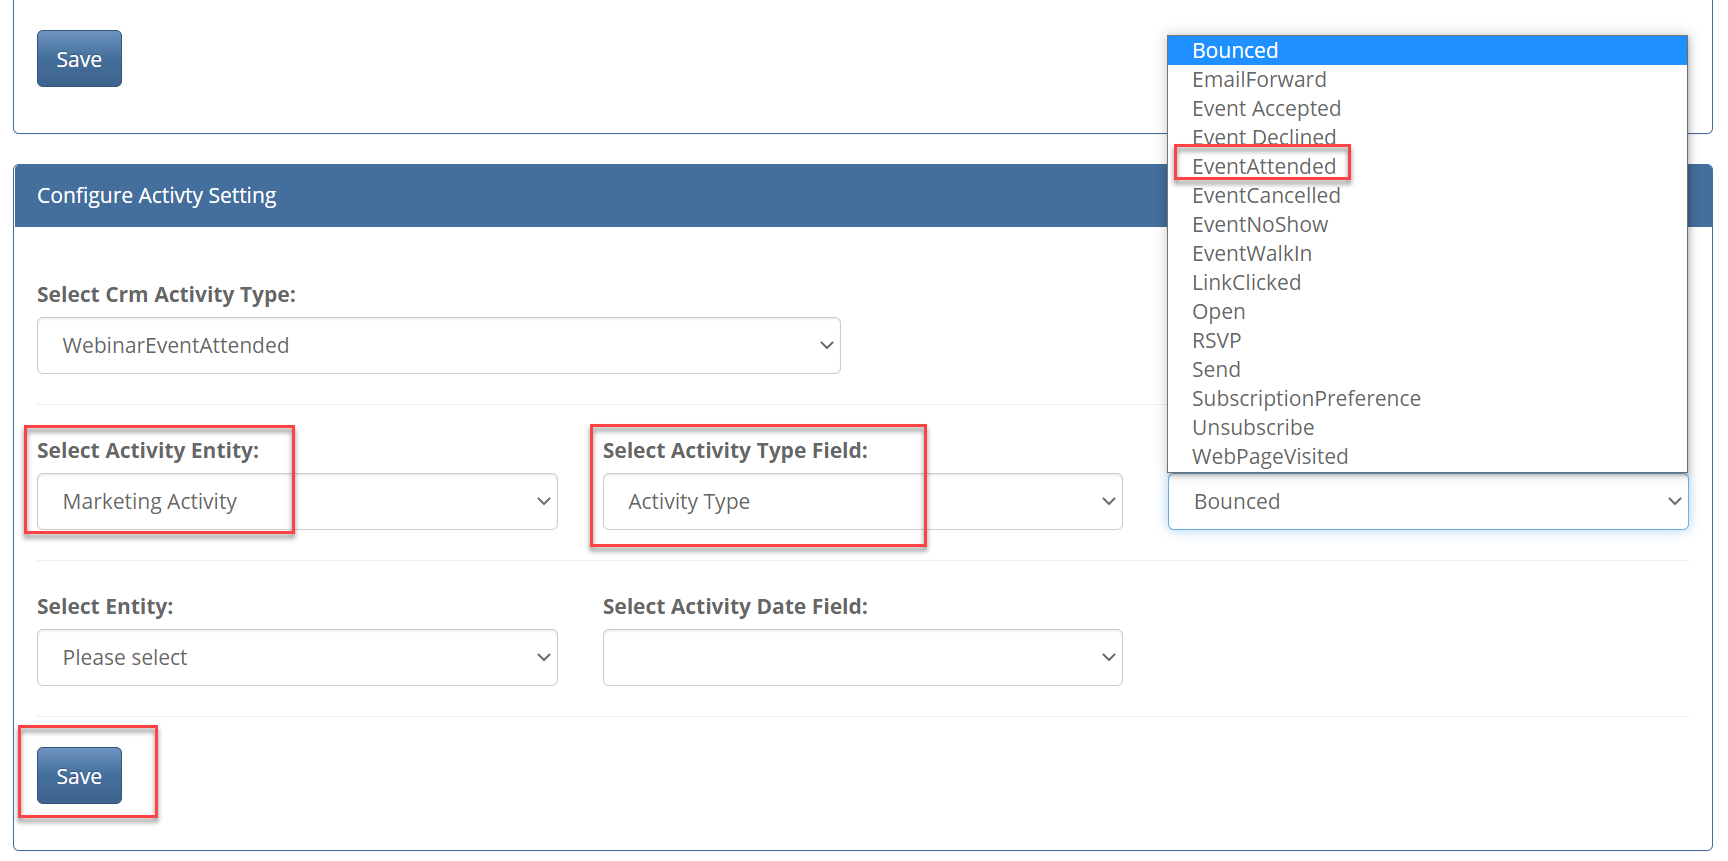
In the image above, the client's CRM has EventAttended already in their list. If they are happy to use this, then select it and click on Save. That will be the end of the process and you can close the tab.
Alternatively, if they have created a new, WebinarEventAttended activity type and that is not yet showing in this list, you will need to go to the Custom Fields tab and pull the new field through before mapping to it. Step 5 below explains how to do this.
5. Select the Custom Fields tab. Then choose Marketing Activity, Activity Type (Lookup) and Save. You do not need to select a Child Field here.
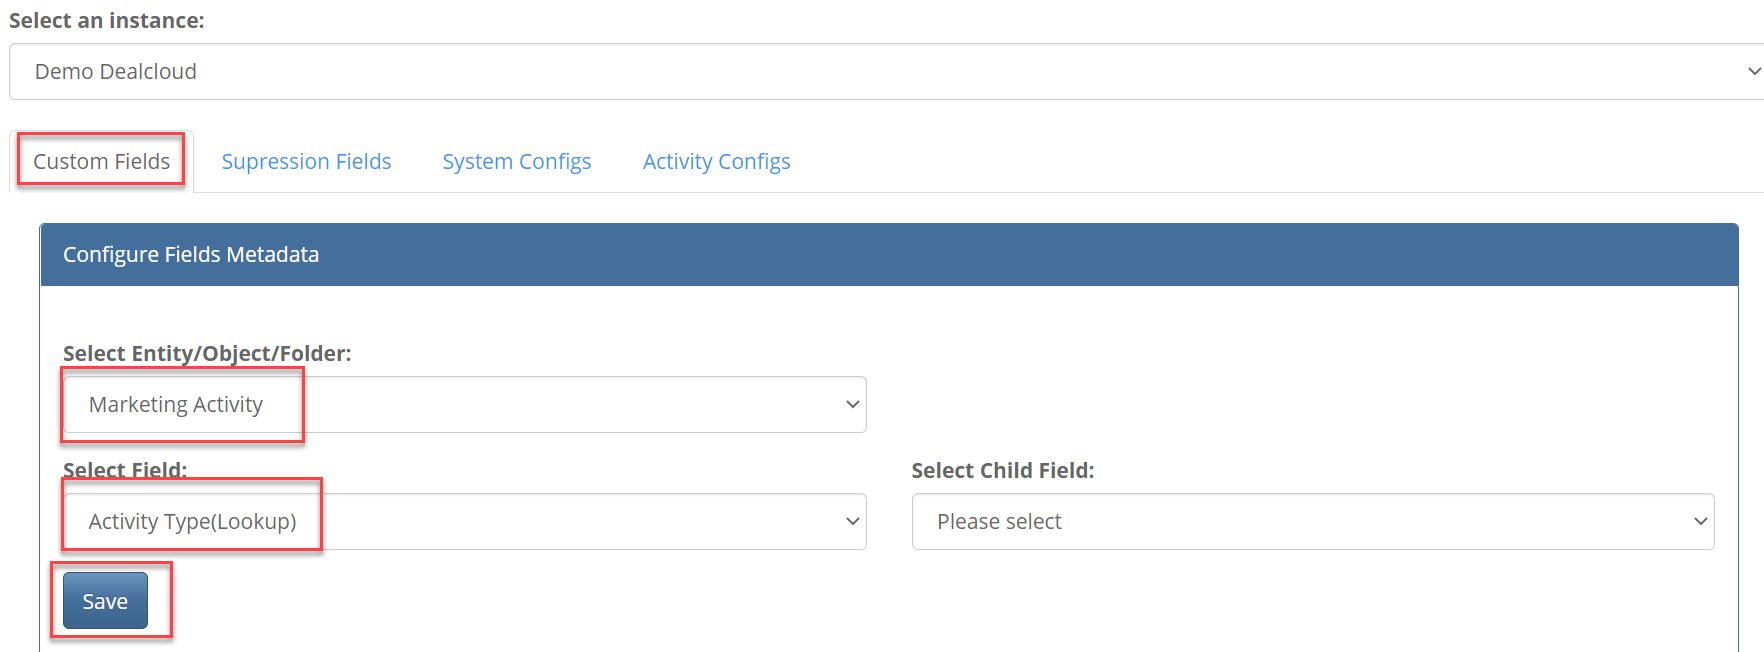
This step has refreshed the list of activities that are available to be selected from the CRM. You will get the Successfully Saved message in red when you Save.
6. Still in the Custom Fields tab, scroll down to the foot of the page, Marketing Activity, and click on Click here in blue.
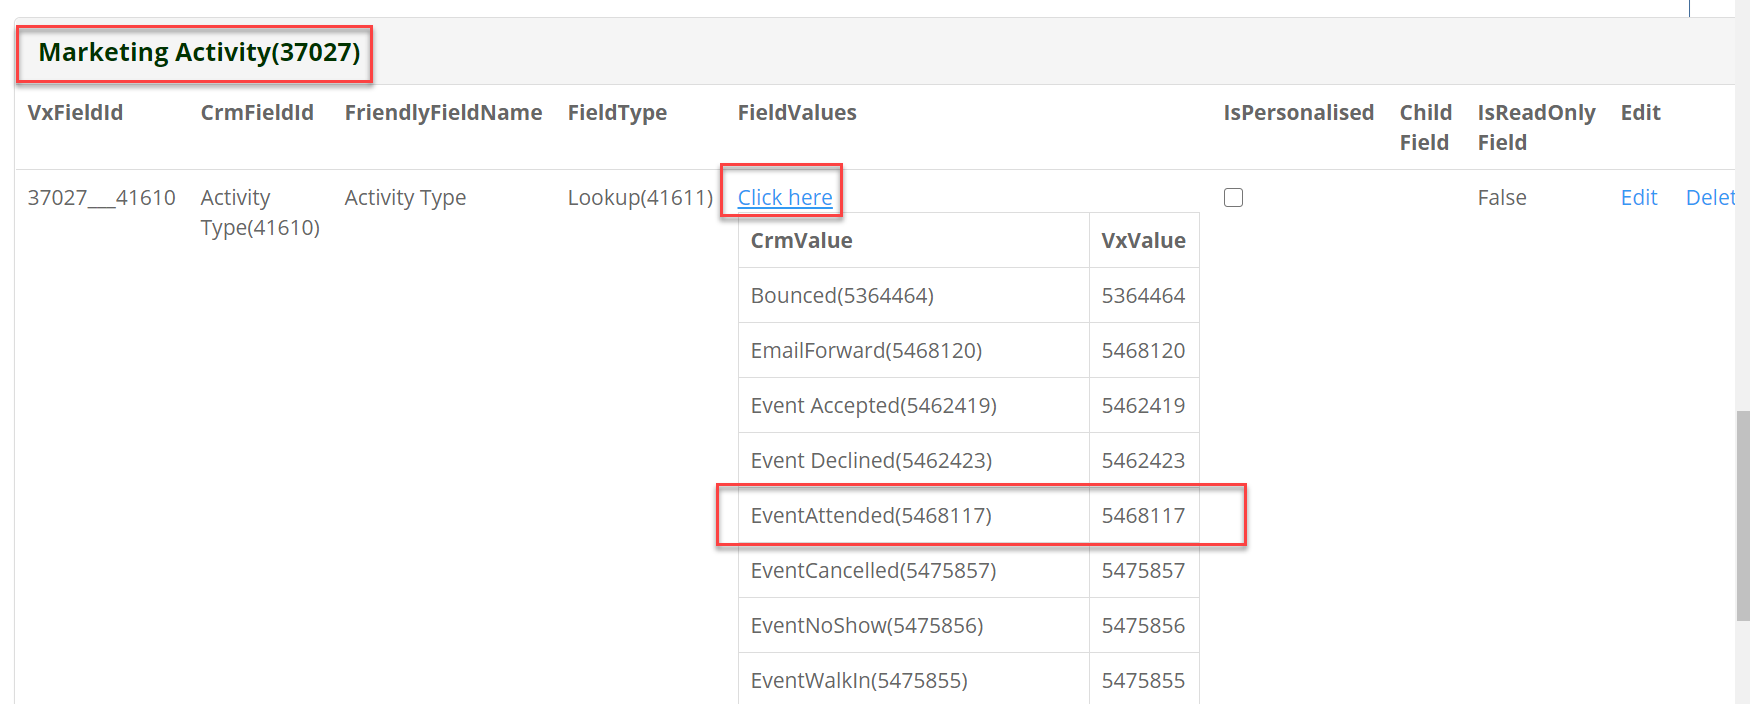
This list is coming directly from the CRM. If the client had entered a new activity type on their CRM such as Webinar Attended, it would now show up in this list. For the purposes of this article I am using EventAttended.
7. Having verified that the Activity you need is now present in this list, return to the Activity Configs tab:
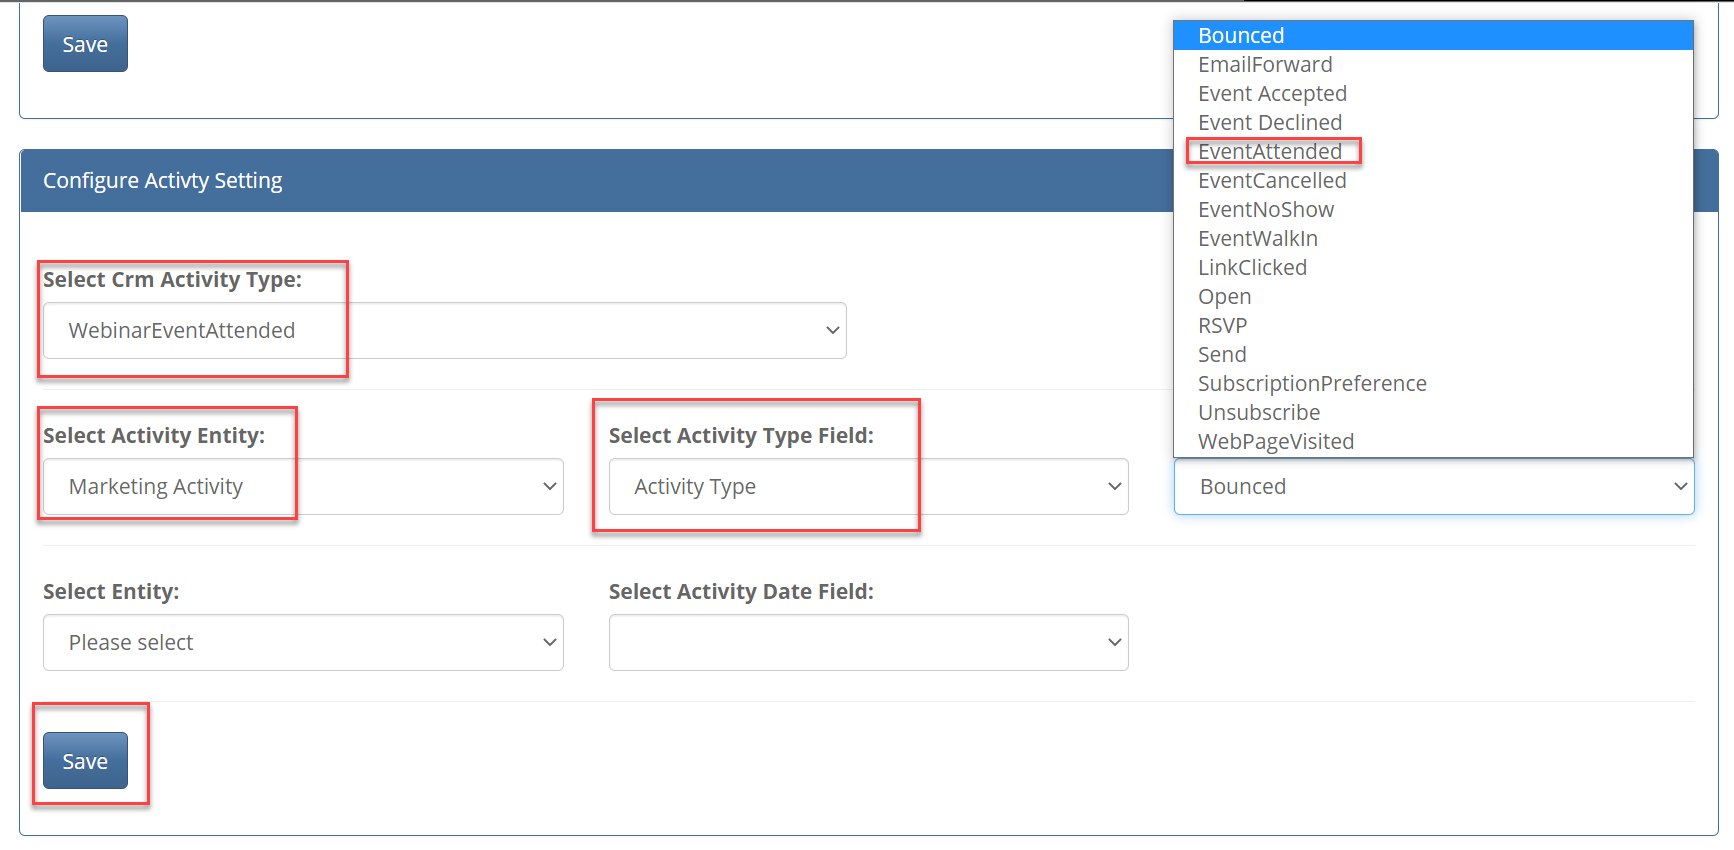
Make your selections as in this image above and click on Save. Leave "Select Entity" and "Select Activity Date Field" blank.
8. You will see the Successfully saved message and the activity will appear in the list at the foot of the screen:
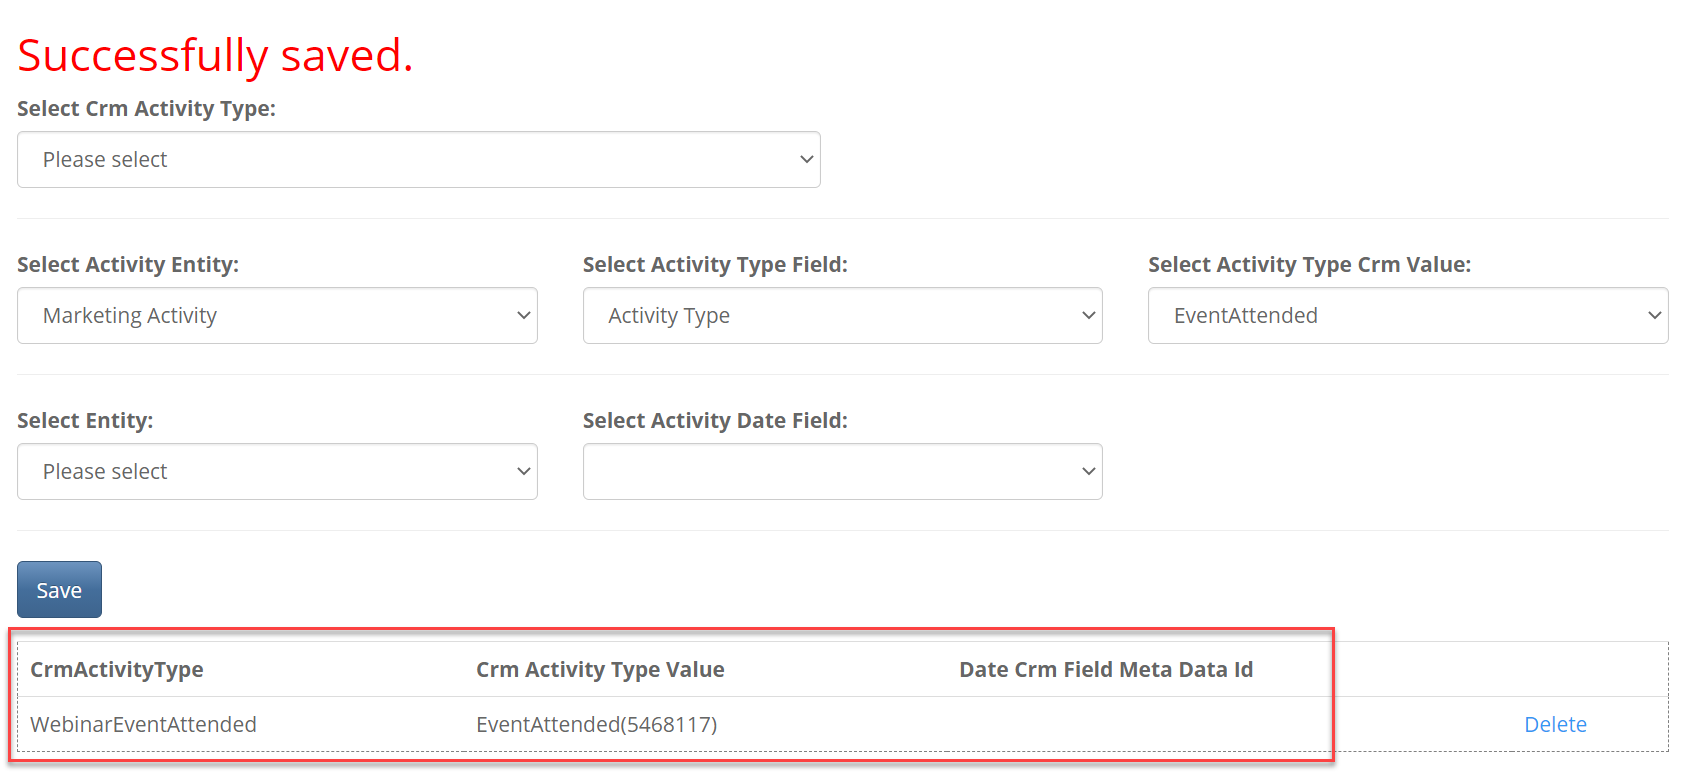
9. You can now close out of the CRM Metadata Manager tool by closing the tab.
Step by Step Instructions for CSMs working with ContactEase Clients
1. Navigate to the CRM Metadata Manager at Admin.System.CrmManager and select Click here:
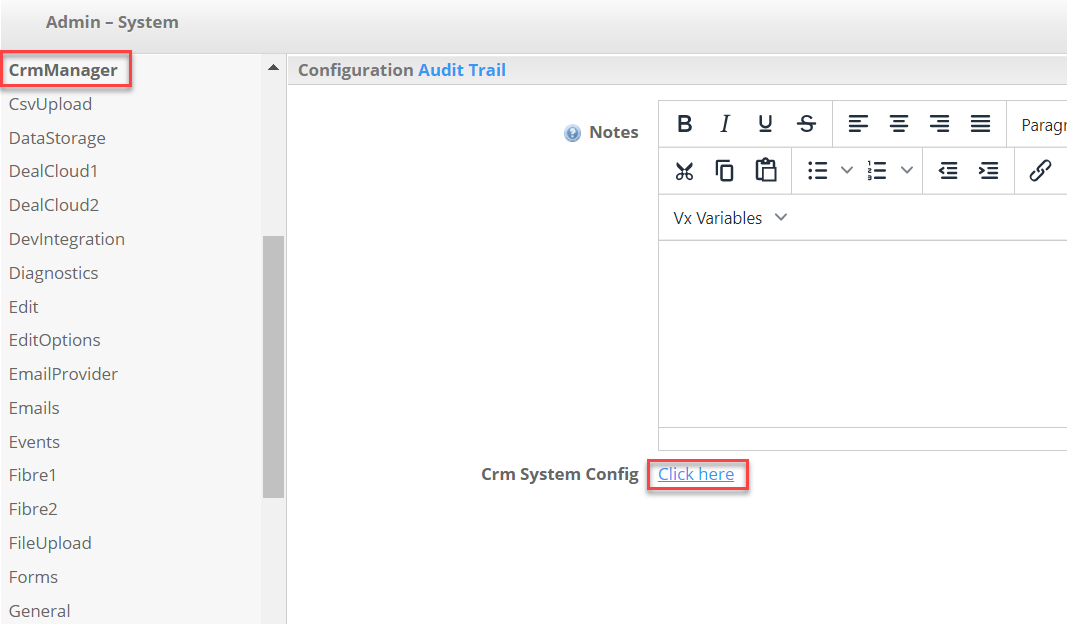
2. Select the CRM to which this Vuture instance is connected. In this example I am using Contactease1.
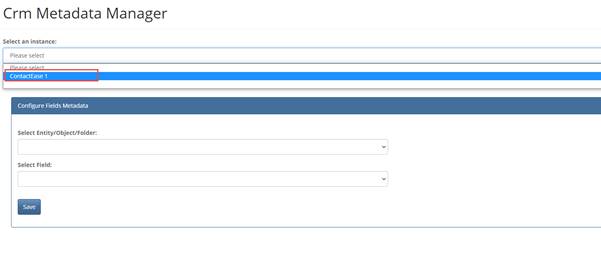
3) Next go to system configuration and follow the steps below:
- Select Contact Ease
- Click System Configs tab
- Select EnableWebinar from the category dropdown
- Tick the check box and save
- Save
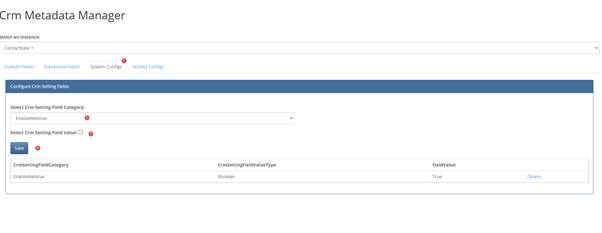
4. You can now close out of the CRM Metadata Manager tool by closing the tab.
Follow the rest of the standard setup for ContactEase.
• The contact clicks through to the Vuture form as normal from a Vuture email.
• They complete or confirm their details which must include an email address and Last Name field as the minimum.
• When the form is submitted, the contact's data is sent in the background to ON24, which registers them automatically for the corresponding event.
• Once the ON24 registration is complete, the form is submitted to your CRM and any fields are updated and an Activity created (note that the ContactEase integration does not include the concept of Activities).
• If an 'Attended' additional field value is entered in the form settings then contacts that have 'Attended' the webinar will be written back as Attended in your CRM.
It is worth considering, when adding a webinar in advance of an email campaign, the time lapse before your invitees actually attend the webinar. We have a 120 days threshold to write back attendees for performance reasons. This means that if the time between the webinar creation date and the event date is longer than 120 days, the attendance will not write back at all.
You should therefore not add a webinar several months in advance of the email campaign and the webinar attendance date. If you need to delay or postpone a webinar that you have already added to an RSVP form, just remove and re-add the webinar to the form. This will reset the webinar creation date to the current date.
This 120 day threshold is not configurable.
• The whole process happens with a single click of the submit or register button on the Vuture form.
Blank Forms
The registration process will also work with blank forms. A new contact is created in your CRM using your normal new contact creation process and the new contact is then registered for the webinar.
Which Vuture fields match up with ON24?
Important: To connect a Vuture form to ON24 it must contain at least an email address and Last Name field.
You can include other fields on the form and the following fields will be written back with each ON24 registration. Any fields not on this list will not be sent to ON24 but will be recorded in Vuture and your CRM:
|
|
ON24 with Dealcloud
|
ON24 with Fibre
|
ON24 with Dynamics
|
ON24 with ContactEase
| ON24 with Intapp OnePlace |
|
First Name
|

|

|

|

| 
|
|
Last Name
|

|

|

|

|  |
|
Company
|

|

|

|

|  |
|
Email
|

|

|

|

|  |
|
Job Title
|

|

|

|

|  |
|
Address Street 1
|

|

|

|
|  |
|
City
|

|

|

|

|  |
|
State
| |

|

|

| |
|
Zip/Post Code
|

|

|

|

|  |
|
Country
|

|

|

|

|  |
Please note: For the above fields to write back to ON24, make sure you have these fields checked in ON24 under 'Registration' > 'Registration Fields' for your webcast. They should also be included on your Vuture registration form(s).
How do I set up my Vuture form(s) with ON24?
Important: The ON24 registration or acceptance is triggered by submitting a Vuture form that references the ON24 Audience URL. Because of this, your RSVP Form(s) should only have the option to RSVP 'Yes’. We suggest that you remove any No, Declined or Tentative options on the form and make the RSVP Yes option prechecked, and hidden. You could then change the Submit button to say Register, and possibly add a line of text above the Submit button to say something like: Click Register to confirm that you would like to attend this event.
Setting up Forms
1. Create your RSVP Prefilled and RSVP Blank forms.
Make sure the below is done for both the RSVP Prefilled Form and the RSVP Blank Form.
• Only provide the option to RSVP 'Yes'. There should be no option to RSVP 'No' as the ON24 registration is based on this form being submitted.
• As a minimum, please include the First Name, Last Name, Email Address, and RSVP Additional field on the form. Pre-check the 'Yes' option and make this field hidden.
• Consider changing your 'Submit' button to read 'Register' or 'Accept' to make clear that by submitting this form, the contact is registering to your Webinar.
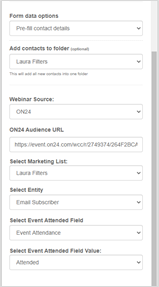
Best Practice Tip: If you have a Webinar Sub-Template, update your template by renaming the 'RSVP Prefilled' and 'RSVP Blank' forms as 'RSVP Prefilled - Yes' and 'RSVP Blank - Yes'. You may also wish to change your 'Submit' button to 'Register' or 'Accept' for each of the forms. Then, save out your updated Sub-Template. This can help to remind you and your team of best practice and eliminate having to do these additional steps each time - aside from the RSVP Additional field which will change each time with your Marketing List.
Form Settings for your RSVP Prefilled and RSVP Blank forms.
Make sure the below is done for both your RSVP Prefilled and RSVP Blank forms within Form Settings.
As with all of your RSVP Forms, make sure you have your Thank You page set, and the Form data options set correctly (i.e. 'Pre-fill contact details' for a Prefilled form and 'Blank form, disconnect from contact' for a Blank Form). The Form data options should be automatically set for you from the template you used, but it is always good to double check.
Confirmation Email
ON24 will handle the Confirmation email for you. You can edit this email, add your logo and branding colours in ON24 itself.
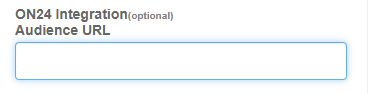
For the ON24 Integration, scroll down in Form Settings until you see 'ON24 Audience URL'.
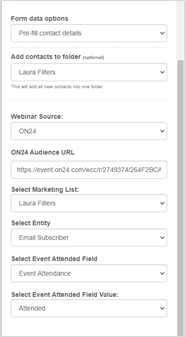
Within the ON24 Audience URL field, paste in your ON24 Audience URL for your ON24 Event. This will be in the following format.
http://event.on24.com/wcc/r/948318/EEC134D94C25333CACFE8AD3242CE09F
or
http://w.on24.com/r.htm?e=948318&s=1&k=EEC134D94C25333CACFE8AD3242CE09F
Select the 'Attended' Additional Field and then select the Additional Field Value of 'Attended' from the options.
Save and publish both forms.
Your forms are now integrated with both ON24 and your CRM. Clients who register via your form will not be asked to register again.
Reminders, Thanks for Attending, Sorry we Missed You
If you make the correct selections in your ON24 dashboard, ON24 will handle Reminders, Thanks for Attending and Sorry We Missed You emails, automatically registering who attended and who missed. ON24 will include the Click here to watch On Demand links in these emails.
