Overview
Notification emails are typically created to automatically send an email to a contact; for example, their booking confirmation for an event. These emails can also be used to inform a team member internally that a contact has submitted a form.
Contents
About Notification emails
When a contact submits a Vuture form, it is straightforward to generate a copy of that form submission and send it automatically to a single, internal address. You can do that by adding the internal email address to the Form Settings tab when creating the Vuture form.
However, if you wish to inform a range of different internal contacts that a form has been submitted, depending on the choices made by the contact, you can create separate Notification Emails which will be automatically routed to the appropriate internal contact.
Notification emails can be personalised by inserting fields in the email that pull in individual form response values. Fields can be inserted into the email in the format #{VxForm_FieldName} where FieldName is the name of the field on the Vx form. The name of the fields can be found in the form editor in the Conditional Value field.
For example, if you have a field called Accept-or-Decline on your Vx form you can use the field #{VxForm_Accept-or-Decline} to display the client’s response value in the email notification to your internal contact. This method will transmit the information given in the form fields and does not refer back to the CRM in use. It therefore works for all CRMs integrated with Vuture and with Standalone.
Create a global “Please Contact Me” blank form and add it to your website. Add a list to the form such as Area of Interest (Banking, Tax, Environment and so on). The prospect visits your website and completes their contact details on the form, selecting Banking before submitting the form. A notification email will be automatically generated and sent to your nominated contact – for example, the Head of Banking. This email contains all the contact details of the prospect and the choices they have made on the form. For this process to work the Vuture user will need to create a separate Notification Email for each Area of Interest and hold them in the same campaign as the Contact Me form.
Alternate Example - Events
Create an event invitation and email it to clients and prospects. On the prefilled RSVP form, in addition to the RSVP Yes/No and other event information, add a list of choices such as Topic 1, Topic 2, Topic 3. The clients or prospects complete the form and select the topics of interest to them. When they submit their RSVP responses, a notification email will be automatically generated and sent to the internal stakeholder responsible for delivering that topic on the day. It will contain the contact details and all the choices made by the client. Again, the Vuture user will need to create a separate Notification Email for each Topic on the form.
To Create Personalised Notification Emails
Creating the Email
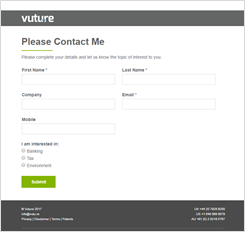
Build the Vuture form with all the fields required. In this example it will be a blank Contact Me form. You will need to include the contact details of the client or prospect, plus a way of identifying who should receive a copy of the form – so a list of Areas of Interest for example – as an additional field with single choices.
Here is an example of the way it could look:
Deploy the form to your website.
In the same Vuture campaign as the form, build a separate Notification Email for each Area of Interest. Any banner text, heading, colours and layout are up to you and your templates. The body of each Notification Email could look something like this:
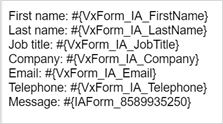
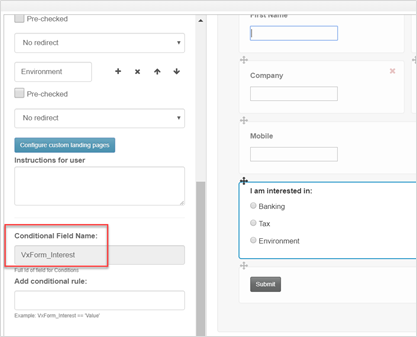
Note: there is a mix of #{VxForm_ and #{IAForm_ prefixes in use in the image above because this example is connected to the InterAction crm. The prefixes and form names in your email will vary, depending on your form and your crm if any. If you have Forms v2 enabled you can find the field names to use in the form editor, in the Conditional Field Name here:
Create each Notification Email and name each email separately, according to the Areas of Interest, like this:
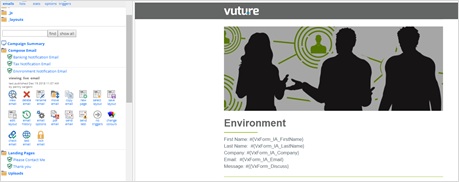
Switch each email to be a Notification Template by selecting the email, and clicking on Email Options:
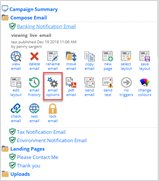
In the next screen select Notification Template from the drop-down menu and Save Metadata:
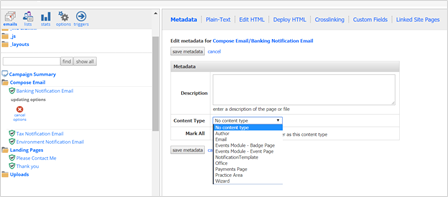
Repeat for all the Notification emails you have created. If you have only Notification emails in this folder you could save time by doing one first and then using the Mark All option to mark all the others as Notifications at the same time.
Now return to your Contact Me form to connect the Notification Emails to it.
Open the form for editing and click on Notifications at the top right-hand side:

Choose Add Notification, enter a unique Description and select the first Notification Email from the drop-down list. Use a valid From email (you will be obliged to add a comma and a Display Name after the email address before you can click Update), your choice of Subject line and then enter the email address of the person who should be notified that the form has been submitted (for example, in this case, the Head of Banking).
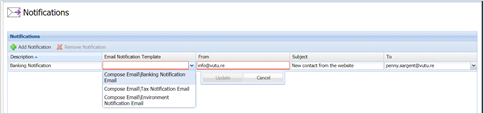
You now need a Condition for when this Notification email should be sent:

Choose Add Condition and then select the Form Field which indicates the Area of Interest or the Topic. The Operator should be “is” and the subject is as appropriate each time. In this first example I will choose Banking.
Select Update in the middle of the screen and then repeat the process of adding a Notification Email, with the appropriate Condition, for as many times as you have Notifications. You will have to select Done each time and then go back into the Notifications area.
You will finish with a screen something like this:
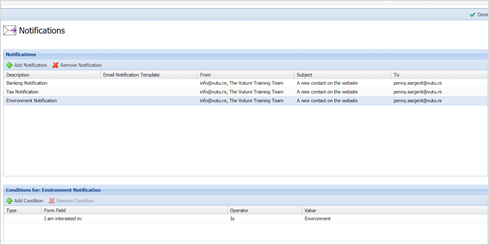
In my example all the Notification Emails are being sent to penny.sargent@vutu.re but your version will have the appropriate internal stakeholder address.
You should now publish the form before testing the process.
Testing
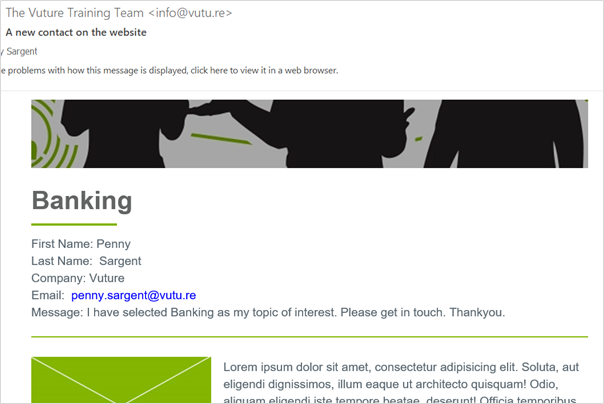
To test, select the Contact Me form and View Page. Complete the form with your contact details and a test message and Submit. Your nominated email address will receive the Notification. In my example scenario the Notification email looks like this: