Contents
Introduction
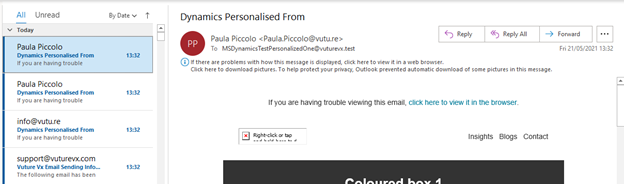
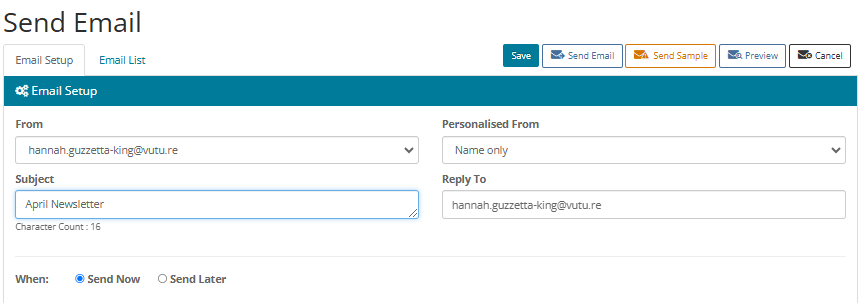
When sending an email you can choose to personalise the From Address that is displayed in the recipient's email client window.
By default, all emails are sent using the From Address which you select from the drop-down on the Send Email screen. This will result in every recipient having the same From name.
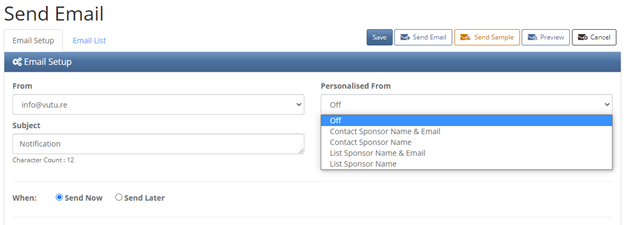
Now, you can choose to vary this. Next to the From Address is a drop-down field called "Personalised From".
There are two different types of Personalised From now available with Dynamics; Sending an email “from” the contact’s Primary Sponsor or sending an email “from” the List Sponsor.
Why did we do this?
In Dynamics, sponsors have been typically associated with individual contacts. Additionally, we wanted to allow Vuture clients to send emails “from” the relevant stakeholder appropriate to each mailing list. For example, an Oil & Gas mailing could go out from the senior Oil & Gas partner to some contacts on the list and from the junior Oil & Gas partner to the rest of the contacts on the list. By adding a new custom field to the integration this is now possible.
Prerequisites
- Dynamics v2 integration with Vuture
- Send Screen v2
- Next to the From Address on Send Screen v2 is a drop-down field called "Personalised From". In order to see the Personalised From drop-down field your CSM should enable "Admin.Roles.Emails.Personalise on From Name" for your Role.
- For Primary Sponsor, the CSM must enter MS Dynamics field IDs in Vuture for the sponsor fields: Name, Email and Job Title in "Admin.System.MsDynamics", these will be picked up when the email is sent.
- For List Sponsor, The “Vx List Member” must at least have the fields “Contact”, “List Sponsor” and “Marketing List” in Dynamics. Working in Dynamics, you can use whatever names for these you like.
Type 1 - Primary Sponsor
You need to create a custom field to hold the primary sponsor value in your CRM. Here is how to do it in MS Dynamics:
Creating the Primary Sponsor field in MS Dynamics
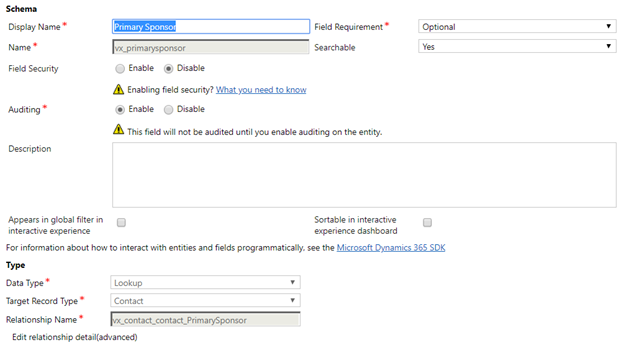
In order to get personalised emails, you first need to specify/create a Primary Sponsor field in the contact entity. This field needs to be a lookup field. The lookup field should ideally point to a contact entity but can technically point to any type of entity that you use for holding sponsor data e.g. lead, account or a custom entity. The screenshot below shows an example of this. Note the name of the entity as you will need it later. For this example we are assuming the name of the field to be vx_primarysponsor. We will also assume that vx_primarysponsor is a lookup field which has a target record type of Contact.
Adding the correct settings for the primary sponsor fields in your Vuture instance
Now that you have added the Primary Sponsor field, you need to configure Vuture to read data from the correct fields for the sponsor entity. For this you need to find the names of the fields in the entity that is specified in Target Record Type. For our example this is Contact. Note that this might be different for your setup but the method of finding the names of the fields is still the same. We need to find the names for the fields that hold the data for full name, email and job title.
In Dynamics CRM, go to Settings > Customizations > Customize the System. This will open up the customisations window. In this window, in the left column under Components, expand Entities then:
- Scroll to find the entity specified in Target Record Type. This is Contact in our example.
- Expand this entity and click on Fields
- In the right hand pane, scroll to find the fields that hold the date for name, email and job title. In our case these fields are fullname, emailaddress1 and jobtitle.
- You can find the field name under the Name column:
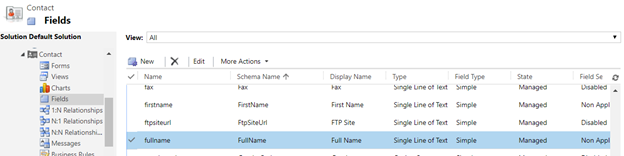
- Note down the name for each of the three fields:
|
Data
|
Target Field Name
|
|
Name
|
fullname
|
|
Email
|
emailaddress1
|
|
Job Title
|
jobtitle
|
- The final step is to combine the Primary Sponsor field name with the Target Field Names to get the final values that will be input in Vuture:
|
Data
|
Target Field Name
|
Vuture Config Value
|
|
Name
|
fullname
|
vx_primarysponsor.fullname
|
|
Email
|
emailaddress1
|
vx_primarysponsor.emailaddress1
|
|
Job Title
|
jobtitle
|
vx_primarysponsor.jobtitle
|
The values in the Vuture Config Value column are the ones that you will have to provide to your Customer Success Manager so that they can update them in Vuture. In Admin > System > Microsoft Dynamics they will enter the values as follows:

Personalised FROM options
- None
This option does not personalise the From Address - each email is sent using the same name - the From Address selected in the From field.
- Name and email
This option personalises the From Address for each contact using the Email Address and Name of the Dynamics contact field as defined in the Dynamics Primary Sponsor fields: Name, Email and Job Title.
- Name only
This option personalises the From Address for each contact using the Email Address selected in the From Address drop-down but uses the Name of the Dynamics contact field as defined previously. The advantage of this option is that you can avoid Out of Office messages going back to a partner or fee-earner, but their name will be displayed in the From Address that the recipient sees.
Type 2 - List Sponsor
The Personalized From box on Send Screen v2 can now contain the following five options:
- Off (emails will be sent from the default name selected from the drop-down on the Send Email screen. This will result in every recipient having the same From name.)
- Contact Sponsor Name
- Contact Sponsor Name & Email
- List Sponsor Name
- List Sponsor Name & Email
The Sponsors are first set up in the Dynamics database and then pulled through to the Vuture mailing. Users can set a different Sponsor for each contact, and for each contact on a list.
Configuring the List Sponsor in Dynamics
You need to make sure that there is a Sponsor Object with 3 lookup fields e.g. Vx List Member entity. If not, add a new one, with the field type Lookup.
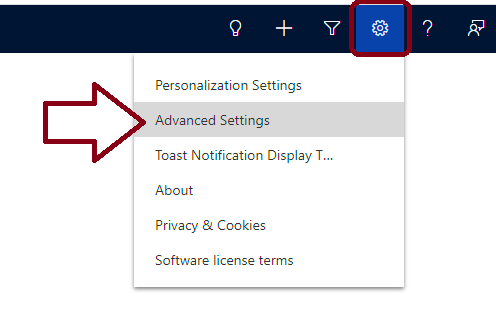
Click the cog icon (Settings, Top Right) → Advanced Settings
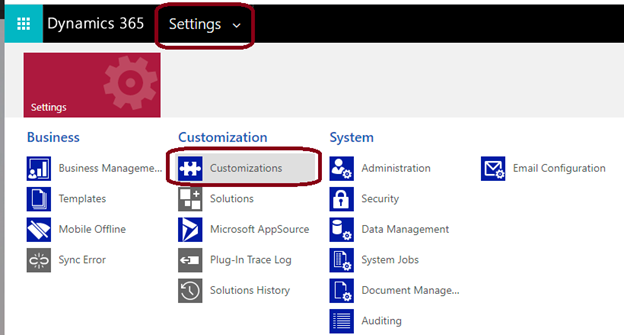
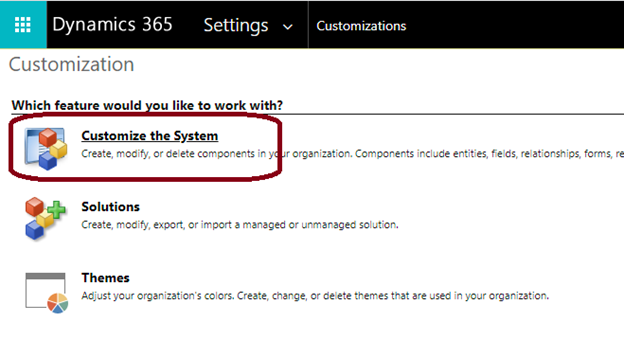
Now click Settings → Customizations → Customize the System
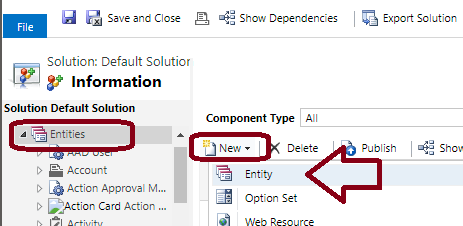
Click Entities → New → Entity
The lookup field typically needs to point towards the contact entity, but could point to a lead or other record type if your sponsors sit in a different entity.
This is set up in Dynamics CRM Customisations, using any field name you want to use, as long as you provide access to the Entity/Object to the Vuture Dynamics Account
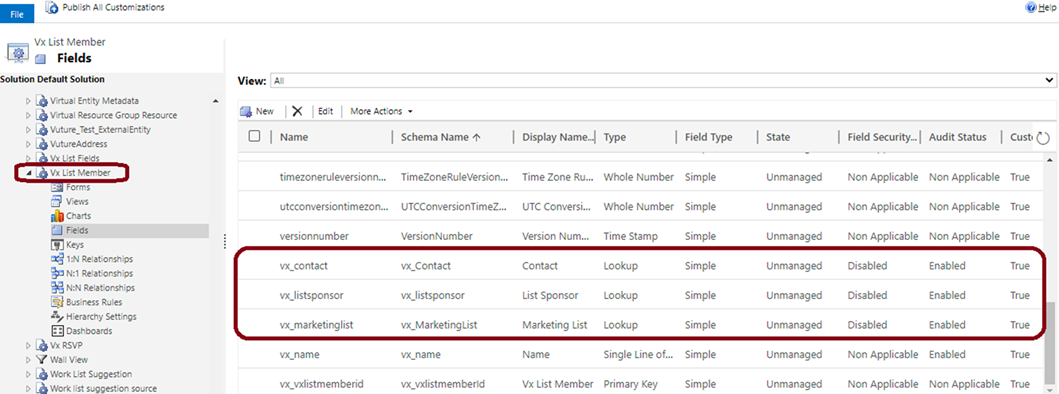
The “Vx List Member” must at least have the 3 lookup fields “Contact”, “List Sponsor” and “Marketing List”. You can name these whatever you like and have additional columns if required.
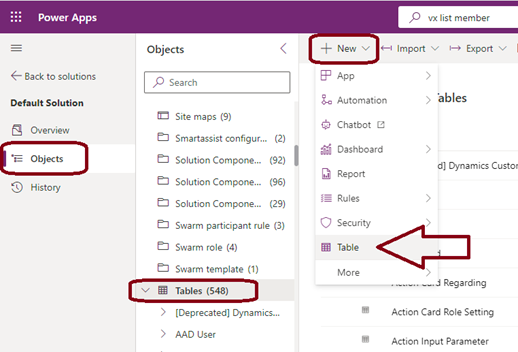
The new Unified Interface is different and you need to go to Objects → Tables
Then click New → Table
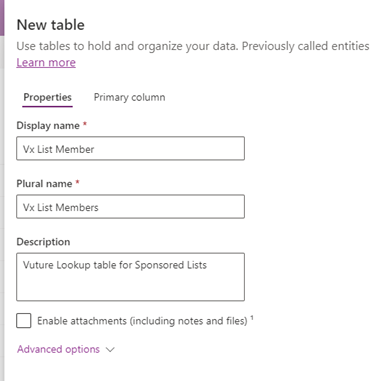
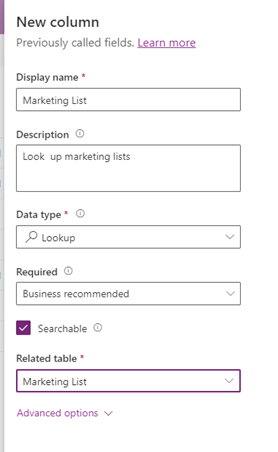
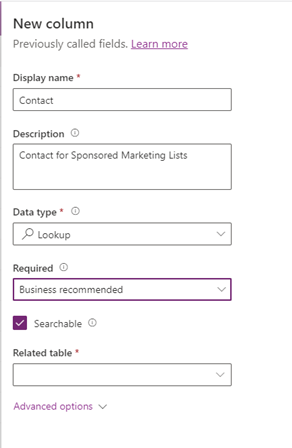
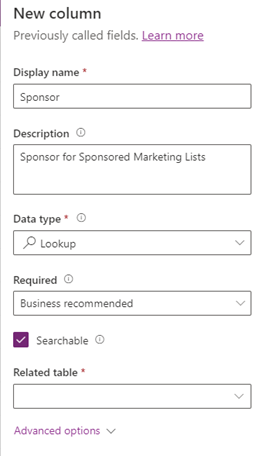
Once defined in the CRM and saved, do not forget to Publish Customizations.
Also add a menu in the SiteMap for this Entity and view it like this:
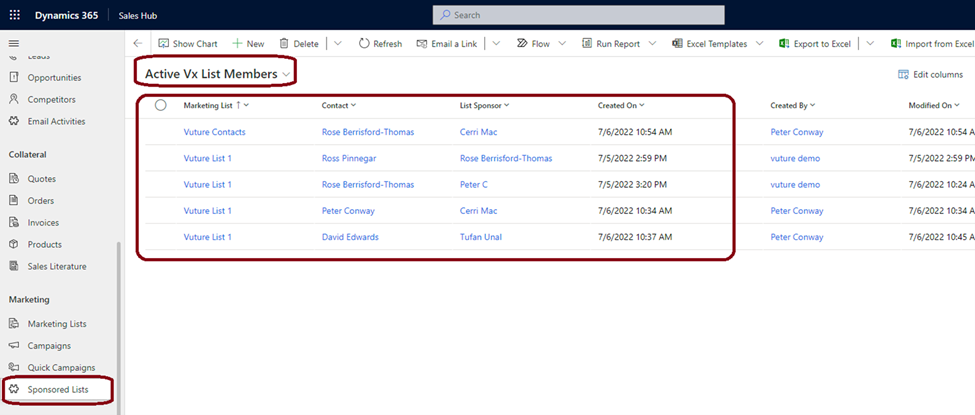
From here you can add new rows for multiple lists:
All three fields are lookup fields, so click on the value, enter a name and the available contacts or lists are displayed:
Add Contact Add List Sponsor 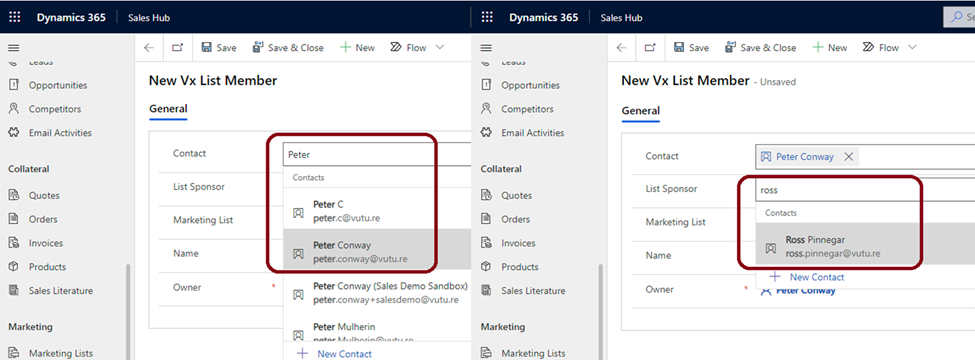
Add Marketing List
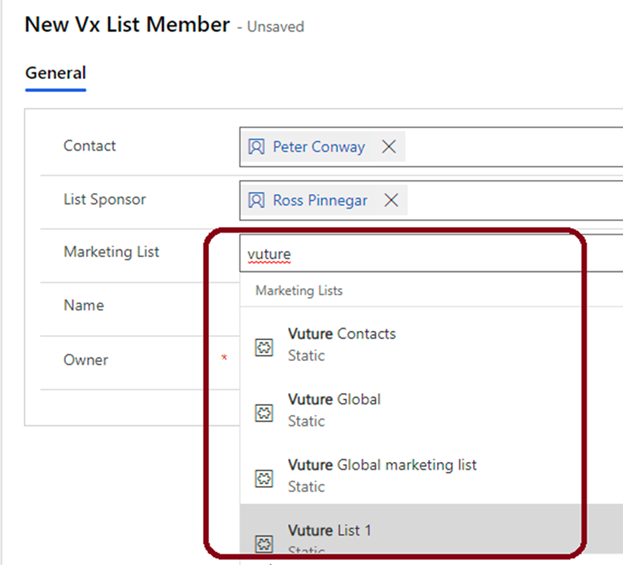
Click Save and Close

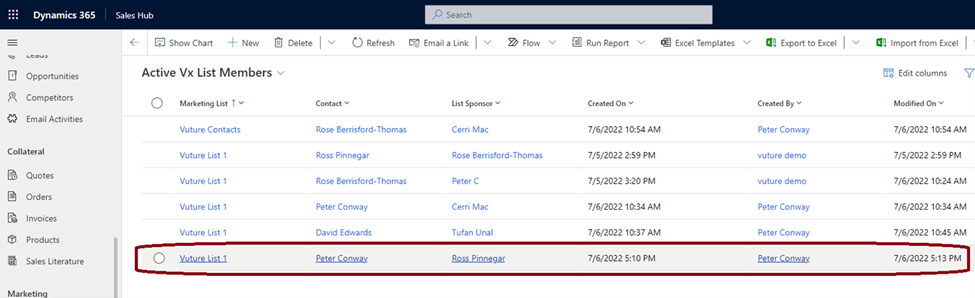
Once that’s added, we need to do the mapping on the Vuture side.
Mapping the Dynamics Fields in Vuture
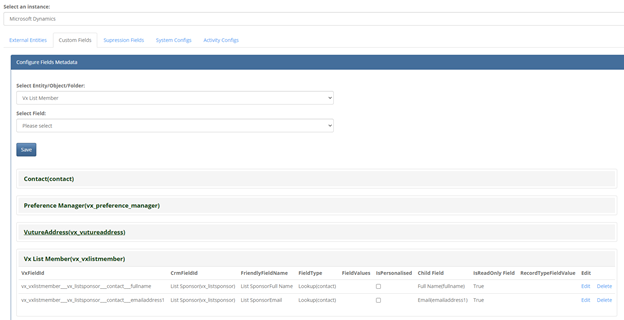
The list sponsor field will need to be imported through the External Entities Tab in Vuture’s CRM metadata tool by Support or by your CSM. They will then be able to pull in the relevant details via the custom fields tab.
The Vuture Team will select the Vx List Member object, select your list sponsor field, and then select a child field. The lookup will reference a particular record in the lookup entity. Let’s use the example of a contact - the lookup field will find the whole sponsor contact record (and return a unique CRM ID). The child field will pull out specific fields from the record. In this case, we want the full name and email address of the sponsor - so we can input those into the child field, one after the other:

It will then be available to configure on the Systems config tab in the metadata tool.
Once it has been configured, the options for List Sponsor Name only and List Sponsor Name and Email will be displayed in the Personalised From drop-down on the Send Screen, along with Contact Sponsor Name and Contact Sponsor Name and Email .
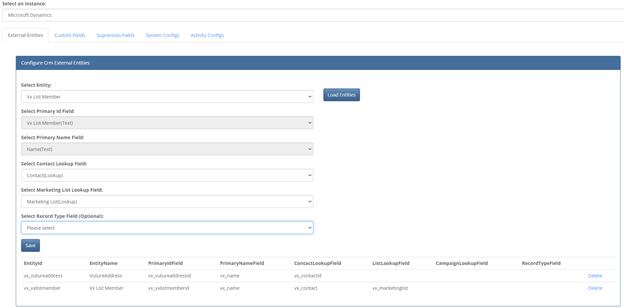
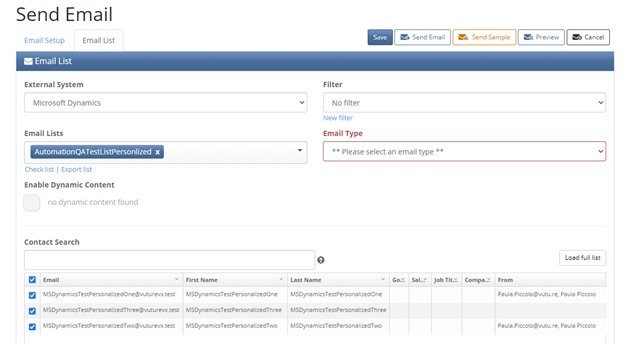
Displaying the List Sponsor for each Contact on the Email List Tab
First select List Sponsor from the Personalised From drop-down. Select a mailing list. When navigating to the Email List tab, you will now be able to see the sponsor for each contact in the From column in the contact grid.
Sending with an empty List Sponsor field
If List Sponsor is selected, but the contact does not have a sponsor associated with the list, the mailing will default to the From address selected on the Send Screen.