What does it mean to A/B test an email campaign?
A/B testing* is a method of analyzing the effect of a single variable (graphics, or text, or timing, etc.) on the performance of a marketing communication. The goal of A/B testing is to optimize a mailing to achieve a desired marketing outcome.
*An important note about A/B testing in the professional services sector: Given the low volumes of emails we see with firms, it may be difficult to carry out A/B testing in the classic way. The classic way to A/B test is to send out a constant version to 10% of the list and a modified version to another 10% of the list. Once you’ve evaluated the results you send the more successful of the two to the remaining 80% of the list. If you are working with very small lists, we recommend the incremental approach outlined below.
Set a Goal
The first step in A/B testing is to set a goal. For an event campaign this might be RSVPs, for a newsletter it might be clicks through to a thought leadership piece, or for an alert it might be social shares. Once you’ve set a goal, don’t waver! Focus on that point as the key measurement of success in the A/B test.
Choose your Variable
Second, decide on the variable that you will be testing. Altering only one variable at a time allows the experimenter to establish the most reliable causal relationship between the modified variable and the outcomes observed. The email that is not changed is your “constant” version which is tested against the “modified” version, or the email with the change to be tested.
Ensure you affect the right variable
Make your best educated guess to choose a variable that will actually affect the goal that you’ve set. For example, if your goal is to increase the open rate, A/B testing with a different banner image is unlikely to have an effect on whether or not the email was opened. To A/B test for increased open rates, you’d want to test the subject line, time and date of send, “from” address, or other elements that are more likely have an effect on the recipient opening the email.
Establish your sample size
A further step in an A/B test is to establish the minimum sample size needed in order for your experiment to gather enough data to generate statistically significant conclusions. Traditionally, statistical significance is achieved when the data support a confidence level of 95%. If you are unable to procure enough observations to establish 95% confidence, then quantitative analysis is still possible, but the statistical confidence of the experiment’s conclusions will be lower.
Best Practice for A/B Testing with Vuture
- Test campaigns one after the other – unless you’re testing the time of send, you want to send the emails out one after the other so that they reach the recipient over the closest possible window of time.
- Test campaigns at the same day of week and time of day if running an A/B test on the same newsletter over a period of time. If you’ve decided to A/B test on your Litigation Newsletter, and you’ve chosen to test with the From address in the first trial, and then in the next month you test with the subject line, make sure that the day of the week and the time of day are the same. This ensures that the maximum number or variables are constant so that trends can be most closely attributed to the variable that’s changed.
- Listen to the data! Don’t second guess the numbers – if the data tells you a story, listen!
Ideas for A/B Testing
- Image variations – location of image, type of image, size of image
- Headline copy and size – your headline is the first thing that the reader encounters so changing the images, font, and copy can have an impact on the reader’s engagement for the rest of the email
- Header height – with smartphones and tablets increasingly becoming the device of choice, the header height can have a big impact on what first appears on the screen. Make sure your emails are mobile optimized and sensitive to the header height.
- One column vs two columns
- The order of your links and CTAs (Calls to Action) – make sure that the order fits with the content. If a reader clicks onto a link and leaves the email, they might not be back! The first link is often the most clicked.
- The style of your links and CTAs – does the reader know what you’d like them to do? Is the most important link featured most prominently?
- Sending time of day – discover which lists open emails at which times
- Volume of content in email versus in landing page
- Sending a reminder for an event campaign
- The number of text links: a lot of links versus not as many links
- Different background colors
- Changing colors to highlight an important element – Make sure that your CTAs are clear
- Use an interesting looking graph or flow diagram – Infographics are popular because they’re easy to digest. If you use a graph make sure it’s easy to read
- Clear versus teasing subject line – Asking questions can be an effective method of capturing readers’ attention
- Link to archives or related content
- Long copy versus short copy
- Use of bullet points
- Adding a footer navigation
- Testing the From: name
- Use steps or a progress indicator in a series
- Repetition of the CTA button
Automatic A/B Testing with Triggers
Alternatively, two manual methods are described below:
A/B Testing Basics
Here are two check lists for some recommended procedures on carrying out A/B testing when your lists are too small to work with the classic 10% first method.
Method 1 – requires the ability to identify half a mailing list at a time*
Using the subject line as your variable:
- Create your first email (1). Set the subject line.
- Copy the email (2). Change the subject line to a different message.
- Send email 1 to half your list and email 2 to the other half.
- Compare open rates, read rates and clickthroughs using the Email Dashboard report.
This can be repeated with different variables such as Sending Time of Day, Sending Day of Week, Call to Action Button Colour / Position on page.
Method 2 – using the same list each time, all the contacts on the list
Using the call to action button as your variable:
- Create your email with a “Click here to read more” link in style 1 (Red button, bold white text for example)
- Send it out to your list.
- The following week or month, create the email with a very similar subject line, the same From name and similar content.
- Change the “Click here to read more” link to style 2 (Blue button, or not a button at all for example)
- Compare the open rates, read rates and click throughs using the Email Dashboard report.
How to split an InterAction list in InterAction
It is possible to identify and mail to half a list using InterAction to split the list.
To split the list in InterAction: in the windows client, open your list and create an additional field on the list called AB Segment. Make the values 1 or 2.
Then, noting the total number of contacts on the list, Mark the first contact on the list with a checkmark, and holding down the mouse drag it down the page to the half way point. You should now have half your list marked.
Then, using the Mark menu, update the new additional field to be Segment 1.
Reverse mark the list using the Reverse Mark command and update the other half of the contacts on the list to be Segment 2.
You can now create a Filter in Vuture at the point of sending, based on the additional field value, and send the exact same email – with one variable different – to half the list at a time.
Reporting on A/B Tests
Monitoring Analytics for A/B Testing
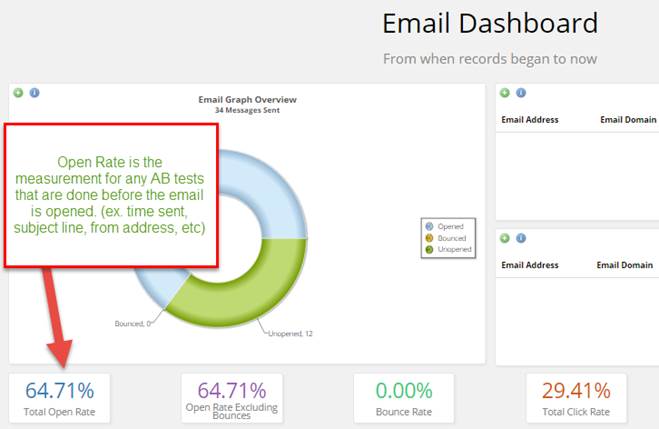
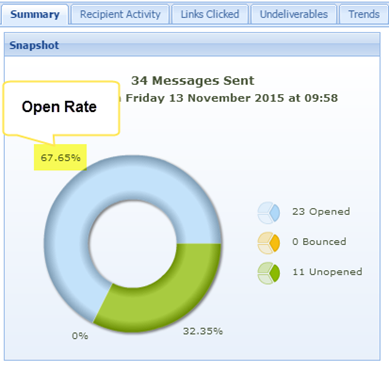
The most efficient method to measure success during an A/B test is to utilize the Email Dashboard or the statistics within the mailing reports in the email campaign. The Email Dashboard clearly outlines both top line statistics from the email and allows you to seamlessly drill into specific metrics such as links clicked and bounces.
To test factors that could affect open rate
In the Email Dashboard:
In the email reports:
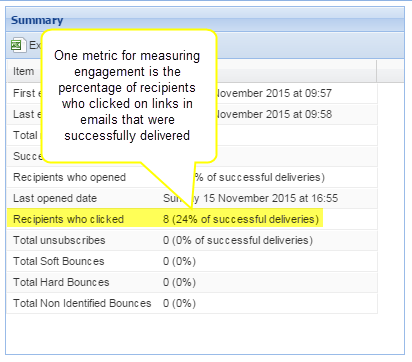
To test factors within the body of the email that could affect the click rate, the measurement to monitor is the percentage of recipients who clicked or the click rate for an individual link.
In the email reports:
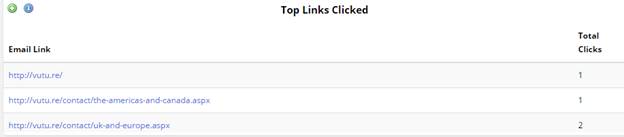
In the Email Dashboard: