Please Note: This is a premium feature. Please contact your account manager to setup.
Contents
What is a custom return-path?
Why should you use a custom return-path?
How do you set up a custom return-path
What is a custom return-path?
The email address used in Vuture has two parts to it:
- The visible part of the email that your recipients see in their inbox or the from address.
- e.g. Vuture’s from address is explore@vutu.re
- the hidden part called the return-path or bounce address. This part isn’t visible to the end recipient but is the real and actual email address from which your emails are sent. By default, Vuture creates a generic return-path for you when your system is first setup. This will be something like bouncebacks@888.vx-email.com.
A custom return-path replaces this generic Vuture return-path with an email where the domain matches your from address. E.g. hello@marketing.firm.com.
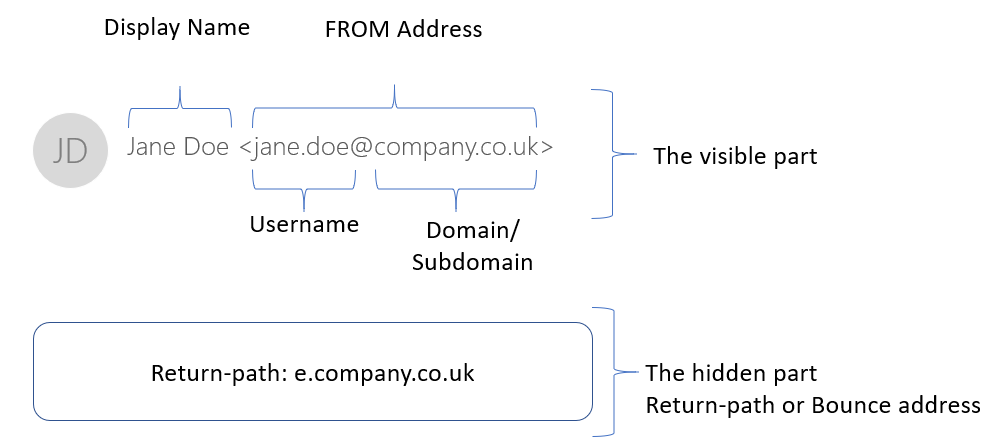
Why should you use a custom return-path?
- The most important reason to set up a return path is that it will help with deliverability and security. Having the two parts of your email aligned minimises the chances of your emails being considered as phishing or spoofing emails.
- It is a very common standard now used in the industry and allows you to build up your sending reputation more easily.
- You can only implement further authentications on a custom return path, for example, SPF, DKIM and DMARC, because the two parts of the email are aligned.
- It removes the "via" message in Gmail that shows both the Return-Path address and the FROM address if the domains are not the same or are not sub-domains
How do you setup a custom return-path?
Steps
1. Choose the subdomain.The subdomain must not be used for any other purpose. For this reason, we strongly suggest using "bouncevx"
2. Let your project manager or account manager know what the subdomain will be.
3. We will then return to you with the required DNS records. Your IT team will need to set these up.
They will be in the format:
SPF record and MX records
----------------

Record Name: "{custom-return-path-subdomain}"
Record Type: CNAME
Record Value: "{instance_id}.vx-email.com"

DKIM records
----------------

Record Name: "vx._domainkey.{custom-return-path-subdomain}"
Record Type: CNAME
Record Value: "{custom-return-path-subdomain}.vuturedkim.com"

Record Name: "vx1._domainkey.{custom-return-path-subdomain}"
Record Type: CNAME
Record Value: "{custom-return-path-subdomain}.1.vuturedkim.com"
3. Once your IT team have made these changes, let us know and we’ll check that everything is configured correctly.
4. We’ll need a small window where you are not sending from your instance so we can configure it with your custom return-path. During this stage we go through various tests to ensure that the custom return-path is setup correctly.
5. Once it has been setup we need to amend your existing sending From addresses in your containers to be your custom return-path. You can also set up your custom return-path as an approved domain.
6. Please remember to add the custom return-path in your email spam filter to an Allow List. Click here to see more information.
If you are also setting up DKIM please click here for the steps. We can support DKIM on multiple Custom Return Paths.
