Please note this is a premium feature. To access this feature please contact your account manager. They will enable the module in your system (under Admin.System.Modules) and for each user (under Admin.System.Containers & Users). Additionally, they will enable Admin.System.Versions.CSVUpload.Version3.
Keywords: contact module; contacts; csv lists; standalone; address book
Contents
The Vuture Contacts Module is the area on Vuture where users can find all of their standalone .csv lists and contacts in a simple visual format. This Help Desk Article will cover the following to help you utilise the Contacts Module:
- Navigate to the container you'll be creating/editing a campaign in.
- Select the "Contacts" module in the top left-hand corner. Then select "Vx" as your "CRM Source" to load the Contacts Module.
Create a new list
To create a new list in the Contacts Module, you'll first need to click on the "+New List" button. A "Create List" window will pop-up where you can enter the list's name and choose the access type this list should have (e.g. "Global", "Container", "Container and Subcontainer").
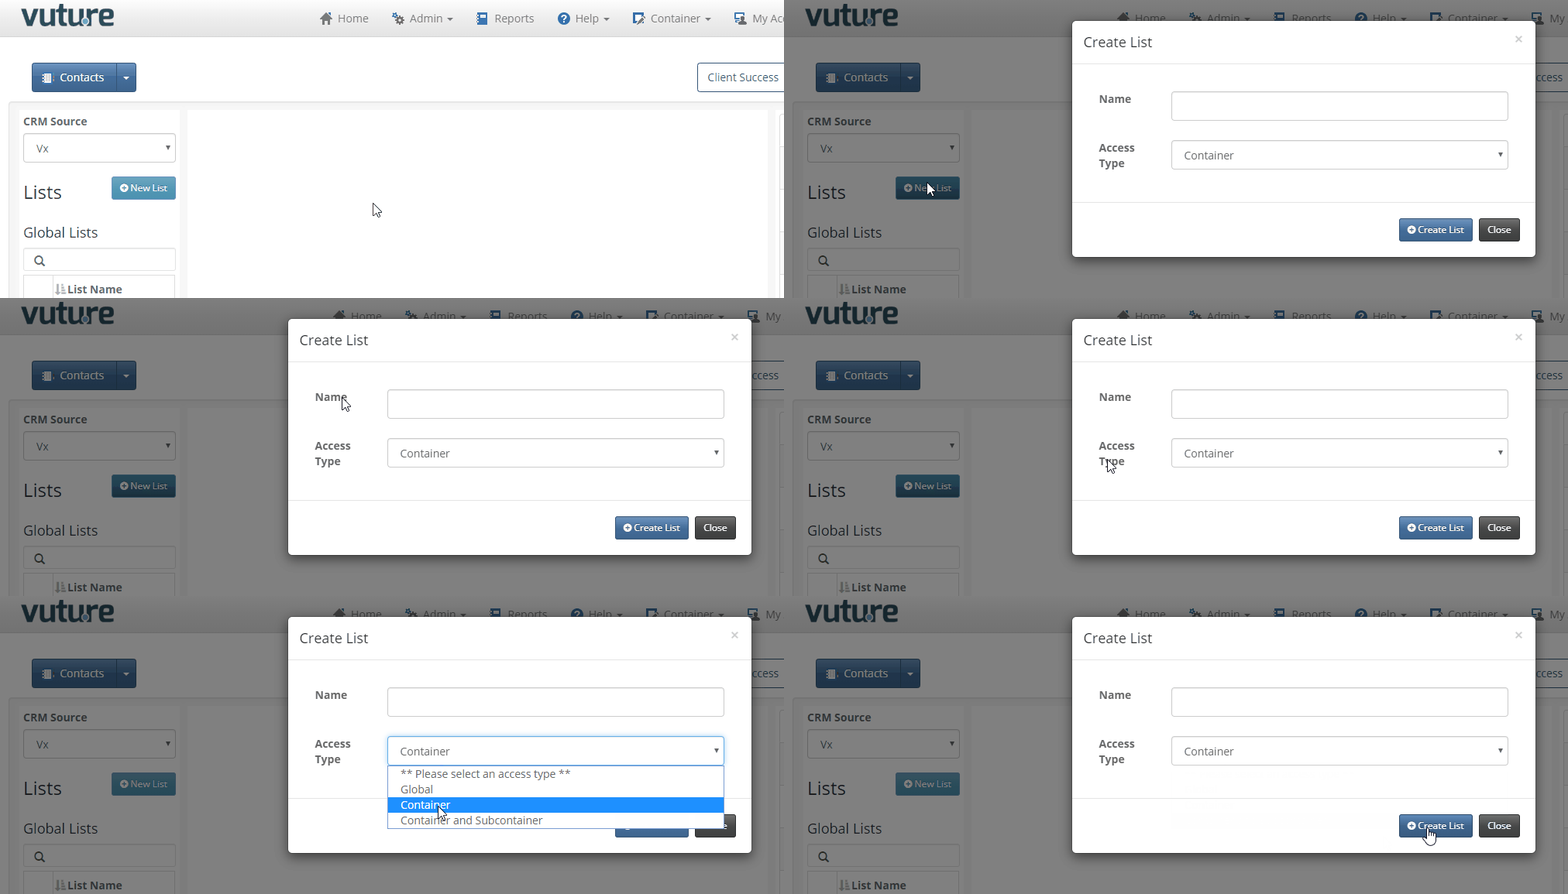
What do the different access types mean?
- Global - A "global" list means that this list can be used globally, regardless of what container you are sending an email campaign from.
- Please note, if you do not see "Global" listed and you should have access to Global Lists, please ask your Account Manager to adjust your Role setting by going to Admin.Roles.Email Lists.Enable Global lists.
- Container - A "container" list means that this list can only be used in this container (e.g. the container you navigated to and then accessed the Contacts Module from). To check which container you are in, look at the top right of your screen.
- For example, in the screenshot below, it shows the "Testing" container. If I create a list while in this container and choose the "Container" access type, I will only be able to use this list in this specific container. This list will not be visible in any sub-containers of the "Testing" container.

- Container and Subcontainer - A "container and subcontainer" list means that this list can be used in a specific Container and its sub-containers.
- For example, in the screenshot below, it shows a "Banking" container and its three subcontainers: Client Alerts, Events, and Newsletters. If I created a list in the "Banking" container and selected the "Container and Subcontainer" access type, I will be able to use this list in the "Banking" container and its three subcontainers: Client Alerts, Events, and Newsletters.
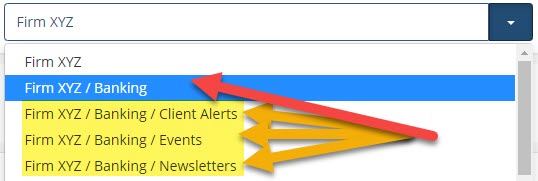
For more information on access types, please click here.
Select the list you wish to add contacts to and click "import emails" at the bottom of the page. This could be a list you've just created or an existing list.
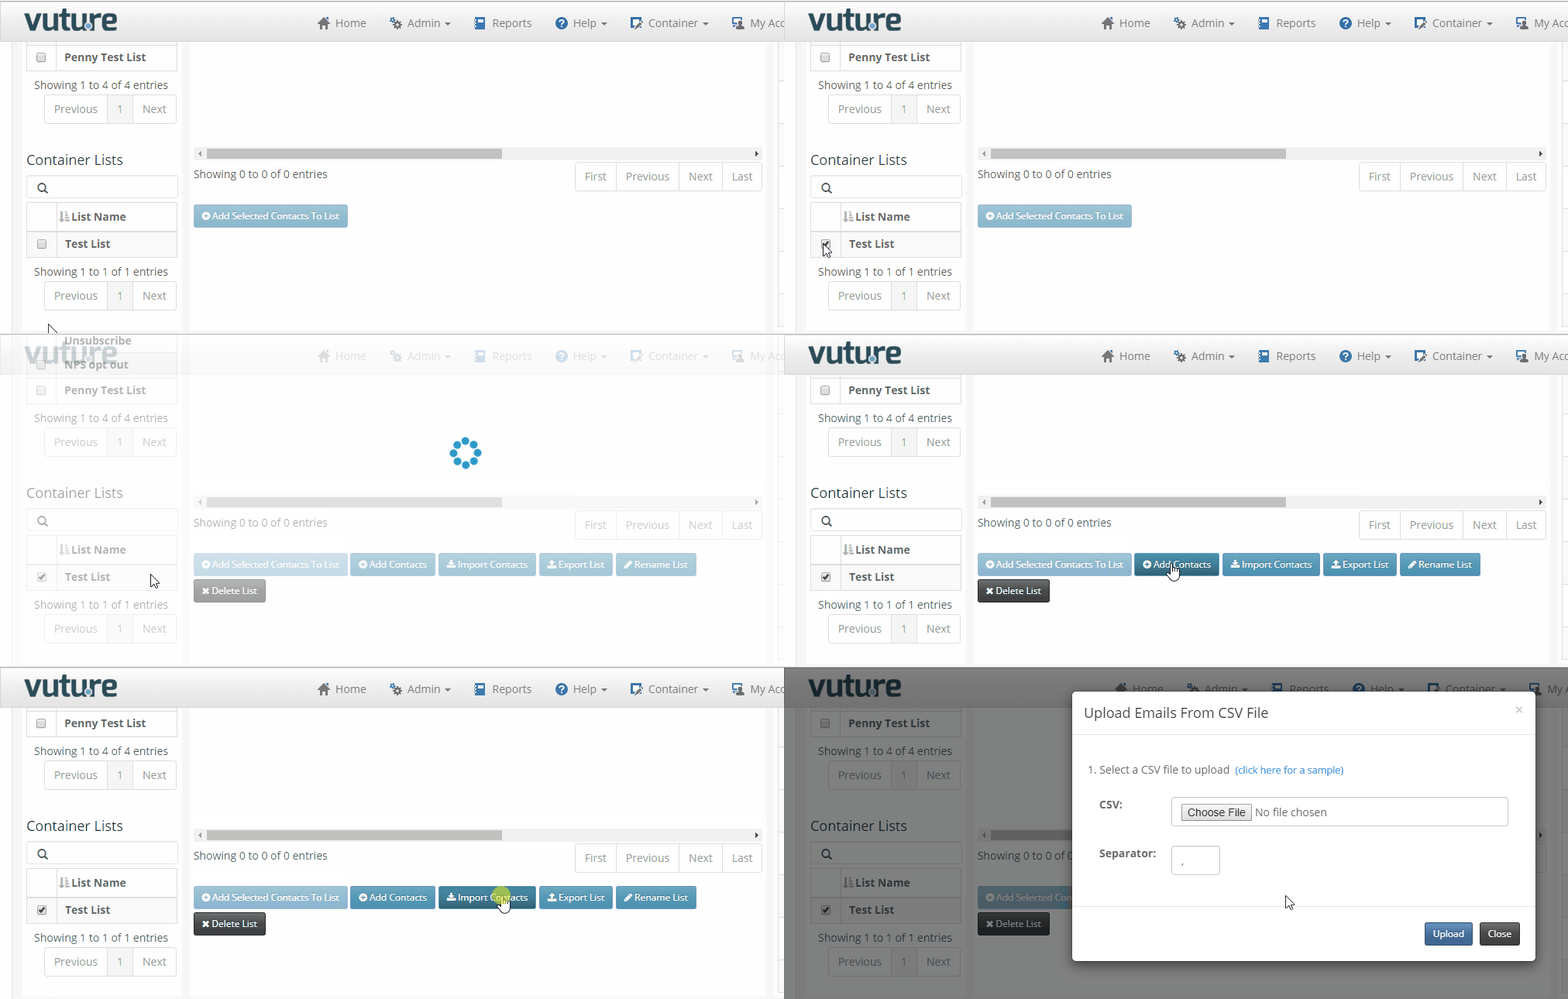
Click "Choose File" to choose the CSV file you wish to upload.
Your CSV file needs to be a in a particular format - use the "click here for a sample" to download an example CSV file:
Enter the Separator character used in the file. This is usually ‘,’ (comma) but can be ‘;’ (semi-colon) in countries such as France that use comma as a decimal separator.
Please note, the following column headers are mandatory in the csv upload file (although all the fields, except email, can be left blank, so only the column headers are required): First Name, Last Name, Company and Email.
Click "Upload" to upload the file.
Match the column headers in your file to the standard Vx headers. Any column header in your file that is not matched will be imported as a custom field. Please note, if you have a "Status" field in your spreadsheet, the values contained must be one of five valid values: Subscribed, Unsubscribed, Unconfirmed, Suppressed or Undelivered.
Click "Check File" to check for errors and duplicate email addresses in your file.
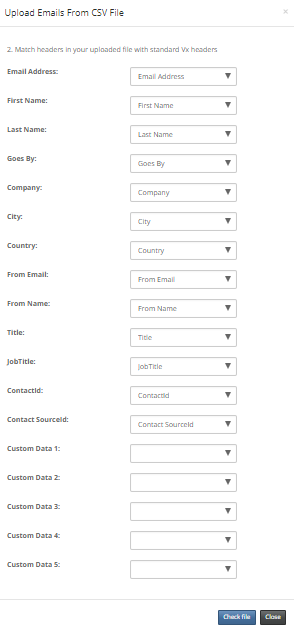
Review the error report, if any, which will indicate any rows that will not be imported.
- The error report will provide a list of errors by row number with the following error messages:
- Email address appears more than once in file (duplicate email addresses in your CSV file)
- Invalid email address (the email address is not in a valid format)
- Email addresses cannot be more than 500 characters (maximum size limit for email addresses)
- Email address already exists in the list (the list you are importing into already has this email address and duplicates cannot be imported)
- Note that if you use a column called "Date Created", this is a special column that expects the date to be either in universal date format (e.g. 2015-12-01) or in the date display format specified in your user preferences. You will receive an error message if any values are found in this column that do not match either of these two formats.
- Date Created is the date the contact was added to the list.
Click "Process" to complete the upload of the contacts in the file.
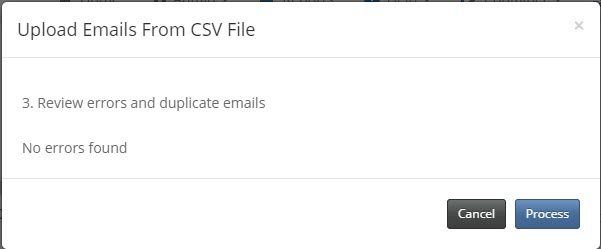
After clicking "Process" you will see that your contacts have been added to your list.
CSV Upload FAQ
1. The system hangs at the check file stage. What should I check?
Open the CSV file in a text editor such as Notepad ++ and check there are no unprintable characters in the file. Remove these, save the file and retry the upload.
When uploading a .csv list to the Lists area or to Contacts Module, there are some requirements which will ensure you achieve a successful load.
Ensure that the column headers in your csv spreadsheet include First Name, Last Name, Email and Company - as a minimum.
Ensure that, if you include a Sponsor Name or Partner Name, you also include a sponsor or partner Email.
2. Can I add contacts without an email address?
By default, Vuture standalone lists will not allow contacts to be added without an email address.
If you must add a contact without an email address to a list, you will need to contact your account manager. They will enable the "Admin.System.Emails.Allow blank email addresses" setting and update your CSV upload in "Admin.System.Versions.CSV Upload Version 3".
Contacts will be de-duplicated based on joining up First Name, Last Name and Company.
Warning: as this is a system wide setting, once enabled it will allow contacts with blank email address fields to be added to any list throughout your instance.
This feature will allow you to move contacts around from one list to another.
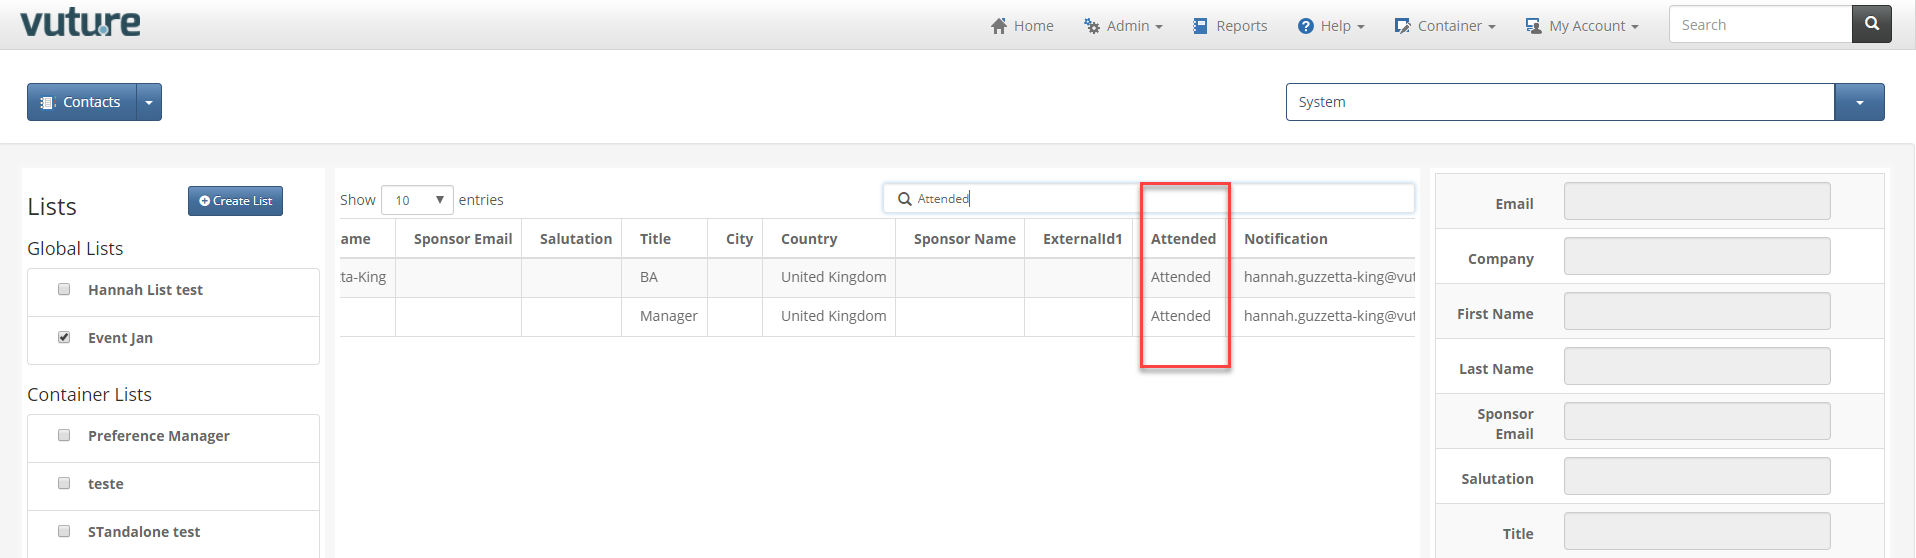
For example, you might want to create a list populated only by users who have all “Attended” an event. Through the Contacts Module, you can select all users with “Attended” as the value in the event attendance field and add them to a second list.
You would do this by first creating a new list using the Create List option.
Then click on the existing list and make a selection. To see all the contacts who Attended an event, for example, type Attended in the search box:
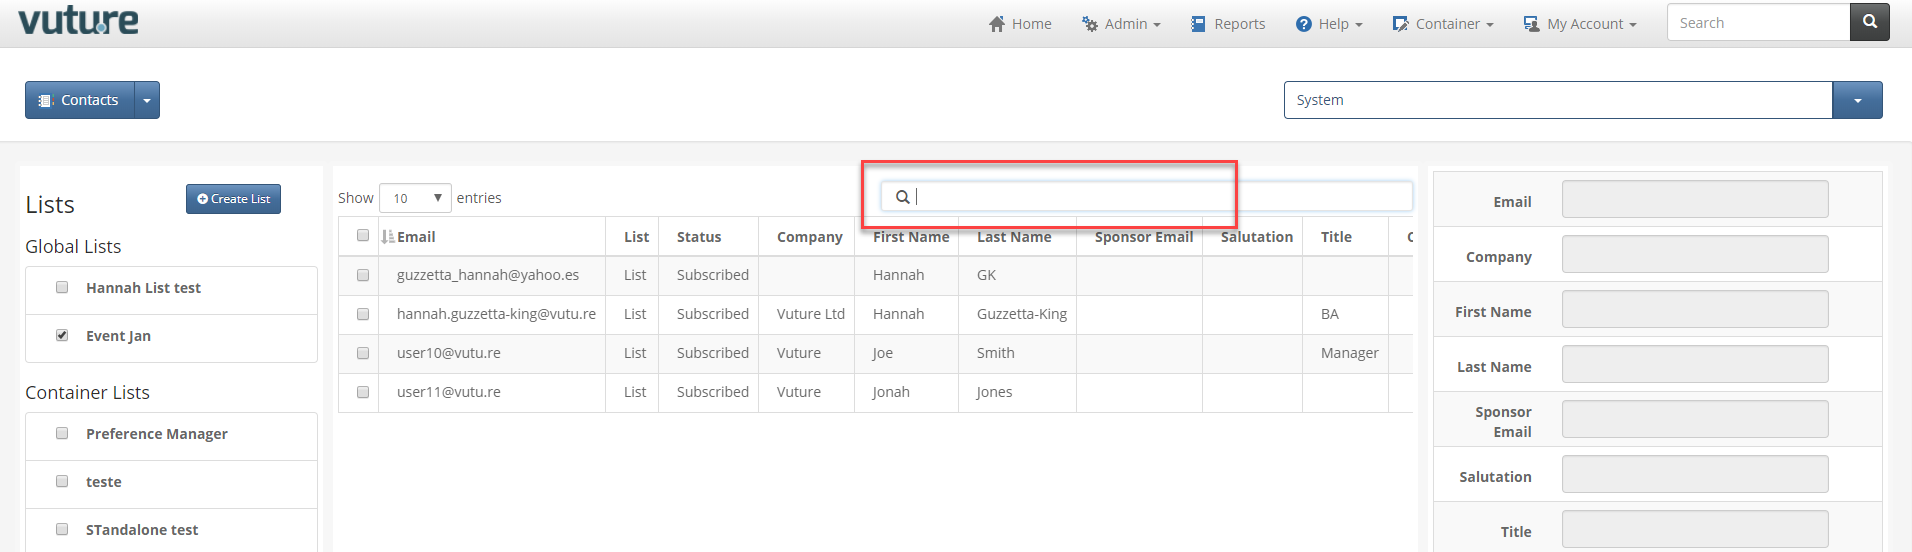
Any contact with Attended in their values will be displayed.
You can now select those contacts by checking the box to the left of their name. Choose Add to List. A pop up appears with a selection for you to choose which list:
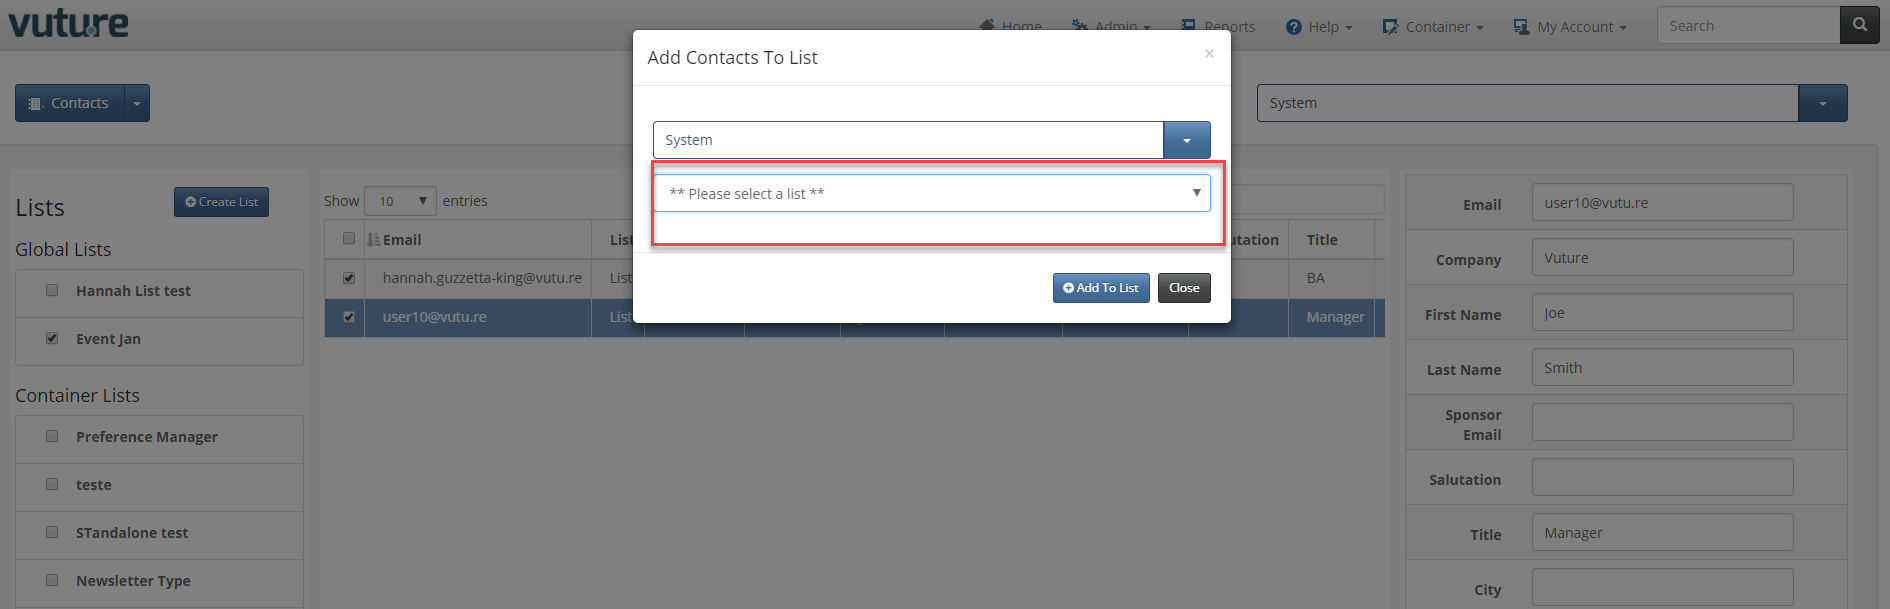
Use the drop down to find the new list and click on Add to List. You will get a Successful confirmation message.
You can also move contacts from one container to another by adding them to a new list.
Edit a List Name
Watch the video below for a How To on editing the name of an existing list in the Contacts Module.
Please note: You cannot have two lists named the same in a Container. Make sure that your lists are named uniquely inside the Container.
Deleting an existing list
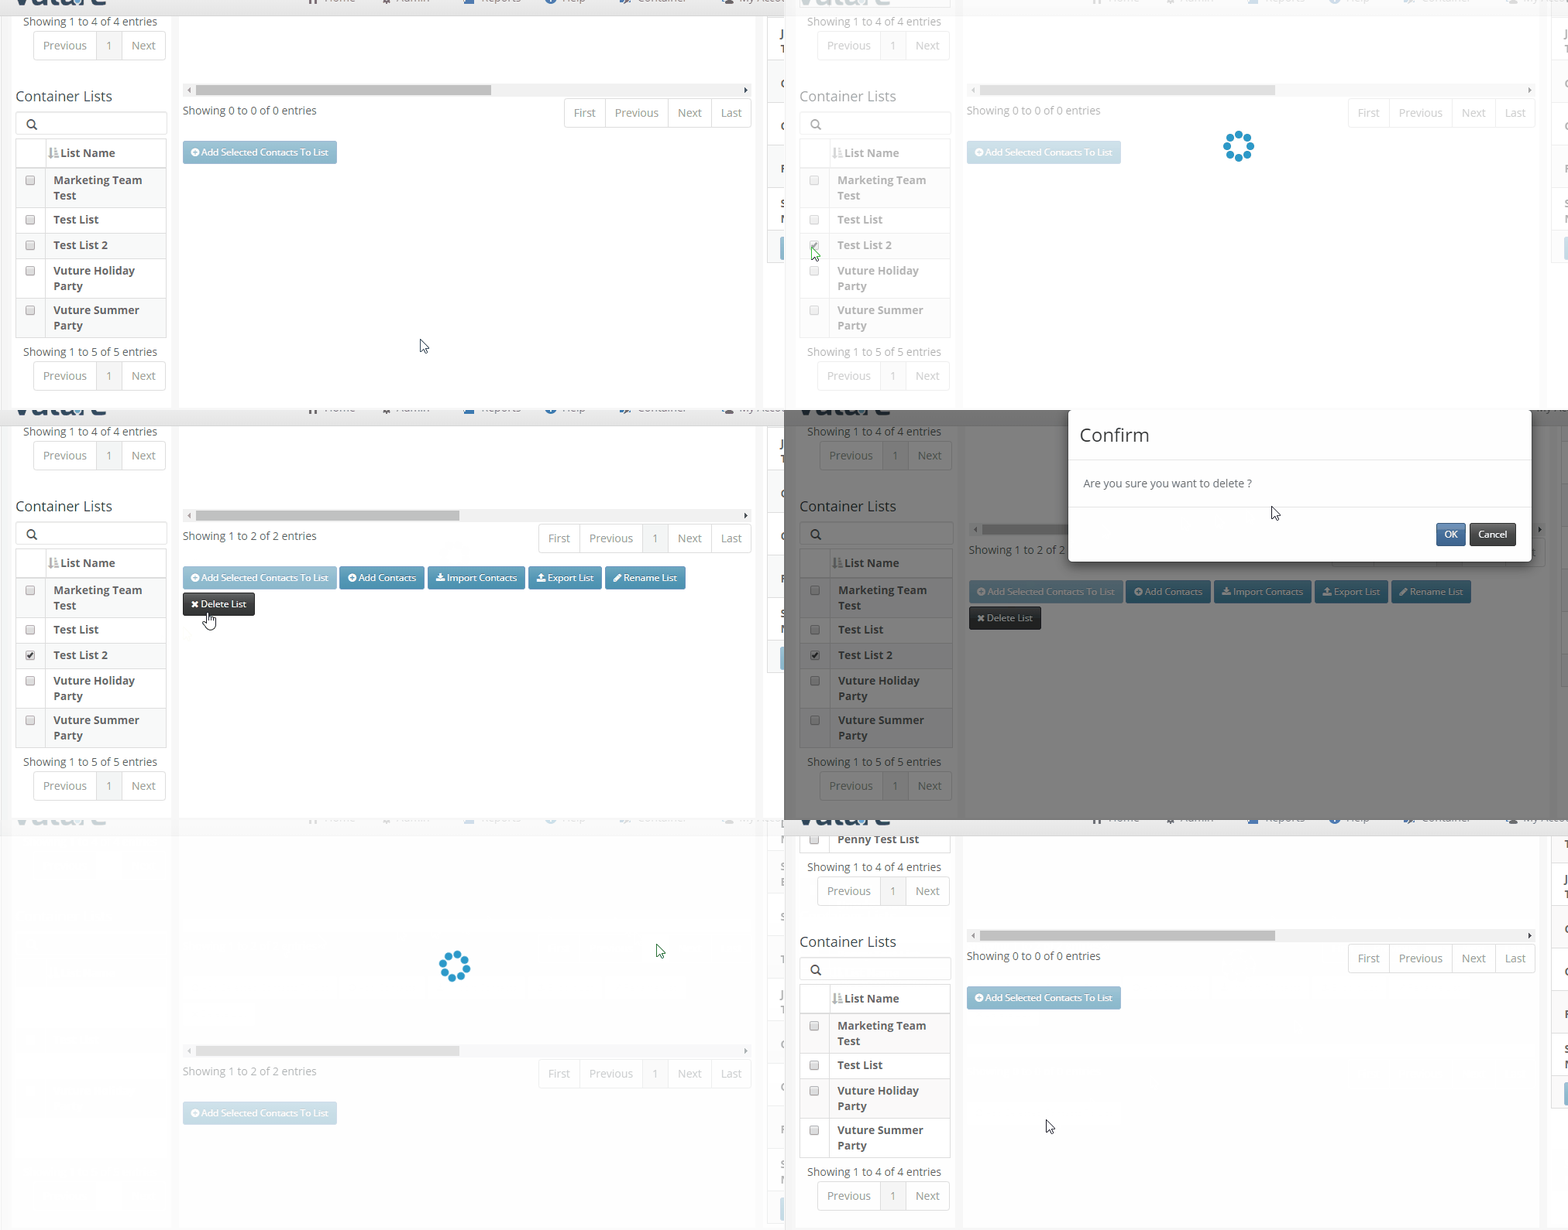
Navigate to the list you wish to delete, select it, and click on the "Delete List" icon. A pop up will appear asking you to confirm you wish to delete the list. Click "OK".
Please Note: When standalone vuture forms match contacts to existing contacts in the contacts module, the code looks at just the email address in the given email list.
Click on a contact in the list you are viewing.
The contact's details will appear in a format in which you can add to, or edit, their data. Then click "Save".
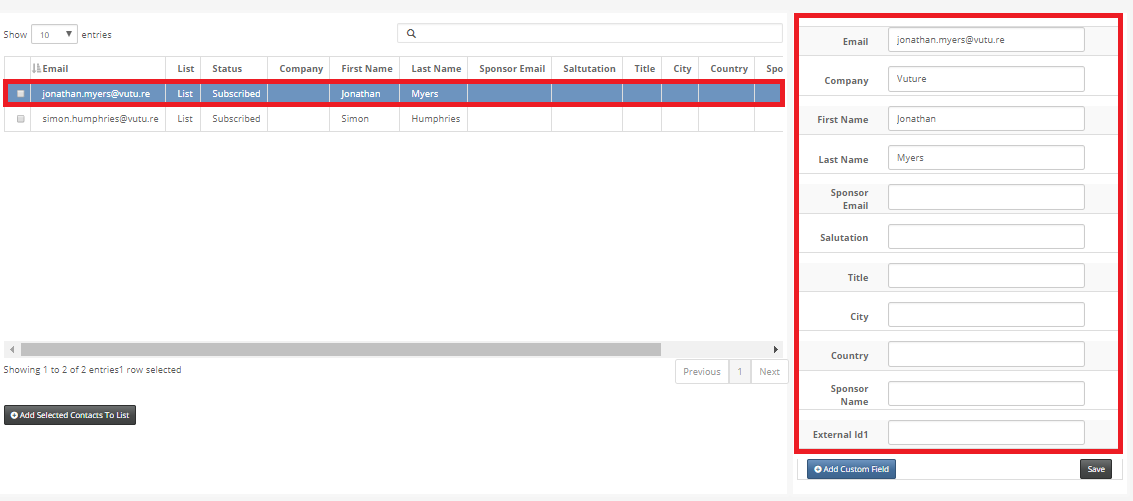
Please note, by default only 20 of your custom fields per list, will show on the screen. If you export the list you can see all the fields. Please ask your account manager if you want to change the limit, they will change it in "Admin.System.AddressBook.CustomFieldDisplay Limit"
You may wish to take an existing list and add, for example, Communication Preferences (for GDPR or CASL purposes) or additional information for a contact.
You can do this by selecting the list first, in the view of all lists:
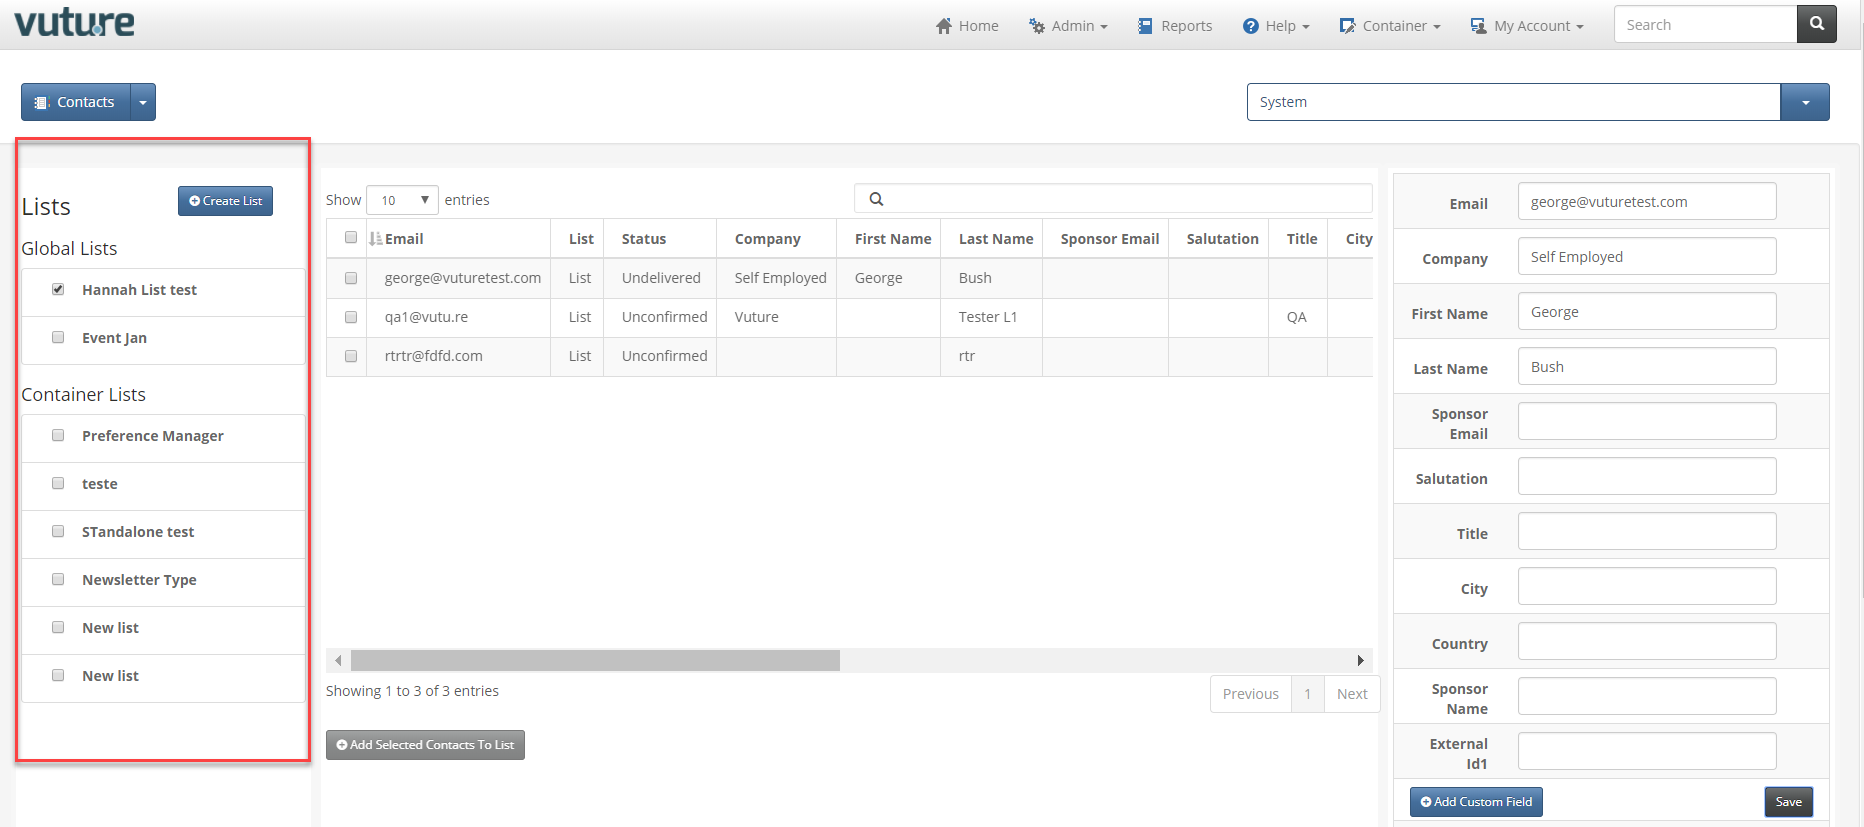
Click on a contact in the chosen list.
You then need to choose Add Custom Field (in the bottom right of the image below).
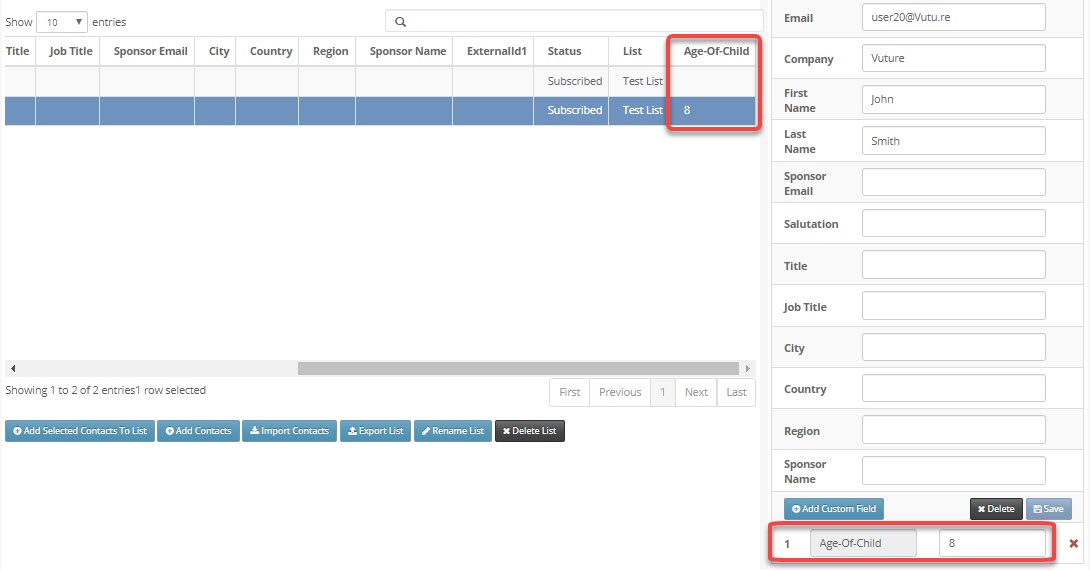
Give the new Custom Field a title (e.g. Age Of Child), and a value for the chosen contact, and Save.
(GDPR note: you should not be storing sensitive personal information such as children's names and ages for any longer than you specifically need to. For example, preparing for a children's Christmas Party is fine, but then be sure to delete that information as soon as you can after the event.)
The new Custom Field is added to the list and is now available for all contacts to have a value entered by you.
Best Practice: If dealing with an Event, where there is a RSVP Form landing page which people will be submitting, it is better to create the field within the form instead of creating the field here in the list. That way, the form will automatically update all the columns in the Contacts module list for the contacts who submitted the form, automating this process for you. For a "how to", please click here.
Important: Primary Sponsor and Sponsor Name fields
These fields should be treated as Read Only in the Contacts Module. They can be viewed here, and even edited here, but if you do edit these fields and then "refresh from CRM" your edits will be overwritten. This occurs because these two fields do not write back to the source CRM. If you need to edit the Primary Sponsor or Sponsor Name fields, you should do this in the appropriate CRM data source. In the case of no CRM, do this in the source .csv file.
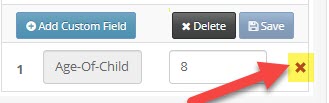
If you would like to delete a certain column - either because you wish to re-make one, or it is no longer needed - ensure that all contacts have empty values in that column. Then you can delete the column by clicking on any contact's information, and pressing 'X' on the special field you wish to remove.
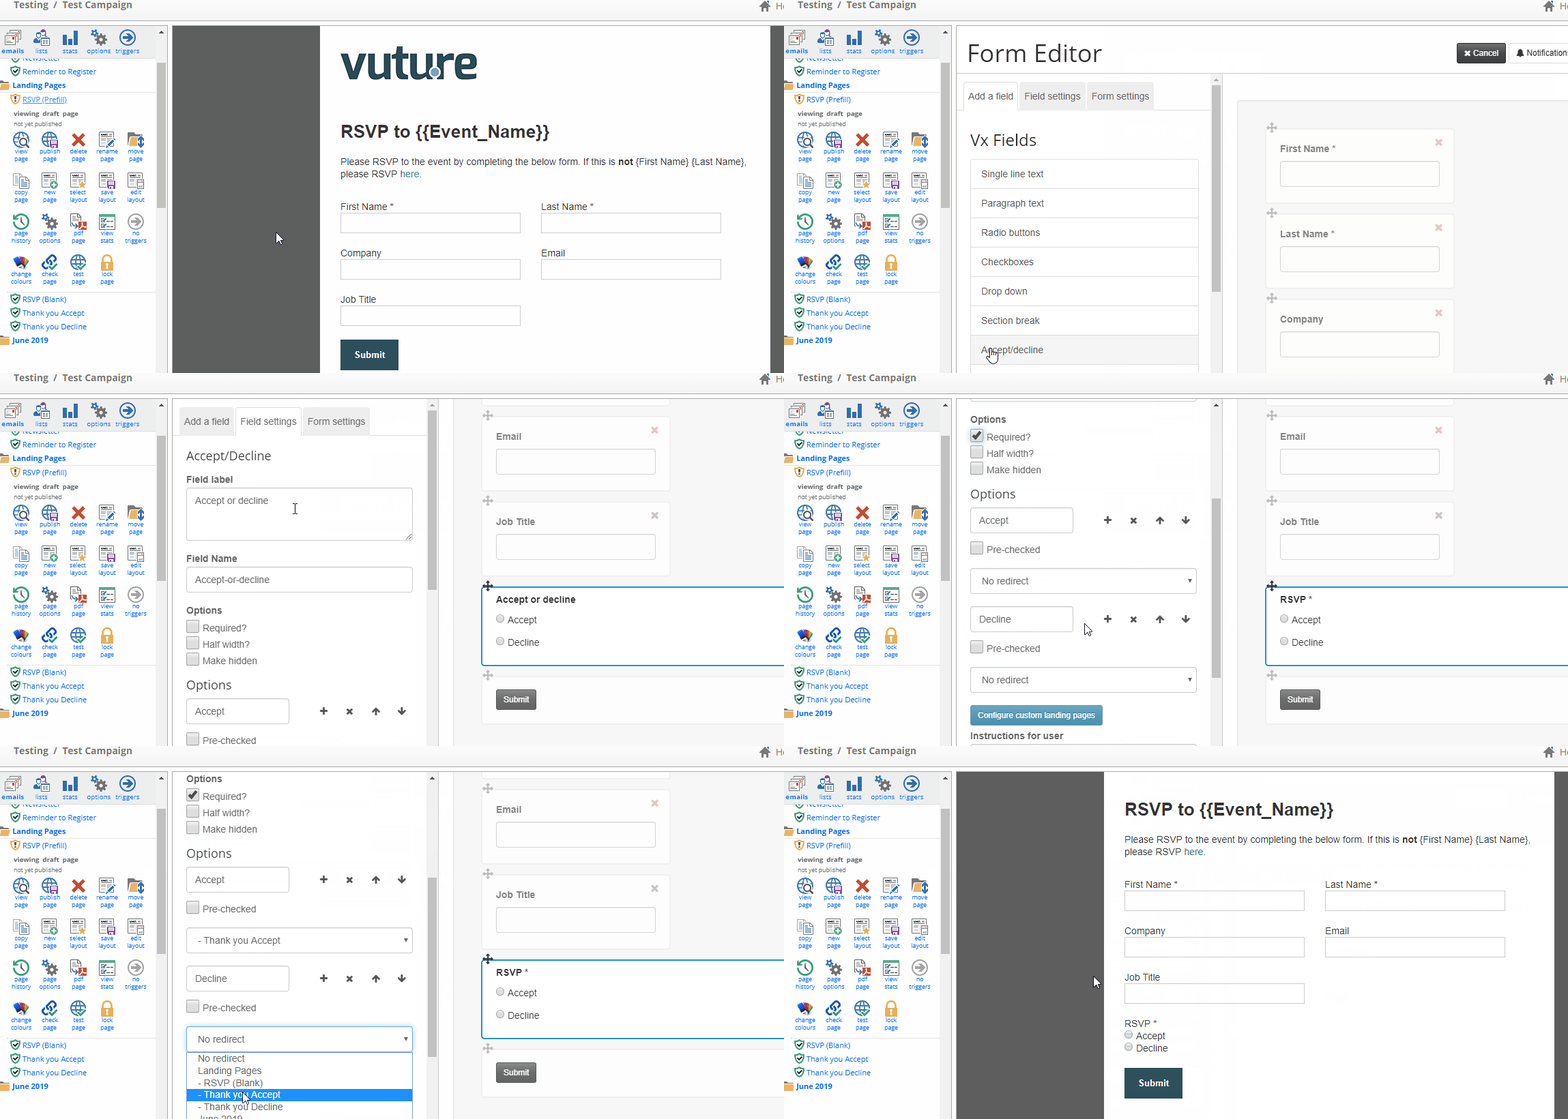
In order to start receiving data/information to your Contacts Module, you must create your form via the Landing Page. Create your Standalone form, making sure to use the below values for basic information. When creating your form, the Field Labels can be anything you like for the clients to see, but it is important that all the Field Names are exactly as listed below, or the Contacts Module will not be able to read responses.
|
Field Label (your choice of words, the client will see these labels on the form)
|
Field Name (you must use these exactly)
|
|
First Name
|
FirstName
|
|
Last Name (could be Surname or Family Name, for example)
|
LastName
|
|
Salutation
|
Salutation
|
|
Email Address
|
Email
|
|
Company
|
Company
|
|
Title
|
Title
|
|
Job Title
|
JobTitle
|
|
City
|
City
|
|
Country
|
Country
|
To add an RSVP Field, you will need to click into the form, click on the "Add a field" tab, and select "Accept/decline". The new field will be added to the bottom of the form. You may then change the Field Label to "RSVP", change the Field Name to "RSVP" (optional - this will change the column heading in the Contacts Module to read RSVP), make the RSVP field required, and set your landing pages for when someone submits the form.
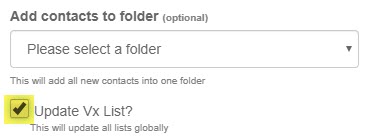
Under Form Settings, create your Form Name then navigate to Add Contacts to Folder (Optional). If setting up a Blank RSVP Form, you must select the list you wish for your RSVP data to write back to (e.g. the list you used to send the invitation to). If setting up a Prefilled RSVP Form, only select a list if you wish the RSVP data to write back to a different list. Otherwise, you can leave this section blank, as the RSVP Prefilled Form will always write back the RSVP data to the list that was used to send the invitation to.
Also tick “Update Vx List?” for both Prefilled and Blank RSVP Forms.
Don't forget to save your Landing Page by clicking the "Publish" icon, then "Publish Now" to save your work.
For additional help with setting up an Event Campaign and RSVP Form, please click here.
Filtering a List
If you wish to filter a list based on a column (works for Core fields only), you must first select your list. Then click on the "Show Filter" icon, scroll over to the relevant Column, and type in the value you are filtering for.
Note: If you are looking to filter a list and send an email to all contacts who RSVP'd "Yes" to an event, you should not attempt this here - because RSVP is not a core field. You can, however, filter the list on the Send Screen, at the point of send. From the Send Screen you can choose to filter your list before sending, and only send to all who RSVP'd "Yes", for example.
Core Fields
The following fields are Core Fields:
- Email
- First Name
- Last Name
- Goes By
- Job Title
- Title
- Company
Email and Form History
When you select a contact in a list, you can view the contact's email and form history by selecting the option in the right hand panel. This will show you all the mailings that have been sent to the contact, inclusively if they were sent to an external (CRM) list. The form history will show all fields submitted by the contact, sorted by date, showing the latest submission first.

There is a pptx pack for this feature linked below.
Export a list into a CSV File
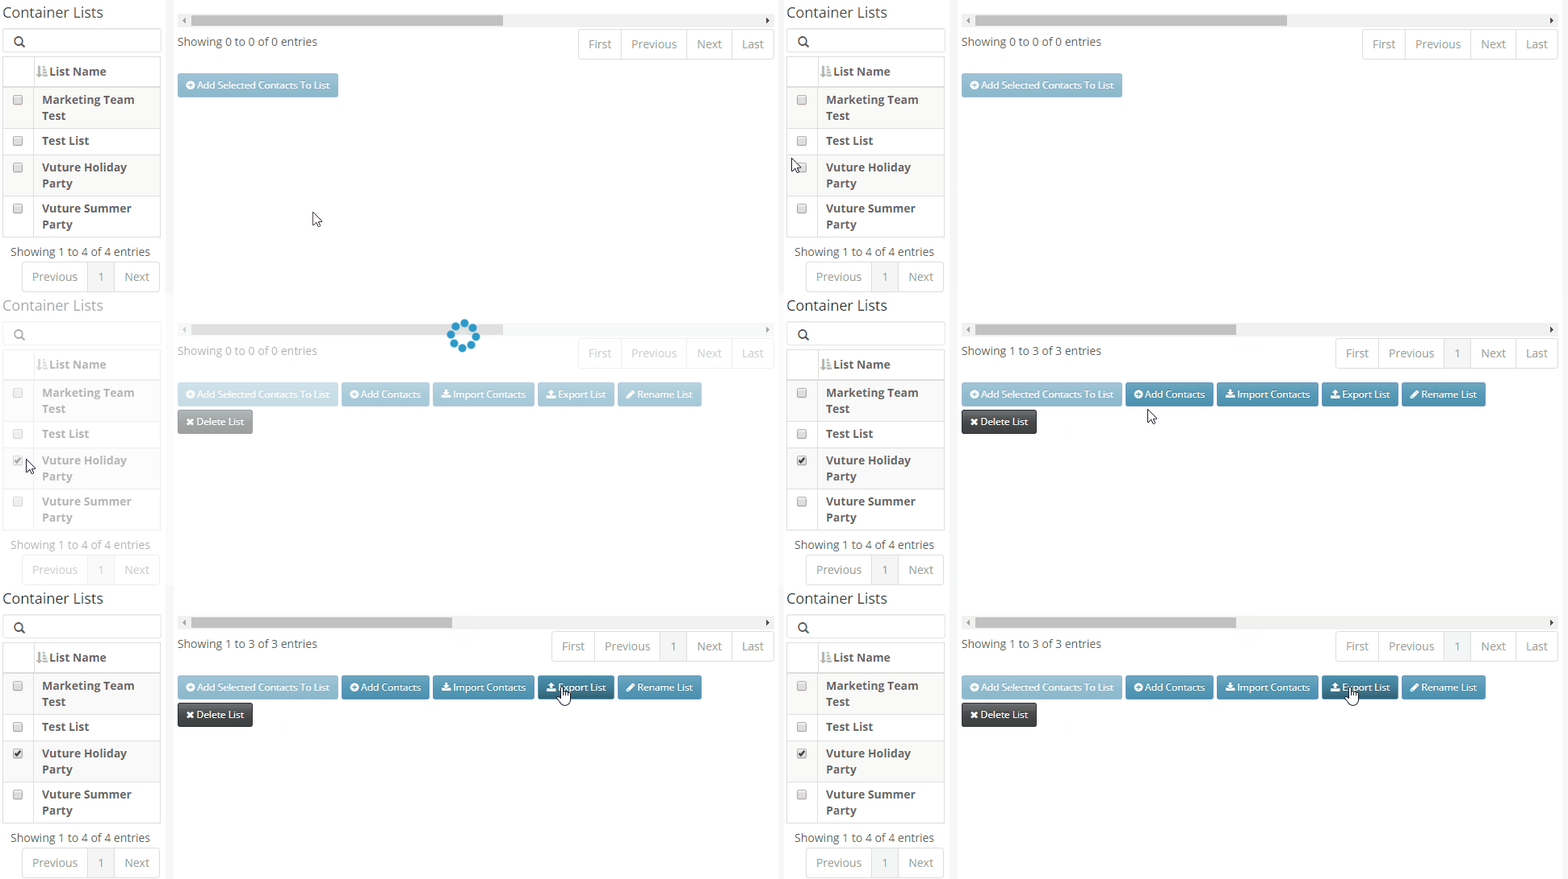
If you wish to export your list to a CSV File (e.g. after an event), you'll need to first select your list. Then click on the "Export List" icon. This will then download the list to a CSV file and should be available in your Downloads folder on your computer.
FAQs
Q. How can I delete a contact who appears on multiple lists?
A. You will need to delete them from each list individually. If you have multiple contacts to be deleted across multiple lists you can contact Vuture Support and we can do it for you.
