There is a Vuture Only version of this article here.
Contents
What is Vuture Connect?
Who will Use Vuture Connect?
How Does Connect Work?
When Might Your Firm Find Vuture Connect Useful?
Prerequisites for the Client
Suppressions
Process - Preparation in InterAction for Client Admins
Preparation in Vuture for Client Admins
Importing Lists via the Contacts Module
Using Email List Access to Assign Lists to End Users for use in Vuture Connect
Creating Campaigns in the Email Module for use in Vuture Connect
Adding one or more Personal Message spaces to the Campaign
Activities in InterAction
Linked Emails
Final Check for Client Admins
Instructions for End Users of Vuture Connect
Mailing History
Sending an Email
Duplicate Mailings
Email Confirmation emails
Editing Connect campaigns
FAQs
What is Vuture Connect?
Vuture Connect is a premium product which focuses on sending personalised messages from senior users to small numbers of selected contacts (we recommend no more than 10 - 20 contacts per partner).
Experienced Vuture users first set up branded, linked and approved email campaigns and make them available, for a fixed time, to their senior stakeholders to send out - with the addition of a personal message.
Who will Use Vuture Connect?
There are two different types of Connect users:
- The Super Admins, or Vuture-experienced Marketing team users, who will create the campaigns in the Email Module and the contact lists in the Contacts Module, and
- The senior stakeholders, also referred to here as end users. End users do not need any previous experience of Vuture and there should be very little training required to help them use Connect. They will each need a Vuture account, but a Read Only role will be enough.
This article is aimed at the SuperAdmins who will set up Connect for their firms.
A couple of simple Quick Reference Guides will be available to help with training end users. Initially in pdf format they can also be supplied in editable Word format for clients to edit themselves (add their own firm’s url, for example).
How Does Connect Work?
End users, (typically, senior stakeholders such as law firm partners or attorneys) will work with:
- small lists of their most important clients (we recommend up to 20 contacts)
- mailing campaigns which have been shared to the Dashboard by the Marketing team.
The end users will decide whether or not to send their contacts a mailing. They will add a personal message to each contact, and a personal signoff, before sending the mail. The personalisation level - how many personal snippets appear in each mailing - will be decided by the firm’s Marketing team.
Mobile Friendly
The module is configured to work efficiently from a tablet or smartphone as well as from desktops and laptops.
Experienced Admin users will upload lists of contacts from InterAction to Vuture Connect (via the Contacts Module) and make those lists visible only to the partner who "owns” them, using the Email List Access tool.
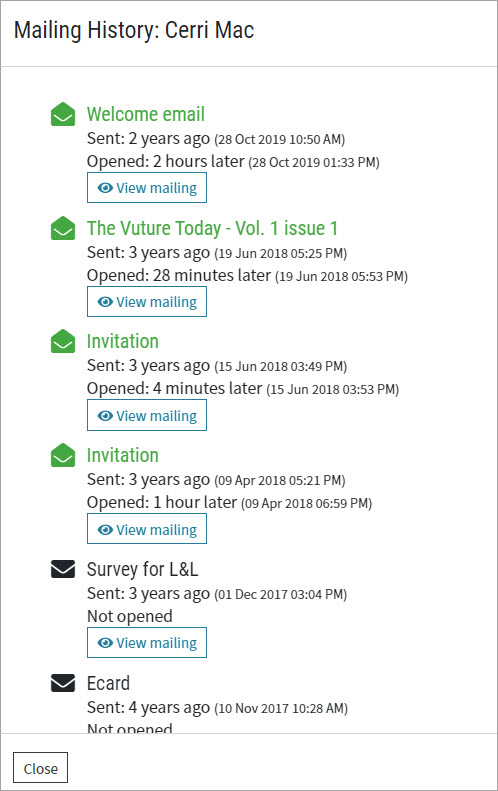
To aid the end user in decision-making, Vuture Connect can show the end user, before they decide whether or not to include a contact in a mailing, how many mailings that contact has already received recently and whether or not they opened them, in their Mailing History. The contact’s Mailing History shows all Vuture campaigns sent to them, not just Vuture Connect campaigns.
When Might Your Firm Find Vuture Connect Useful?
- Centralised Marketing can sometimes appear impersonal. Use Vuture Connect to personalise a standard campaign for special clients.
- Add personalised comments to any mailing to make the communication feel like a 1-1 mailing.
- Use Vuture Connect to personalise holiday cards and VIP event invitations.
There is a single slide here which gives compelling reasons for why senior users might want to get involved and use Vuture Connect. In addition, the reasons are reproduced here:
- More control over the emails/messaging that goes out to clients, particularly VIP clients
- Easy to use email tool built for partners on the go (built to be mobile-first)
- Access reporting directly at any time, no longer 100% reliant on Marketing
- Control over which mailings they would like to send to specific client contacts and lists
- Add a personal touch to each send such as custom messages, sign-off language or email subject lines
- Login at any moment to view and track mailing performance per each contact
- Increase event attendance and engagement by empowering partners to personally invite high-value clients with Vuture Connect
- Access Vuture Connect at any time to review email performance such as emails sent, percentage opened
- See if contacts engaged with a specific email by clicking into the contact record to view an engagement timeline.
- Demonstrate commitment to the firm’s marketing effort: time spent on Vuture Connect is reportable.
How do I Set Up Vuture Connect? Are there any Prerequisites?
Prerequisites for the Client firm
Single Sign On (SSO)
SSO will ensure that your partners or other senior users do not have to remember additional passwords for logging in to Vuture Connect. This is the process:
Get SSO working (with the help of your Vuture Project Manager) and get it authenticated. Ask the ‘Connect Users’ to access the Connect URL “https://clientname.vuture.net/connect.
The browser then updates the URL to the following with a return URL https://clientname.vuture.net/mvc/login?returnUrl=%2fmvc%2fvxr%2fconnect . When the Connect User hits the login screen they have to click the “Click here to access with SSO” link on the login page (just below forgotten password link). Doing that authenticates the user and redirects them to the Connect Dashboard.
Further Prerequisites
- Email Module - Admin users create the campaigns in the Email module
- InterAction CRM integrated with Vuture
- Contacts Module - Admin users upload the InterAction lists to Connect via the Contacts module
- User Roles - Admin users need to have Connect enabled (both Access to Connect and the ability to edit Connect mailings)
- User Roles - Admin users need to have Email List Access enabled
- User Roles - Admin users (those who will be setting up the email campaigns) need to have Email Types for Standalone enabled
- User Roles - end users or Vuture Connect-only users need to have a Read Only role, with access to Connect enabled but no edit rights.
Image - Admin User Roles

Image - End User Roles

- In Admin.Containers & Users. Ensure that you have entered the IA Vuture User Name in your Vuture user settings against InterAction2 or 3 or whichever you are using for Connect. You do not need to add this for every user, only the Admin user who is setting up Connect and importing IA lists to the Contacts module.
- An IA list for each end user is required. Lists should be named uniquely, preferably including the end user’s name and the date (e.g. First Name Last Name’s VIPs for 2022). You may use a list with or without sponsorship. Sponsorship is not considered in this release of Vuture Connect.
- At least one campaign marked as Content Type=Connect, with an Email Type set (also known as a Campaign Type) and a deadline date for mailing (set in Email Options, Custom Fields). The Content Type, Email Type and the Deadline Date are all mandatory to cause the mailing to appear in the Connect dashboard. This campaign could be a copy of a mass mailing campaign, adjusted to be used in Connect, or it could be built from scratch. Full details on making a campaign available in Connect are given below.
Suppressions
Any contact who has been suppressed from receiving all emails (is in global suppression list eg Send No Marketing in InterAction) will also be suppressed from all Connect mailings.
To bypass content-specific suppressions such as Send No Events or Send no Banking emails you could create an email Campaign Type of Connect Events (for example) or Connect Banking (for example) and not add any suppressions to the email type (also called Campaign Type). There is an explanation of Campaign Types here.
The email type is defined for each campaign at the campaign site page level under Email Options - Email Type and the campaign will not appear in the Connect dashboard if there is no Email Type set.
Global Unsubscribes
At the point of sending the email, VC first checks IA to see that they are not part of the global Unsubscribe from All or Send No Marketing list. To make this process fast and efficient, Vx will download the global unsubscribe list once a day and refer to that copy before sending. This daily download will be set up by the CSM.
Process - Preparation in InterAction for Client Admins
In InterAction, begin by creating lists for each partner/senior user. Name each list clearly and uniquely so that you can easily assign them to the correct user later and consider adding the date to help you keep the lists tidy. For example, “John Smith’s VIP Contacts” or “David Brown’s Christmas Card List for 2025”.
How Big can the Lists be?
There is a default maximum size of 500 contacts in a list, but Vuture recommends that you encourage your end users to identify far fewer than that as their VIPs, or special contacts, who need a personal message; Up to 20 contacts should work well.
Bear in mind that the end user will be scrolling through the list, possibly on their phone, to find each individual (there is a search facility too). Each Send is handled separately, as a 1-1 communication, with the end user clicking Send each time. They will find it tiresome to send a personal message to too many contacts.
The list size allowed can be increased if there is a good reason to do so.
Preparation in Vuture for Client Admins
Logins
Navigate to Admin.Containers & Users and create a Vuture login for each partner or end user. SSO is preferred. If you have SSO you will not require your end users to remember login and password details.
Assign these end users a Read Only role. The Read Only Role must also include Connect as follows: Access to Connect is On, Edit Mailings is Off
Containers - your choice:
Consider where you want to keep Connect mailings, including making available some (or all) Connect mailing campaigns to some or all Connect users. Here are some options:
Option: One Connect Container
If you will only be creating firm-wide Connect mailings, such as Holiday Cards, you may decide to keep all your Connect mailings in one container. In which case, simply create that container, name it clearly, assign a sub-template to the container if you wish, and ensure that all your new end users have access to the new container.
Option: Subject-matter Connect Containers
Alternatively, you may decide that you are going to divide the Vuture Connect mailings into subject matter; so all Banking mailings in one container for Banking partners to see, all Tax mailings in a different container for Tax partners to see, and so on. If this is the case, you could choose to create a series of new containers and ensure that your new end users have access to just the correct containers for their practice area.
Option: Use Existing Containers
It is not mandatory to create a completely new container structure for Vuture Connect mailings if you prefer to use your existing folder tree. In addition to the container access options described above, you will make campaigns visible to end users in the Connect dashboard by assigning the Content Type of Connect to the campaign, adding an Email Type, and by specifying the Deadline Date. This means that only Connect mailing campaigns, marked specifically for Connect, will appear in the Vuture Connect dashboard. It is possible therefore to have Connect mailings held in the same containers as Marketing mailings.
Importing Lists via the Contacts Module for Client Admins
To complete the integration, you will first have to import your IA lists into Vuture’s Contacts Module. Once that has been done, any subsequent changes you make to your lists in IA can be synced across to Vuture. Any changes you make to your lists in Vuture (note: adding a new contact from within the Connect dashboard is not supported in this version) will be synced back to your CRM when you click Save.
Process to Import Lists
From Vuture, navigate to the Contacts module via the module selector.
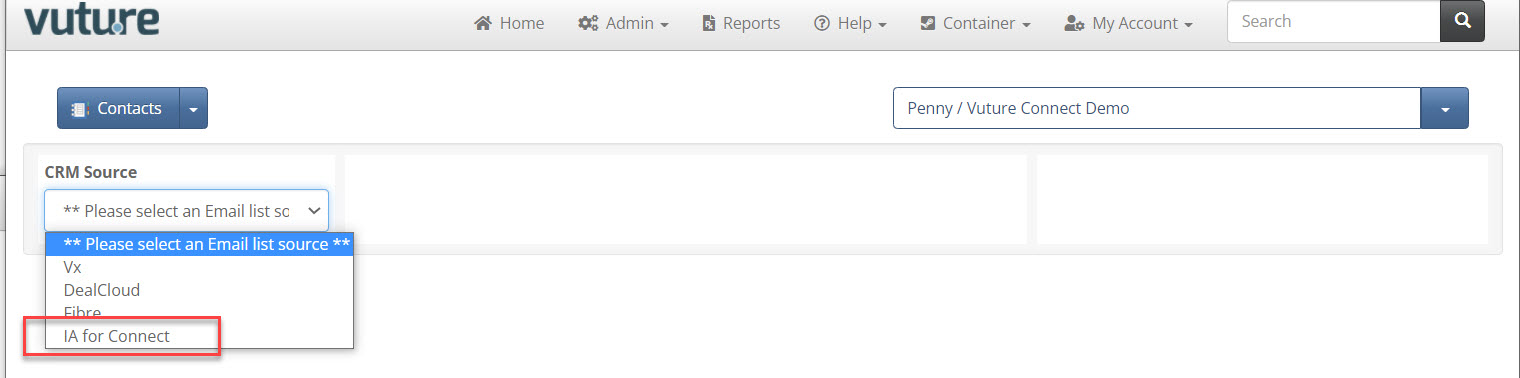
In the Contacts module, select your data source as InterAction2 (or IA for Connect or as appropriate if you have renamed it).
- Select your IA lists (more than one if you wish)
- Click Import List to import the data. They will be imported as Global lists at this point. You will later assign each one to be viewed by only the corresponding partner in Vuture Connect, using Email List Access.
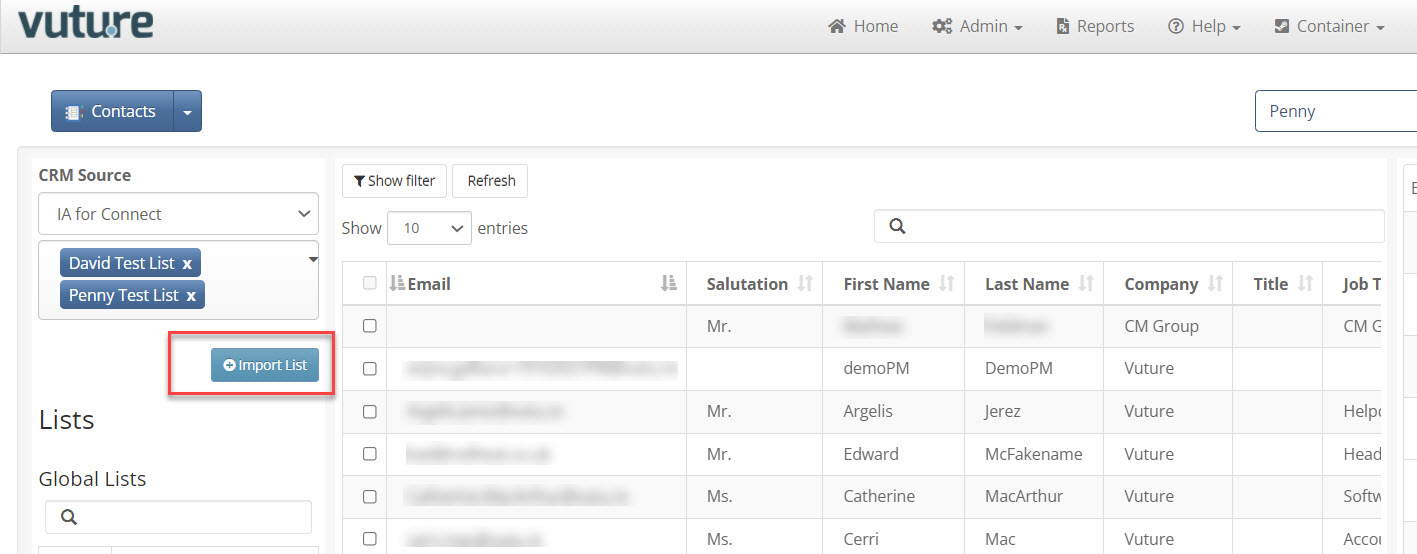
Select each list in turn and click Refresh from CRM to bring across the latest state of the data.
Now that you have the lists in Vuture, you need to ensure that the end users can see just their own list(s) in the Connect dashboard. To do this you will use the Email List Access feature.
Using Email List Access to Assign Lists to End Users for use in Vuture Connect - for Client Admins
Use the Email List Access tool to assign IA lists to partners in VC. This allows partners to see just “their” lists in VC.
Ask your CSM to enable Admin.Roles.Admin.View Email List Access Screen (and ensure that Enable Spacelab pages is on). This will give you the right to allocate lists to others on their behalf, narrowing the view of a global list to that user only.
Note: This restriction of visible lists will work for Vuture Connect, the Contacts Module, Email Lists, Send Email v1, Send Email v2 and the Campaign Summary screen.
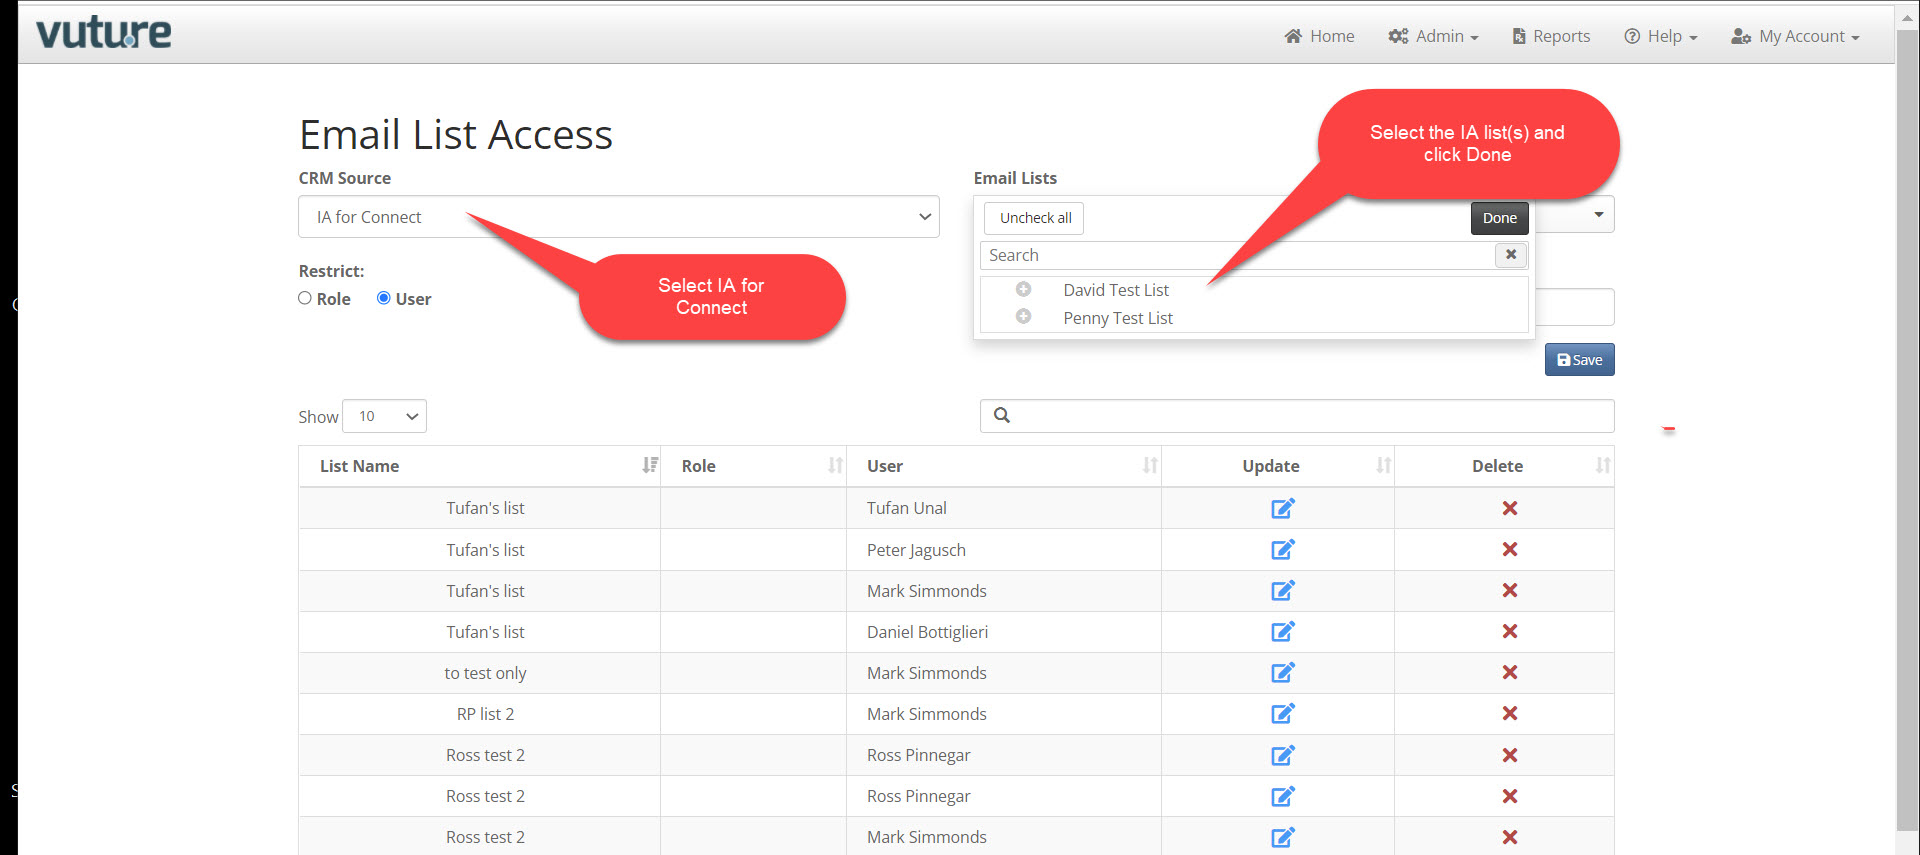
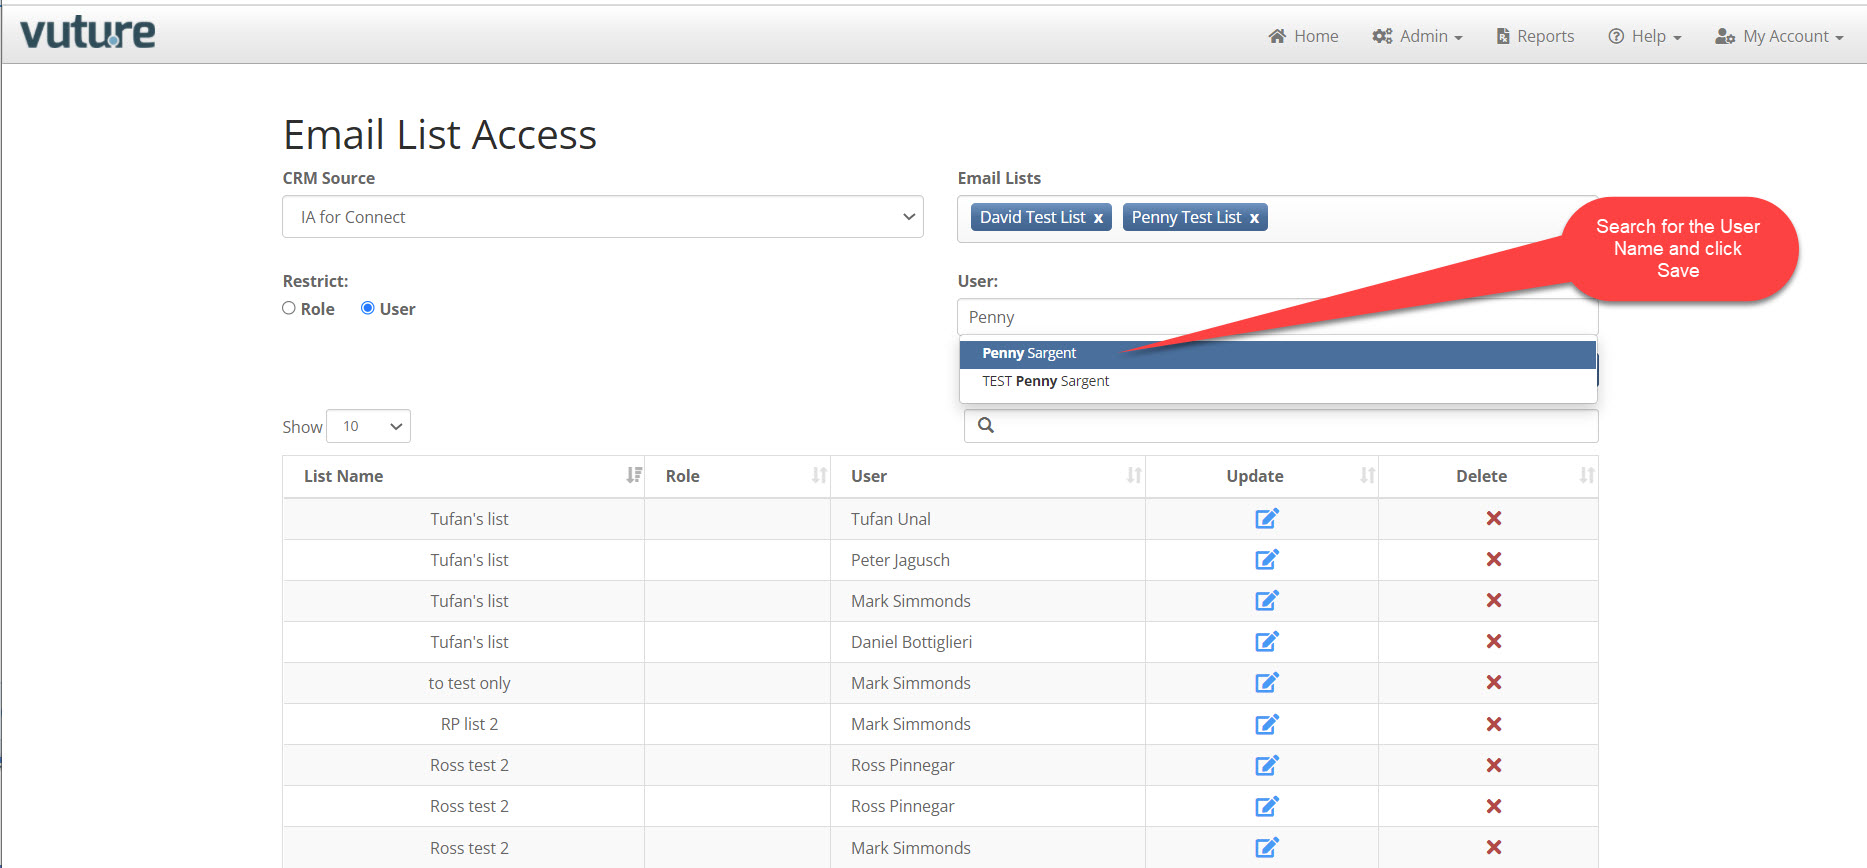
You will see a green Saved Successfully message in the top right hand corner of the screen.
If you wish, you can also give a login and access to a Secretary/PA or Administrator user for any end user’s lists. The lists will then show up on the PA's Vuture Connect dashboard and they will be able to work with the contacts on the partner's behalf. However, please note this warning:
Sending Emails Warning: Emails will be sent out from Vuture Connect as "from" the logged-in user. This means that it will be necessary for the logged-in user to be the senior stakeholder, not their PA, to ensure that the mailings are sent out "From" the correct name.
Creating Campaigns in the Email Module for use in Vuture Connect
Build an email campaign in the usual way. You do not need a special template for Vuture Connect campaigns, although you could design a sub template and save it for future use. Alternatively, you could create a campaign in a main container first and then copy it over to the Connect container.
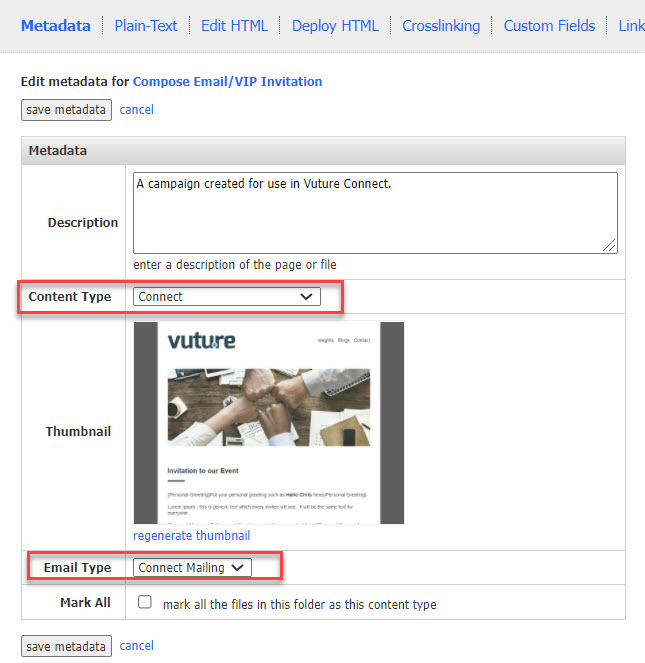
In the campaign intended for Vuture Connect, use Email Options to set the Content Type to Connect. This plus the Expiry Date (set in Custom Fields tab, see below) and the Email Type will cause the campaign to appear in the end users' Connect dashboard, under the Mailings tab. Any user who has access to this container will now see this mailing in their Connect dashboard.
The Content Type ensures that this mailing will be seen in the Vuture Connect dashboard, so change this to Connect. The Email Type controls which suppressions will be honoured so change this to the Email Type you have chosen and Save Metadata.
Then navigate to the Custom Fields tab and enter a Subject Line. As an Admin user creating the campaign, you choose whether or not to lock the Subject Line. If you decide to lock it (by checking the Fixed Subject box), the end users cannot change what you have written, in Vuture Connect. If you leave it blank, end users must enter their own choice of subject line in Vuture Connect. The subject line is a mandatory item which must be entered, either here or in Vuture Connect, before the email will send.
Next, enter the Deadline for the mailing - the date by when the end user should send this out. The Deadline is mandatory here. Without this Deadline, the mailing will not appear in the Dashboard. Deadlines are intended to prevent the end users' dashboard getting cluttered with old, expired mailings and invitations.
Description for the mailing. This description should tell the end user what the mailing is about and who should be targeted to receive it. The description you enter will appear under the campaign thumbnail on the dashboard.
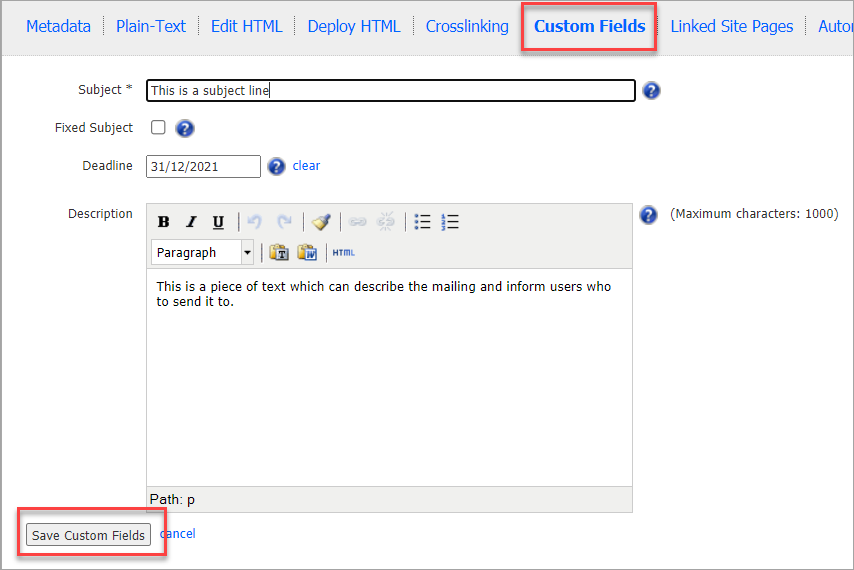
Save the Custom Fields and return to your campaign.
Adding one or more Personal Message spaces to the Campaign
Personal message spaces or message tags are the method used to personalise each email. How many message tags you create and where you place them are up to you.
In the email body, create a message tag where you want a personal message to appear. Use the format: {message}Place your personal message here{/message}
You can set up as many message tags as you wish - for example, a salutation, a private message and a sign off. Ensure that each message tag is uniquely named and contains a hint for the type of content you are expecting the end user to add.
For example:
{Greeting}Place your greeting here{/Greeting}
Then some standard body text which every recipient should see. Then to finish off...
{Salutation}Place your salutation here{/Salutation}
It is customary, but not essential, to restrict your message title between the curly brackets to one word; however {Private Message} put your private message here {/Private Message} would also work. No need for underscore between words.
It is not mandatory to have more than one message tag. However, if you create a message tag the email will not send unless there is some wording inside the tag, that is, a mail will not send with an empty tag.
Important: End Users must be trained to replace the placeholder text with their own text and not leave any empty tags, before sending.
Activities in InterAction
Contacts will be mailed from the Vuture Connect dashboard and the associated Activities (for example, any of the typical InterAction Activities which you may have already set up: Email Opened, Link Clicked, Email Forwarded, Email Bounced) will be written back to IA in real time.
Linked Emails
Once a user has sent an email from within the dashboard, you will notice that subsequent sent emails are shown in the Sent Mail monthly folders as linked emails (indicated by a paperclip symbol) like this:
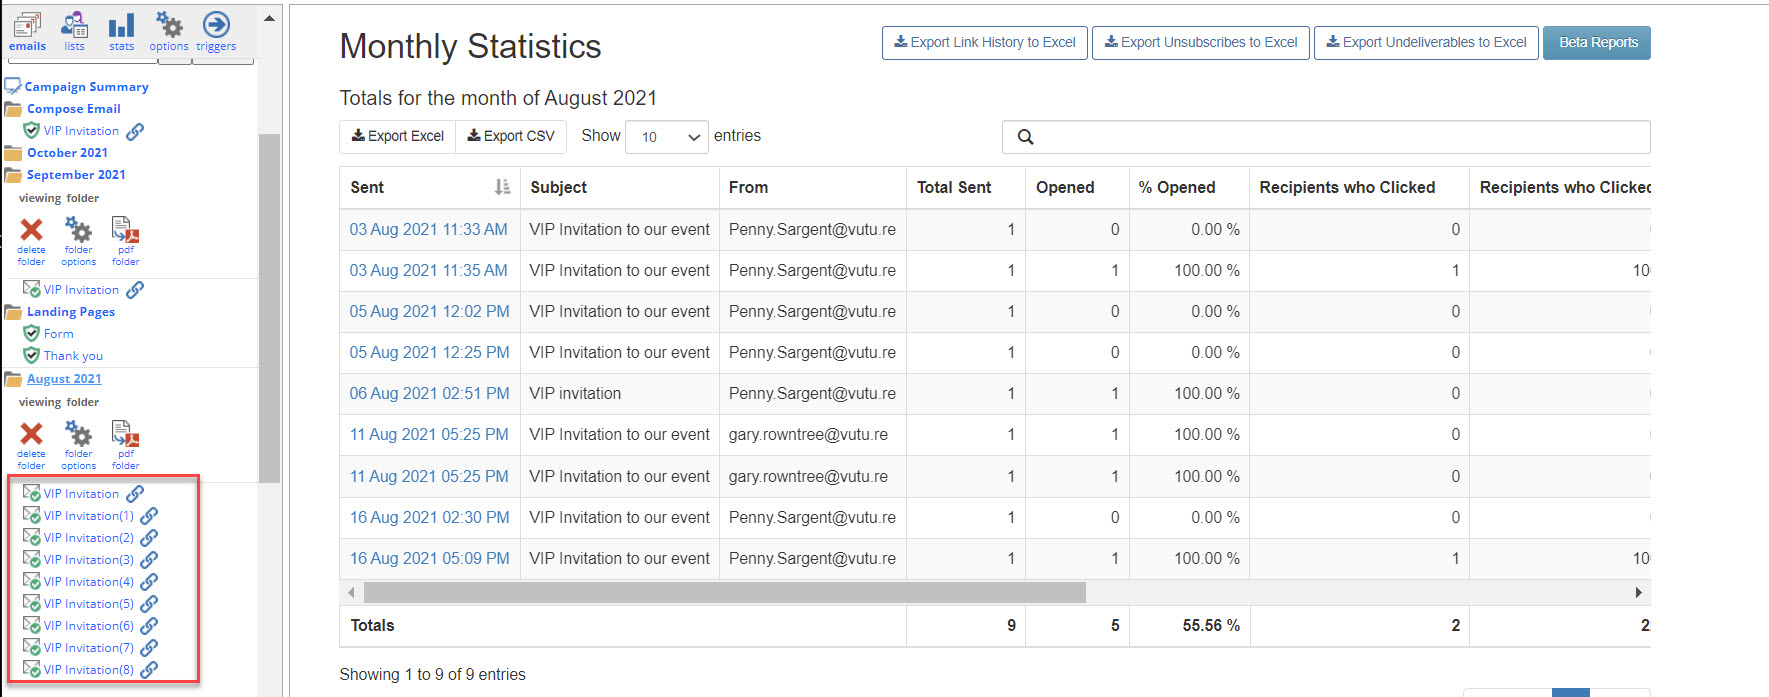
Each time the email is sent out, Vuture Connect will create a copy of the original, and then link it to the original, so that the reporting is related and Vuture understands who has already received this email. You can compare the metrics from your linked emails by looking in the Send Email History Screen. You will see all emails that are linked to the selected one, along with the number of Opens and Links clicked.
If you are interested in the concept of linked emails there is an article with more information here.
Vuture Connect will link the emails for you, as they are sent out. You do not need to take any action.
Final Check for Client Admins
At the end of the above process, you should have:
- End User Roles created
- End User logins created and assigned to the Role
- End User lists uploaded from InterAction to the Contacts module and access given to the correct users via Email List Access.
- One or more campaigns created and assigned to Vuture Connect in Email Options, with personalisation message tags inserted, ready to be personalised and mailed from the Connect dashboard.
You are now ready to invite your users to access the Connect dashboard by sending them the URL.
Browsing to the Connect Dashboard
Once Connect has been enabled for your instance, you can tell your end users to access the Connect dashboard by adding /connect to the end of your Vuture URL like this:
https://yourfirm.vuturevx.com/connect
Instructions for End Users of Vuture Connect
Browse to your Vuture Connect URL. You will need to be logged in to Vuture first. If not logged in you will be prompted to go to the login screen, to use Single Sign On. When the Connect User hits the login screen they have to click the “Login with Single Sign On” link on the login page (just below forgotten password link). Doing that authenticates the user and redirects them to the Connect Dashboard.
SSO is recommended if partners (or other end users) are going to be accessing Connect. If your end users are used to logging in with username and password then they can also use Connect that way.
End User's View of Vuture Connect Dashboard
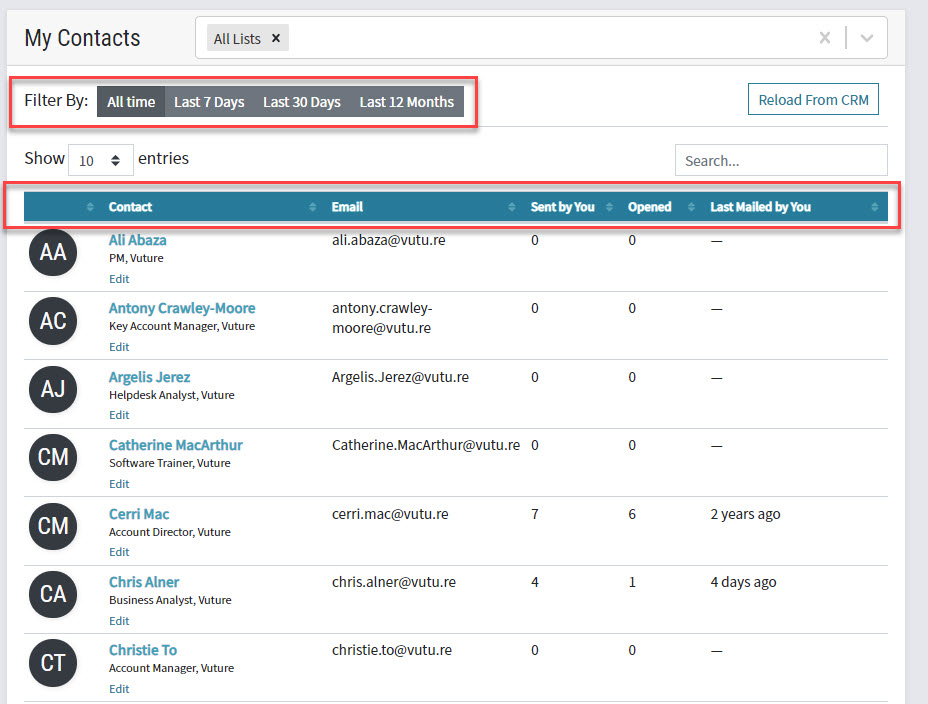
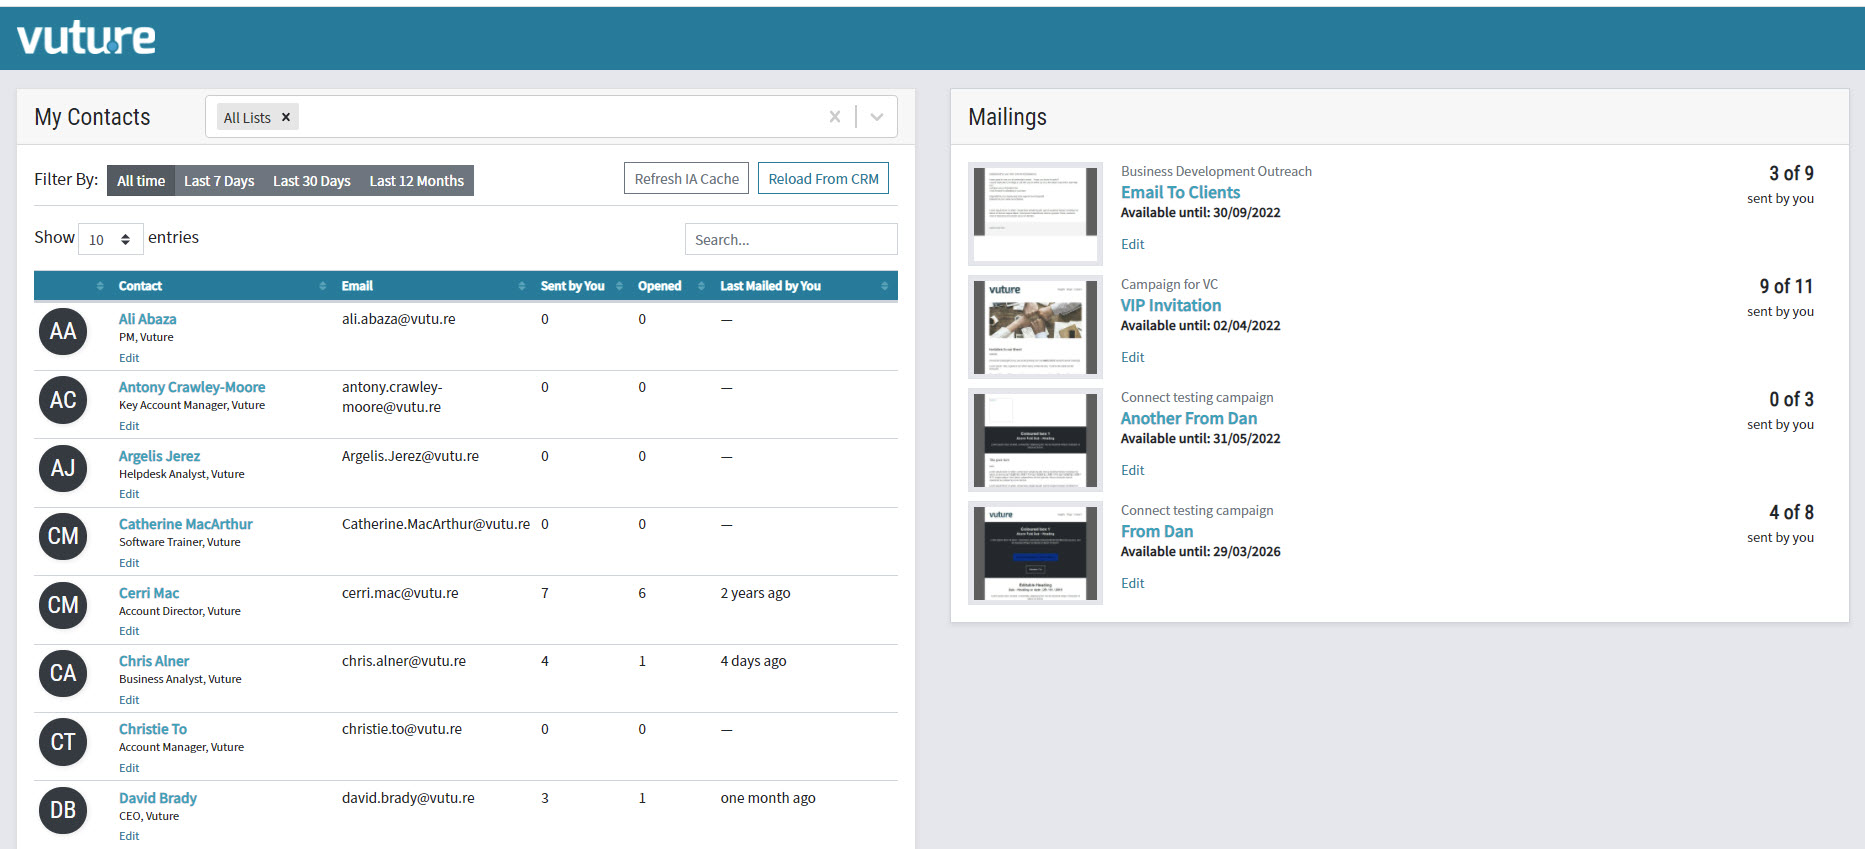
At the top of the image above, next to My Contacts, you can see All Lists or the List Name. There is a drop down selector to the right where any other lists available to this user can be found. The drop down list selector allows the user to choose which list they will work with - if they have more than one.
Choose Filter By All Time, Last 7 Days, Last 30 Days or Last 12 Months to see contacts filtered by when they were mailed.
Click on the arrows next to the column headers Contact, Sent by You, Opened, Last Mailed by You to sort the list of contacts.
Mailing History
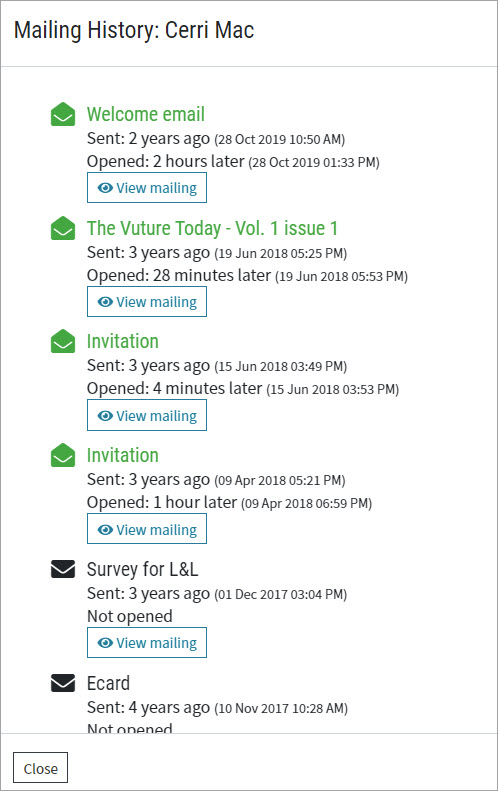
View the Mailing History of any contact by clicking on their name. This will show previous mailings sent by you and by other users, from Vuture generally not just via Connect. The envelope icons are colour coded to indicate whether or not they opened them; green for Opened, black for Ignored. Clicking on View Mailing will show the campaign as it went out to the user, including the personalised content.
Sending a Mailing
There is a Mailings tab on the right side of the screen.
Clicking on a thumbnail image (or the name of the mailing) in the Mailings tab opens the second dashboard. This dashboard allows the end user to see the Description, and decide who from their selected list should receive the mailing.
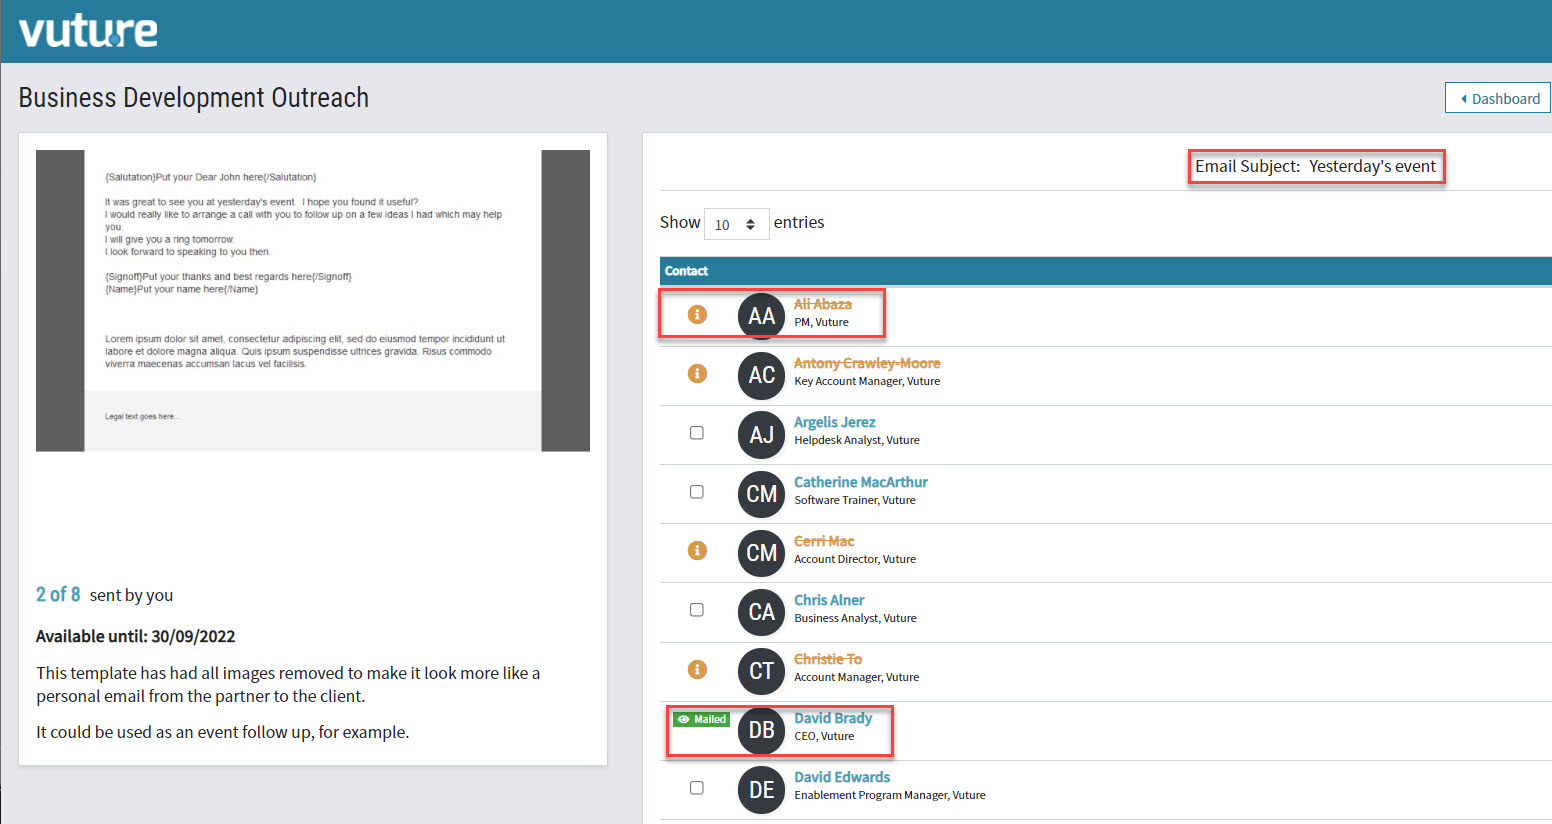
In the above image, the Email Subject has been locked and is not available for editing. This is a choice made at the campaign creation stage, in Email Options, to lock or leave unlocked.
Unsubscribed
Some contacts have been struck through with an orange line. The little i in the orange circle explains that these contacts are unsubscribed and cannot be mailed. The reason for being unsubscribed could be that they have asked to be removed from mailings, or they are unengaged (depending on your firm’s settings) or they have bounced x times (depending on your firm’s settings).
If the contact is cleared in IA (removed from the Send No Mailings folder or has their email address changed to a correct one, for example) then refreshing the cache (via the link on the dashboard) will remove the strikethrough and allow the contact to receive mailings again.
Mailed
In the image above, David Brady has already received this mailing from you, so cannot be sent it again by you. Clicking on the word Mailed will reveal a copy of the mailing as it was sent, including the personalisation.
Under the thumbnail on the left, the explanatory text displayed was entered by the Admin user in the Email campaign, at Email Options.
2 of 8 sent by you means that this mailing has been sent out 8 times. Of those, 2 of them were sent by you - the logged in user.
Personalise
Select an available person by checking the box to the left of their name, then add a private message, a private sign off or as many private messages as appear in the template, Preview the result, and then Send.
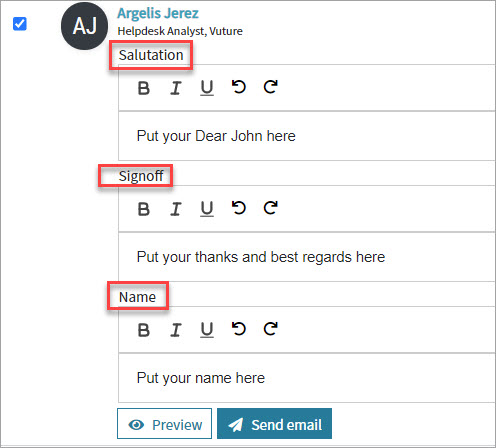
In the example above, the admin user has added three personalisation areas for the user to complete. The positioning and number of these areas, and their names, is a matter of choice. The only rule is that, if the admin user creates an area, it must have text in it before the mailing will send. It cannot be left empty. Users also need to remember that they must replace the default text with their own text.
Sending an Email
Add each personal message and click Send individually. It is only possible to send one mailing at a time.
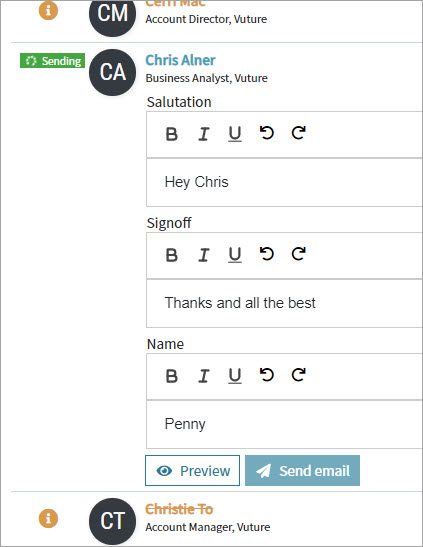
Once you click Send email, the personalised email will be queued to be sent immediately. The email may not arrive immediately - that will depend, as usual, on the recipient's email server settings and firewall.
Duplicate Mailings
One user cannot send the same mailing twice to the same contact. This is standard behaviour throughout the Vuture platform. However, currently in Vuture Connect some duplication is allowed; different users can send the same mailing to a contact. This means that a popular contact could receive the same campaign from several end users.
Email Confirmation
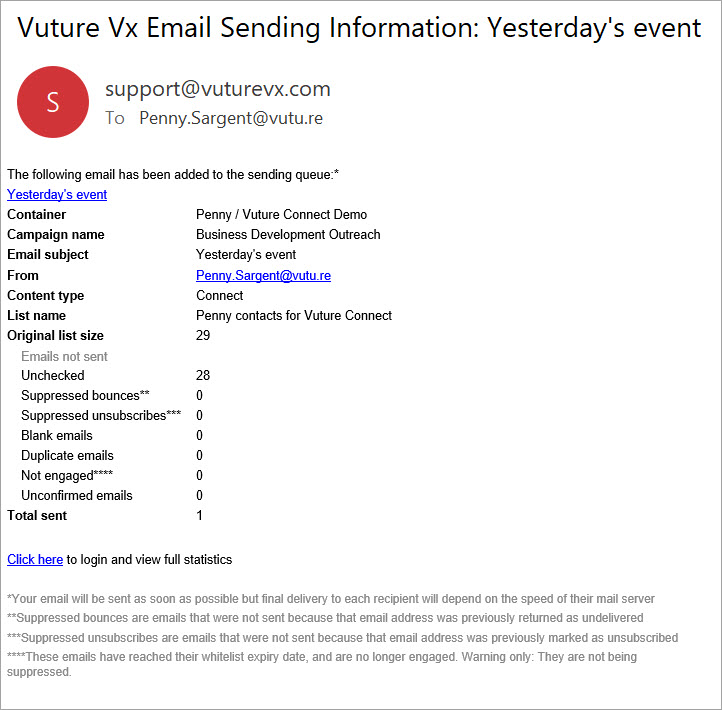
With every send the user makes, they will receive an Email Sending Information email, one for each time they click Send. If the send fails, they will also receive an Email Sending Information email, indicating the reason for the failure. If the instance is set to Warning Only, the send will go through, but the user will be notified, as in the image below:
Editing Connect campaigns
If, once the campaign has been allocated to Connect, corrections need to be made, SuperAdmins (or other Vuture users who have the edit Role) can edit any campaign in the usual way, by navigating to the container in the Email module. Alternatively, it will be easy to jump directly back to the campaign from within Vuture Connect. There is an Edit link below the Campaign availability dates. The Edit button will only appear for Admin users who have this additional Role enabled.
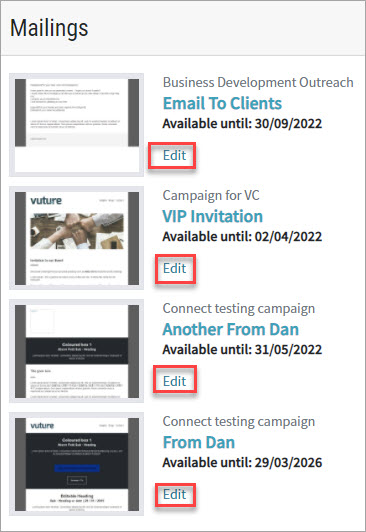
The process would be:
Identify the error, click the link to Edit the campaign, make the change to the email within the campaign and Save. Return to Connect and refresh the dashboard view.
The change should be instantly visible.
FAQs
Q. Can you send two linked emails to different list sources? In Connect - could the partner send to a standalone list and the main marketing email still go to the IA list?
A. There is nothing stopping you sending a linked email to two different list sources but as typically emails link to forms and those forms will be CRM/Standalone-specific there might be challenges there. You will need to test the flow.
Q. If a client has open tracking disabled (but click tracking still generating opens) then would the contact's mailing history screen still show the green open activities?
A. Yes the open tracking in the mailing history screen would work, but only for clicks.
Q. Can I edit a contact’s details in VC? For example, if their name is misspelled?
A. You can edit a contact in VC (click on Edit beneath their name) and it will write the edits back to IA - change name, job title and other contact details. The change will be sent to IA immediately. You will receive a Success message in the top right corner of the screen. Sometimes, depending on how long the traffic to IA takes, or if you have DCM on this field, you will get a message informing you that Vuture Connect is waiting for IA to update. We recommend that you wait for the update to occur and refresh your screen before continuing with the send to this contact.
Alternatively, you could make a change to a contact’s details in IA, then refresh your list in VC and pull through the latest version of that contact. You cannot change which list they are in, from within VC. If you need to change the list a contact is in, do that in IA.
Q. A contact can appear on more than one IA list. What happens if they are mailed from one list (list A) - will they show up as Mailed for that campaign on another list (list B)?
A. No they will not get the Mailed label on list B, because the contact was mailed from list A - which is where the Mailed label will show. However, because the Mailing History is based on email address, that will display all mailings. To see if a contact has already received a mailing from another user, check their Mailing History.
