Keywords: iCal, Outlook, Google Calendar, ics file
Overview
You can create an iCalendar file in Outlook, or directly in the Vuture platform. This article describes both methods.
Contents
What are iCalendar files?
iCalendar files are the standard calendar file format used across both Windows and Mac. You can attach iCalendar files with details of your event to emails and landing pages. This will allow your recipients to add your event to their calendar.
Google Calendar is now also supported. See more on that below.
Prerequisites
This feature needs to be enabled for your role type. You can ask your Customer Success Manager to enable it from Admin>Roles>Email Campaigns>iCal Enabled for the required roles or for all users.
Your iCal Creator should also be upgraded to iCal Version 2. This includes the option to format the text in your iCal file. Ask your Account Manager to enable this by visiting Admin>System>Versions>ICal Client>Version 2
Note: There is an occasional issue which can be caused by multiple lines of text and saving the html. Vuture support can investigate by following this article here.
Option 1: Upload an existing iCalendar file
- Go to Outlook or your existing email client.
- Create the calendar item as you would do normally. Make sure that you set the correct date and time and any details you want to add into the description
- Choose File>Save as>iCalendar format (*.ics)
- Click Save and save the file to your desktop
- Go back into Vuture
- Go to the campaign where you want to upload this file.
- Click on the Uploads folder but it could be any folder.
- Click on Choose Files
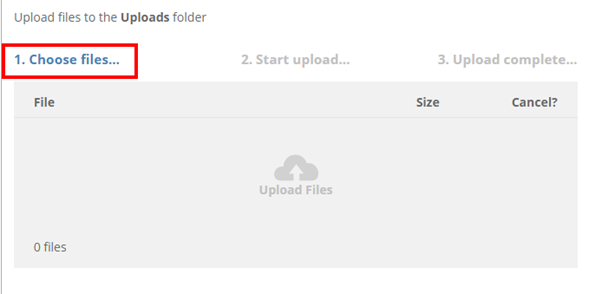
- Select the ics file from your desktop.
- Click Start Upload. The file(s) will appear in the selected folder.
- To link the ICS file to your email or landing page, add the text for the link in your email or landing page
- Highlight the text and click on the hyperlink button

- Click on Link List
- Select the ics file from the relevant folder
- Tip: when creating the .ICS file using Outlook remember to set the correct timezone for the calendar request.
Note that If you create iCalendar files outside of the Vuture system you won’t be able edit them within Vuture after you’ve uploaded them.
Option 2: Create iCalendar file in Vuture
You can also create iCalendar files in Vuture without leaving the system.
- Click on the Landing Pages folder or any folder other than the Compose email folder
- Click new page
- Give your file a name at the top of the screen
- Click Create Calendar File. You should now see the Calendar File creator ready for you to fill in the details. (See Animated GIF below).
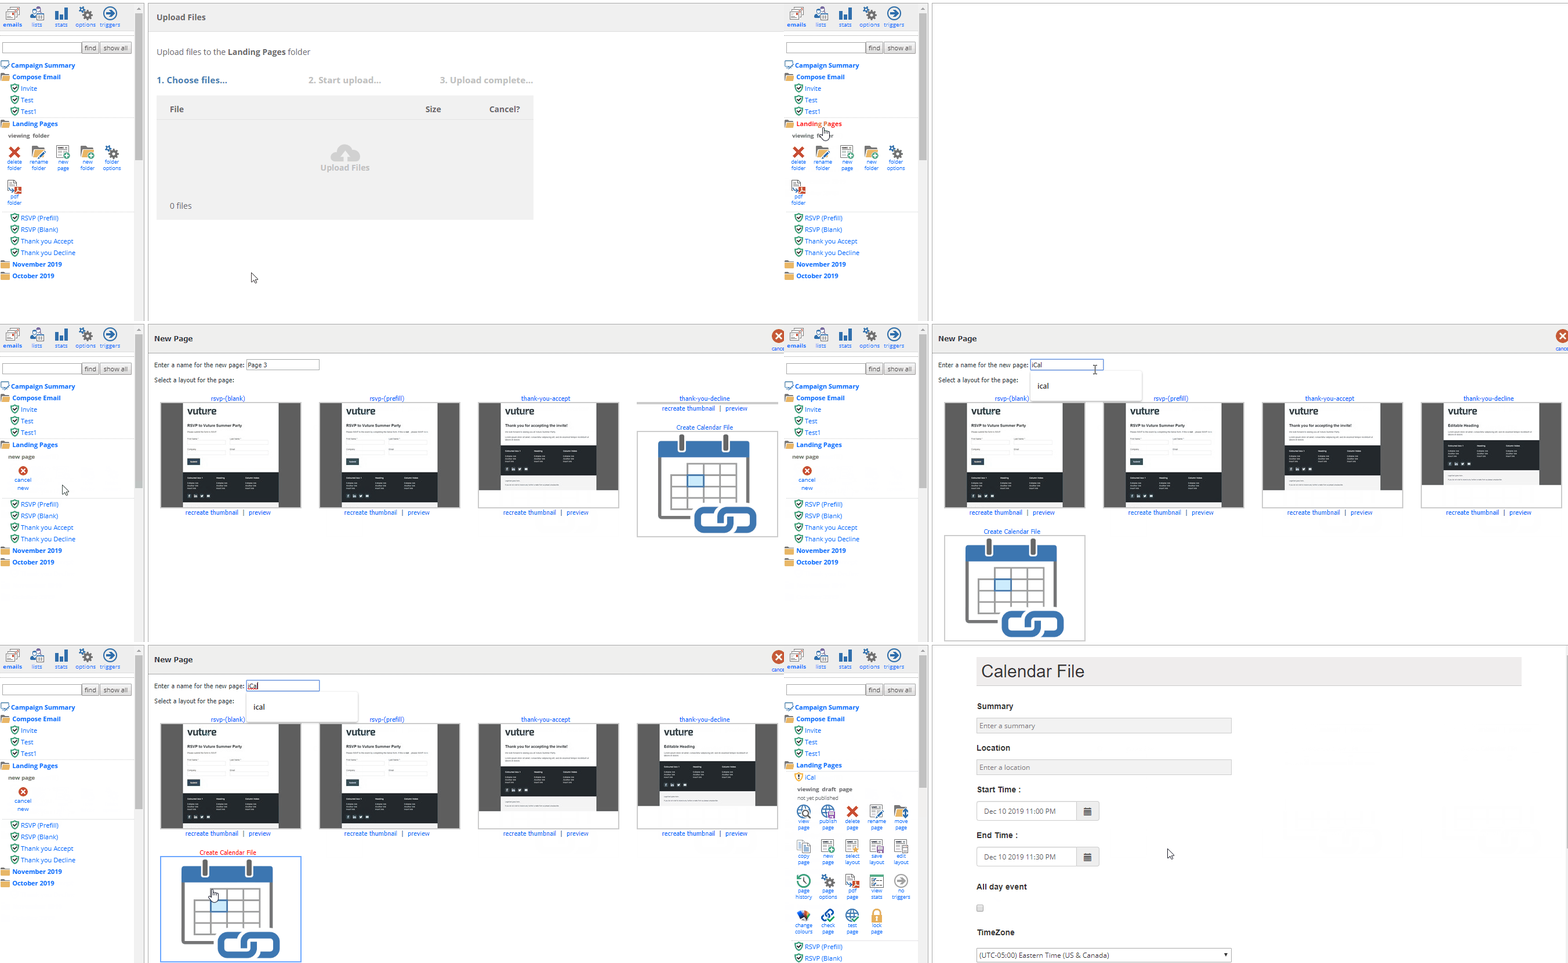
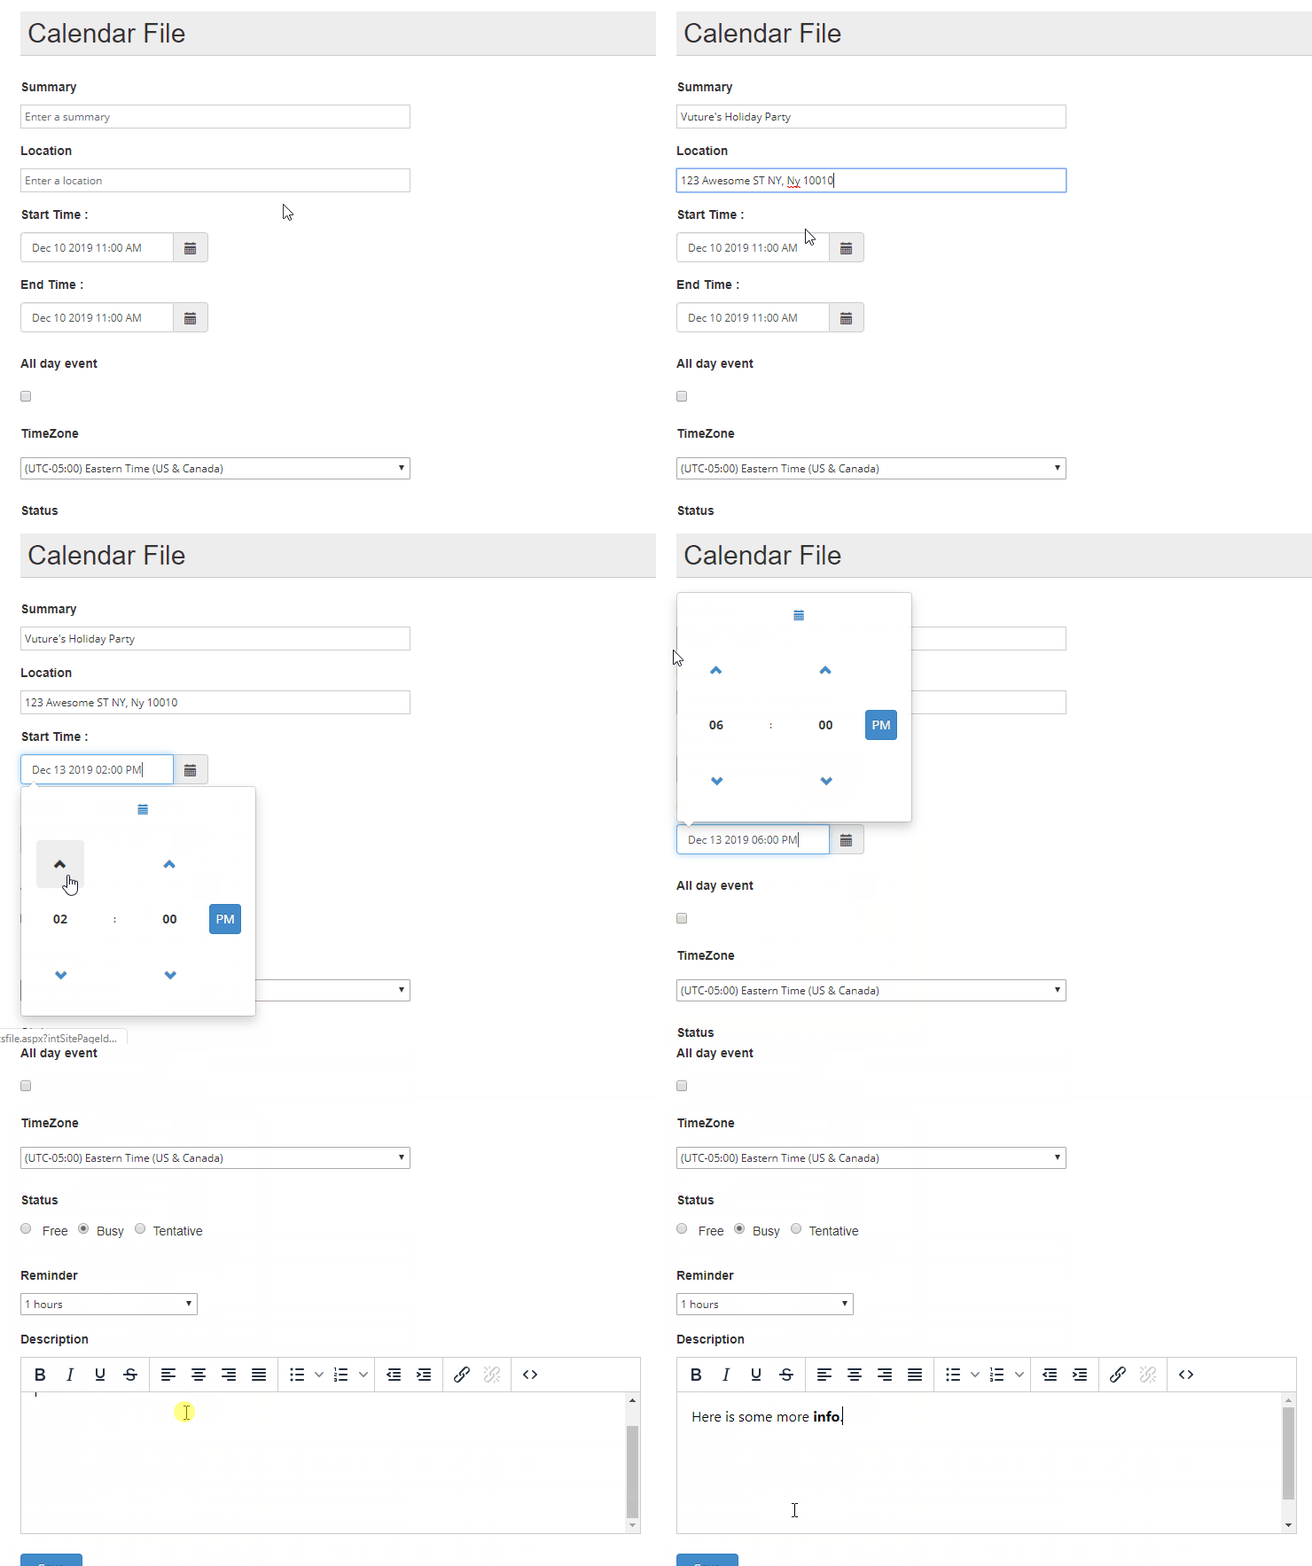
- Fill in the details of your event (See Animated GIF below):
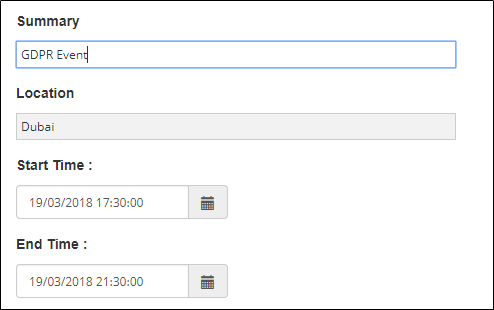
- Summary: This is the title of your event and will come through as the "subject line" of your iCal.
- Location: Type out the full location of where the event will take place.
- Start Time: Select your start date and time for the event.
- End Time: Select your end date and time for the event.
- All day event (optional): Check this box if this is an all day event.
- TimeZone: Select the timezone this event will take place in.
- Status: Select the status of how this iCal should appear in the recipient's calendar - Free, Busy, or Tentative.
- Reminder: Set the iCal reminder for this event (i.e. 1 hour) to notify the recipient.
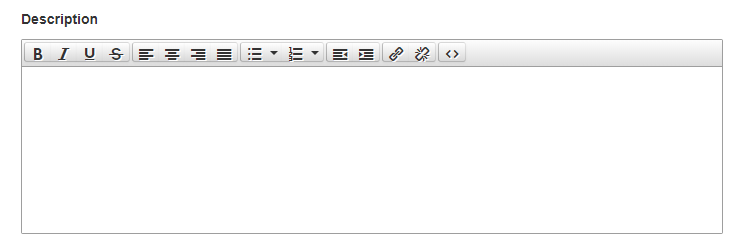
- Description: Include any additional information your attendees should be aware of for this event. You can also use the text editor menu (i.e. bold, italics, etc.). Please note: This editing feature is available in version 2 of the iCal. Please ask your Customer Success Manager to enable this for you.
Note, formatting will not show on calendar files opened through email clients such as iOS or Android. The text will still show but without the formatting.
- Click "Save" to save the iCalendar file. Then "Publish" > "Publish Now" (See Animated GIF below).
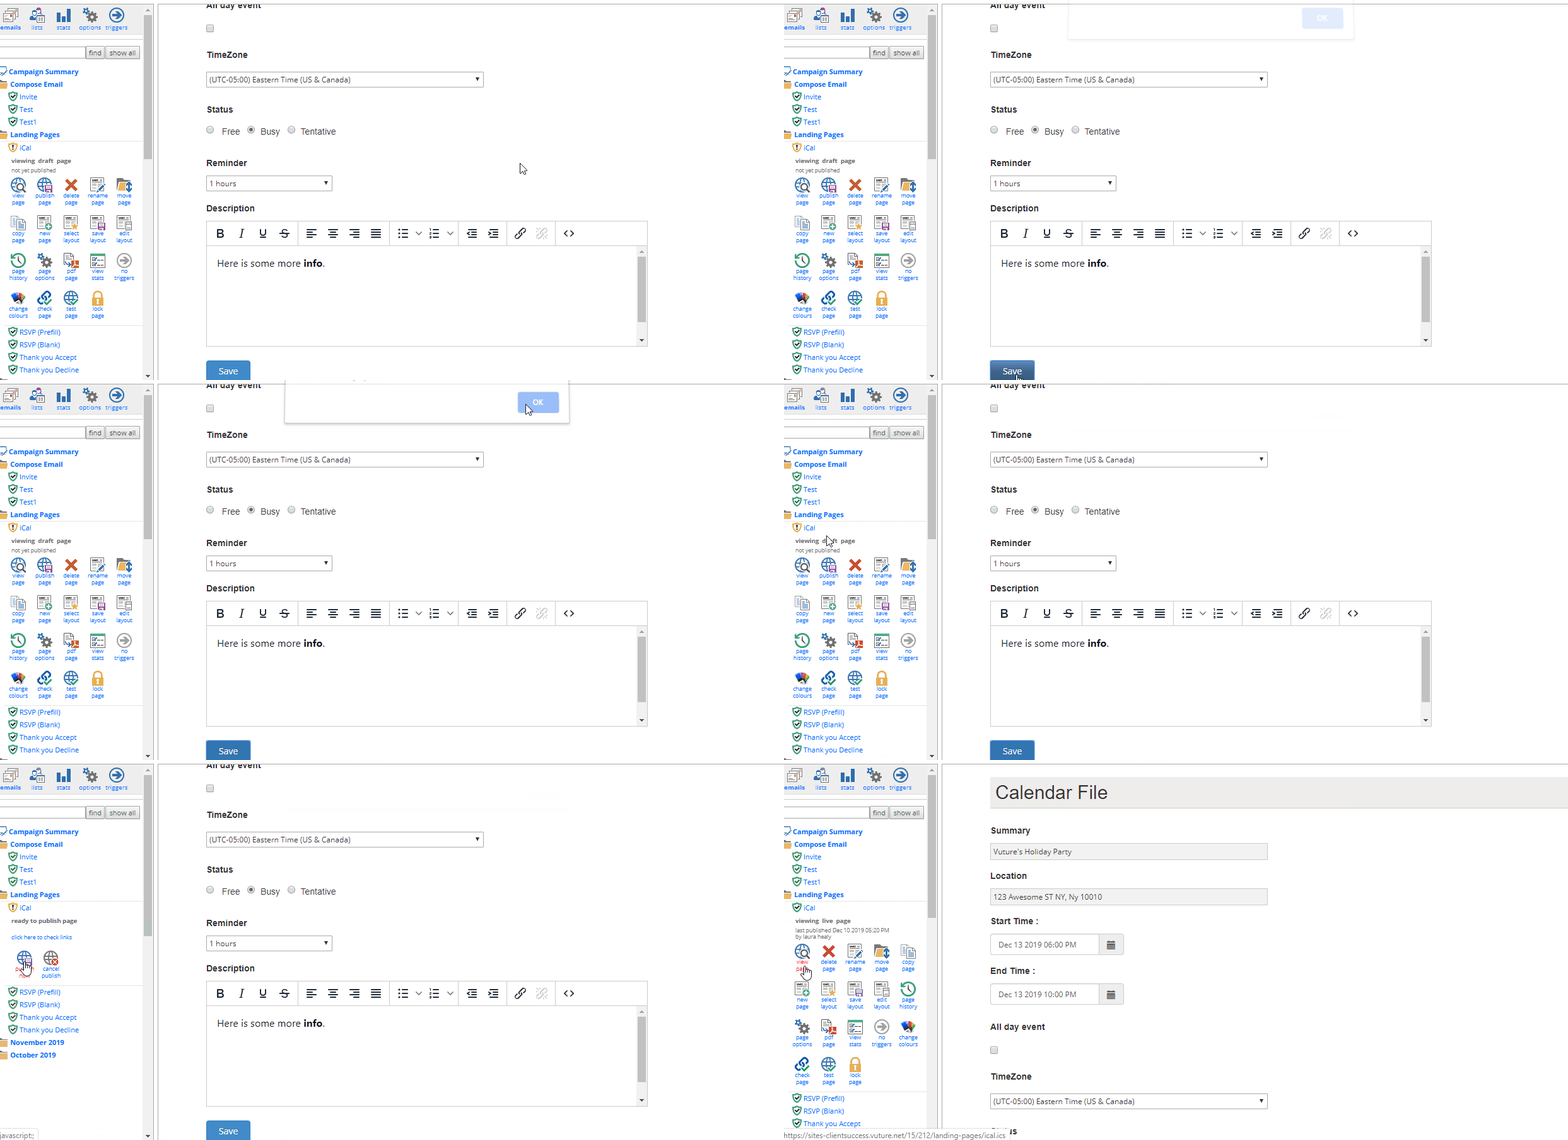
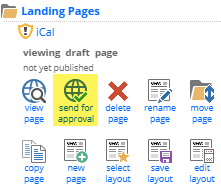
Note, if using Vuture's Approval Workflow, after you click "Save" to save the iCalendar file, you must then click "send for approval". There will be no "Publish" icon. You may then send this to the required individual(s) to approve the iCal for publishing. Once the individual has approved the iCal, the iCal will be published. Until then, it will remain in draft mode.
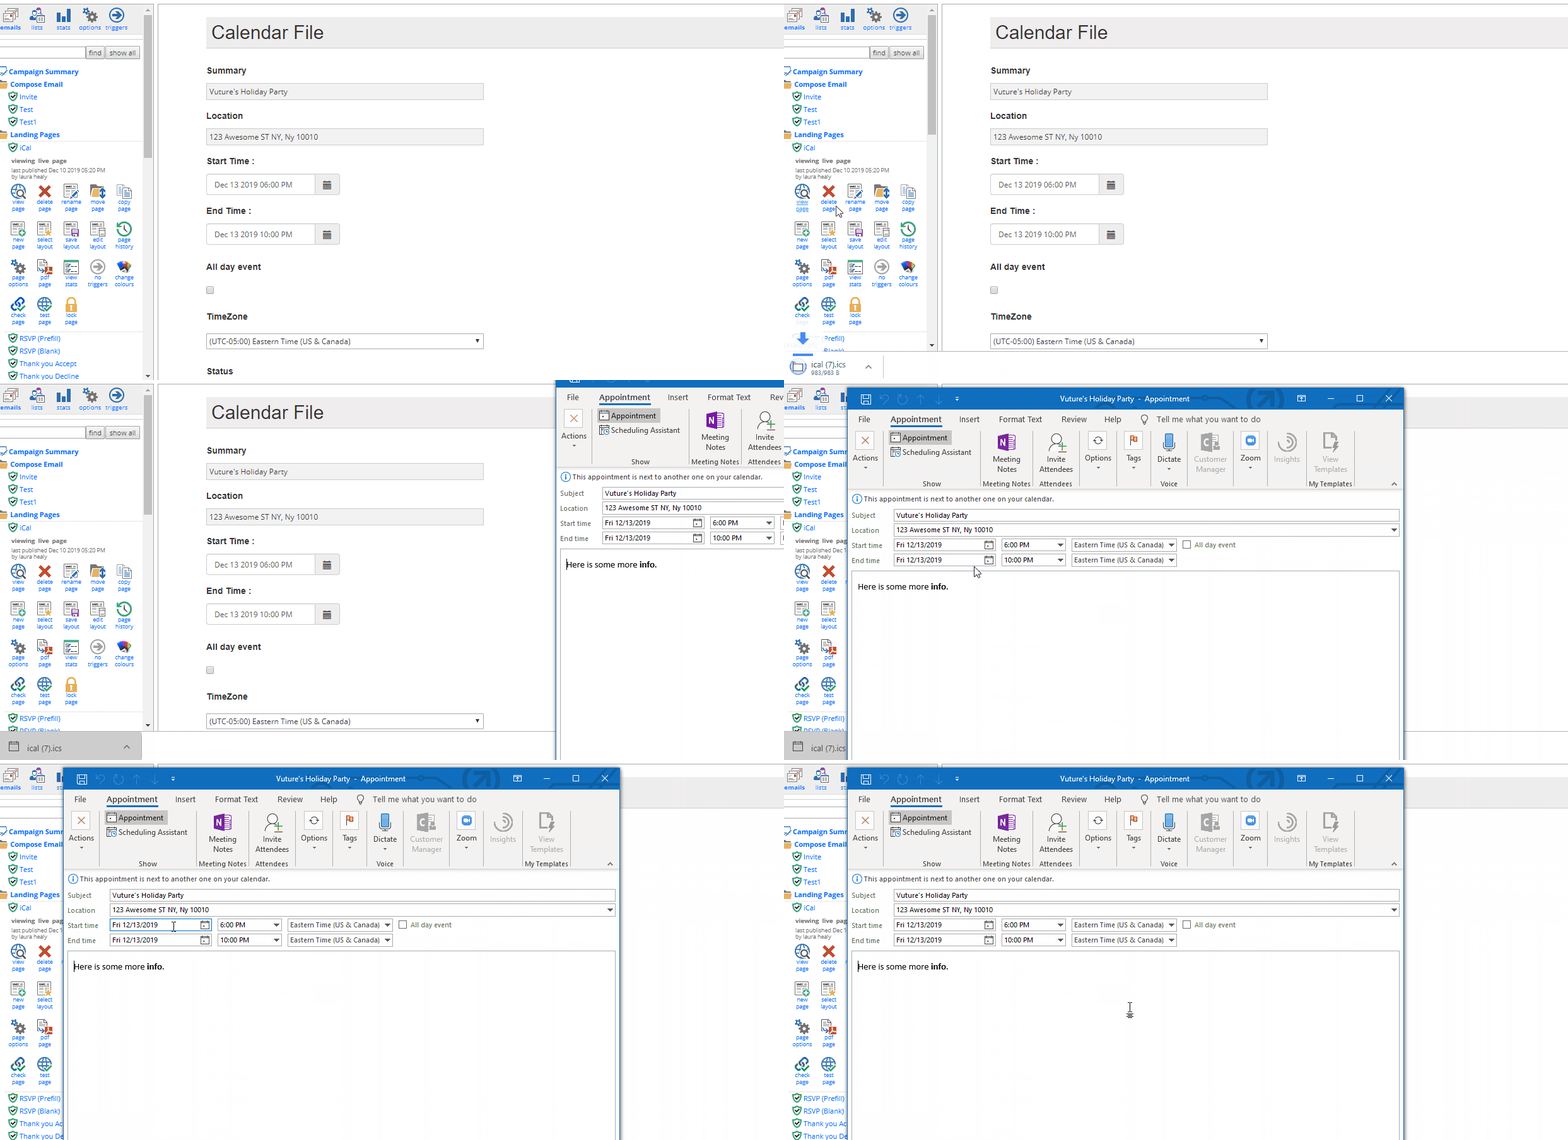
- You can test the file by clicking on view page. The iCal file will then be downloaded so you can see how it looks. (Please see animated GIF below).
Google Calendar Support
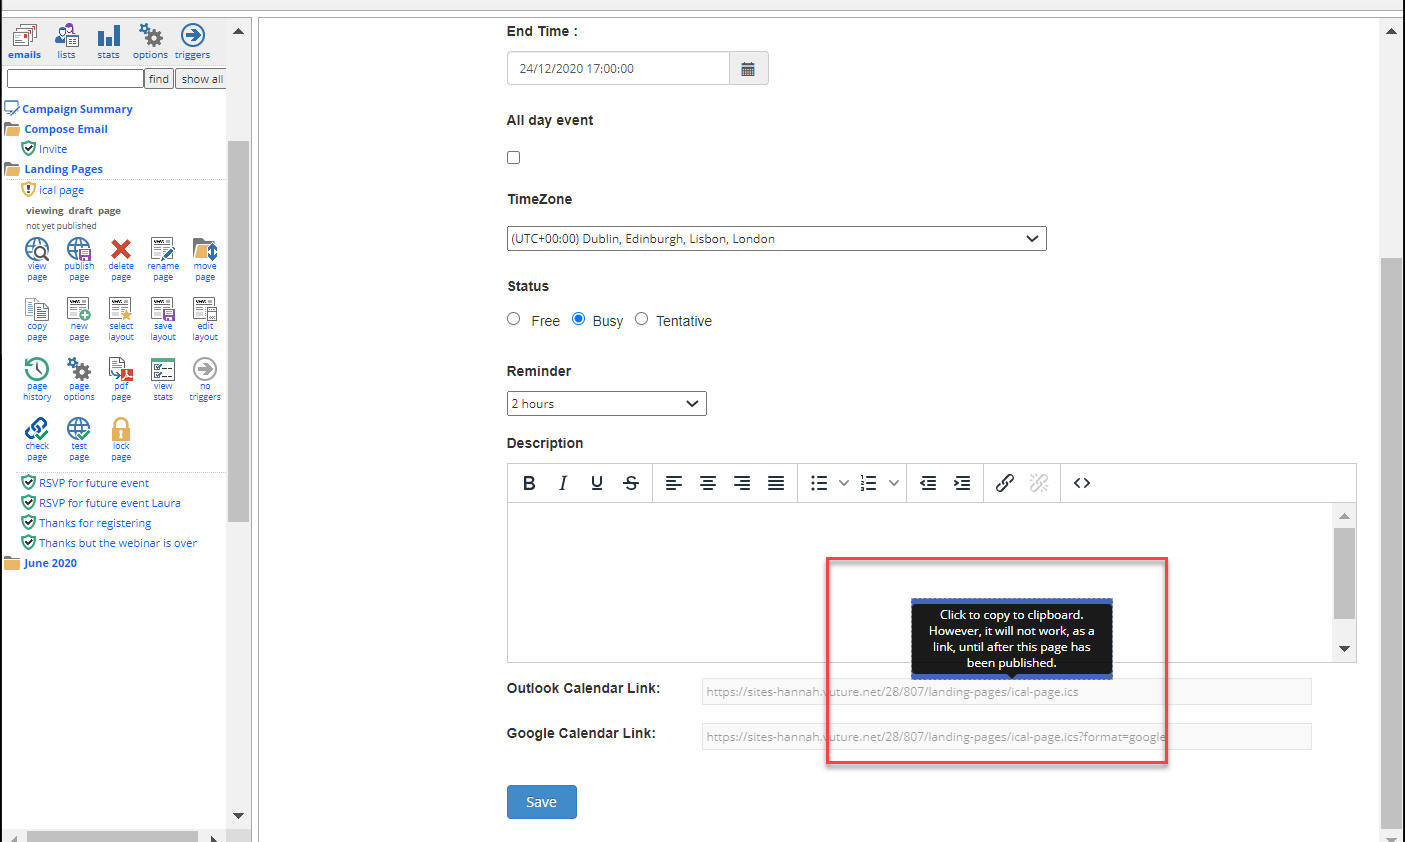
May 2020 Release Update: Our current iCal generator has been updated to create download files that work in Outlook Calendar and in Google Calendar. The files will be shown at the bottom of the page (see image below). Once they appear they are available to be copied into a landing page as a link but please note they will not work as links until the page has been published.
Here is an image of the iCal being created, with the Google link now visible below the Outlook link. Hovering over the links at the foot of the page will give you a warning message. This functionality has been developed to ensure that you can create the page and save it, and use the links in your landing pages, without first going through the approval process.
Please Note: the iCal Description field is limited (by Google Calendar) to 3,000 characters maximum. If you need more characters, we recommend you link to a further landing page and put your detail there.
Process to create a Google Calendar link
- Create a new calendar page just like any other calendar page. (See creating an iCalendar file in Vuture)
- In your email or landing page, create a link to the calendar page in the link editor.
- In the link editor, either copy and paste the Google Calendar Link from the calendar page (See image above) or in the link editor, select the calendar page from the drop down and append the text ?format=google at the end of the Link URL. (Note: We advise to copy and paste the link rather than embed.)
- Send the email to your contacts
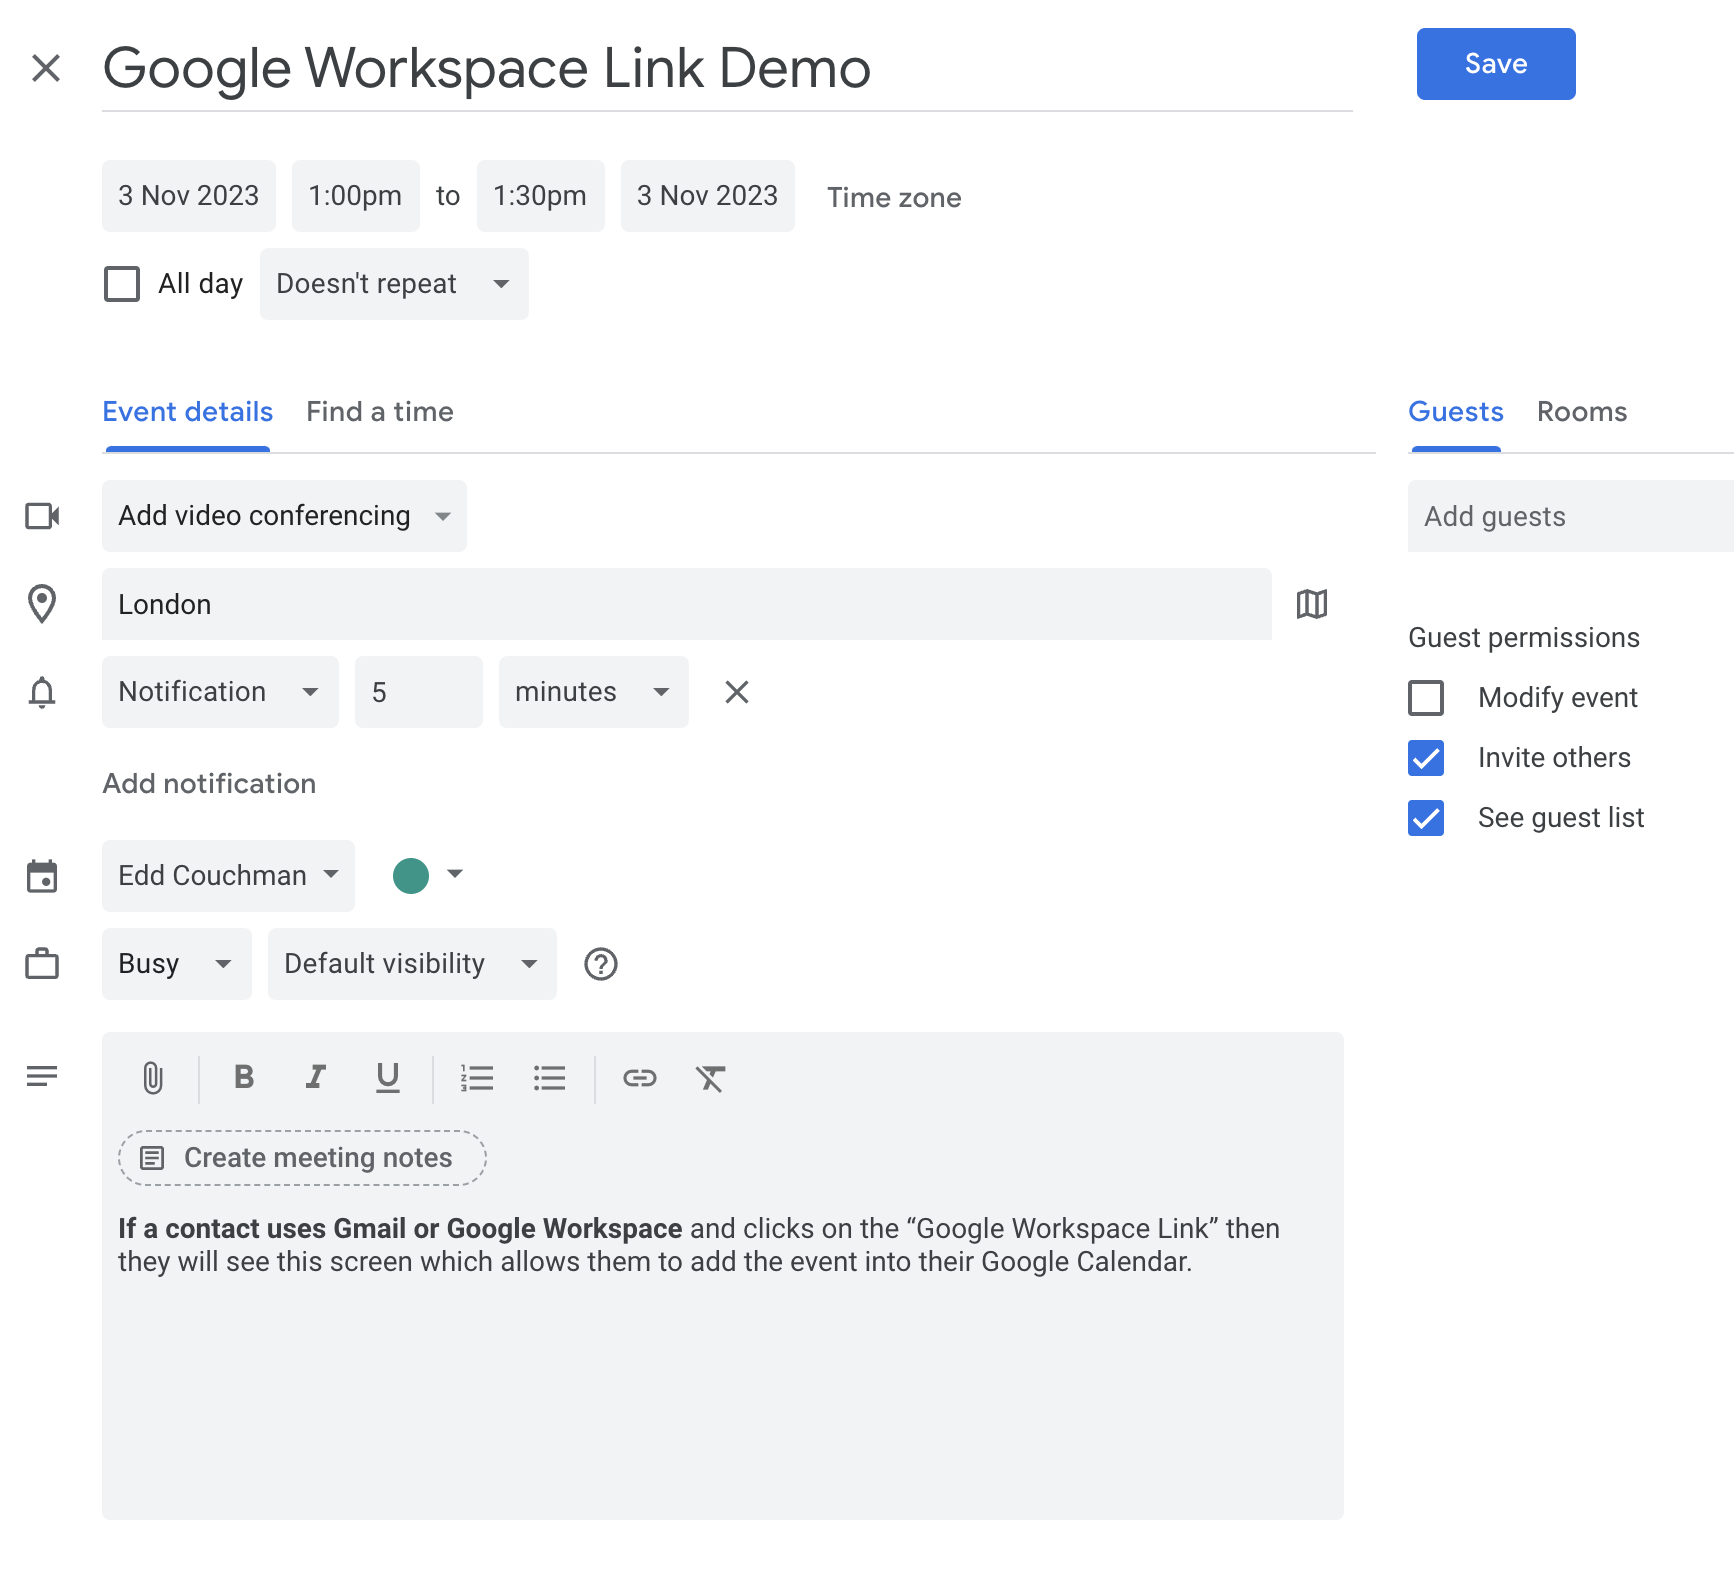
- On clicking the calendar link the email, the link redirects to the Google calendar page. The contact saves the new calendar entry in their Calendar.
Note: Testing the link - the links will not work until the page has been first Published. Create your iCal, click Save and then click Publish before attempting to test.
How to link to the iCalendar file
Note: Your iCal file must be published before linking to it. You can, however, use the URL in a landing page while you are preparing a campaign, before you publish.
- To link the iCal file to your email or landing page, first add the text for the link in your email or landing page (i.e. "Add to my calendar" or "Download the iCal here".
- Highlight the text and click on the hyperlink button in the Text Editor.

- Click on Link List
- Select the ics file from the relevant folder (i.e. Landing Pages / iCal)
- Then click "Update" in the Text Editor.
- "Publish" > "Publish Now"
- You can then test the link by clicking on "View Page" to open the landing page/email in your browser and click on the link. The iCal should then download to your computer.
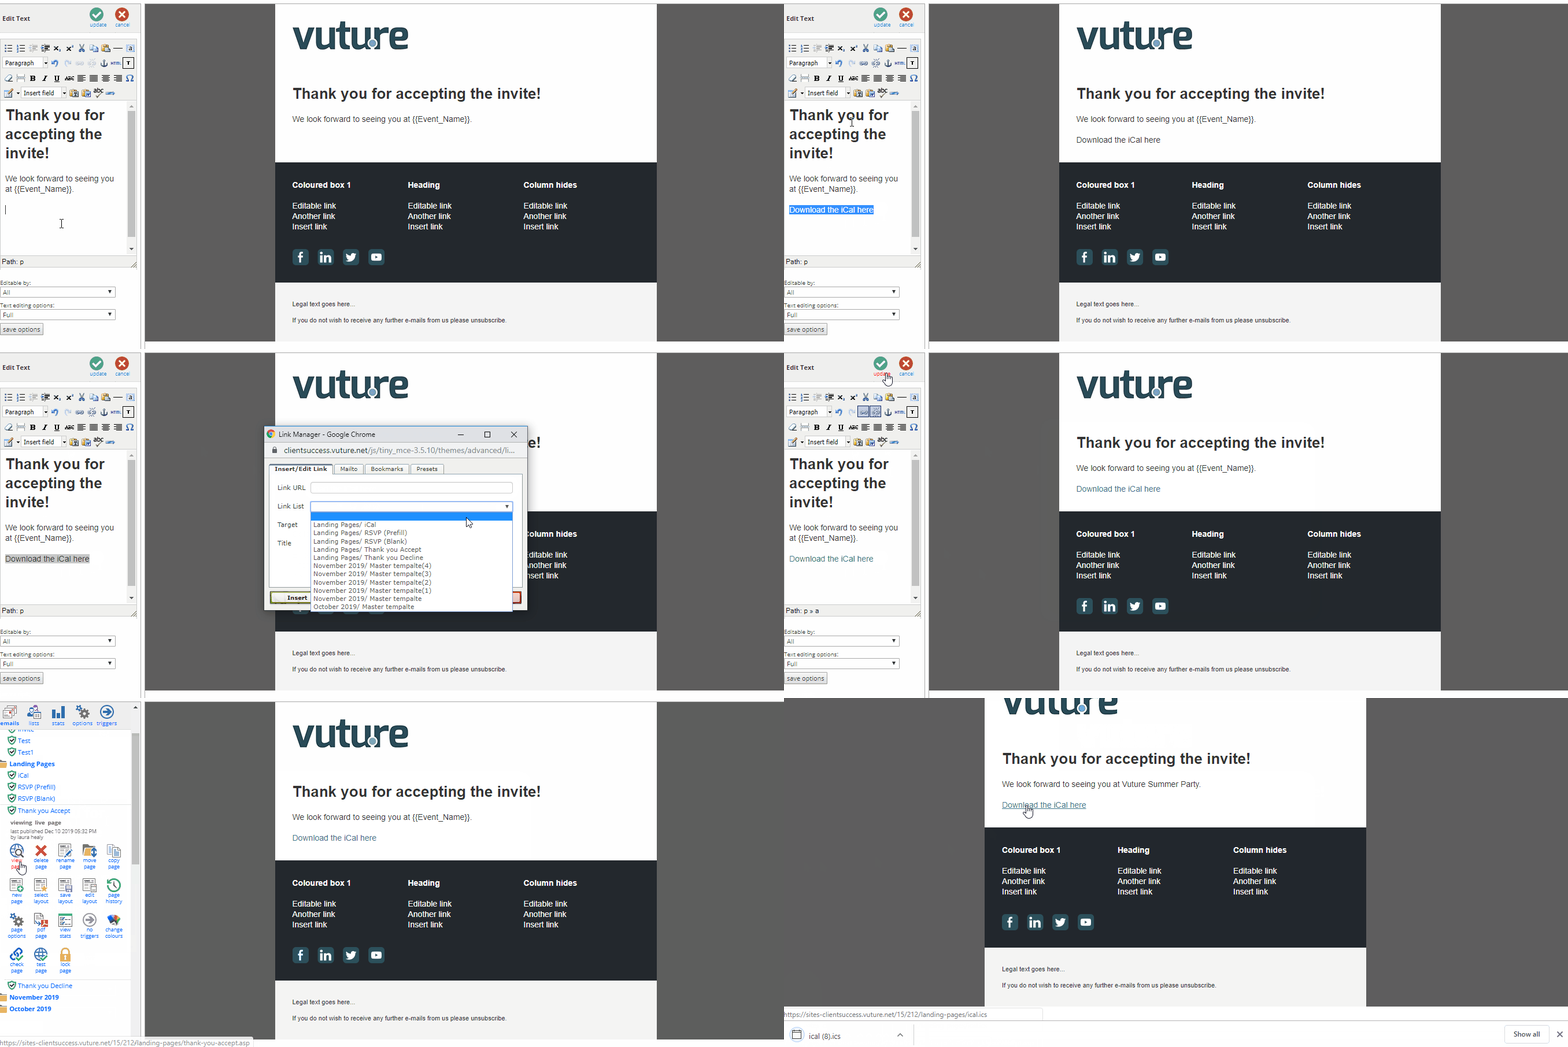
Note, if using Vuture's Approval Workflow, after you click "Update" in the Text Editor, you must then click "send for approval". There will be no "Publish" icon. You may then send this to the required individual(s) to approve the email/landing page for publishing. Once the individual has approved the emai/landing page, it will be published. Until then, it will remain in draft mode.
Using Variables in iCalendar files
You can speed up how quickly you create your iCalendar files by using Vuture’s Campaign Variables. You can use the variables {{Event_Name}} , {{Event_Location}} and {{Event_Description}} in the Summary, Location and Description fields, but see the Note below the image about formatting in these variables.
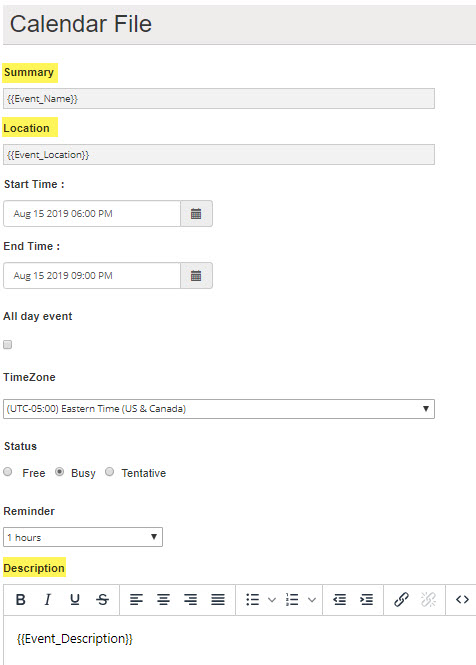
Note: Formatted variables cannot be used in the Summary field or Location field of an iCal. This is because formatting of these fields is not supported by Outlook and other email clients. The formatting appears broken if you attempt to use formatted variables in these fields.
Note: The Description field is limited to a maximum of 3,000 characters, even if pasted in. If you need more space, we recommend you link to a further landing page.
Click here to read more about how Campaign Variables work and how to set them up.
Date and Time settings for Calendar files
Calendar files will default to the date and time format as per the Vuture user's settings in "My Account > My Settings".
You may also set up your ical files to suit your contacts' local preferences - for the 12 hour clock in the US or the 24 hour clock in the UK for example.
You can also set a default Reminder time, in advance, on your iCals. Contact your Account Manager and ask them to add the default in your system. They will go to "Admin.System.Emails.Calendar File Reminder" where they will enter your specified reminder interval. For example: 15 minutes, 1 hour, etc. This will be the default every time you create a new calendar file. You can still edit each calendar file individually when you are setting them up.
Text Formatting in Calendar file description
If you would like flexibility in formatting the text of an iCal file please contact your account manager. They will update the version in "Admin.System.Versions.ICal Client Version" to "2".
Once updated, you can do the following for the Description text only:
- Add Bullet points
- Add numbering
- Add Hyperlinks
- Change text to Bold / Italic / underlined
Please note, formatting will not show on calendar files opened through email clients such as iOS or Android. The text will still show but without the formatting.
Managing the Date and Time in your iCal page
- When you update the Start time, you will notice the End time will update to reflect the same selected time. You are still able to change the End time as you require.
- The time intervals are not rigid. You can update the time to be as granular as you require.
- Set a default reminder time in advance. Contact your account manager and ask them to add the default in your system. They will go to "Admin.System.Emails.Calendar File Reminder" where they will enter your specified reminder interval. For example 15 minutes, 1 hour, etc. This will be the default every time you create a new calendar file. You can still edit each calendar file individually when you are setting them up.
Troubleshooting
1. My calendar text is randomly being formatted as headings, or line breaks are not rendering correctly in Outlook.
This is a known issue with Outlook which unfortunately has no clear fix. Outlook will search for content it thinks is a heading and will format it as a heading.
We have found that putting a punctuation mark at the end of the sentence occasionally works.
If line breaks are not rendering correctly try adding a double line break.
2. My calendar text is not showing as formatted.
Formatting will not show on calendar files opened through some email clients such as iOS or Android. The text will still show but without the formatting.
3. I need to edit the html underlying the iCal page.
There is an article about editing html here.