There is a video to accompany this article, here.
Personalisation is a way to increase engagement by ensuring that your clients and contacts receive only the data which is relevant to them. The simplest form of personalisation is Dear {FirstName} but it is possible to record, in Dynamics, some detail about the contact's preferences on the contact entity and use that to really personalise the invitations or newsletters they receive.
The data held in Dynamics' Contact fields can be included in emails and landing pages by inserting a placeholder variable in the email.
(Note: this method works for Contact entity fields only).
Example 1 - simple variable replacement
Here is an example using an out of the box Dynamics field. A further example using content preferences follows further down this article.
If you wanted to include a contact’s "Shipping Method" in an email or landing page, you could include, in the email, something similar to {dynamics:vx_address1_shippingmethodcode}, where "address1_shippingmethodcode" is the name of the field in Dynamics.
You will need to first identify the field(s) in Dynamics:
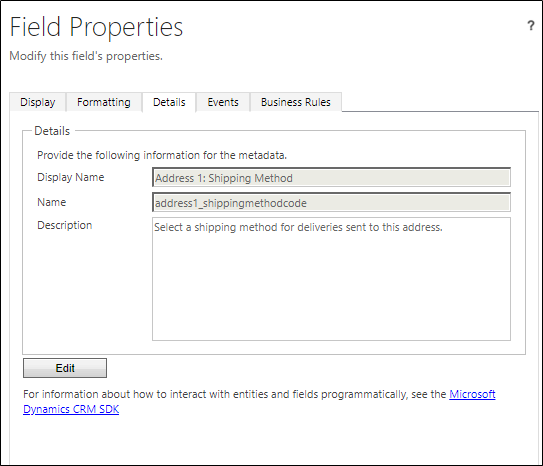
Then ask your Account Manager to add the Field Name(s), in "Admin.System.Microsoft Dynamics.Custom Additional Fields". They will edit the dictionary and Save for you.
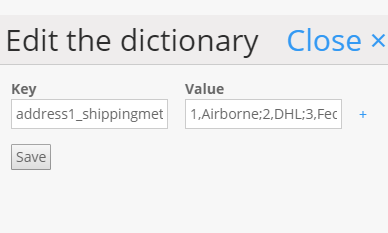
If you now include {dynamics:vx_address1_shippingmethodcode} on your email page, it will resolve, for each contact, to the value that is held in their contact record.
Example 2 - Dynamic variables or combining variables to personalise an email or landing page
Using Dynamic variables, (also called Nested Variables) you can combine a Dynamics Contact Entity field with a Vuture variable to personalise an email or landing page with a selection of text from previously-stored content.
This will allow you to create paragraphs of content which are only seen by contacts who have the right value in their contact record (we recommend that you hold campaign-specific content in the Campaign Variables section of the Campaign Summary screen). This content will only appear in an email if the value in the Contact Entity field applies. This means you could alter the appearance of an email, depending on the values held against a contact in the Dynamics database.
For example, a custom option set field, created in this example to record a preference, for example "Banking and Finance" could be used, along with a Vuture campaign variable, to customise the information on an email like this:
- If the contact has opted in to receive information on "Banking and Finance" they will have the checkbox in their Contact entity field ticked. This means the value is "true". If it were un-ticked, their value for "Banking and Finance" would be "false".
- When you create the variable in Vuture, in the Campaign Summary screen, you would add the intended value ('true') as part of the Variable Name (see example below):
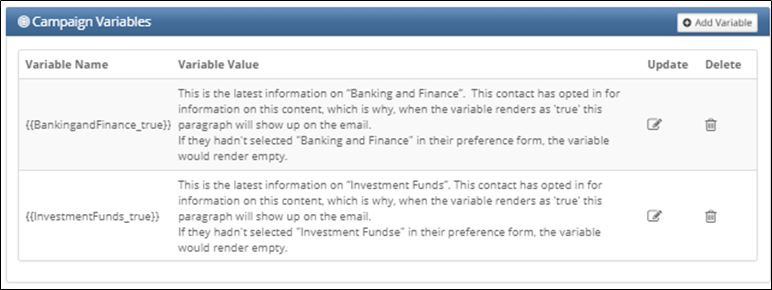
- When you add the variable to the email page in the text editor, to place the content where you want the content to appear, you must replace your intended value ('true') with the Contact field placeholder. In this example, the variable in the email would be {dynamics:vx_bankingandfinance}
- Note the use of triple curly brackets in the image below - because one variable is "nested" inside another giving one set of curly brackets and then campaign variables have double curly brackets, giving a total of three brackets.
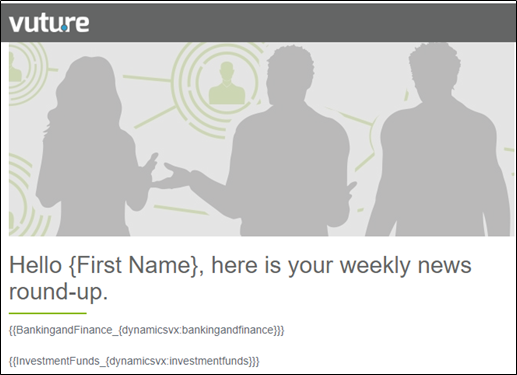
- When a contact views an email or landing page which contains the Nested Variable, the content will render, based on the value in their contact field. In this case, based on their preference, it could be 'true' which would render as {{BankingandFinance_true}}, and in turn, fulfill the requirement for the Vuture variable you previously set up.

- If the value was 'false', no content will be rendered. Because you hadn't created a variable named {{BankingandFinance_false}}, the Vuture variable would render as blank and no content would be added. This means the page will not be full of empty gaps.
