This document explains how the form editor works with the new integration with ContactEase through the connector (VXDEV-8909). Using the Connector is a separate integration and the previous ContactEase integration still works and is in use. It is possible to connect a client using both methods in one instance.
Prerequisites:
Add login details for ContactEase CRM in Admin.System.ContactEase
Enable Contacts Module Admin.system.Modules
Enable Send screen V2 Admin.System.Versions.Send Email Screen Version 2
Enable Admin.System.ContactEase.ContactEase Connector
Enable Admin.System.Forms Display Instance Dropdown
Form Editor
Steps:
1. Insert a Vx Form snippet by editing the layout of a form. For the new integration with CE, Vx snippet is required.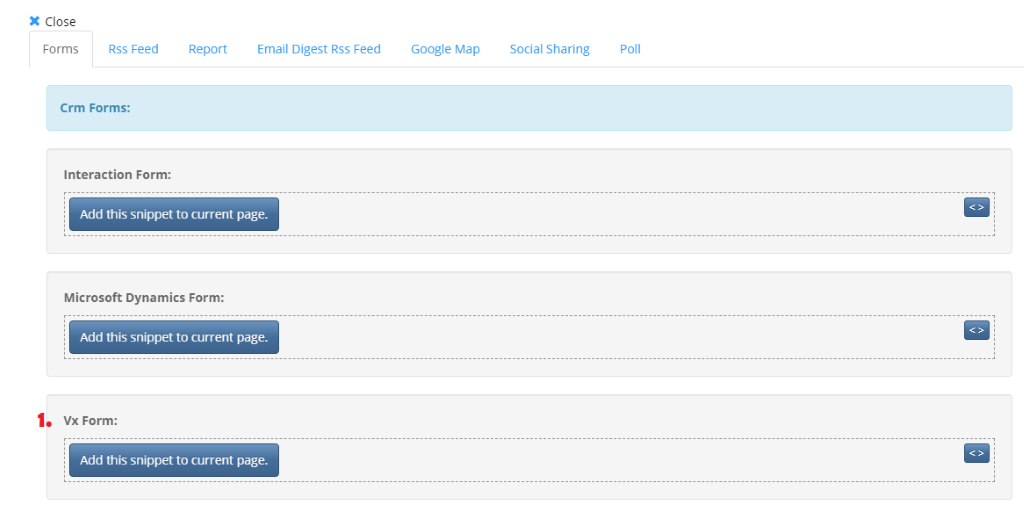
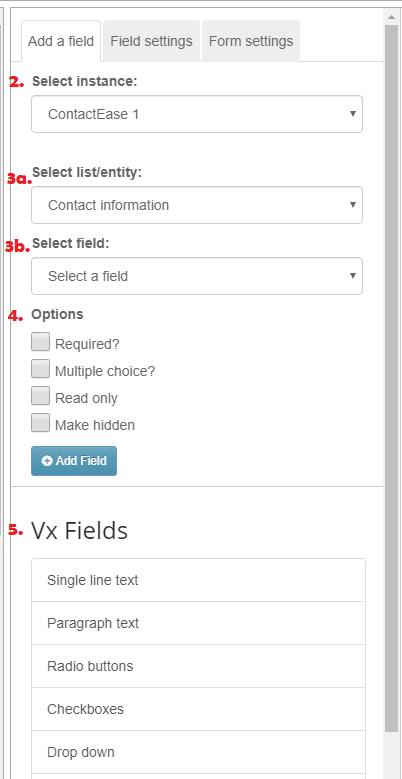
2. Go to the Form editor, on the Instance dropdown select ContactEase
3. Two dropdowns should be available below the instance dropdown:
Select list/entity
Select field
4. Below the dropdowns the following Options should be available;
-
Required?
-
Multiple choice?
Read only
Make hidden
NOTE: Dropdown option is available for the other CRMs going through the connector as well as for Vx lists, it was not implemented for CE because the CRM is list based, unlike the rest which are field based.
5. The Vx Fields section is also available but note that if these fields are added, they will not write back to CE. These fields are meant to be used separately from the CE fields.
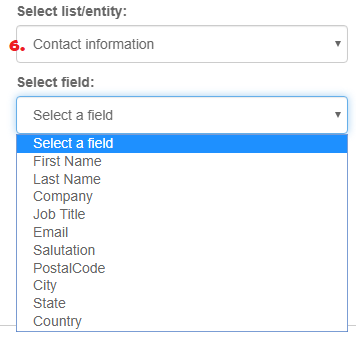
6. The Contact information fields available for the ContactEase integration through the connector, are:
First Name
Last Name
Company
Job Title
Email
Salutation
Postal Code
City
State
Country
NOTE: In comparison to the other CRMs going through the Connector and the Vx Lists there is no Street field (has been removed from the list), because there is no matching field in ContactEase.
7. In the Select list/entity, all lists(fields) from the CRM will be available, except for the Contact information fields, not only the ones imported through the Contacts module. Once a list(field) is added to the form it will automatically be added to the CRM Meta Data Manager.
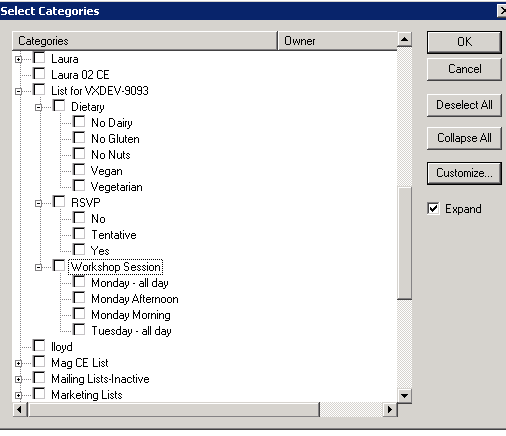
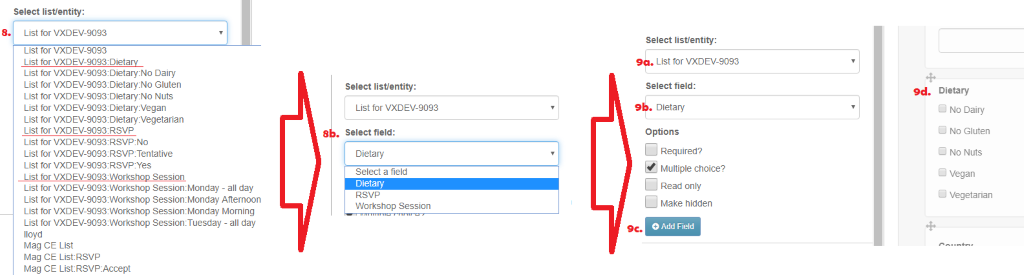
8. Example list with sub-lists, which serve as fields.
In this example, the name of the list is “List for VXDEV-9093". This is the parent list
Dietary, RSVP and Workshop Session (underlined with red) are child lists of the parent list “List for VXDEV-9093". These 3 serve the purpose of fields in the form, they are available in the Select field dropdown in form editor.
Each of the 3 child lists has its own child lists, which serve the purpose of field options in the form.
This is how the structure looks in the CRM
9. Example scenario:
Select the parent list - “List for VXDEV-9093"
Select a field in the Select field dropdown – Dietary
Click Add field
The field will be added to the form with its sub-lists as field options
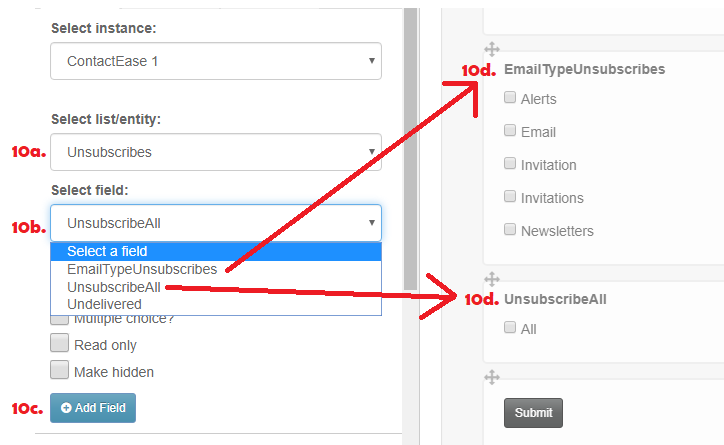
10. Adding Unsubscribes fields work differently than the example above.
Select the Unsubscribes list, which was configured in the CRM Meta Data Manager in step 3.
In the Select field dropdown you will see the list of the suppression categories added in the CRM Meta Data Manager. Select one of the categories.
Click Add Field.
The selected category will be added as a field in the form and the Suppression values configured in the CRM Meta Data Manager will be added as field options. There’s no need to select Multiple? From the field options, the fields will automatically be added as checkboxes.
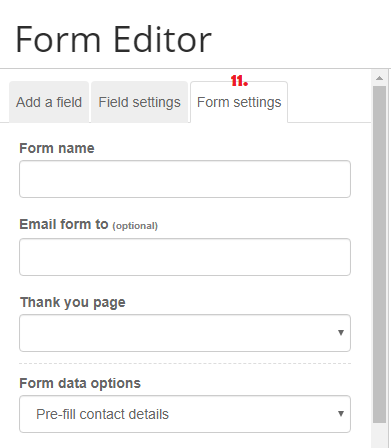
11. Form settings. In phase one of the new integration with ContactEase only the following 4 fields are available:
Form name
Email form to
Thank you page
Form data options
Please note, after a field is added into a form or through the CRM Metadata Manager, you must "Refresh list from CRM" in the Contacts module. This way, any pre-existing values for that field will be brought forwards into the connector and forms.
Form Submissions
Steps:
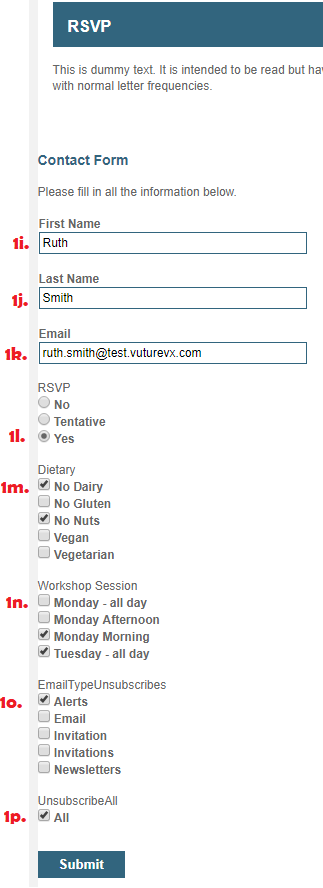
1. If we have a form with the following fields:
First Name
Last Name
Email
RSVP
Dietary
Workshop Session
EmailTypeUnsubscribes
UnsubscribeAll
And we submit the following values for them:
First Name - Ruth
Last Name - Smith
Email – ruth.smith@test.vuturevx.com
RSVP - Yes
Dietary – No Dairy, No Nuts
Workshop Session – Monday Morning, Tuesday – all day
EmailTypeUnsubscribes - Alerts
UnsubscribeAll - All
NOTE: This works the same for blank and prefill form, except for the fact that contacts, created with blank forms are added to a contactease:Create category – see point 2. For further info
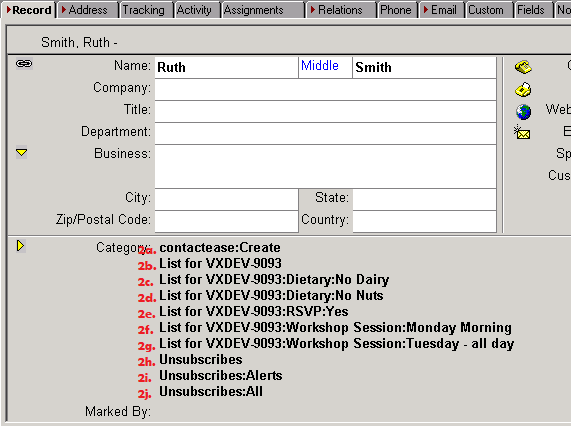
2. This is how the form submission will appear in ContactEase.
contactease:Create – when the contact is created from a submission of a blank form it will be added in this category. Applies only for contacts created from a blank form!
“List for VXDEV-9093” – that is the list to which the email was sent. For prefill form – the contact will already exist there, for blank forms – the newly created contacts get added to the original list.
“List for VXDEV-9093:Dietary:No Dairy” – as mentioned in the section for Form editor ContactEase is a list based CRM, and each field option is actually a list in the CRM. So when the contact submits No Dairy as an option of the Dietary field, this contact gets added to a list, named in accordance to the following convention Parent:Descendant:Descendant etc. depending on how many descendant lists there are.
“List for VXDEV-9093:Dietary:No Nuts” – See the explanation in 2c.
“List for VXDEV-9093:RSVP:Yes” – See the explanation in 2c.
“List for VXDEV-9093:Workshop Session:Monday Morning” – See the explanation in 2c.
“List for VXDEV-9093:Workshop Session:Tuesday” – all day - – See the explanation in 2c.
Unsubscribes – this is the Unsubscribes entity that was configured in the CRM Meta Data Manager
Unsubscribes:Alerts – the email type unsubscribes option - See the explanation in 2c.
Unsubscribes:All – this means that the contact has unsubscribed globally - See the explanation in 2c
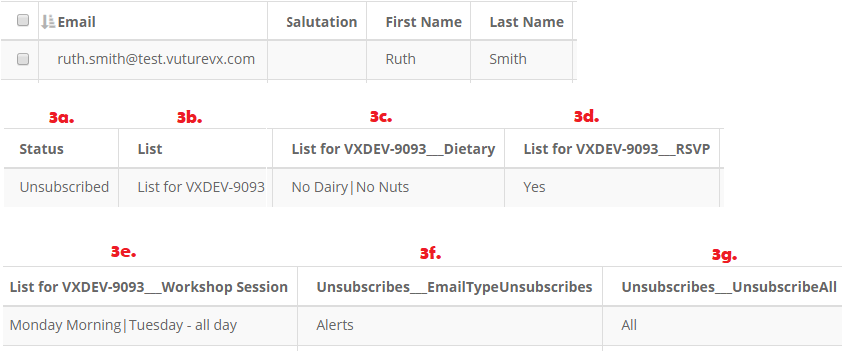
3. This is how the form submission will appear in the Contacts Module (there are some other fields in contacts module, but they are not related to the form submission, so they are not present in the screenshot):
Status – Unsubscribed , because the contact has unsubscribed globally The values can be either Subscribed or Unsubscribed. Unsubscribed is shown only when the contact has unsubscribed globally (if the field Unsubscribes_UnsubscribeAll has value All)
List – shows “List for VXDEV-9093”, because the contact is part of list
“List for VXDEV-9093__Dietary” – No Dairy, No Nuts. Descendant lists will be displayed as field names in Contacts module following the convention Parent__Descendant. The corresponding values are displayed in the column, divided by pipe ( | )
“List for VXDEV-9093__RSVP” – Yes. For more information see point 3c. above.
“List for VXDEV-9093__Workshop Session” – Monday Morning, Tuesday- all day. For more information see point 3c. above.
“Unsubscribes__EmailTypeUnsubscribes” – Alerts. The values for email types unsubscribes will be displayed here, if there’s more than one value, they will be divided by pipe ( | ). The name of the field is formed by the Unsubscribed entity, configured in the CRM Meta Data Manager and the field name: EntityName__FieldName
“Unsubscribes__UnsubscribeAll” – All. The field can be either empty or have a value - All. When it is empty means that the contact is subscribed, and their status in the Status column will be Subscribed. When the value is All, as in this case, the contact’s status is Unsubscribed in the Status column. The name of the field is formed by the Unsubscribed entity, configured in the CRM Meta Data Manager and the field name: EntityName__FieldName
NOTE: If in the form there are fields from different lists A and B, the contacts will be added to both parent lists A and B and the fields coming from those lists will be displayed only in their parent lists in contacts module.
