This article explains how to set up the CRM Metadata Manager for the integration with ContactEase through the connector.
The configurations in the metadata tool, described below, are needed for the processing of Unsubscribes (Global and Email Type) and Bounces and to allow the users to add those fields to their forms.
All other fields coming from ContactEase can be added through the tool in the Configure Fields Metadata section. ContactEase fields will also be added automatically to the CRM Metadata Manager when they are added to a form through the form editor.
In order to use the fields coming from the CRM Metadata Manager, in your forms, you need to:
- Have CE in your user’s external systems
- In Admin.System.ContactEase enable “ContactEase Connector”
- Form editor V2
How to access:
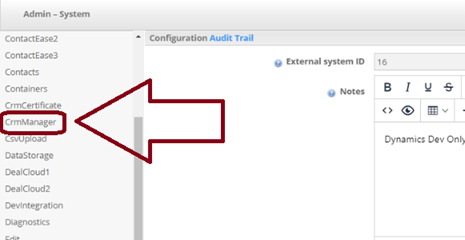
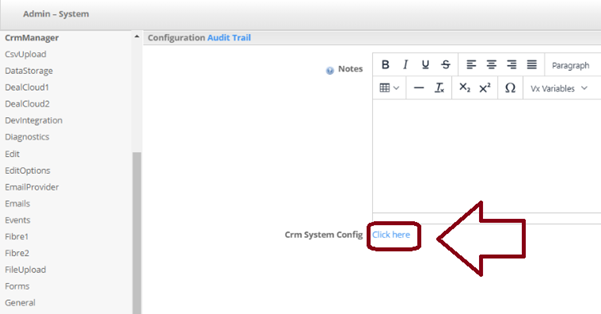
Can be accessed via Admin.System.CrmManager.Crm System Config.Click here
Set up
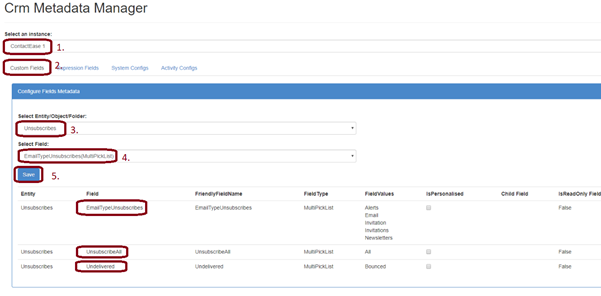
1. Select ContactEase from the “Select an instance” dropdown list (Image 1, 1.)
2. If not selected click the Tab “Custom Fields” (Image 1, 2.)
3. To add the fields in the “Configure Fields Metadata” section you need to:
a. Select “Unsubscribes” from the “Select Entity/Object/Folder:” dropdown (Image 1, 3.)
b. Select “EmailTypeUnsubscribes” from the “Select Field” dropdown list (Image 1, 4.)
c. Click Save (Image 1, 5.)
Repeat steps b & c to Add “UnsubscribeAll” and “Undelivered” as shown below
Image 1:
To add “Configure Suppression Settings” section you need to:
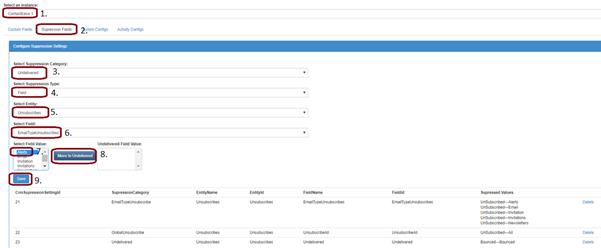
1. Select ContactEase from the “Select an instance” dropdown list (Image 2, 1.)
2. If not selected click the Tab “Suppression Fields” (Image 2, 2.)
3. To add the fields in the “Configure Suppression Settings” section you need to:
a. Select Undelivered from the “Select Suppression Category” dropdown list (Image 2, 3.)
b. Select “Field” from the “Select Suppression Type” dropdown (Image 2, 4.)
c. Select “Unsubscribes” from the “Select Entity” dropdown (Image 2, 5.)
d. Select “EmailTypeUnsubscribes” from the “Select Field” dropdown (Image 2, 6.)
e. Click each option in turn starting with “Alerts” and click “Move to Undelivered” any options which you want to move to the “Unsubscribed Field Values” (Image 2, 7. & 8.)
f. Click Save (Image 2, 9.)
Repeat steps c, d, e & f for:
• EmailTypeUnsubscribes & GlobalUnsubscribe
• UnsubscribeAll & Undelivered
Image 2:
In Form Editor the Client will now be able to see any Custom Fields to add to their forms.
