Creating and Using QR Codes for Events, Using Campaign Variables or HTML
Warning: The creation of QR codes should only be done by users who are fully confident with reading and writing HTML. For this reason, the role is not automatically enabled for all users, by default.
Note: There is also a method using Campaign Variables for placing a QR Code onto a page. This does not require HTML access. That method is given first in this article.
Prerequisites
- The Email module
- A prefilled RSVP form (this process does not work with blank forms because the blank form does not know the IA contact ID. If you need to work with blank forms please contact Support for assistance.)
- The Events app
- HTML knowledge
- A QR code reader or scanner. (Vuture cannot recommend any hardware in relation to this. However, QR code readers can be easily downloaded to most smartphones.)
- The process will work for InterAction which is integrated with Vuture’s Events App. It is not currently available for any other integrated CRM.
Why Use QR Codes?
Adding a QR code to the notification email (or event registration or confirmation email) means that the contact does not have to give their name/spell out an unusual name, at the point of entry for the event. They can simply hold up their smartphone to the QR code reader, their details will be taken automatically and they will be marked as Attended.
This can reduce waiting time, and typing, at the check-in desk.
Creating QR Codes
Users will need to:
- Create the invitation campaign as normal, including a confirmation email which is going to contain the individual’s personalised QR code
- Create the event in the Events app
- Open Notepad or similar, in which to build the line of code
- Copy the code given below and make the necessary changes to apply to your event:
- Copy the bold part of Part 1 as it is given below and paste to Notepad
- Copy the bold part of Part 2 from your own Events App address line (image example below) and paste it to the end of the line in Notepad
- Copy the bold part of Part 3 as it is given below if you are happy with the size.(200 pixels is approximately 3 inches). Paste it to the end of the line in Notepad.
All 3 elements of the code should be strung together on your Notepad page, one after the other, with no extra characters, spaces or returns. They are only broken down here for clarity.
Part 1
<img src=https://api.qrserver.com/v1/create-qr-code/?data= This part of the line is the same for everyone
Part 2
https://comm.xxxxxxxxx.ch/version3/api/event/14101 This part of the line will come from the url of your event, visible in the top line of the event app after you have created the event in the Campaign Summary tab.(See below for the series of 3 images)
Part 3
/contact/{IA:ContactId}/attend.json&size=200x200alt="" width="200" height="200" /> This part of the line will reference IA and will link to the identity of the attendee.
The 200x200 is pixel size, which you can change, if you wish to alter the size of the code box.It is recommended that you use a square box.
Image 1 - Finding your Event App

Image 2 - Navigating to the event

Image 3 - copying the url for your event

Clicking on the Event in the Summary tab and then navigating to the actual event gives the second part of the line (for this example only - yours will be different) of:
https://sites-penny.vuturevx.com/version3/event/7624
Important: Please now add api/ after version3 to get the whole url of Part 2 so the new url will look like this:
https://sites-penny.vuturevx.com/version3/api/event/7624
Your version of this is the line you need as Part 2 of the whole line in Notepad.
Finally add Part 3 of the line of code
/contact/{IA:ContactId}/attend.json&size=200x200alt="" width="200" height="200" />
Once finished, the example line of code in Notepad looks something like this (too long to fit across the page and not the penny instance):

Copy the whole line you have made.
Adding the QR Code to your Email using Campaign Variables
Navigate to the Campaign Summary page of your campaign.
Create a Campaign Variable called QR Code
Paste in the line you have just copied from Notepad. You may have to use Control V to paste the line in.
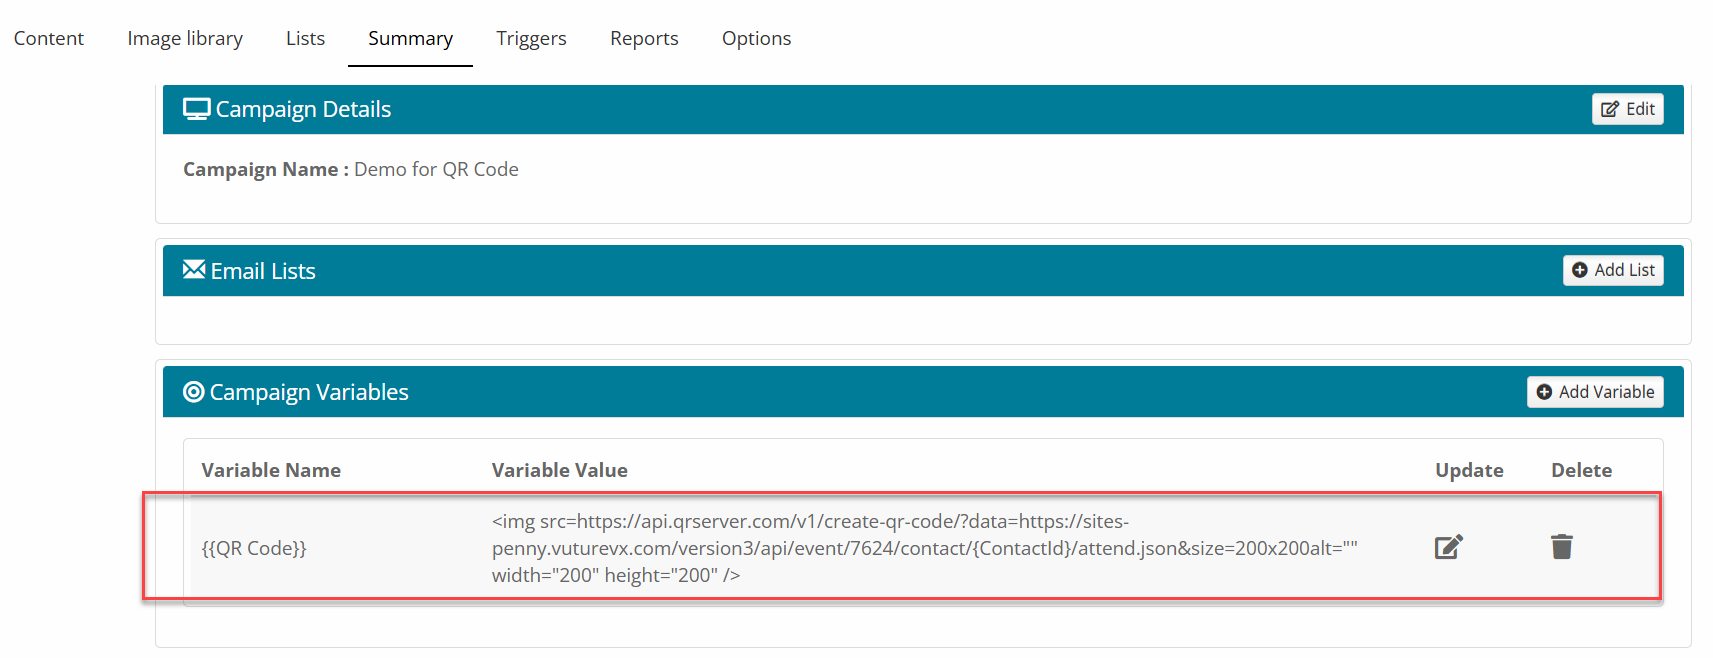
You can now return to your Content page and type the {{QR Code}} variable link to the new variable, anywhere on the page you wish, in the Confirmation email.
Click on View Email to see the QR Code in place. It is likely that the QR Code will not appear on the screen in Edit mode. You will have to View Page or View Email to see it.
The contact will be able to hold up this page on their smartphone when they arrive at the event, to be checked in.
Adding the QR Code to your Email using HTML
This alternative method requires HTML access and is only for users who have received HTML training and who have the HTML Role.
Once you have built the whole 3-part line in Notepad and copied it to your mouse memory, you can add it to the email using HTML. Navigate to the email and, using the text editor, mark where on the page you want the code box to appear by adding a key: “Put QR Code here” for example. (You will overwrite this text later.)

Note: You cannot add the code directly to the html from the Source Code icon in the text editor. It will not save from here. You must use the Options route described below.
You need to navigate to the email More Options, then Email Options and then select the Edit HTML tab.
Like this:

Like this:

On the HTML page, scroll down, or do a Control F search for your “Put QR Code Here” key.

You can now highlight all the words in the key and Paste the entire 3-part line from Notepad on top, to replace the all the key words.
Scroll up to the top of the page and Save HTML

You will be returned to your page, the QR Code may flash briefly and then disappear. You need to select View Email to see it.

The contact will be able to hold up this page on their smartphone when they arrive at the event, to be checked in.
FAQs
Q. I have typed the {{QR Code}} variable onto my page but after clicking View Email to see the square image in place, when I return to the editing screen I cannot see the variable code {{QR Code}} on the page any more. Why is that?
A. There is a configuration setting that allows variable replacement to take place when viewing content in the editing window. If this is enabled (Admin.System.EditOptions.Replace Variables) then while you are in the Campaign Editor you will only see a blank space where you typed {{QR Code}}.
Q. How does the system know for which event to mark the contact as Attended?
A. It knows because Part 2 of the QR code contains a direct link to the correct event.
Q. How does the system know who the contact is?
A. It knows because the {ContactID} which is in Part 3 of the QR code is noted when the invitation email is sent to them and the confirmation email is generated.
