Alumni Websites - An Introduction
Vuture's Alumni Websites product is an online portal to help manage the relationships between a firm, its staff and its Alumni. The site provides a central directory to find former and current members of staff, promote Alumni events, share information, access news and provide re-recruitment resource.
The platform is fully integrated with your CRM to allow for the integration of profiles, security and to decide which content should be shared with an Alumnus.
Note: It is not possible for a firm to have more than one Alumni site.
Who should use this guide?
This guide is intended to come into use at the end of an Alumni website implementation project, to help the Website Manager once Go Live has been reached. It will help the Alumni Website Manager to manage the site, adding and removing users and keeping the content updated. It should be an aid to memory, for use after training from Vuture. Any problems with the site should be reported to support@vutu.re.
What is covered in this guide?
Logging in
To log into the administration site, you will need to access the URL your Project Manager provided with your email address and password.
To access the site, (1) ensure that you have the Websites Module selected and then (2) select the container which has your Alumni site (typically it will be called Alumni). Then (3) click on the thumbnail for your live Alumni Site to access the backend. (Please see screenshot below)
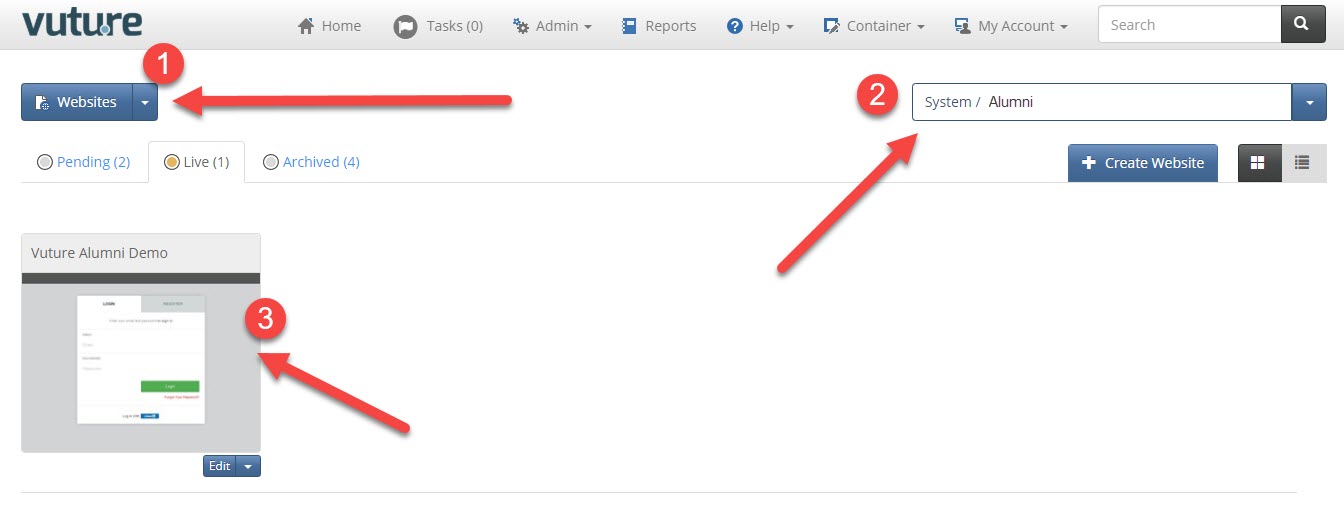
Accessing the site
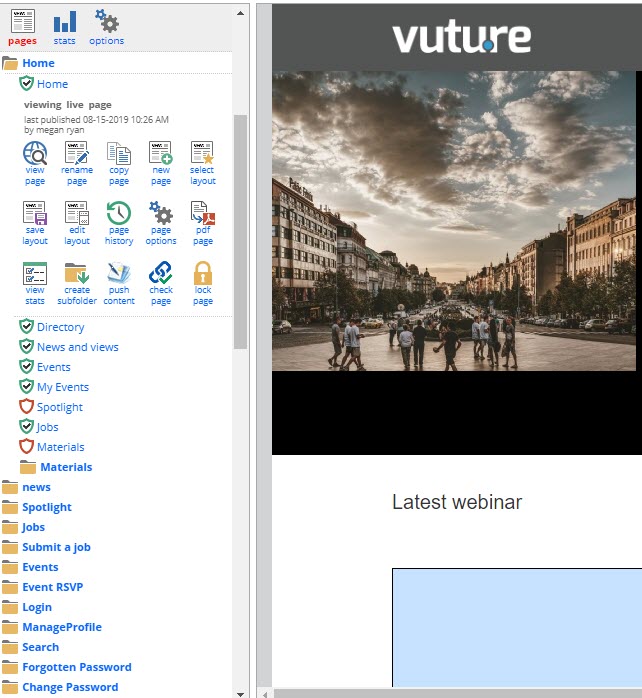
Your Alumni site, like Vuture's Email module, is accessible via a series of folders (see screenshot below for an example). Your Home folder contains the high level pages of your website.
During your training, your Project Manager should have trained you on how to make edits to these pages, as everyone's site is customized to their needs. However, we'll still cover some basics in terms of editing later in this guide.
Administering Alumni Users
Alumni Administrators access the site admin functions through the site "Options" icon at the top of the editing screen. Click on Options. The two options for the administrator are: Manage User and Manage User Email.
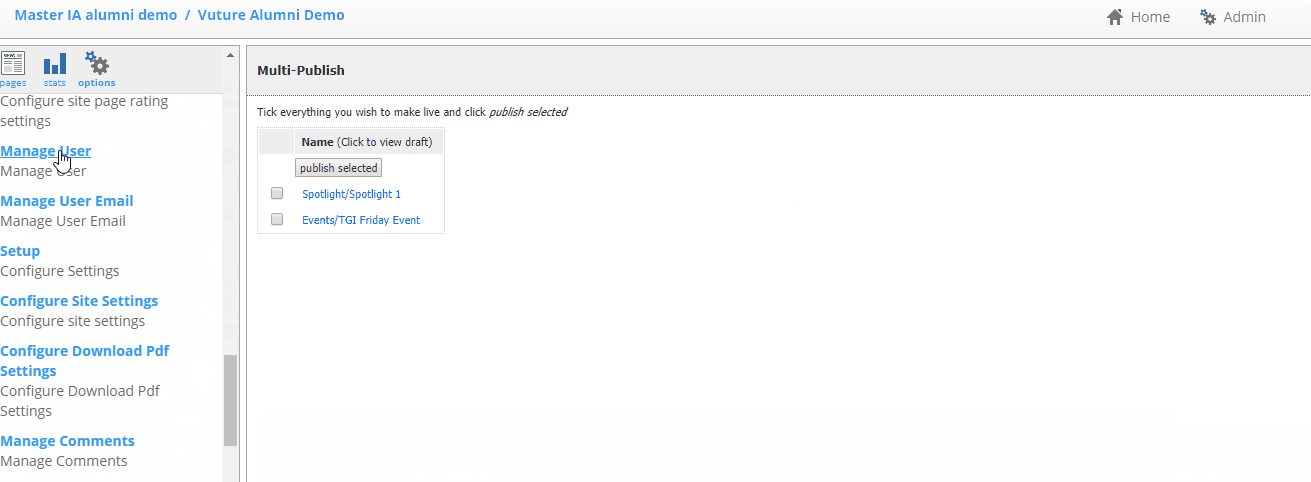
Manage User
Importing users from your CRM
All PreApproved alumni users (that is, all eligible members of your firm, past and present) are imported from your Alumni folders into the website using the import tool. At site launch, all of these users will already be imported for you, and going forward these will automatically be imported by a regular syncing process.
However, if you need to manually import users, select the Import Users tab > choose the Folder you wish to import, set the "User Approval Status" to "PreApproved", then click on Import Users.
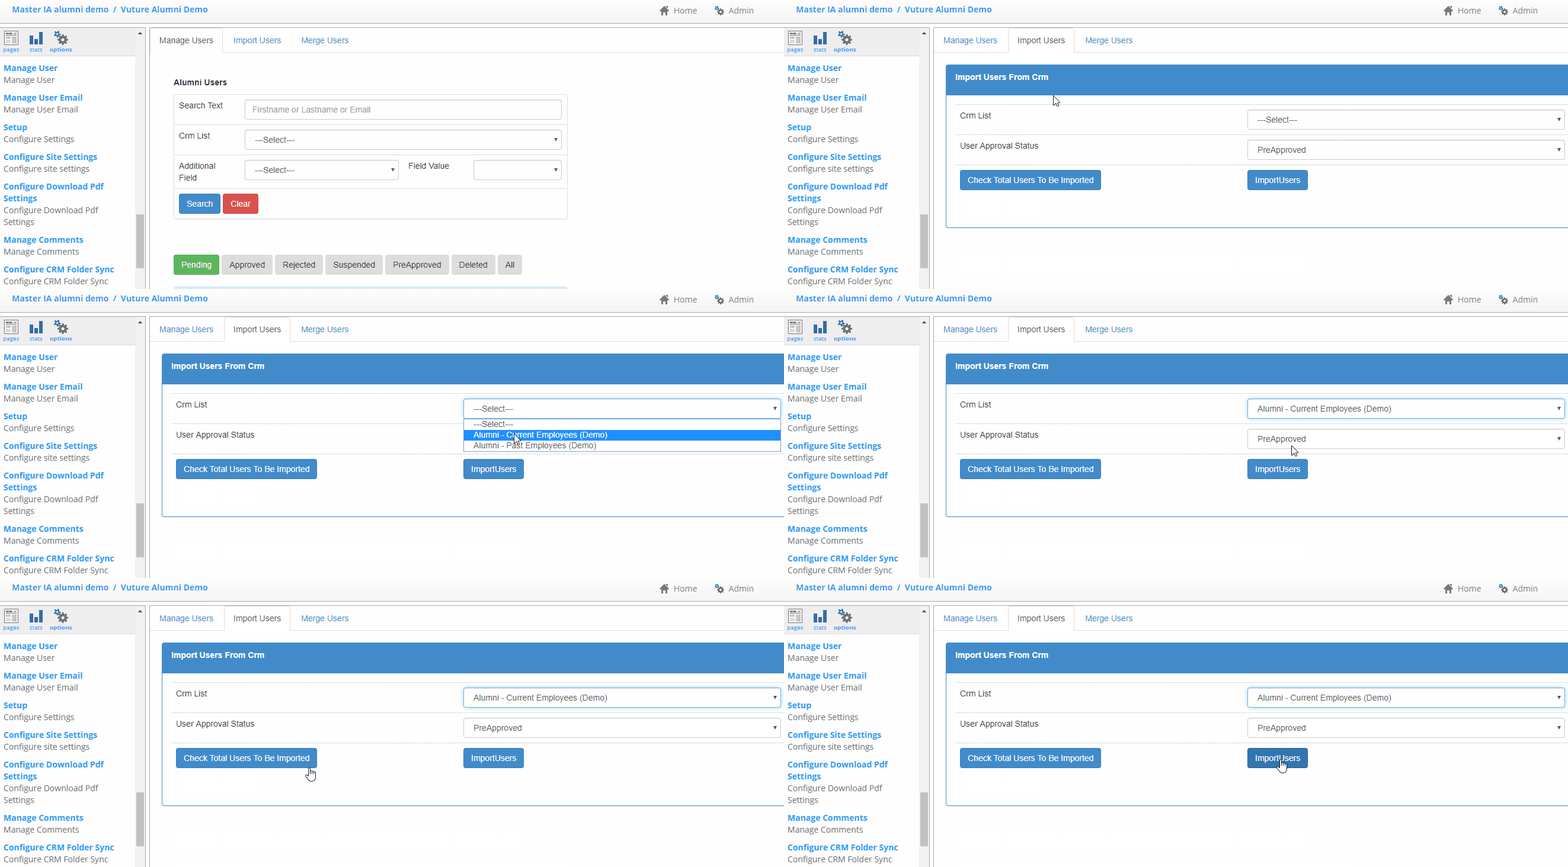
Note: Clicking the Check Total Users To Be Imported button will show you all users in that folder who have a PreApproved status. It’s likely that many of them will already exist in the site. Vuture will know they already exist and will only import the contacts in the list that do not already exist in the site. So you won’t see duplicates with the same email address.
Approving the PreApproved Users
Once PreApproved contacts are migrated into the Alumni Site they cannot access it immediately. The next step is to approve the users. Approving them will initiate an automated welcome email to them which contains a link to complete their registration (e.g. fill in additional contact details and set a password).
To approve your PreApproved contacts select the "Manage Users" tab and click the "PreApproved" button (see screenshot below).
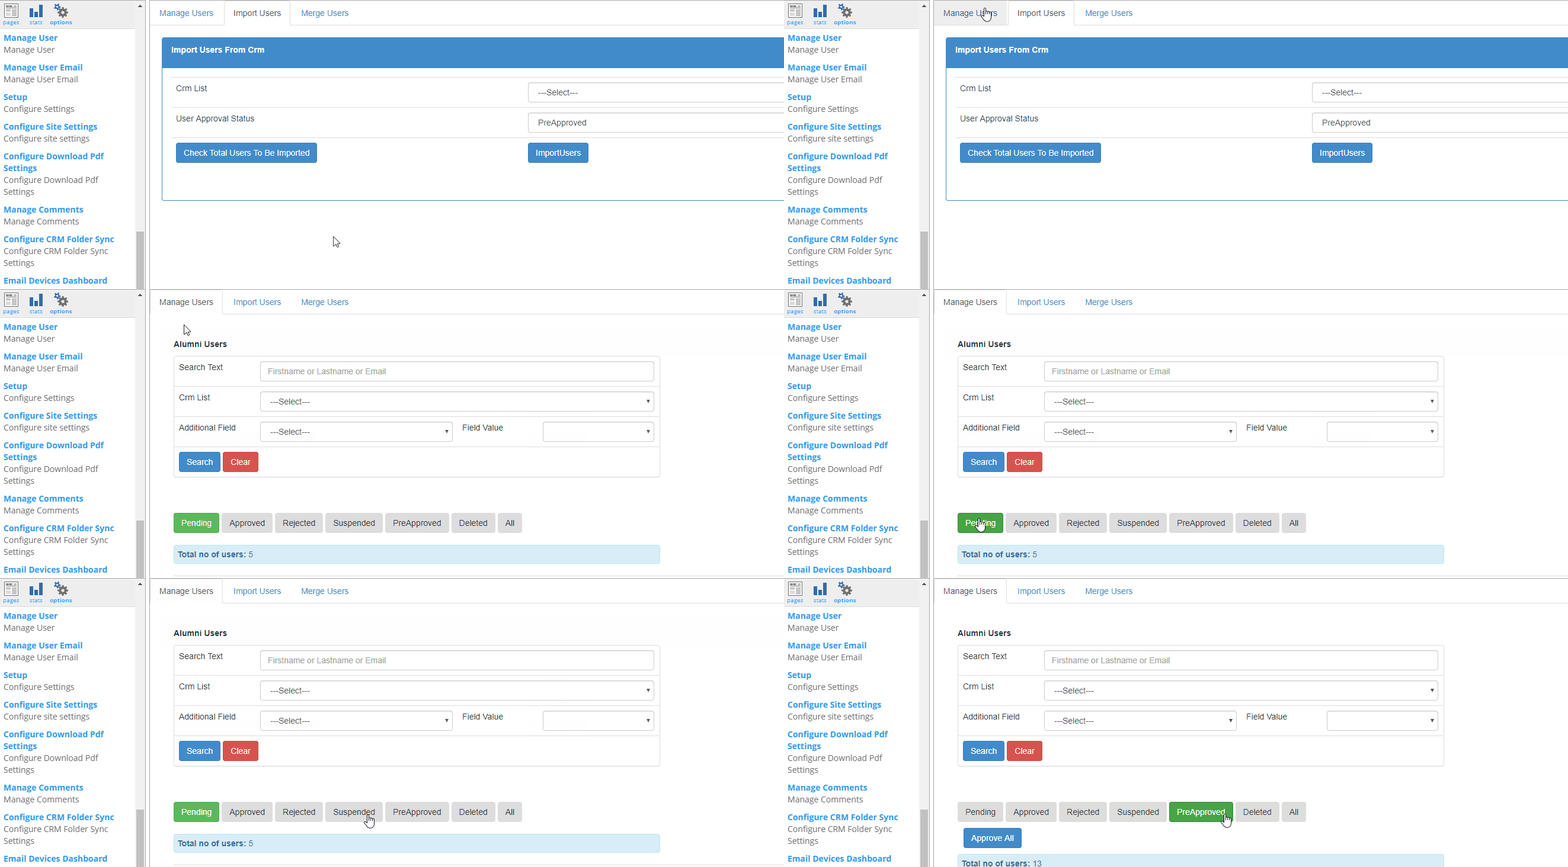
Within PreApproved will be all the users that have been migrated.
You can approve all the users in one click by selecting the Approve All button. Or you can approve each contact individually.
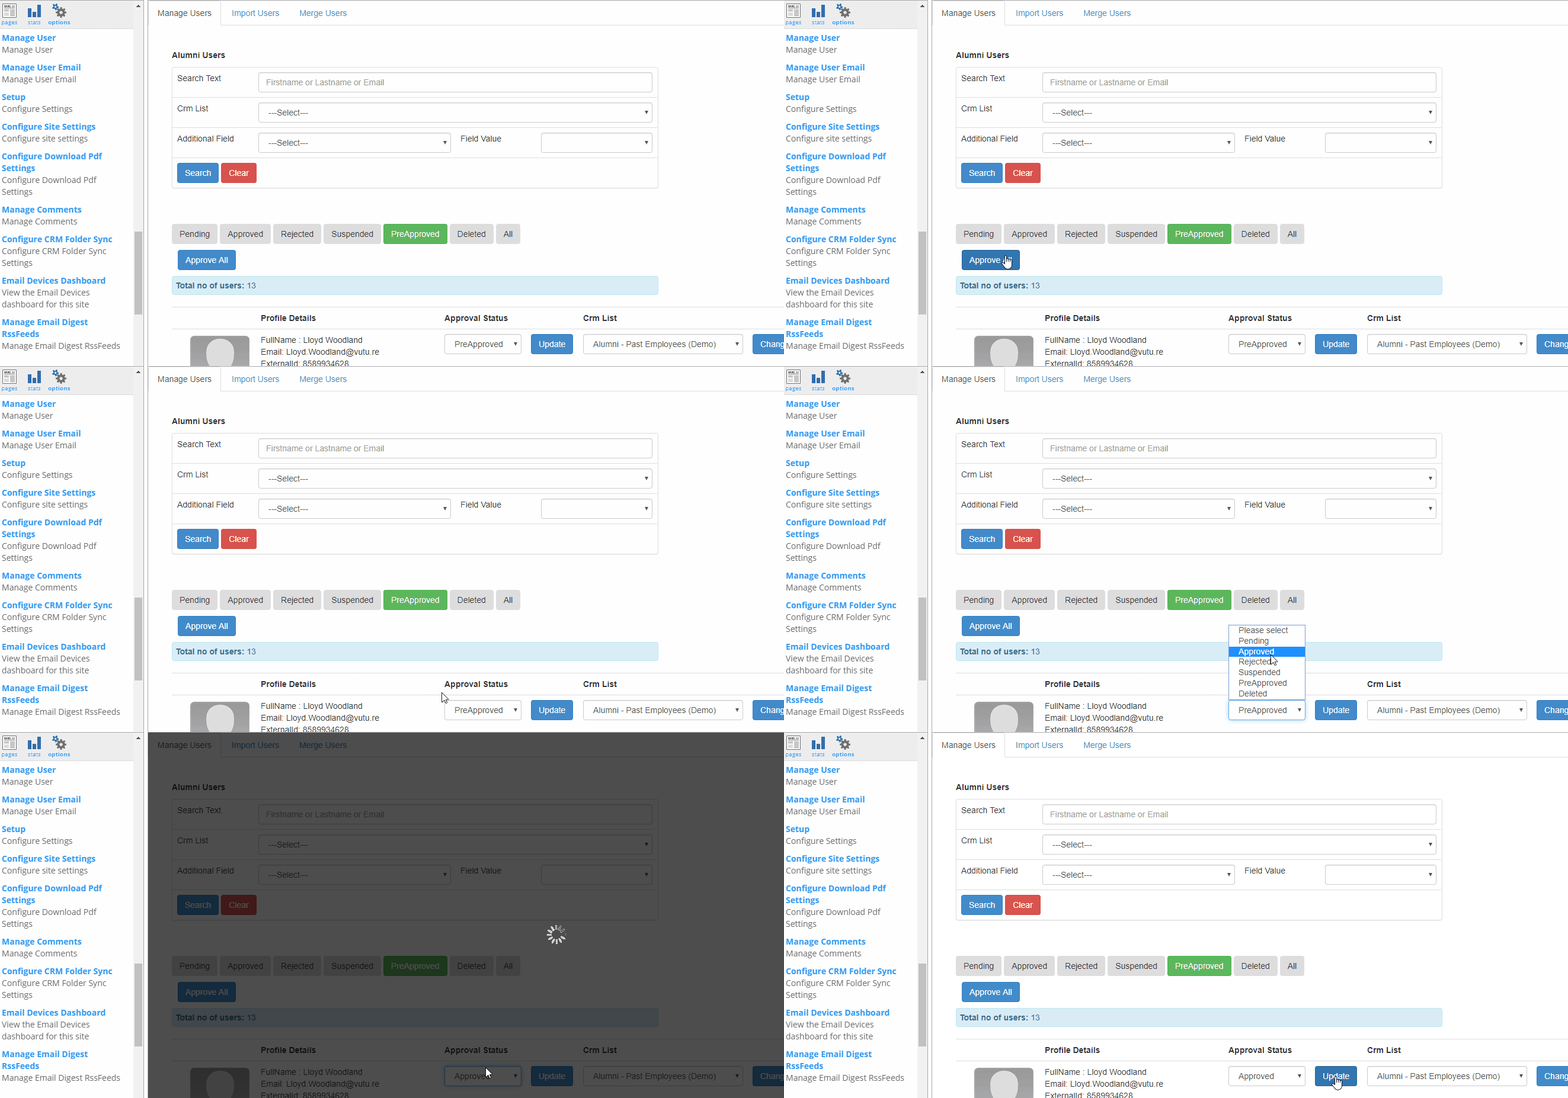
Important: You must change the approval status (i.e. PreApproved to Approved) within the Manage Users section of the Alumni site. Changing this in the CRM will not sync back to the Alumni site.
Each contact shows, in their Profile Details, their full name, email address, external ID (CRM ID #) and the Vuture Container they are held in.
Once a contact has been newly approved, they will be moved to the "Approved" section of the site and sent an automated welcome email to their alumni email address. The automated email wording is set up during the Alumni site build project.
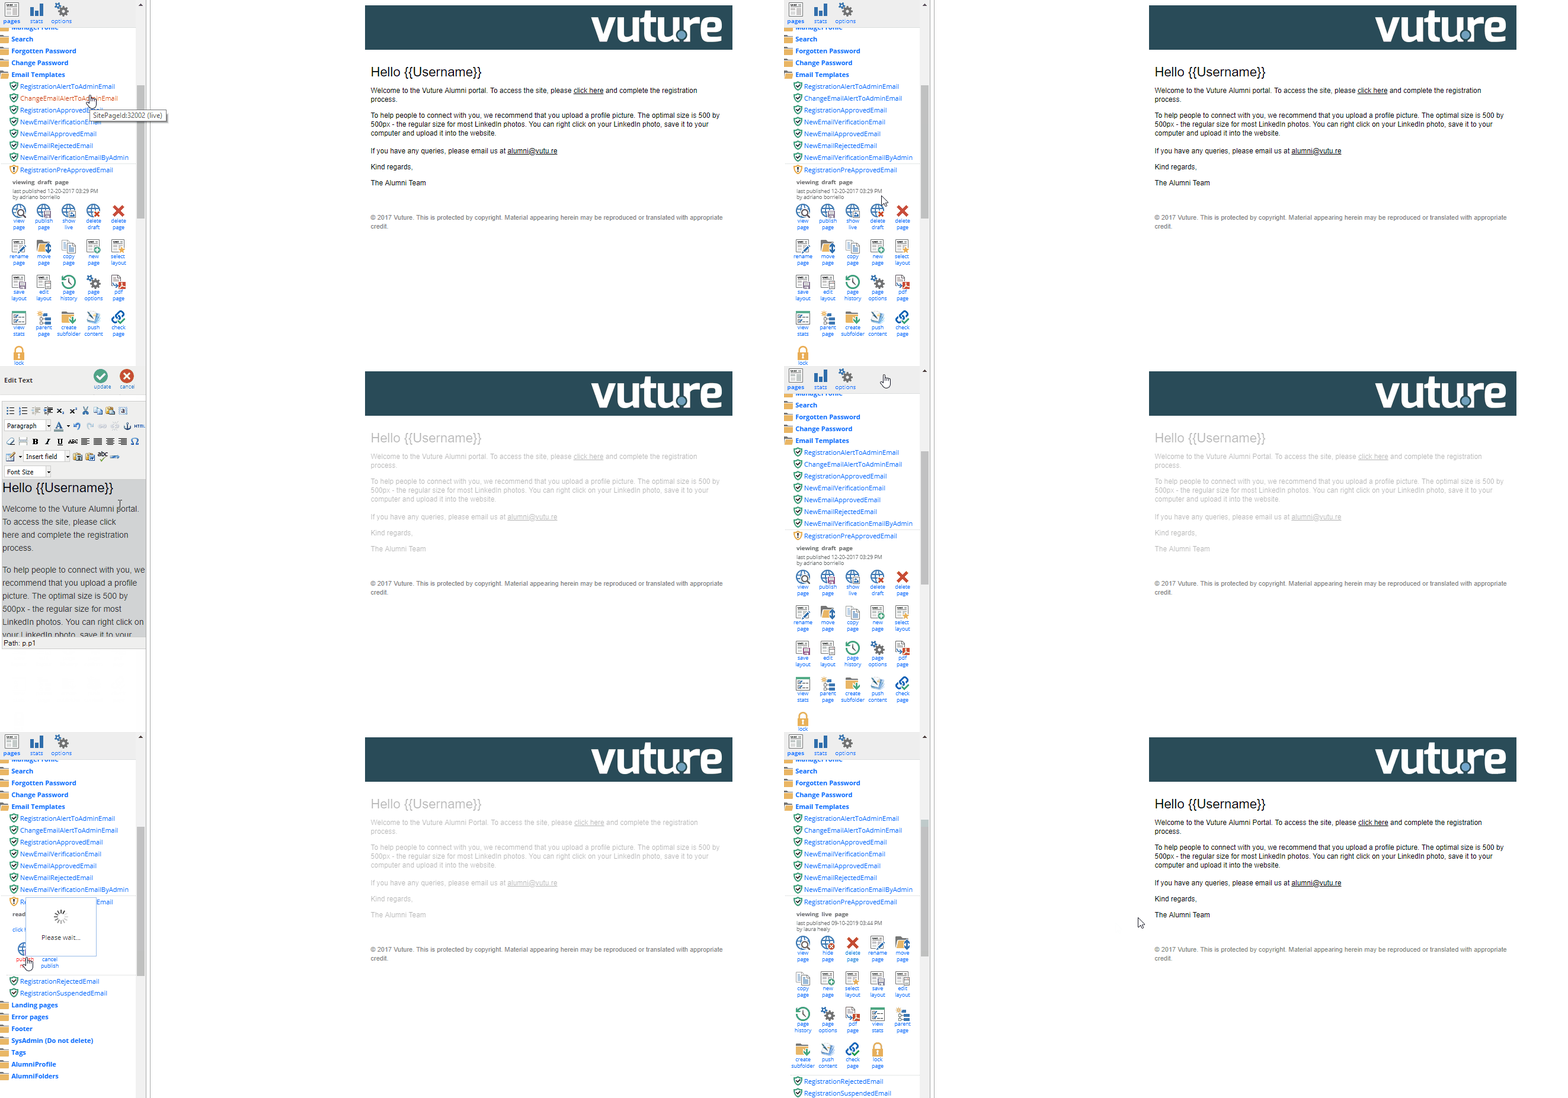
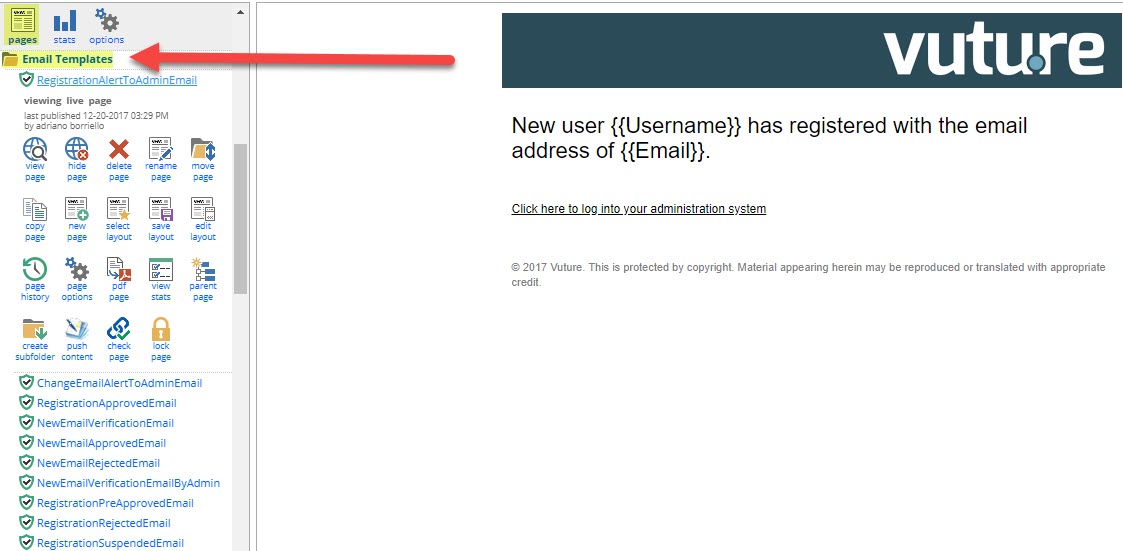
You can alter the text in the welcome email they receive within the site folder structure. To do this, click on the "Pages" icon, if you're still in Manage Users to get to the back end of your site. Then, navigate to the "Email Templates" Folder and look for the "RegistrationPreApprovedEmail".
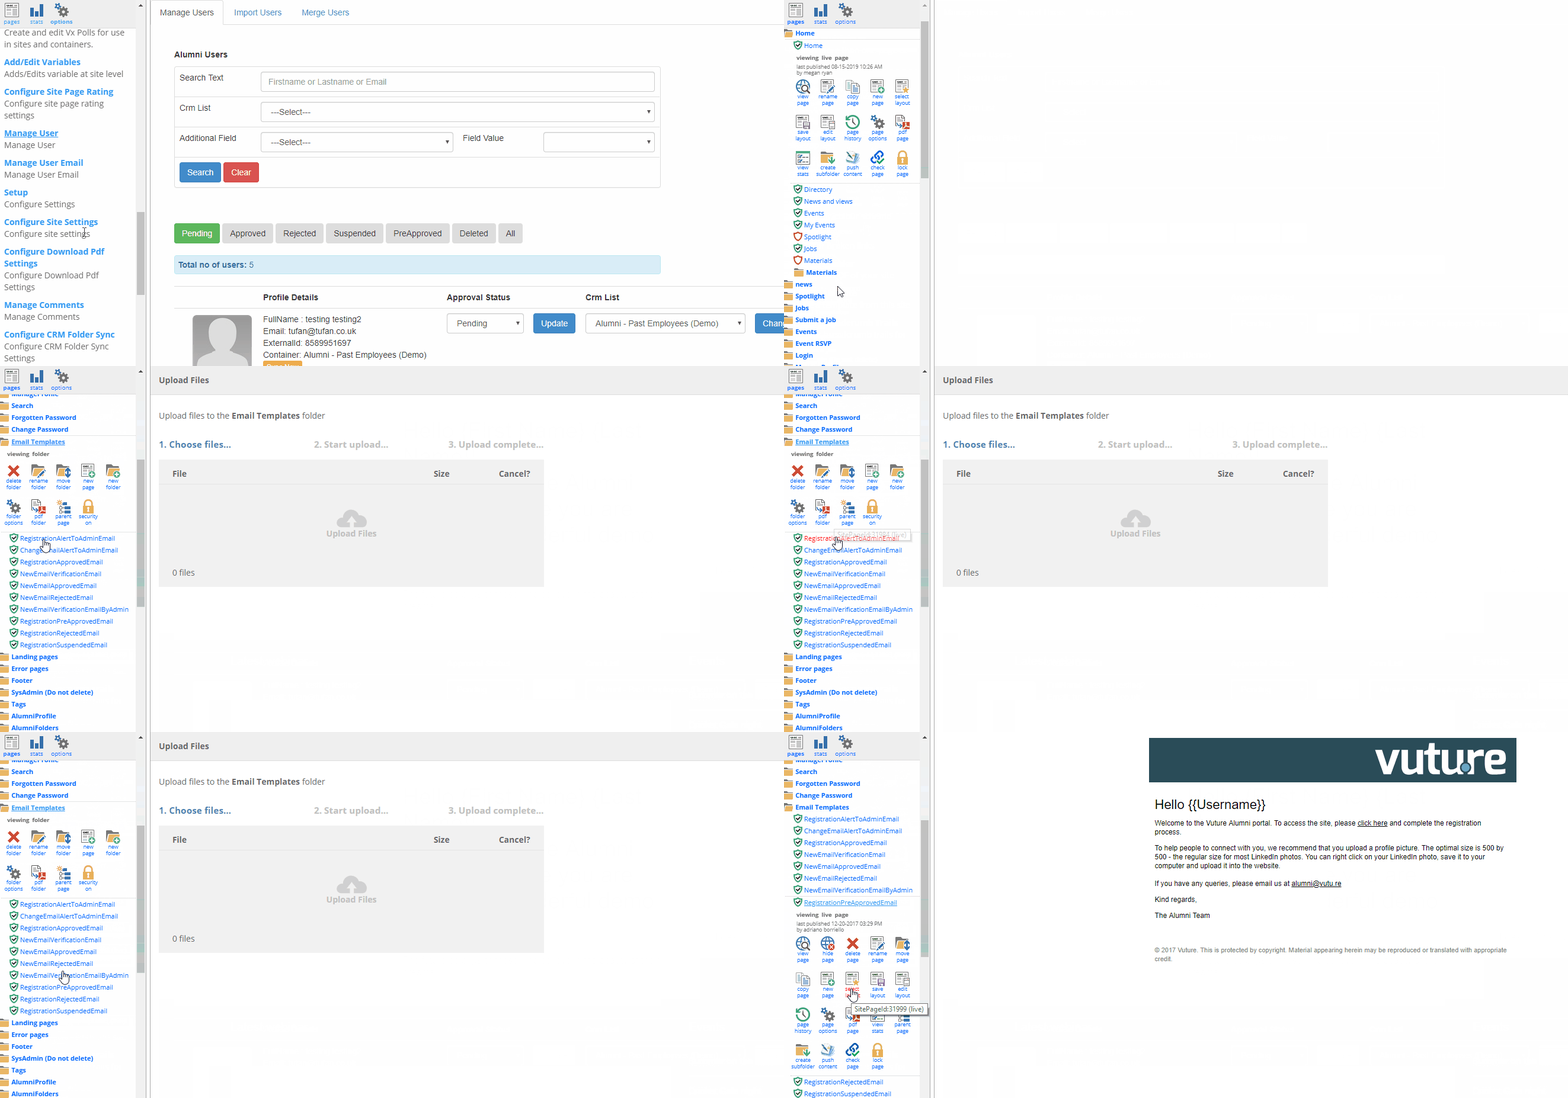
You may then click into the email to alter the text. Then Publish > Publish Now to save your changes. However, please do not remove the link that takes the user to complete their registration.
Suspending Approved Users
There may be a need to suspend a user of your Alumni website for not following the rules. You can suspend them from accessing the site by locating their account in the Manage Users section and choosing Suspended from the Approval status options.
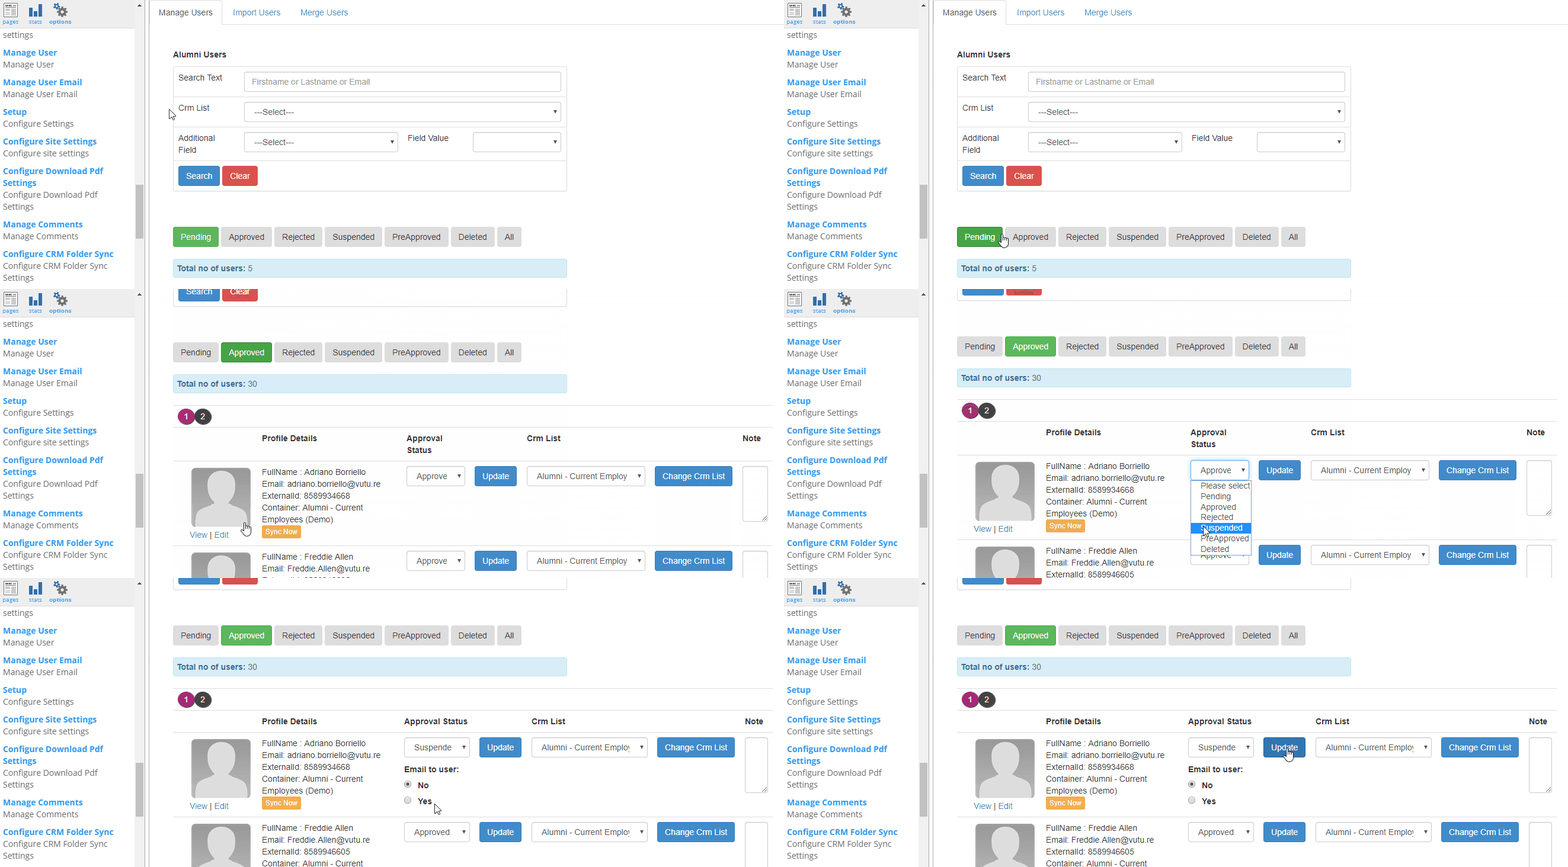
Doing this will require you to decide whether or not to send them another automated email about their suspension.
Once you have clicked Update the user will be moved to the Suspended area of the site. Suspension means that the user will not be able to access the site via their login. Approving the contact later will mean they regain access.
If you wish to edit the suspension email, click on the "Pages" icon, if you're still in Manage Users to get to the backend of your site. Then, navigate to the "Email Templates" Folder and look for the "RegistrationSuspendedEmail".
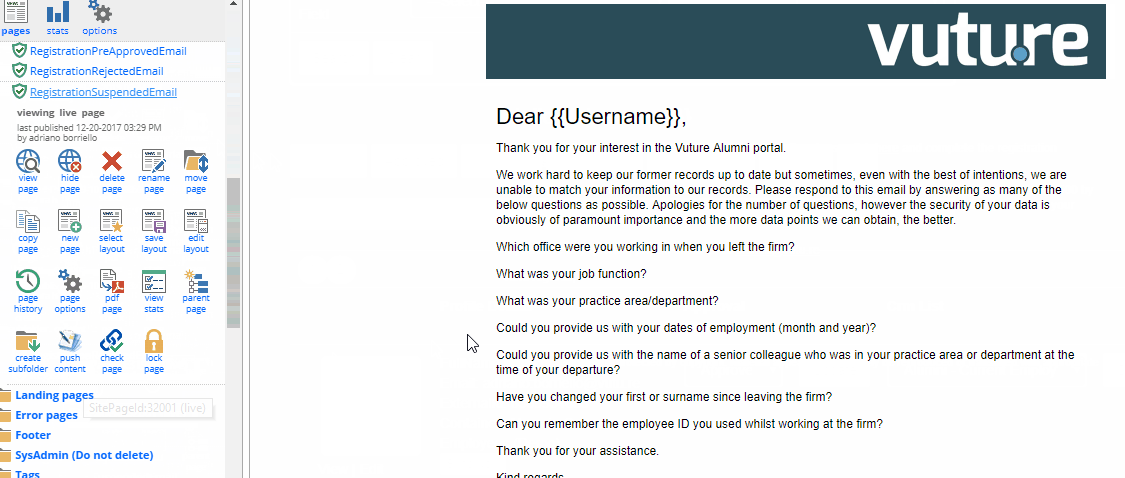
You may then click into the email to alter the text. Then Publish > Publish Now to save your changes.
Deleting Users
Changing a user’s Approval Status to Deleted will put them in the Deleted section of the site and mean they no longer have access to the website. Their profile will also be removed from the Directory.
Users are not notified by automated email when their accounts have been deleted. If desired, the site Admin will need to notify these users manually.
Change a Registered User's Email Address
For the alumnus to change their email address, they will first need to sign-in to the Alumni site, click into their Profile, and select the "Change Email" menu item. They can then update their email address and click on "Change Email". The alumnus will then receive an email notification to the new email address, asking them to click on a link to verify this new email address.
Manage User Email
Within the Alumni site, a user can request to change their email address using the Change email address form.
When this email change form is submitted, the Alumni site administrator is sent a notification email requesting them to review the change request.
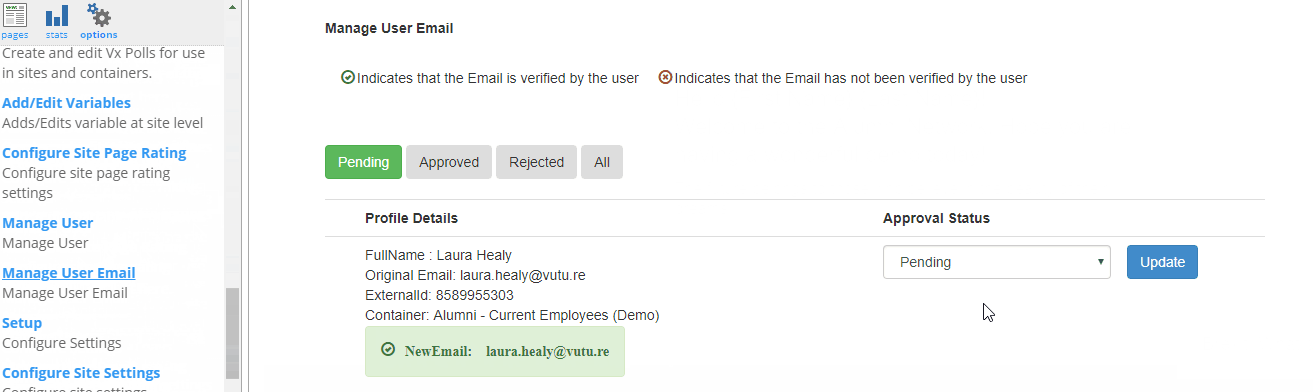
To review a pending email change request, navigate to Options > Manage User Email and click on the Pending Tab. You will see the user's basic profile details, existing email address and new requested email address.
Selecting the options:
Approved - This will update the user's email address in Vuture and in your CRM (see more info on folder specific email). They will be notified by email and asked to use the new email address going forward. The user request is then put into the Approved area of the "Manage User Email" section.
Rejected - This will reject the email address change. The user is notified and asked to continue to use the existing email address. The user request is then moved to the Rejected area of the "Manage User Email" section.
Keeping Content Updated
RSS Feeds are a useful device for constantly updating your alumni site with data which is being created and managed elsewhere, such as on your main website.
The RSS Feed is a snippet which which can be edited by clicking on the place holder. You may then define the URL for the source data, the format of the date displayed and the number of items to display in the feed. If you require additional feeds, they can be selected by inserting a new feed.
Automated Email Messages
There are a number of automated messages in the system (e.g. notifying Alumni that they have been approved). These can be edited in the same way as standard Vuture pages, for example in the Email module. They are located in the "Email Templates" Folder of your Alumni Site.
Simply select the appropriate page in the admin section on the left. Highlight the text or image you wish to edit by placing the mouse and clicking to open the Editor. When you are finished, click on the Publish button.
Editing Standard Web Pages
The basic principles in Vuture for editing are always the same, find the page you want to edit, put the mouse on the page and click the area of the page you wish to edit. The following details outline some of the common editing functions.
The text editor has a number of formatting options that can be applied to the text. The way in which formatting options operate is set up in the page templates and style sheet for the site.
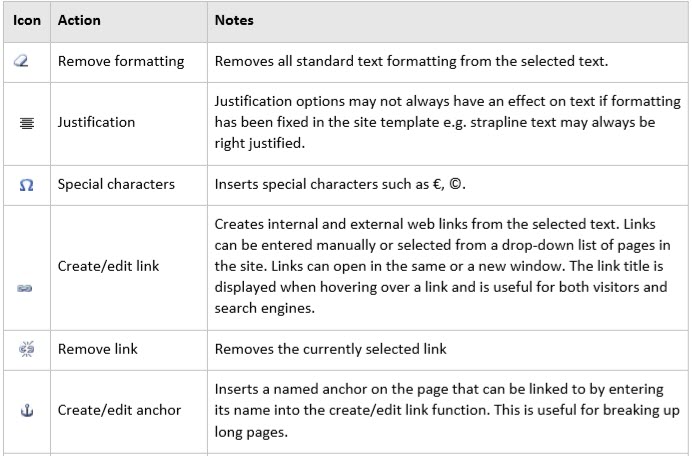
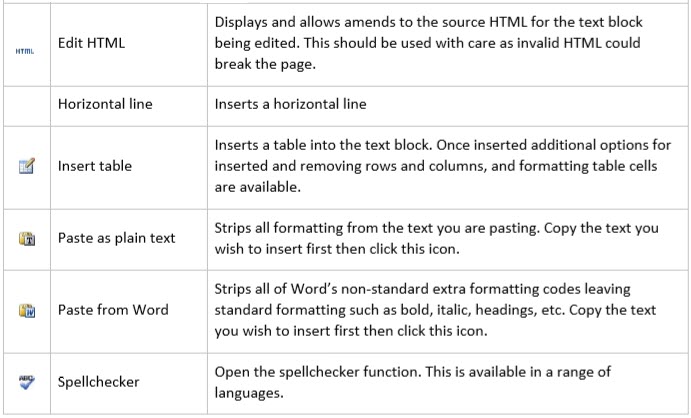
Most formatting options operate as you would expect in Office applications with the following additions and notes:
Editing Icons and their Actions
Some text blocks may be repeated on every page (e.g. footer text) and are marked as shared content in the site template. When editing this text there is no draft function and you will be told before updating that the change will be made immediately across the whole site.
Editing Images
To edit an image, mouse over the chosen image and left click. Note that not all images are set as editable in the page layout and only images that fade out can be changed.
The image editor allows you to:
- Upload to and manage images in the library
- Select a new image from the image library
- Crop and resize that image
Uploading Images
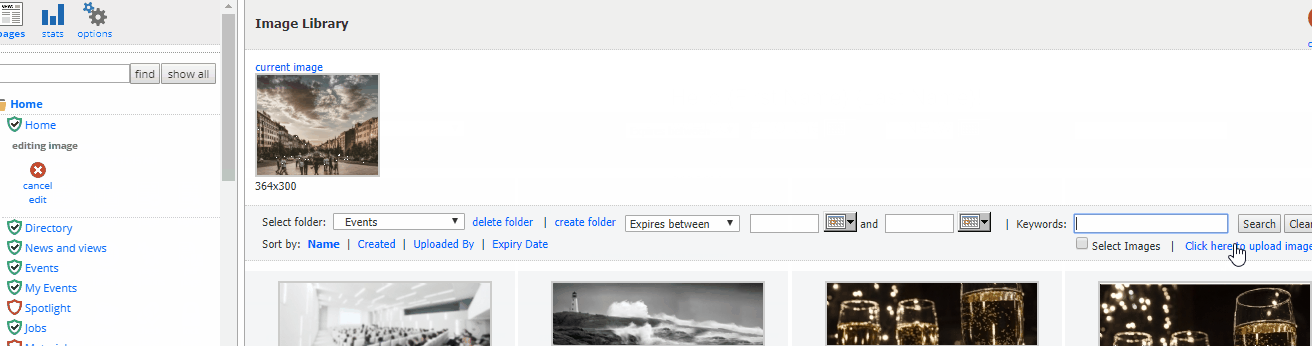
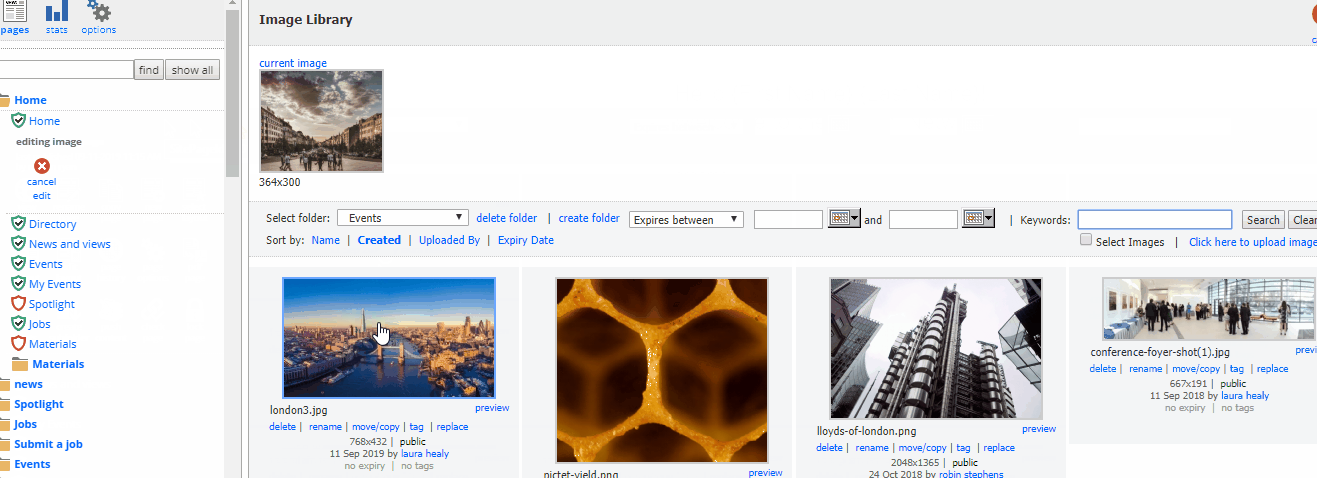
Multiple images can be uploaded into the image library simultaneously. To get to the image library, click into any editable image (one that fades out as you hover). Then, follow the below steps:
- Select the folder you wish to upload your images to
- Select "Click here to upload images..."
- Click "Choose files" and select the images you wish to upload (usually you will have already saved them to your Desktop)
- You can click "Add more files" at any time in the process to upload more images
- Click "Start upload" to upload the images
Images can be in JPG or GIF format and should be uploaded as a high resolution image.
Individual file size upload limit is 30Mb, but we recommend that file sizes are kept below 5Mb for best results.
Selecting a New Image
To select a new image to replace the current one, click into the image you wish to replace (one that fades out as you hover). Then follow the below instructions.
- Select the folder that contains the new image you wish to use. If you recently uploaded the image to this folder, you may want to click on "Created" to find it more quickly.
- Click on the image you wish to use
- This will then open up the "Edit Image" screen
- Vuture will scale down the image so that the height fits within the size requirements for this snippet, but you have control over the cropping (see more instructions here).
- Clicking "done" will replace the old image with the newly selected image.
Cropping and Resizing Images
Once a new image is selected, the system will automatically try to resize the image to fit the space available.
Use the controls to resize and crop the image then click "Done" to insert the new image onto the page. You can change the size of the image by dragging the slider bar, then select which part of the image you wish to crop by moving the crop box.
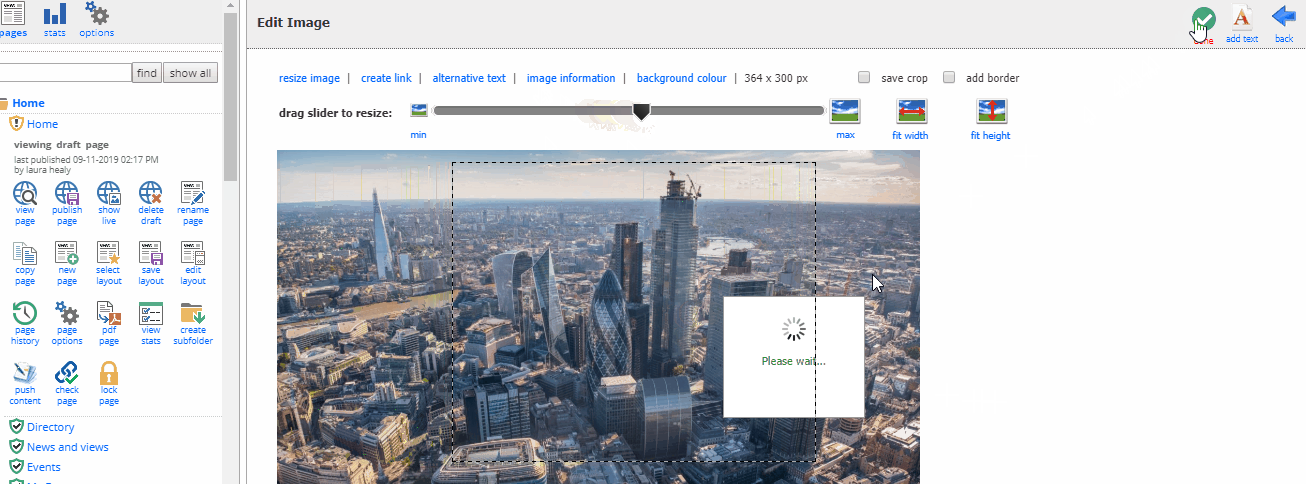
- You can also use the max, fit height, and fix width buttons to automatically resize the image.
- "Create link" turn the image into a link with same options as the text editor.
- "Alternative text" is used to give the image descriptive text otherwise known as an ALT tag. This is useful for visually impaired website users, visitors with images switched off, and for search engines.
- "Image information" provides the dimensions of the image.
- "Background colour" allows you to set the background colour to match a corner of the image. This is useful if you wish to crop an image that is not on a white background.
- You can also tick the "save crop in image library" box to make a copy of the cropped and resized image available in the image library. This is very useful if you plan to reuse the cropped image elsewhere in the site and you don't want to have to work out the exact same crop again.
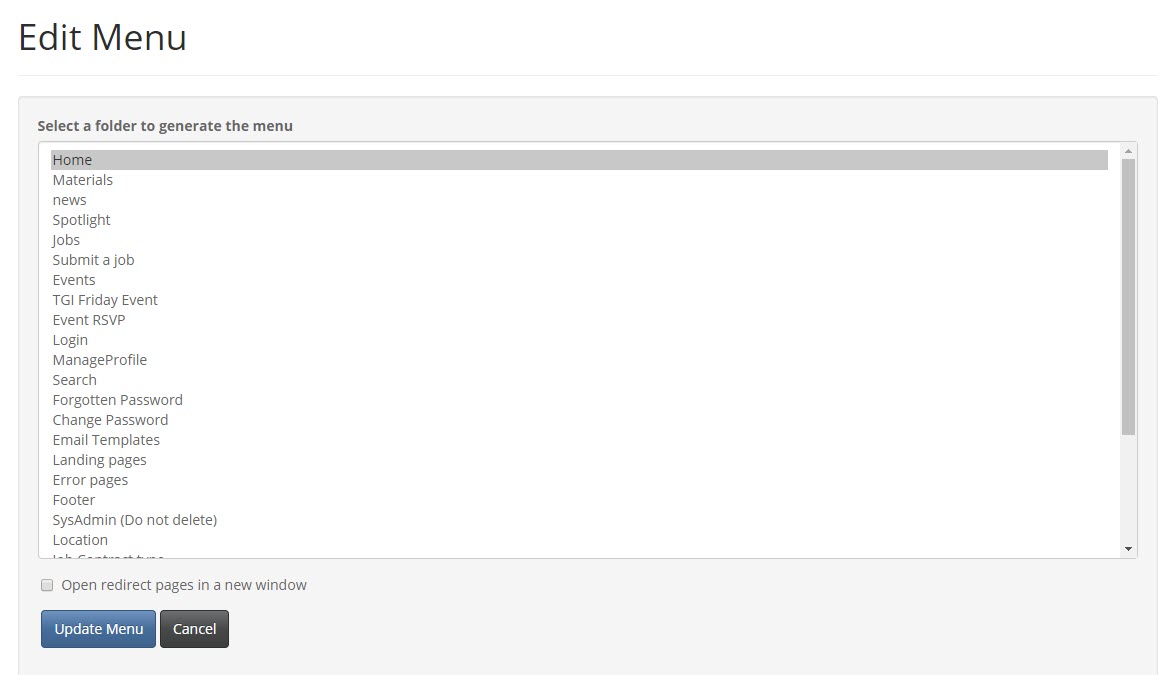
A menu is a set of links that are automatically generated from all the pages in a particular folder. If pages in the folder are added, deleted, hidden, moved or renamed the menu will automatically update. Menus can be reused across the site and make it easy to control the site navigation and to set up lists of similar pages such as news, articles or events.
Clicking on a menu element on a page will open the menu generator. Select the folder that you would like the menu to be generated from and click update menu. The menu will be regenerated with links to the live pages from the selected folder.
- Menus can be generated from any folder on the system including those containing uploaded files.
- Renaming, moving, copying and hiding pages in a folder automatically updates any menus based on this folder.
- The links in the menu are displayed in the order they appear in the left navigation panel. Use move page to re-order the pages and thus re-order the menu.
Changing Page Layouts
All pages are based on layouts provided as part of the website template. You can change the layout of a page at any time by picking a different standard layout or by customizing the layout using the edit layout function.
Choose a Standard Page Layout
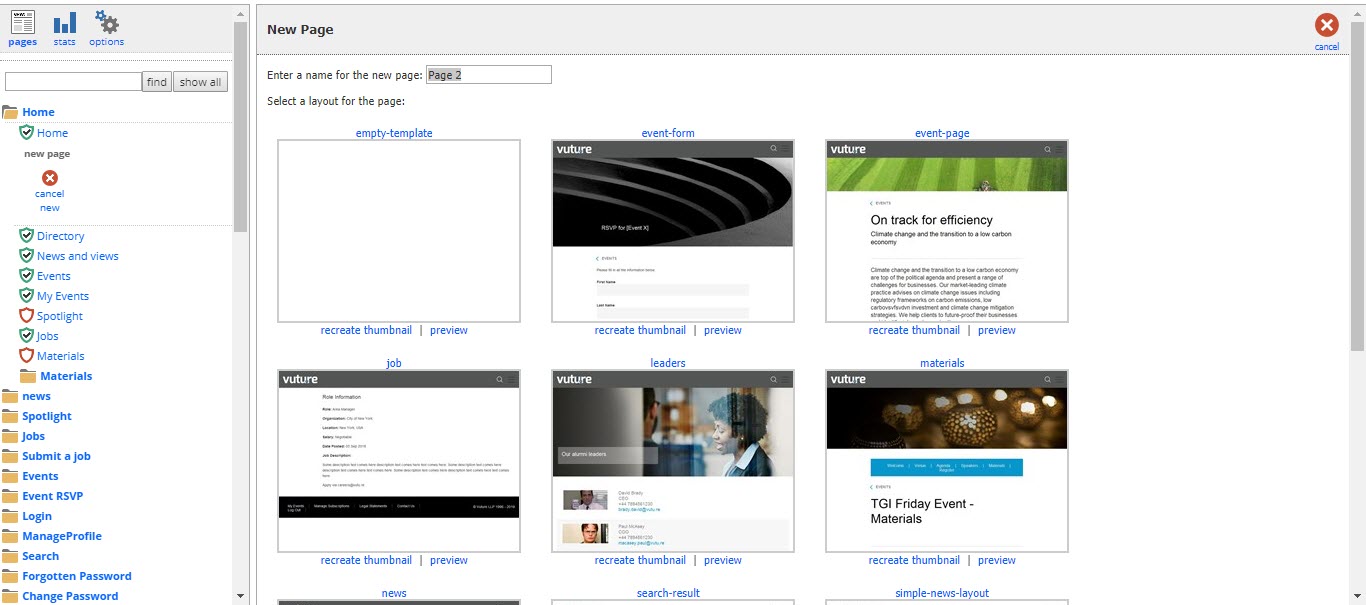
Select the page whose layout you wish to change or create a new page. Click on select layout and you are presented with a list of all the standard page layouts available. Select the required layout and the page will be updated. The page is automatically put into draft mode when you select a new layout.
Important: Copy and image changes on the page will be lost when you select a new layout.
If creating a new page, you'll want to click on the "new page" icon to select your layout for the new page.
Using Edit Layout
The edit layout function allows you to re-organize content on the page using drag and drop. You can also remove content from the page, copy existing content and insert new elements onto the page.
To edit the layout of a page, please follow the below instructions:
- Select the page whose layout you want to change, then click on the "edit layout" option.
- Elements that fade out when you mouse over them are called snippets. They can be clicked and dragged around the page.
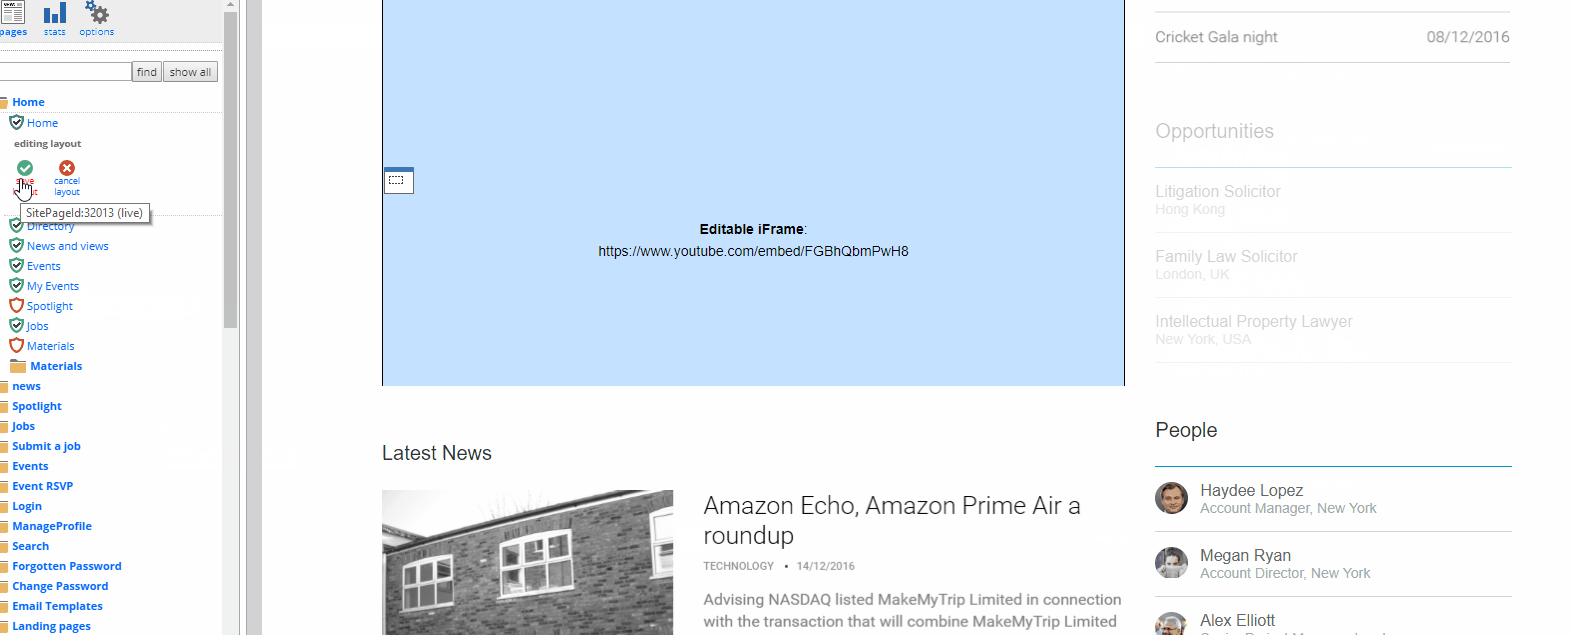
Please note, that only snippets and columns on the page that have been set up in the template can have the content re-organized. - You may also right click on a snippet to delete, copy, or insert below:
Delete - removes that snippet from the page.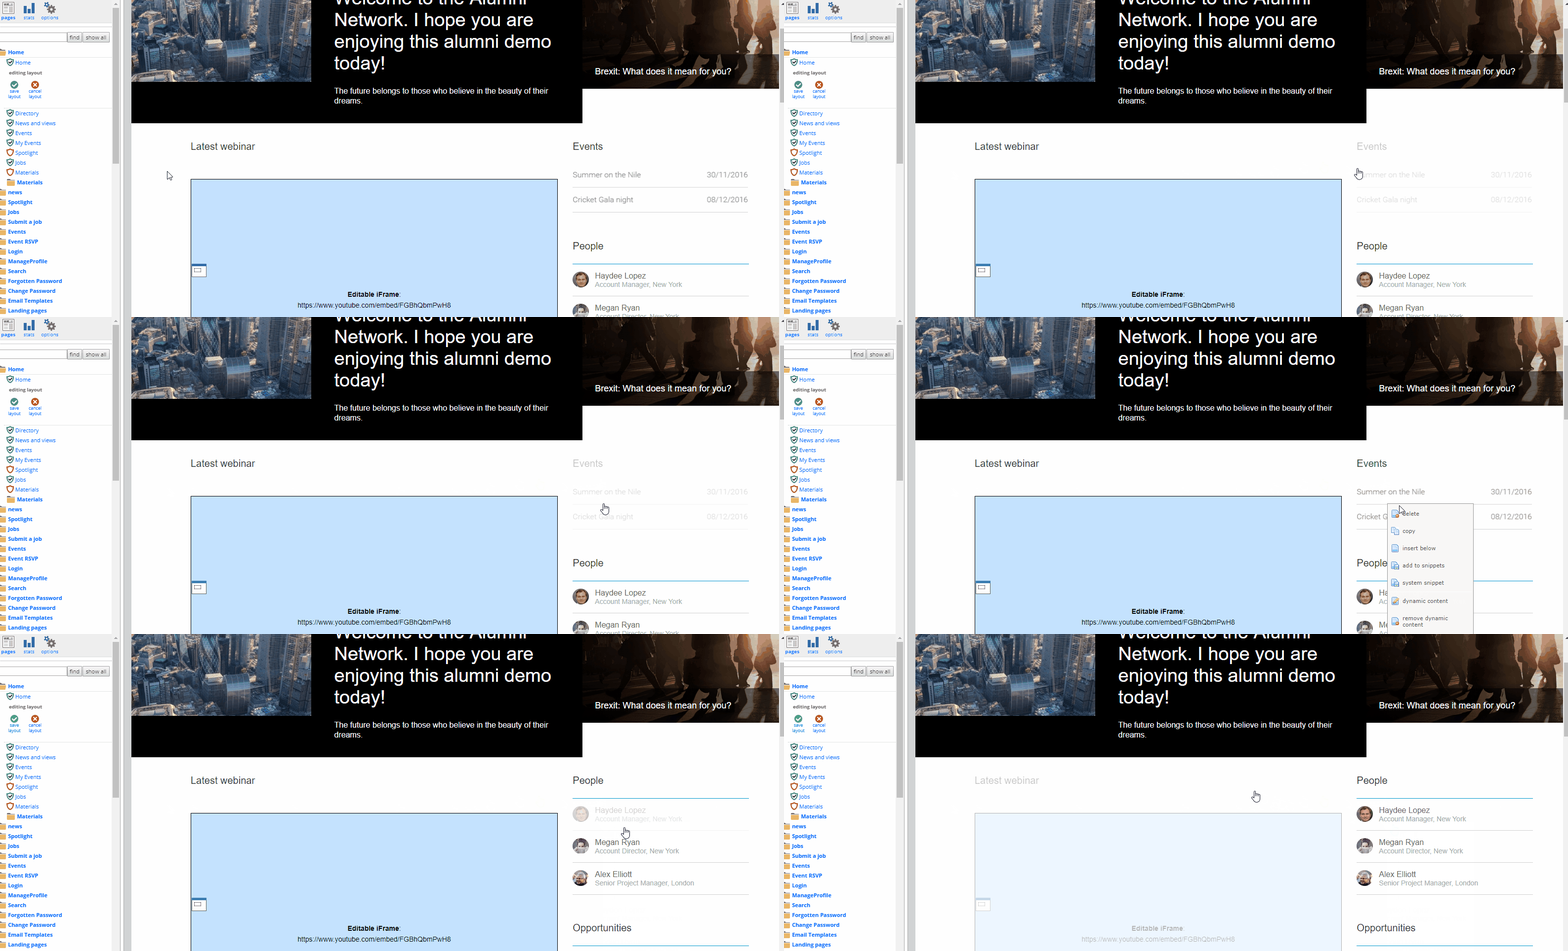
Copy - makes a copy of the snippet below the original snippet.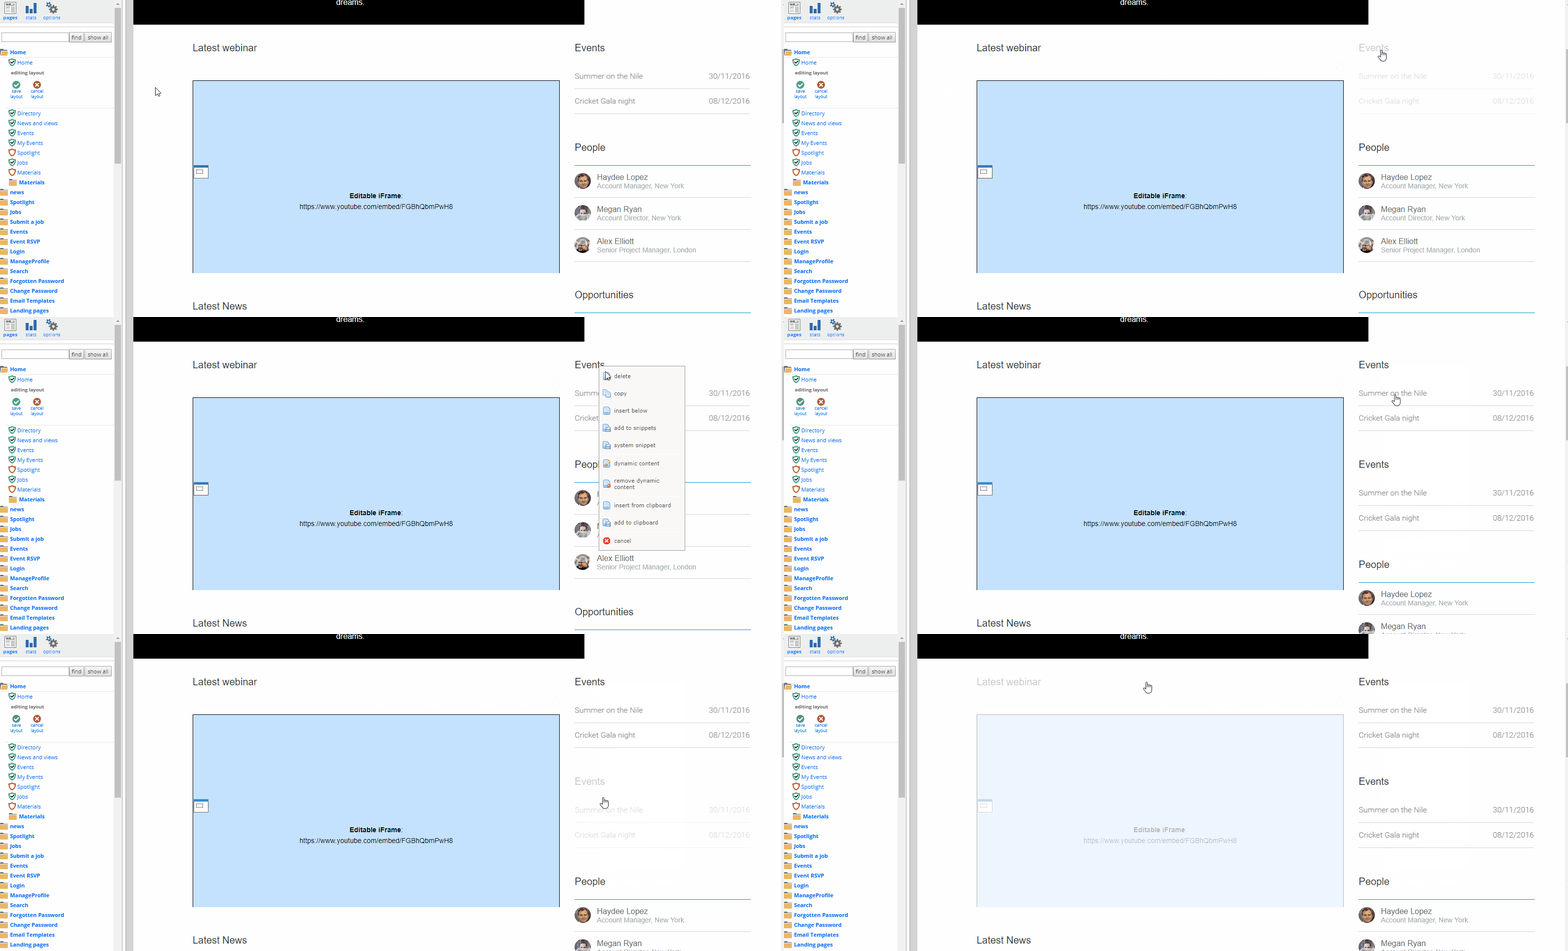
Insert below - allows you to pick from a list of snippets. Select the snippet required and it is inserted below the current snippet. You can then drag this new snippet around on the page.
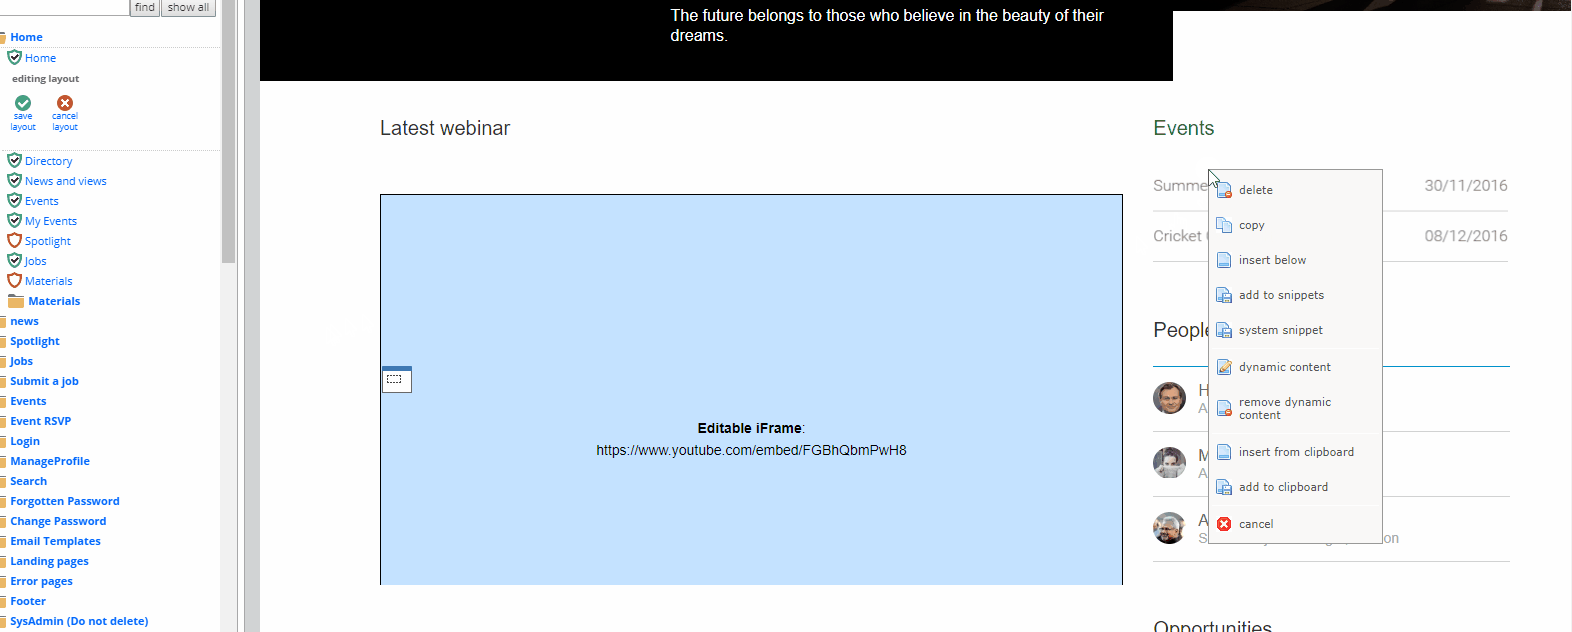
Add to snippets - this adds the currently selected snippet into the snippets library for re-use wherever the same website template is in use. - When you are happy with your changes, click on the "Save layout" icon. Then, when you are ready to make your changes public, click on "Publish" > "Publish Now".
Uploading Files
Multiple files of any kind can be uploaded to any folder simultaneously. Once uploaded they can be linked to using the linking tools in the text and imaging editors. If the folder they are uploaded to is used to generate a menu the menu will automatically be updated with the uploaded files.
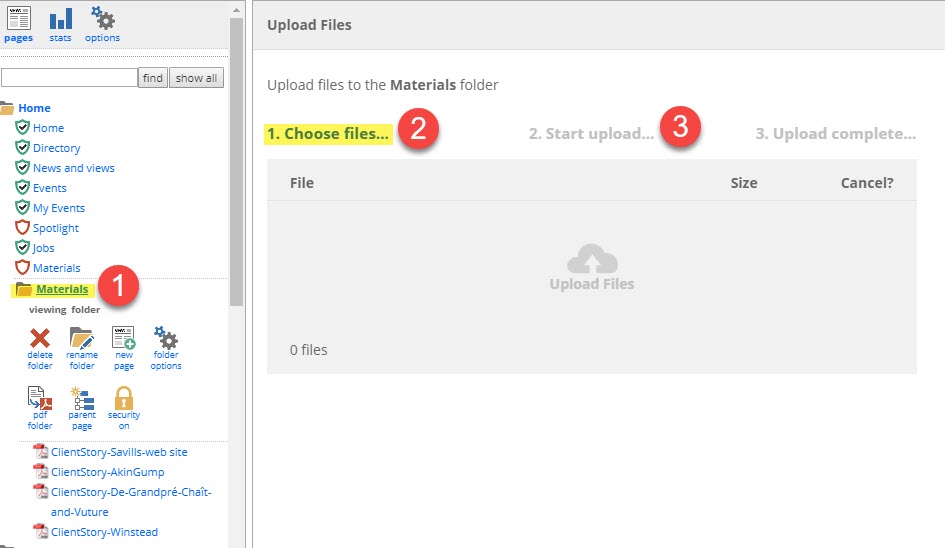
- Select the folder you wish to upload files to, or create a new folder.
- Click Choose files and browse for one or more files to upload.
- Click Start upload to upload the files.
- Once complete the left hand panel will be updated automatically to display the new files.
- Uploaded files can be viewed from the right panel by selecting them and clicking on "view file" link.
- Uploaded files can be moved within folders or to different folders in the same way as a web page.
