This integration allows you to manage your Webex event using Vuture invitations and registration forms. Responses will write back to both Webex and to Vuture, and from Vuture to your CRM.
You will first need to create a single user account in Webex and a further matching account in Vuture. This process is described here. You will then allow the integration by entering your Webex secret key into Vuture's Webinar Setup Tool. The step to obtain a secret key is only required once. It is described here.
Once you have your secret key you will enter them into the Webinar Setup Tool.
The integration will allow Webex to send an automatic confirmation email to your contacts, and will also allow you to report on Acceptances and Attendances; either from Webex’s own reporting, or from your CRM, or from Vuture.
CRMs
The CRMs with which this feature will work are InterAction, Dynamics, Fibre, Dealcloud, ContactEase and Salesforce. It will also work standalone with uploaded .csv lists. (Note: ContactEase and Intapp OnePlace integrations do not have activities integrated with Vuture. They will accept RSVP updates but not event activity records.)
Restrictions
Large Event and Webcast session types are not supported.
Multi-webinar registration - there is an article describing this new functionality here.
Process
You will need to:
- Create your Webex user account (once). This is described here.
- Obtain your Webex client number and secret key (once). This is described here.
- Configure the system in Vuture to accept Webex events (once). To do this you will need the Webinar Setup tool. There is a description of the tool below.
- Add the Activity type (once)
- Create the Event in Webex (each event)
- Add the Event ID to a Vuture form (each event)
- After each event, Webex will write back Attendances to Vuture and to your CRM.
Please Note: It takes at least 4 hours for Webex to update their API to show "Attendance". This will affect the time it takes to write back to your CRM. To report on attendance, we recommend you leave it at least 24 hours - to give Webex time to catch up.
Prerequisites
- The Webex integration back to the CRM will only work for clients who are on Vuture's Form Editor v2. Your Vuture Client Success Manager will check this for you.
- You will need a Webex account username and pw with developer level access and access to Webex webinars product
- Your CRM integrated with Vuture’s Email Module
- Webex enabled for your Vuture Role to display the Webex ID field - at Admin.Roles.Forms.Webex Integration Webex Id Field (Your Client Success Manager will do this for you)
- Webex configured for your instance (see Configuration section below - your Client Success Manager will do this for you)
Using the Webinar Setup Tool
The Webinar Setup Tool is the new way Vuture has developed to make integration easier, quicker and more secure, plus providing a check at the same time that the ID numbers entered are valid.
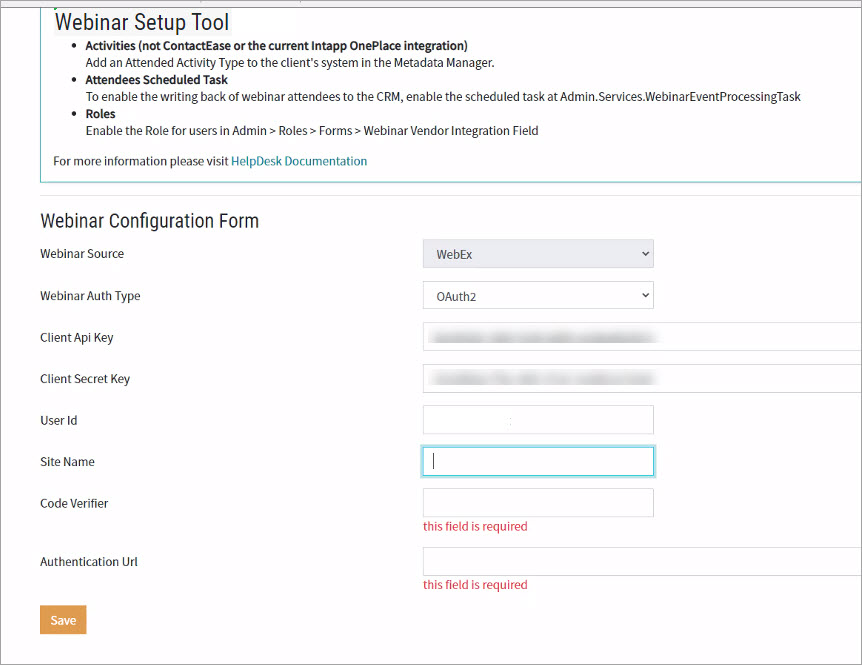
The Webinar Setup Tool will be required to configure the Webex account. This tool is pictured above.
Enter your Client Key and Secret Key in the boxes provided. Entering them yourself is more secure than emailing them to your CSM.
User Id in this form is the email address of the client firm's main user who set up the integration and obtained the Keys or the primary email address at the client firm of the Webex account.
Code Verifier: Enter any single word here to describe the integration. This word will act as callback verification for when the Vuture api calls your (the client's) system - so for example, the word Vuture would be ok here.
Authentication Url should be https://api.webex.com/v1/oauth2/token
Enter as above and click Save.
Important Note for ContactEase clients: There is an additional step required to set up any form of webinar i.e. Webex, Zoom, ON24
The Vuture CSM or Project Manager should navigate to Admin.System.CrmManager.Crm System Config
Select the instance you want to use for webinars. In most cases this will be ContactEase1.
Click on System Configs. From the Select Crm Setting Field Category: select EnableWebinar and check the Select Crm Setting Field Value box. Click Save.
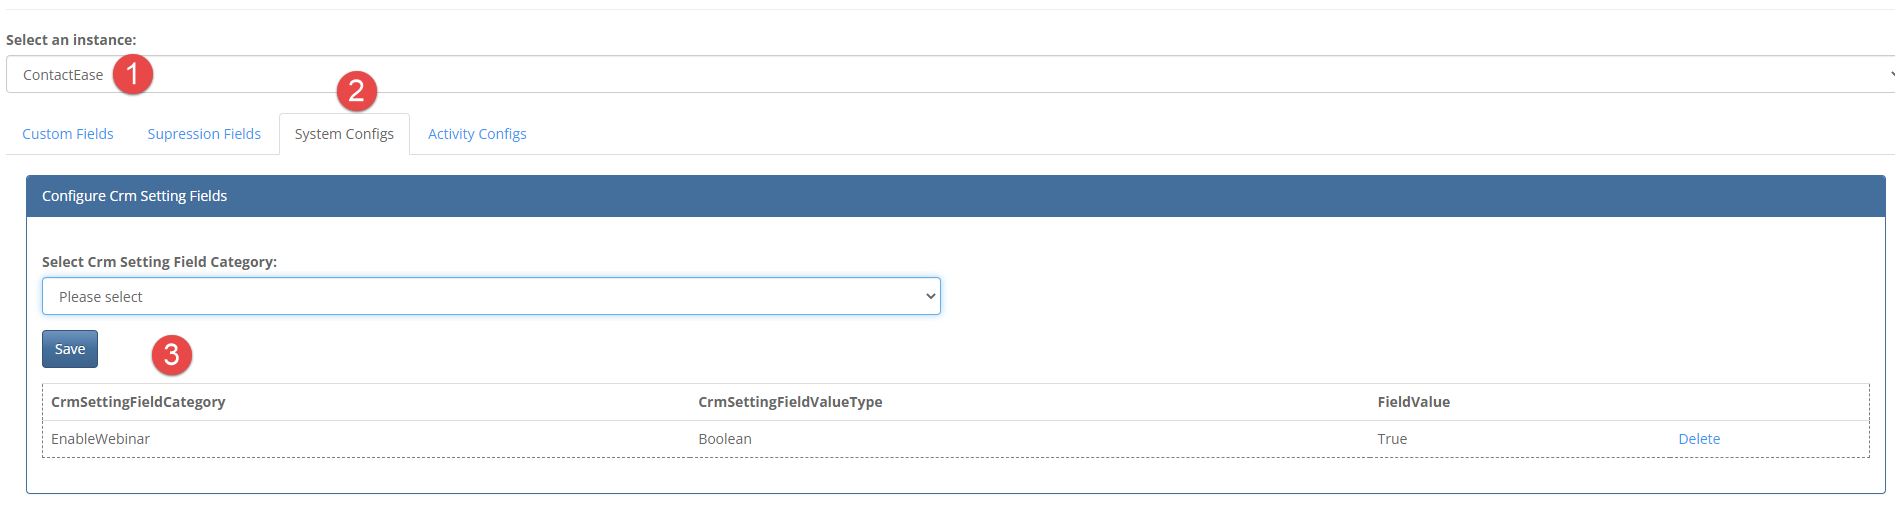
Also ensure that in Admin.System.ContactEase1.ContactEase Connector the config is set to False. It must NOT be switched on.
For all crm clients:
The WebinarEventProcessing task will need to be enabled at Admin.Services by the Client Success Manager. This task processes the attendees.
Check that you have the following configuration setting:
Admin->System->Forms>Display Webex Integration Webex Id text field - True
Creating a Webex Event
Go to the Webex site online and sign in.
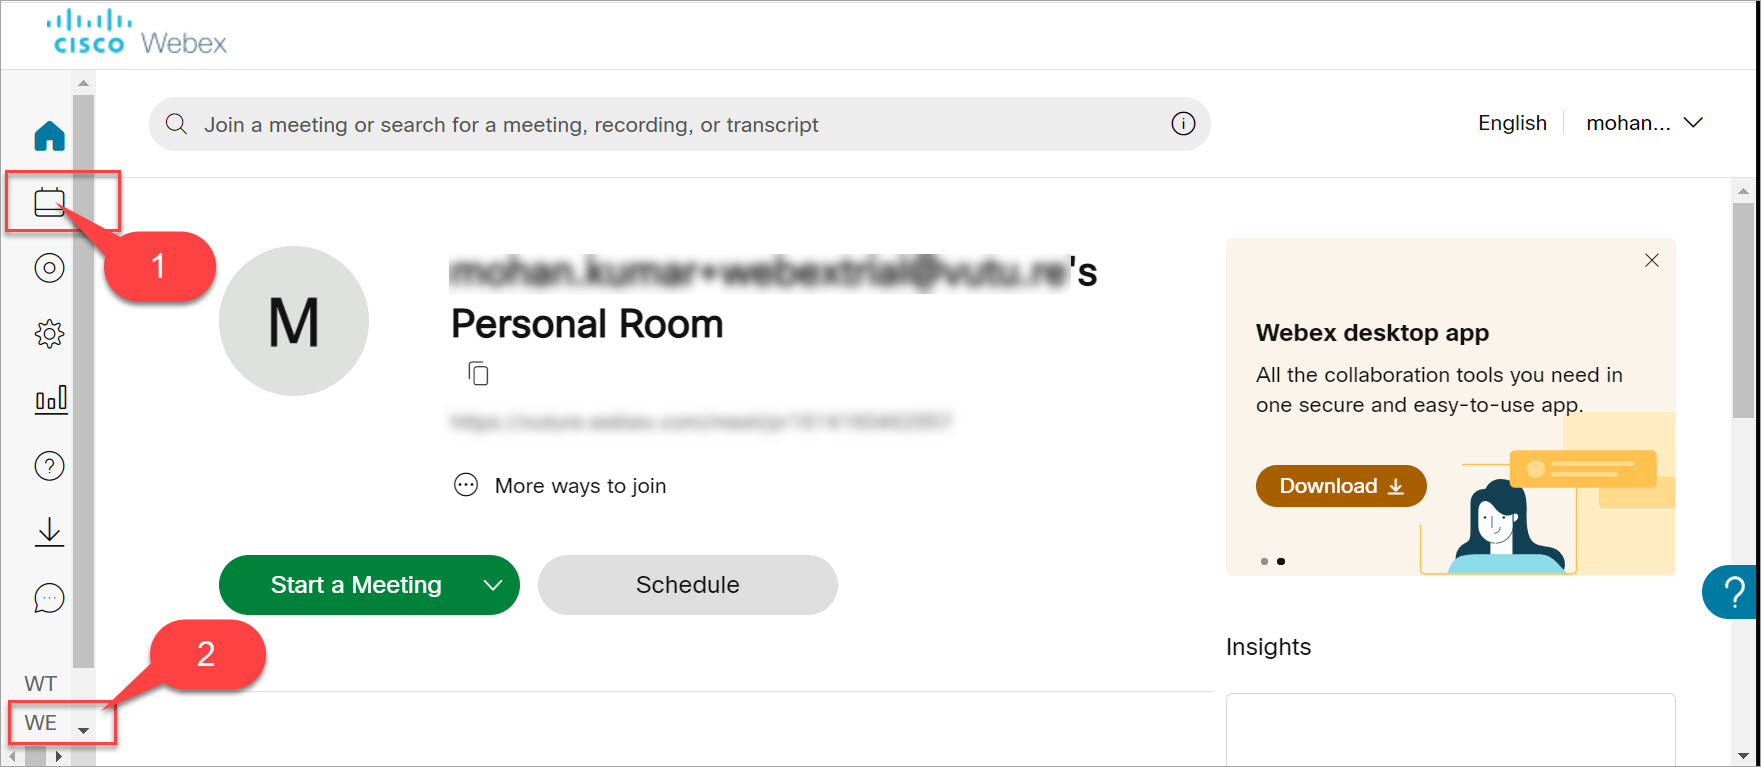
Once signed in, depending on the account you have with Webex, you will have the option to either 1. Schedule a Meeting or 2. Schedule an Event or possibly both.
Follow Webex’ own instructions to create your Meeting or Event.
Please note that we only support events set up via 'Webex Events (classic)' You may be offered another option under Meetings to 'schedule an event' which we don't support.
Once scheduled, you will have some Event Information provided to you on screen:
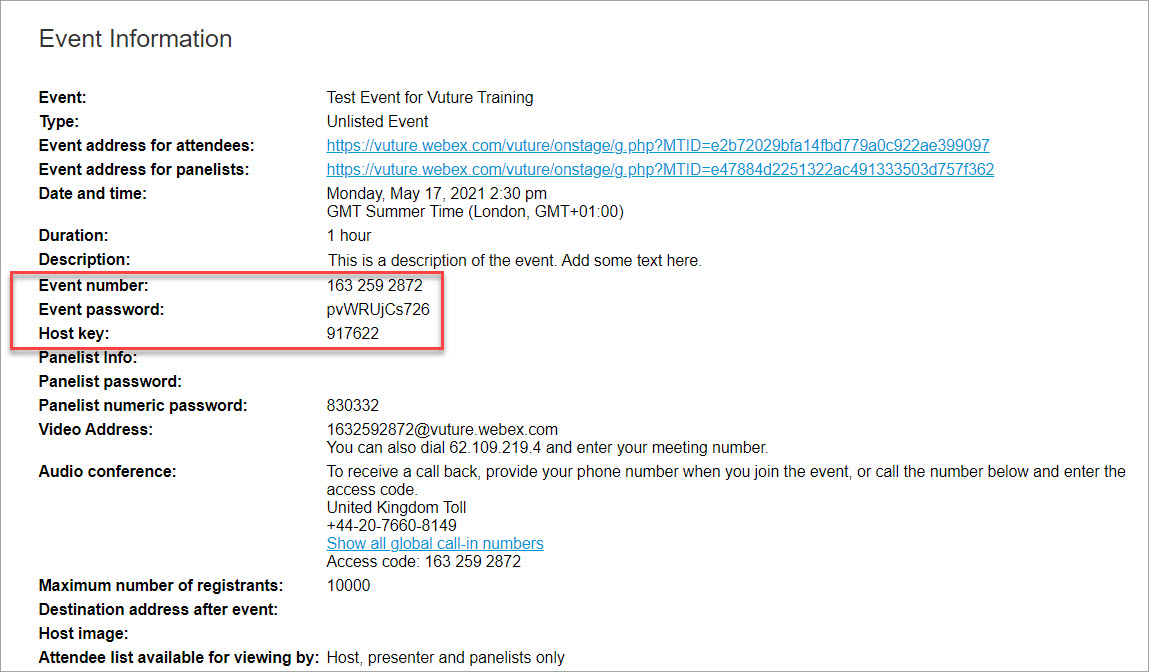
Make a note of the Event Number. You will need this in the Vuture form attached to your invitation. It will be referred to as the Webex Id.
Setting up the Event in Vuture
Navigate to your Vuture campaign and the RSVP forms - Prefilled and Blank.
Optional: Rename these forms with the Event Name and Date. This will aid reporting later.
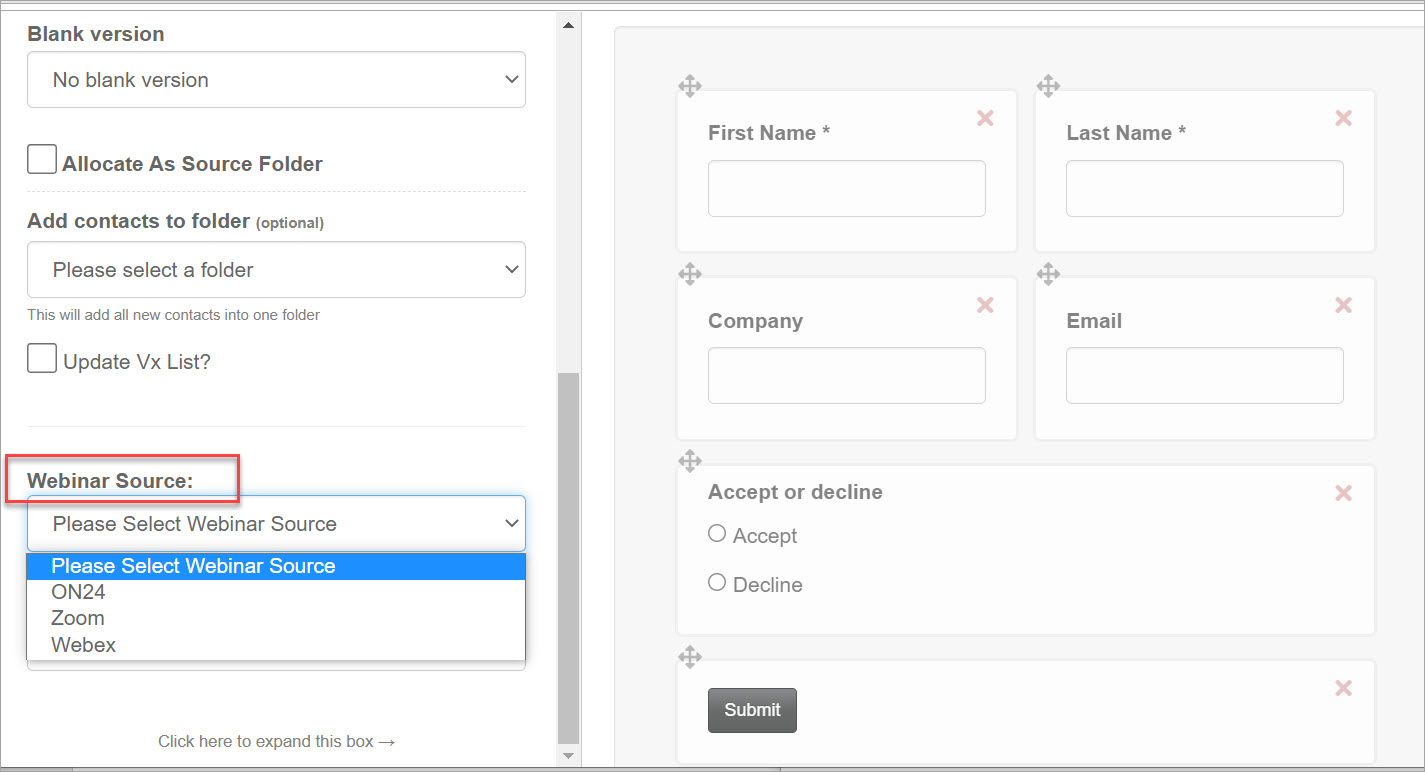
In Add a Field tab find the drop down selector and choose your webinar vendor.
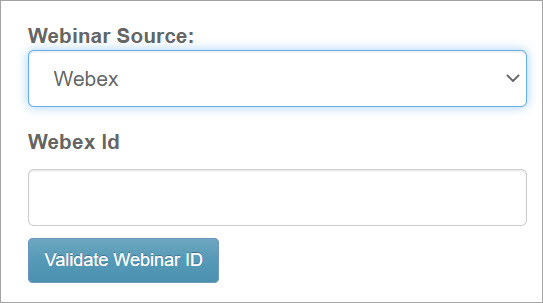
Enter the ID of your event in the box below the Source.
Clicking on Validate Webinar ID will check for you to ensure that the ID is a valid one. You will get a green Validation Successful message at the top right of your screen. If the ID is not valid you will get a red message Please Check and Try Again.
Note: We have developed a new way to enter webinars on a form described here. It gives peace of mind that the webinar number is correct, by confirming the title of the webinar that you have entered.
Specify Attended additional field (not for ContactEase and Intapp OnePlace integrations)
If your mailing list includes an Attended additional field, you also need to specify this on the Settings tab.
Select the Marketing list name, the Entity, the Event Attended Field and the Event Attended Field Value. You could use either Enumeration or Boolean field types for the Event Attended field.
Remove the Tentative and No options from RSVP.
The RSVP options on your forms for Webex invitations should be Yes or Accept or Accepted only. Precheck the Yes or Accept value and mark the field as Hidden. Remove any Tentative or No or Decline values.
Why? This is because the action of clicking Submit on the form tells Webex that the contact would like to attend. There is no Decline option. Webex will automatically assume that anyone completing the form and clicking the Submit button is Accepting.
Suggestion: You may wish to add an Instruction field to the bottom of your form, just above the Submit button, with some text such as "Click Submit to confirm that you wish to attend this Webinar". This would stand in the place of the usual RSVP Yes / No which the clients normally see.
Supported Fields in the Integration
The following Webex fields are supported in Vuture
Name (made up of First Name, space, Last Name)
FirstName
LastName
Title
Email
Company
Phone
Address1
City
Country
State
ZipCode
If you add any other fields to your Vuture form, Webex will ignore them. Do not make any other fields mandatory.
Link the RSVP form to the Vuture email and send the Mailing
Suggestion: On the Call to Action or RSVP button in the email, you may wish to use alternative, positive wording instead of RSVP, such as the words “Register” or “Accept”. This is because the form should (as explained above) contain no Decline option.
Contacts will receive the email, from where they can click the button, complete the Vuture form and click Submit. They are then registered for the Webex webinar. They will not be asked to also complete Webex’ own registration form.
Reporting on a Webex event or meeting
To report on attendance at your meeting or event you will need to wait at least 4 hours, preferably longer, for Webex to write back the Attendance data and display it in reports. Once this has happened, you can choose to report via Webex, use your own CRM reporting, or use the Activity reporting in Vuture to show you who attended.
After the required wait time, you can see Webex reports by navigating to either Meetings or Events (classic). Find your Profile name and click on the arrow to the right of your name. The drop down menu includes My Reports.
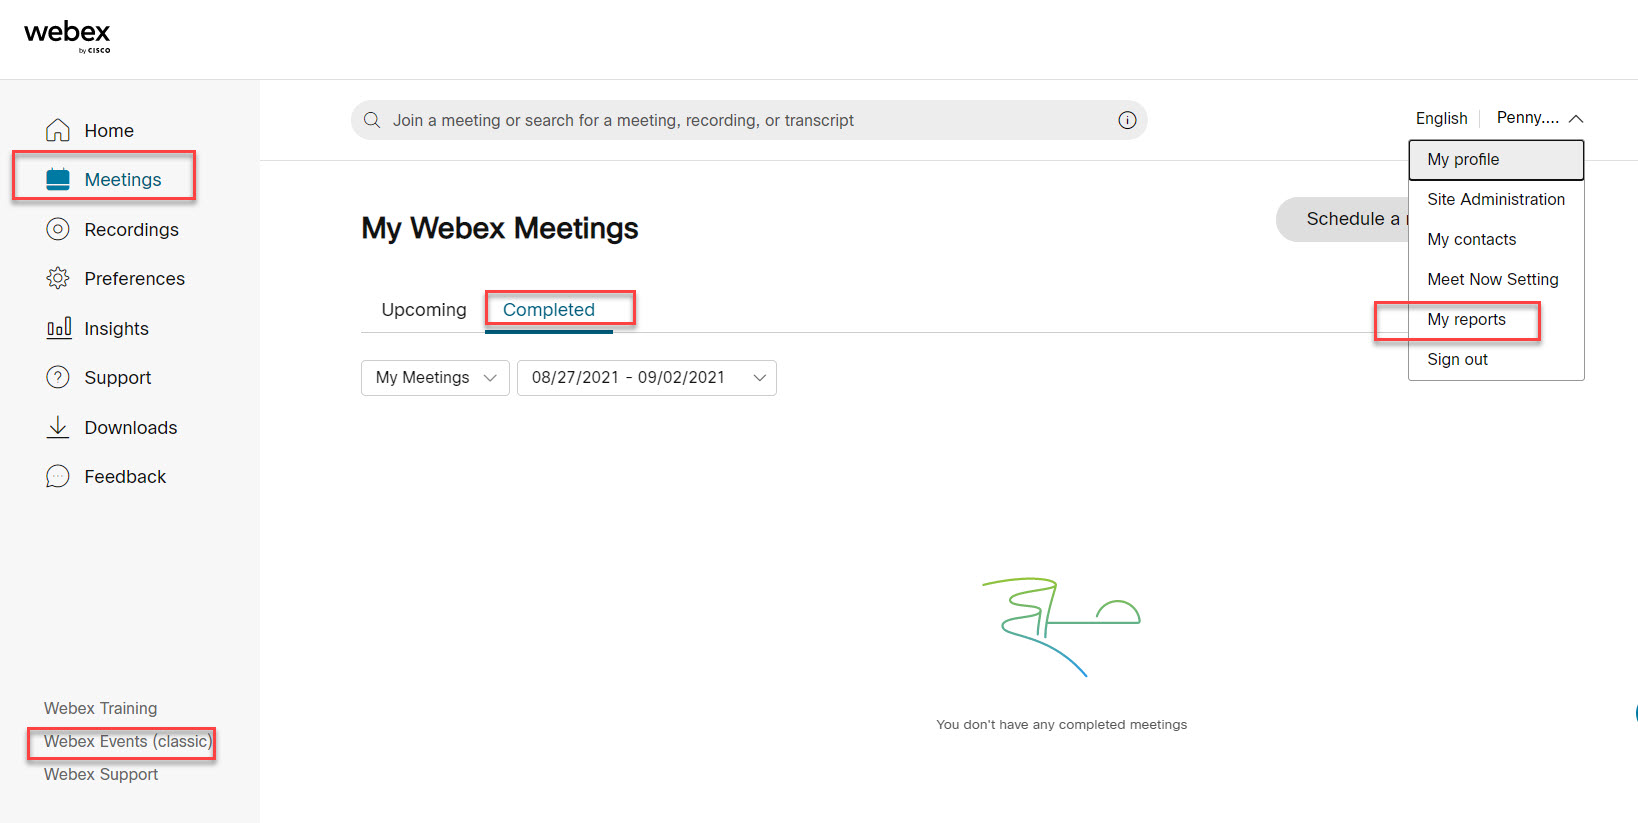
From My Reports you will be offered an array of different options, including Attendance Reports.
