"Vuture Connect" "Connect Module" "Connect Dashboard"
This article is intended for Clients - Super Admins or other Vuture-experienced Marketing team users.
There are two very short Quick Reference Guides available - for end users of Vuture Connect (typically partners or other senior users who have not had any Vuture training). You can download them from the foot of this article. One is for laptop users (or tablet, held in landscape view) and one is for smart phone users (or tablet, held in portrait view). If you wish to use these documents as a basis for your own edits, please ask your CSM for the editable version.
What is Vuture Connect?
Vuture Connect is a premium product which focuses on sending personalised messages from senior users to small numbers of selected contacts. Experienced Vuture users first set up branded, linked and approved email campaigns and make them available, for a fixed time, to their senior stakeholders to send out - with the addition of a personal message.
Who will Use Vuture Connect?
There are two different types of Connect users:
1. The Super Admins, or Marketing team users, who create both the campaigns and the contact lists, and
2. The senior stakeholders, also referred to here as end users. End users do not need any previous experience of Vuture and there should be very little training required to help them use Connect.
This article is aimed at helping the SuperAdmins to set up Connect for their firms. There is a Vuture Only article for CSMs here.
How Does Connect Work?
End users, (typically senior stakeholders such as law firm partners or their assistants) will work with small lists of their most important clients and decide whether or not to include them in a mailing. They will add a personal message to each contact, and a personal signoff, before sending the mail.
The module is configured to work efficiently from a tablet or smart phone as well as from desk tops and laptops.
Admin users, experienced with Vuture, will upload lists of contacts to Vuture Connect (via the Contacts Module if they wish, or via the Lists area) and make those lists visible only to the partner who "owns" them, via the Email List Access tool. To aid the partner in decision making, Vuture Connect can show the partner, before they decide whether or not to include a contact in a mailing, how many mailings that contact has already received recently and whether or not they opened them (are "engaged").
When Might Your Firm Find Vuture Connect Useful?
- Centralised Marketing can sometimes appear impersonal. Use Vuture Connect to personalise a standard campaign for special clients.
- Add personalised comments to any mailing to make the communication feel like a 1-1 mailing.
- Use Vuture Connect to personalise holiday cards and VIP event invitations.
How do I Set Up Vuture Connect? Are there any Prerequisites?
For CSMs, there is a (Vuture Only) setup article here.
For Clients - Super Admins or other Vuture-experienced Marketing team users:
- This version of Vuture Connect operates with .csv files. This means that you can use Connect with any CRM or none. There is no integration with any CRM in this version.
- Your CSM will enable the necessary configurations and edit your Roles to allow you to manage Connect lists and edit Connect mailings.
- You will need to upload .csv lists of contacts for each partner or other end user.
- You will find the Contacts Module very helpful (to assist with creating and managing lists for each user). However, this is not mandatory.
- You will use the tool which is found at Admin.Email List Access to mark each list as private to the appropriate end user.
- You may wish to create one or more containers for Vuture Connect, to keep Vuture Connect mailings separate from other mailings. It will be possible to create a campaign in the usual way, for the Marketing team's use, and then copy over a new version to the Connect container before adjusting it and editing its Content Type, to work with Connect.
- SSO will be helpful (not mandatory) for ease of use with occasional users such as partners/attorneys. However, if your firm is accustomed to logging in to Vuture with a login and password, that will also work.
- You will need to create Global Lists of contacts before then limiting their view to specific partners.
Note: Before you begin setting up Vuture Connect, please ensure that your end users have an account to access Vuture. This may be a new step for your firm, since senior stakeholders often do not access Vuture themselves, but end users of Connect will need to have a Vuture login and password, or use SSO. The Role for these end users can be minimal - Read Only, for example.
Let your CSM know which Role you intend to use. They will add the necessary permissions to this Role to allow the end users to see Connect mailings.
Step 1 - Create a Container (if using only one container)
This step is optional. A separate container can useful; it will keep Vuture Connect mailings in one place and make reporting easier, but is not essential.
Give your Marketing team, and all involved end users, access to this container. End users will only see mailings in the container(s) to which they have access. They do need to have a Vuture account, but they can have a limited access Role such as Read Only.
Step 2 - In the Contacts Module, or the Lists Area, create one or more lists for each end user.
Lists are uploaded, either to the Contacts Module or to the Lists Area, as globally-available .csv files. This means that the data can originally be generated by any crm or none. In this release there is no connection to or writeback to crm.
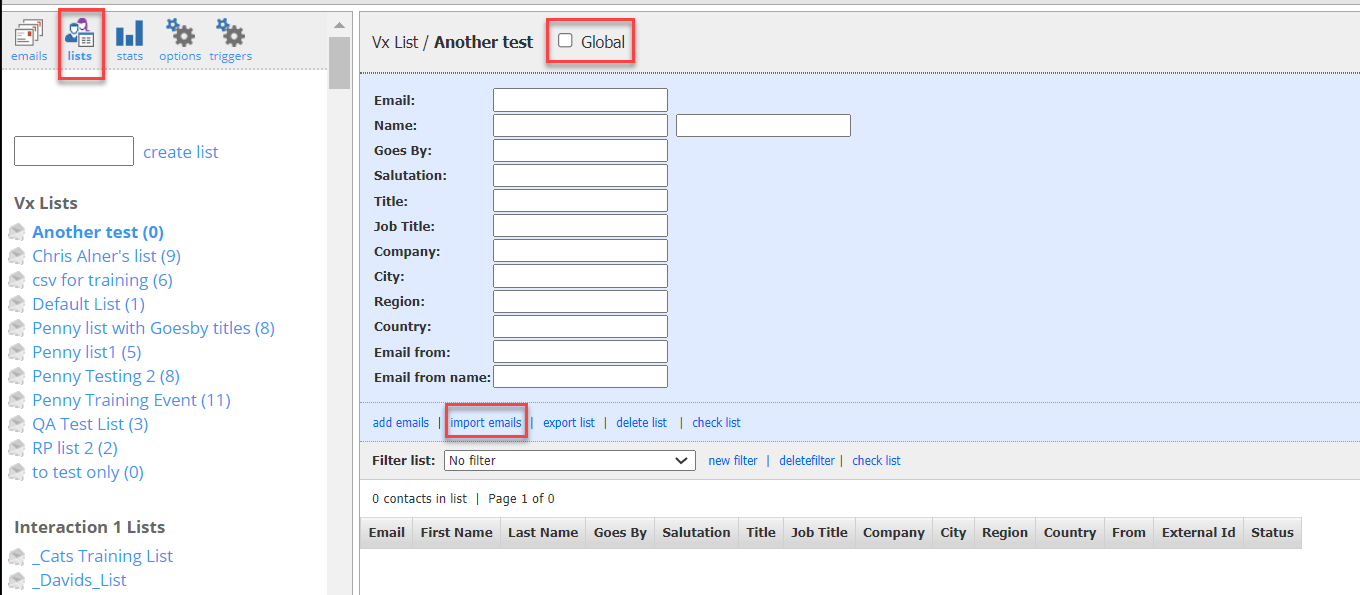
Uploading a Global list to the Lists area: check the box marked
Uploading a list to the Contacts module: select the Global option
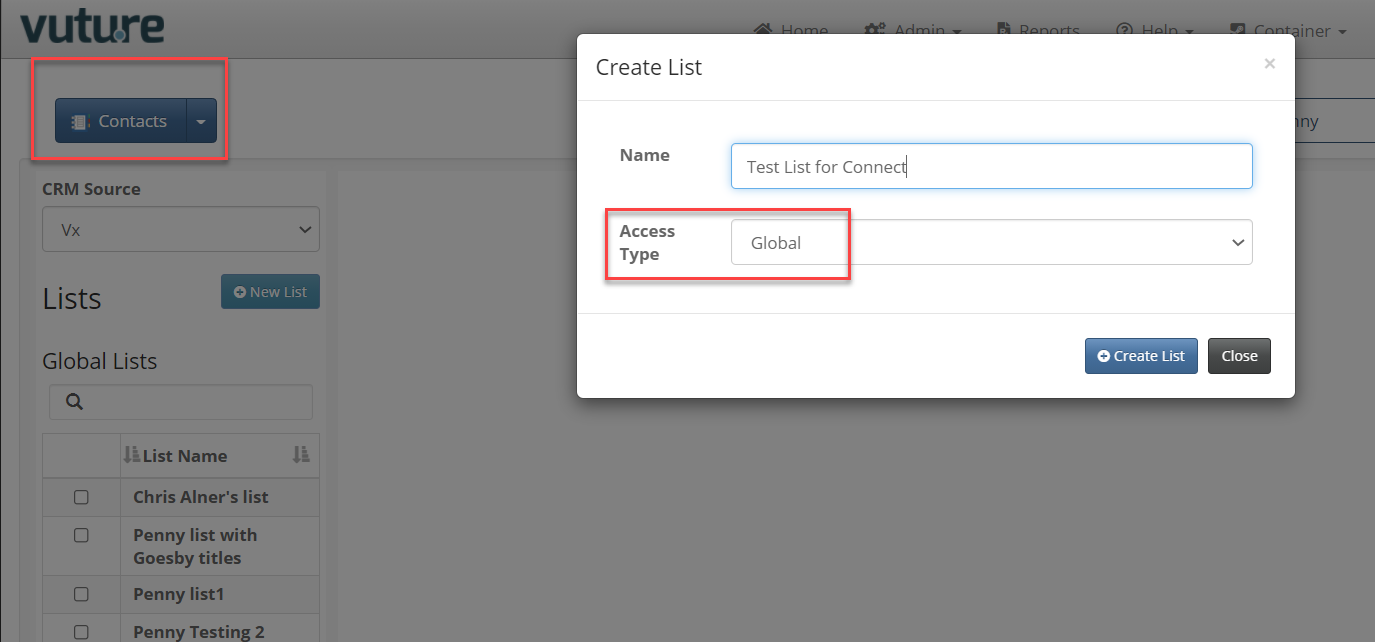
Important: Mark each list, as you upload it, as Global so they are initially available from all containers. Later, you will limit access to these lists using the Edit List Access feature.
.csv lists need to contain a minimum of Last Name and Email Address. However, First Name, Job Title and Company Name are useful. These fields will be displayed to the end user in the Vuture Connect dashboard.
How Big can the Lists be?
That is your decision. However, bear in mind that the end user will be scrolling through the list, possibly on their phone, to find each individual (there is a search facility too). Each Send is handled separately, as a 1-1 communication, with the end user clicking Send each time. They may find it tiresome to send a personal message to too many contacts.
There is a default maximum size of 500 contacts in a list, but we recommend that you encourage your end users to identify far fewer than that as their VIPs, or special contacts, who need a personal message.
Step 3 - Mark Lists as Private
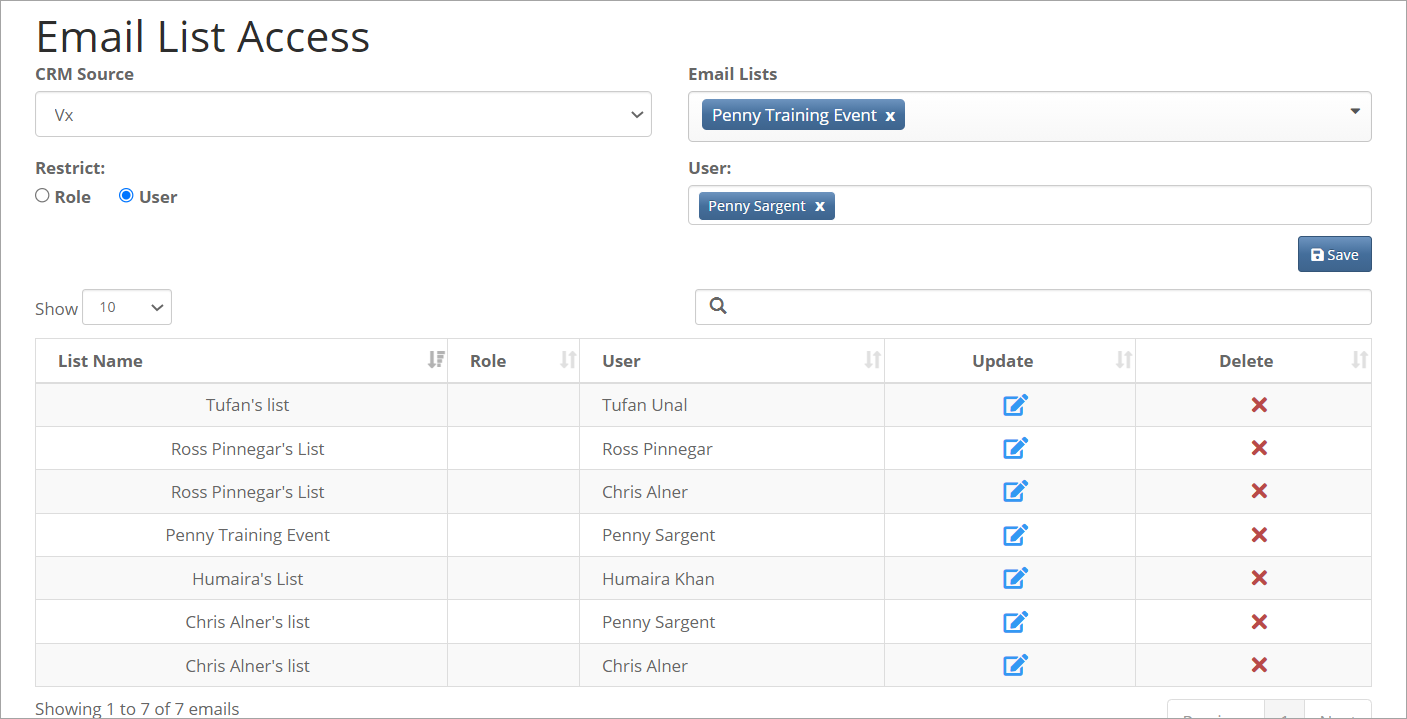
Use the Admin.Email List Access tool, to set each user's lists as private to them. This is how Vuture Connect knows which lists to show a given user. It also prevents users from viewing each others' lists of contacts.
The Email List Access tool can restrict access to Global Lists for other purposes, not just Vuture Connect. There is an article about it here.
In the image below, Tufan has been given access to Tufan's list. Both Ross and Chris have been given access to Ross' list. Penny can see both Penny Training Event and also Chris Alner's list.
If you wish, you can also give access to a Secretary/PA or Administrator for any set of lists. The lists will then show up on the PA's Vuture Connect dashboard and they will be able to work with the contacts on the partner's behalf. However, please note the warning about Sending Emails in the next paragraph.
Sending Emails Warning: Emails will be sent out from Vuture Connect as "from" the logged-in user. This means that it will be necessary for the logged-in user to be the senior stakeholder, not their PA, to ensure that the mailings are sent out "from" the correct name.
Step 4 - Preparing Email Campaigns for use in Vuture Connect
Build an email campaign in the usual way. You do not need a special template for Vuture Connect campaigns, although you could design a sub template and save it for future use. Alternatively, you could create a campaign in a main container first and then copy it over to the Connect container.
In the campaign intended for Vuture Connect, use Email Options to set the Content Type to Connect. This plus the Expiry Date (set in Custom Fields tab, see below) will cause the campaign to appear in the end users' Connect dashboard, under the Mailings tab. Any user who has access to this container will now see this mailing in their Connect dashboard.
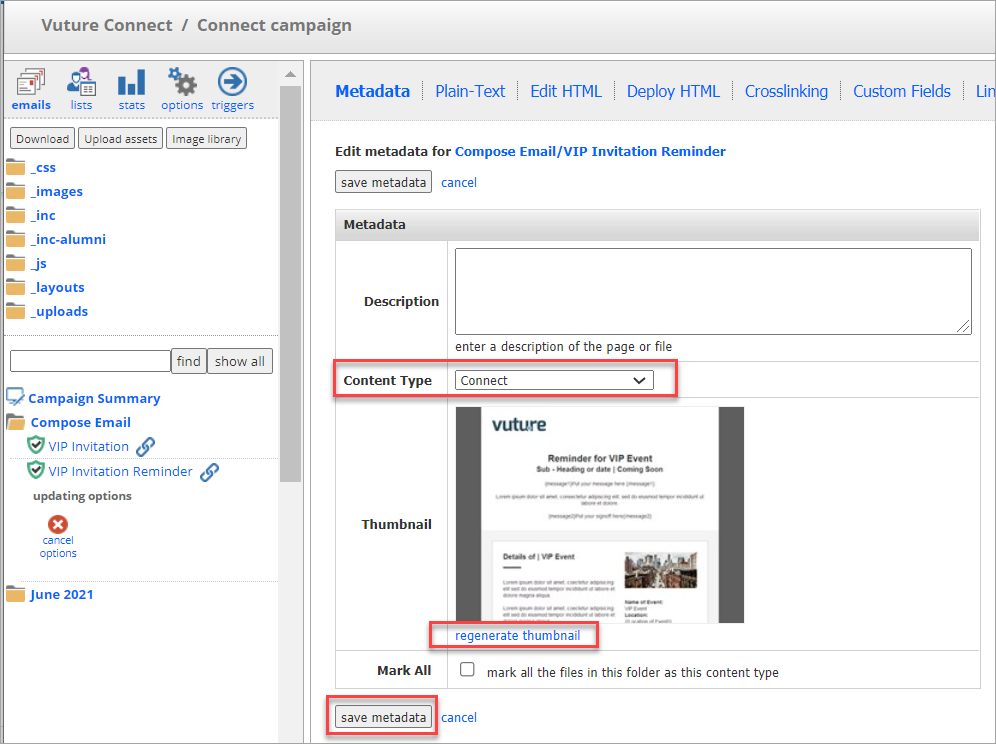
You can regenerate the thumbnail. This is the image that will be used to represent the email in the end users' dashboard.
Save Metadata
Next, click on the Custom Fields tab and enter a Subject Line. As an Admin user creating the campaign, you choose whether or not to lock the Subject Line. If you lock it (by checking the Fixed Subject box), the end users cannot change what you have written, in Vuture Connect. If you leave it blank, end users will have to enter their own choice of subject line in Vuture Connect. A subject line is a mandatory item which must be entered, either here or in Vuture Connect, before the email will send.
Next, enter the Deadline for the mailing - the date by when the end user should send this out. The Deadline is mandatory here. Without this Deadline, the mailing will not appear in the Dashboard. Deadlines are intended to prevent the end users' dashboard getting cluttered with old, expired mailings and invitations.
Description for the mailing. This description should tell the end user what the mailing is about and who should be targeted to receive it. The description you enter will appear under the campaign thumbnail on the dashboard.
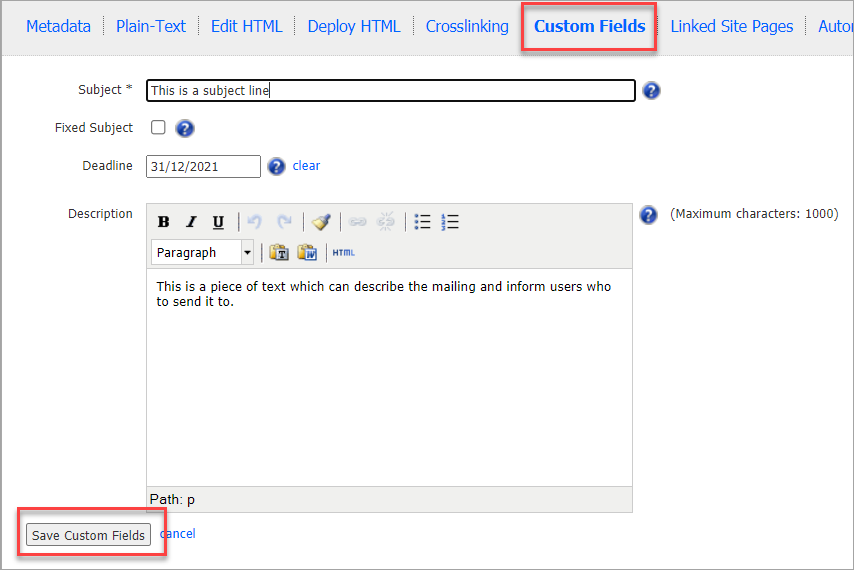
Save the Custom Fields and return to your campaign.
Adding one or more Personal Message spaces to the Campaign
In the email body create a message tag where you want the personal message to appear. Use the format: {message}Place your personal message here{/message}
You can set up as many message tags as you wish - for example, a salutation, a private message box and a sign off. Ensure that each message tag is uniquely named and contains a hint for the type of content you are expecting the end user to add. For example:
{Greeting}Place your greeting here{/Greeting}
Then some standard body text which every recipient should see. Then to finish off...
{Salutation}Place your salutation here{/Salutation}
It is customary, but not essential, to restrict your message title between the curly brackets to one word; however {Private Message} put your private message here {/Private Message} would also work. No need for underscore between words.
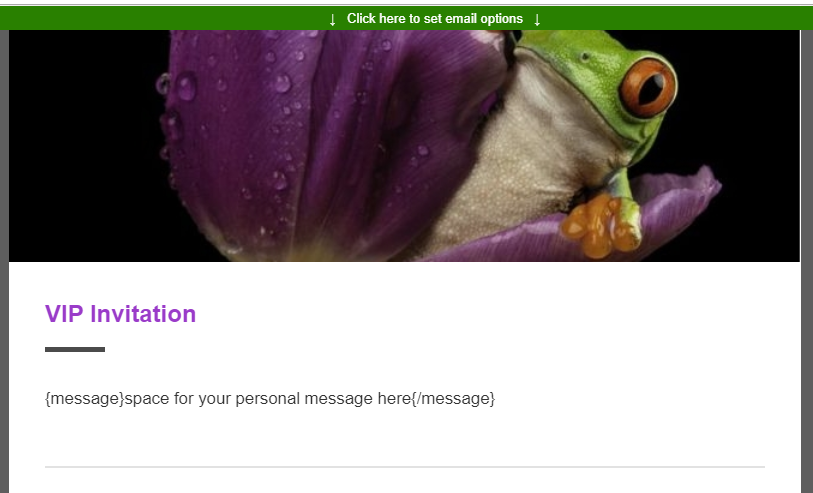
Important: Please note that if you create a message space, it will be mandatory for the end users to enter something in that space. They will not be allowed to leave the space empty and click Send. However, if you type in "Put your personal message here" for example, they can potentially send the email leaving that line of text as their personal message. End users will need to be trained to remove the placeholder message and enter their own text in every message box.
Linked Emails
Once a user has sent an email from within the dashboard, you will notice that subsequent sent emails are shown in the Sent Mail folders as linked emails (indicated by a paperclip symbol) like this:
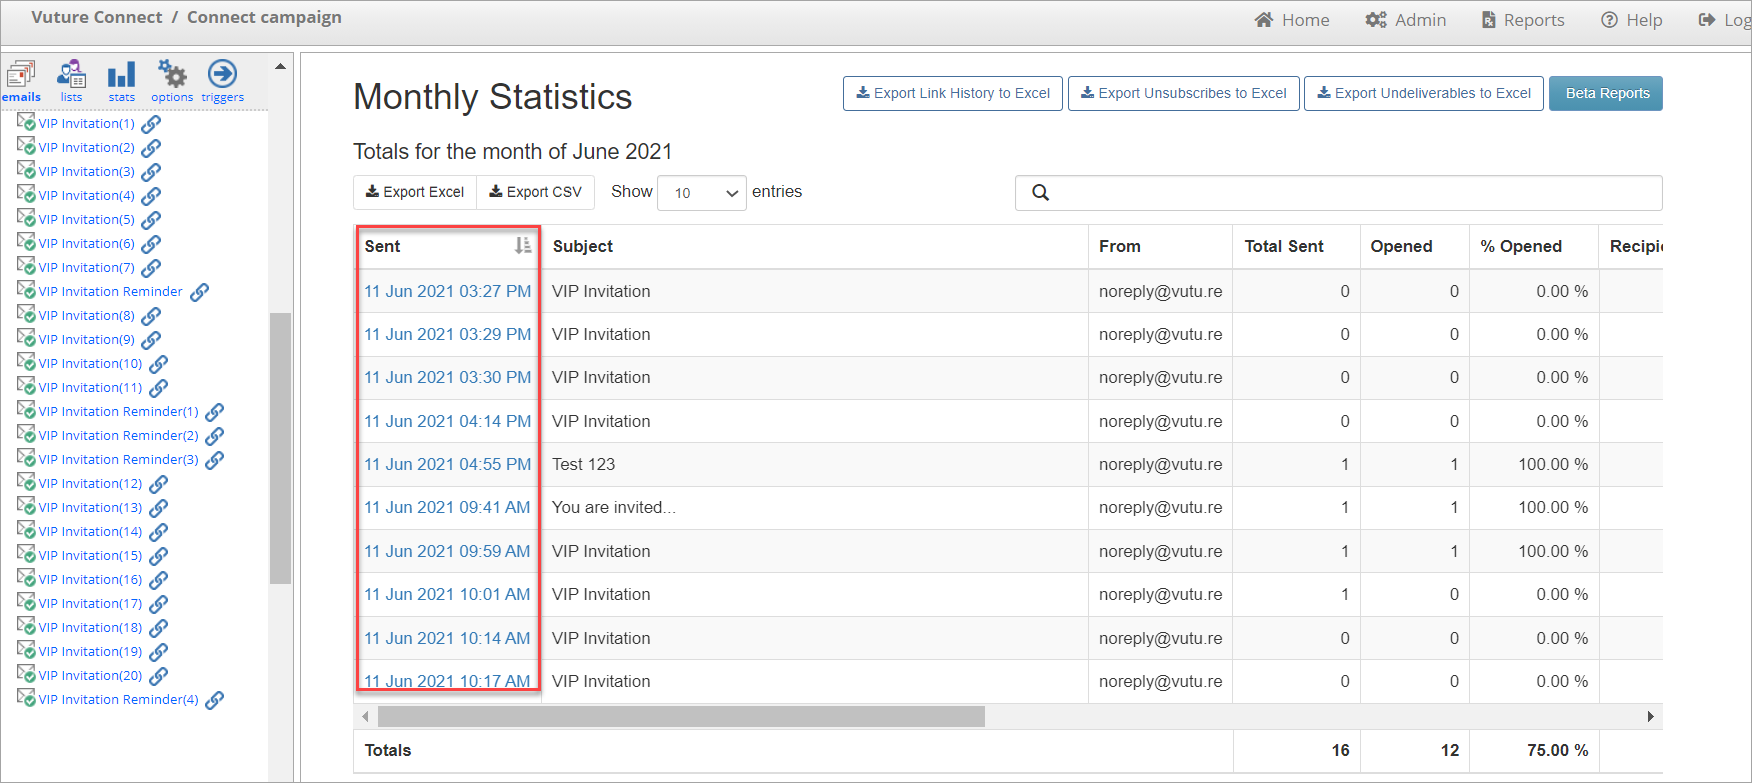
Each time the email is sent out, Vuture Connect will create a copy of the original, and then link it to the original, so that the reporting is related. You can compare the metrics from your linked emails by looking in the Send Email History Screen. You will see all emails that are linked to the selected one, along with number of opens and links clicked.
If you are interested in the concept of linked emails there is an article with more information here.
Vuture Connect will link the emails for you, as they are sent out. You do not need to take any action.
Step 5 - Browse to the Connect Dashboard
Once Connect has been enabled for your instance, you can tell your end users to access the Connect dashboard by adding /connect to the end of your Vuture URL like this:
https://penny.vuturevx.com/connect
Browse to your Vuture Connect URL. You will need to be logged in to Vuture first. If not logged in you will be prompted to go to the login screen, unless you are using SSO.
SSO is not mandatory, but it is recommended if partners (or similar type of end user) are going to be accessing Connect. If your client's end users are used to logging in with username and password then they can also use Connect that way.
User's View of Vuture Connect Dashboard
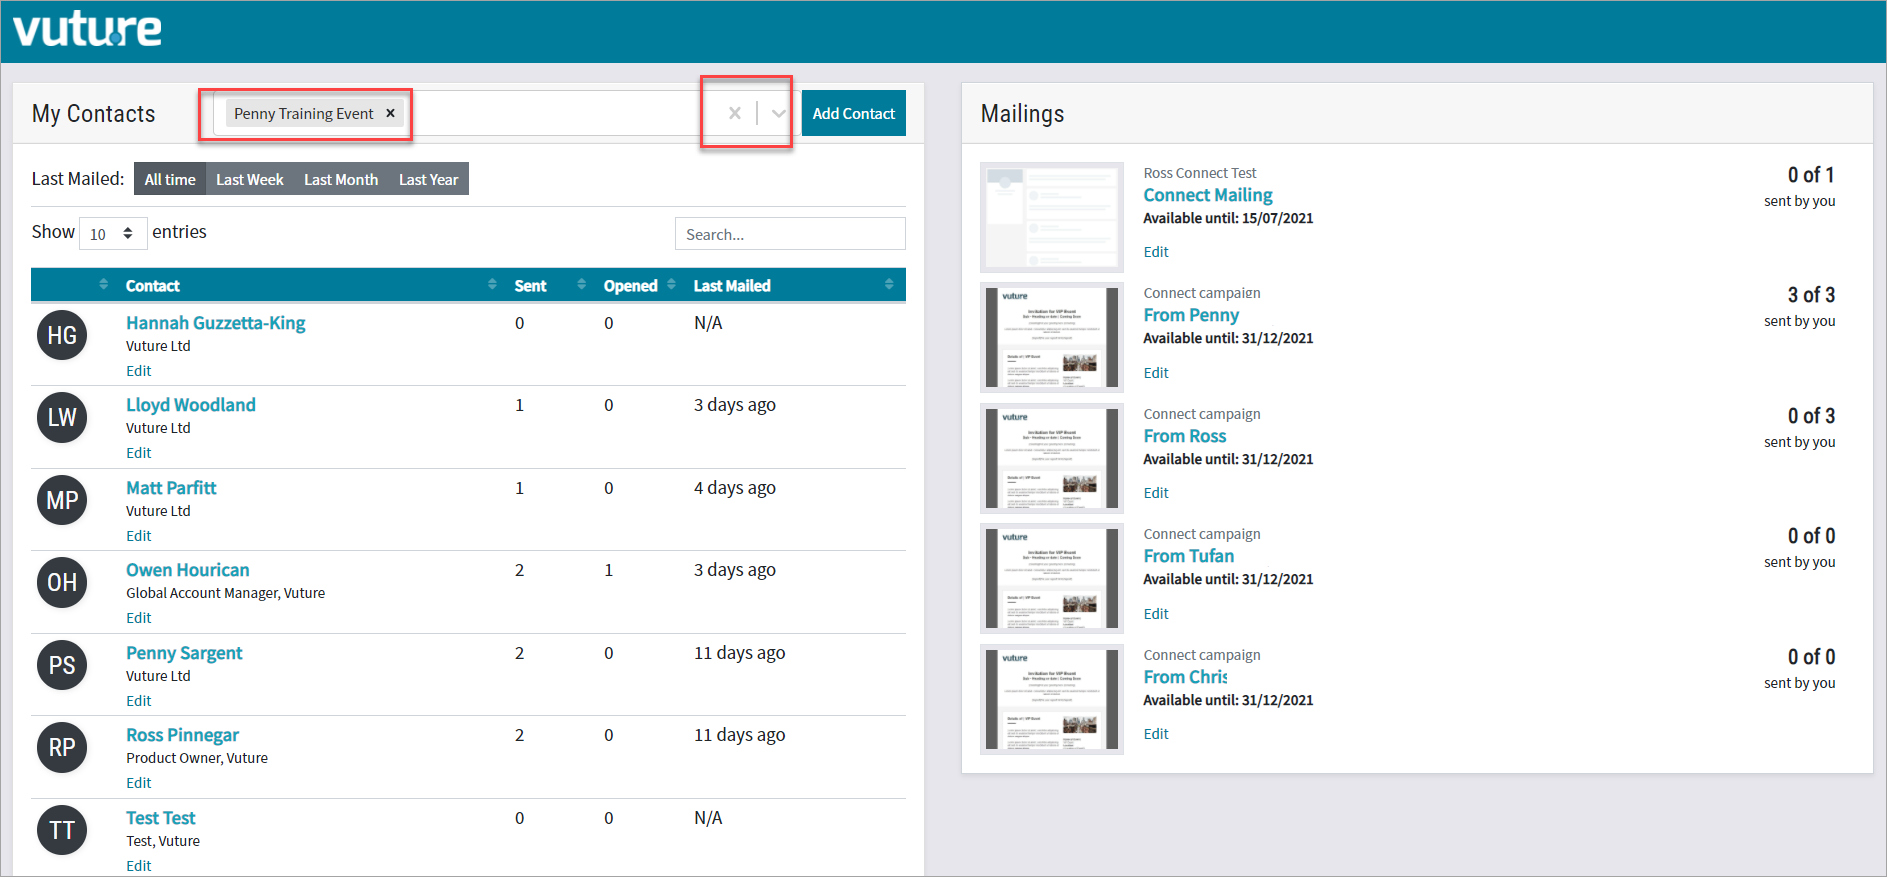
At the top of the image above, next to My Contacts, you can see the List Name. There is a drop down selector to the right where any other lists available to this user can be found. The drop down list selector allows the user to choose which list they will work with - if they have more than one. There is also the option to view all contacts from all their lists together.
Choose All Time, Last Week, Last Month or Last Year to see the mailings which the contacts have received.
The Job Title and Company Name below each contact's name come from the .csv list(s) which you have uploaded.
Adding a Contact
If a contact is not available in their list, end users may click on Add Contact. They will enter the details for the new contact who will be added to their list, or to any list to which they have access.
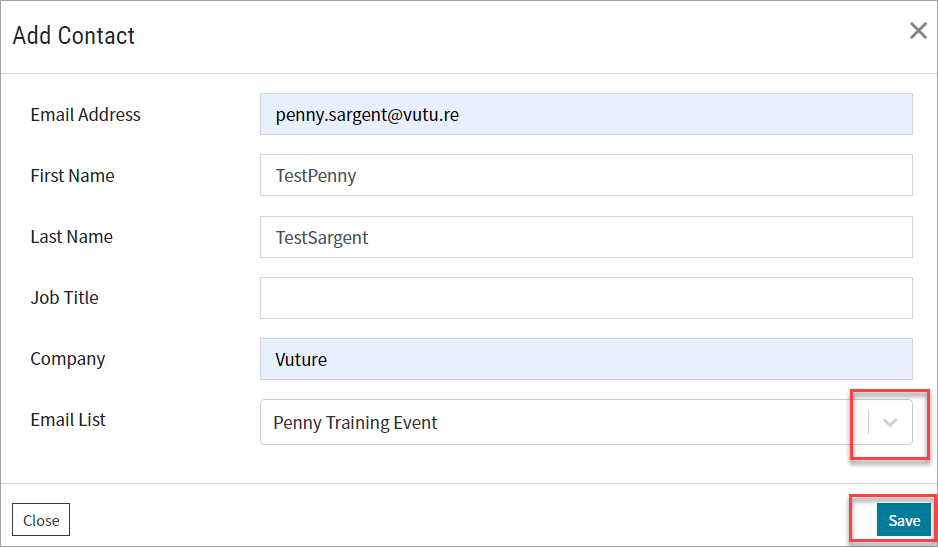
Add the new contact's details, select the list where they should appear from the drop down box on the right and click Save.
When entering a new contact's details, the new contact's First Name, Last Name, Email Address and Email List are mandatory.
If a contact is entered who already exists in the list, Vx will identify the duplicate based on their email address. If you enter altered first name, last name or other contact details, those details will be updated in the contact record which is already in the list. You will not be allowed to enter a duplicate record if that contact is already in the list. However, in Vuture Connect, a contact may appear in more than one list so if you click Add Contact and add an existing contact to a new list, the contact record will be added to that new list.
Mailing History
It is possible to see the Mailing History of any contact by clicking on their name. This will show previous mailings sent by you and by other users, not just via Connect. The envelope icons are colour coded to indicate whether or not they opened them; green for Opened, black for Ignored. Clicking on View Mailing will show the campaign as it went out to the user, including the personalised content.
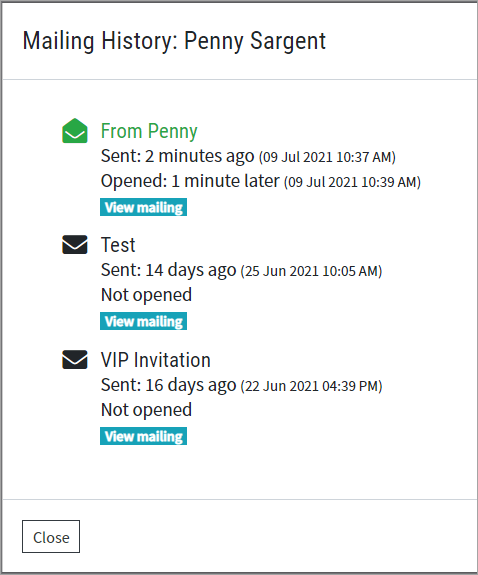
Clicking on View mailing in the mailing history view opens the mailing with the personal text displayed.
Step 6 - Sending a Mailing
Clicking on a thumbnail image (or the name of the mailing) in the Mailings tab opens the second Dashboard. This view allows the end user to see the Description, and decide who from their selected list should receive the mailing.
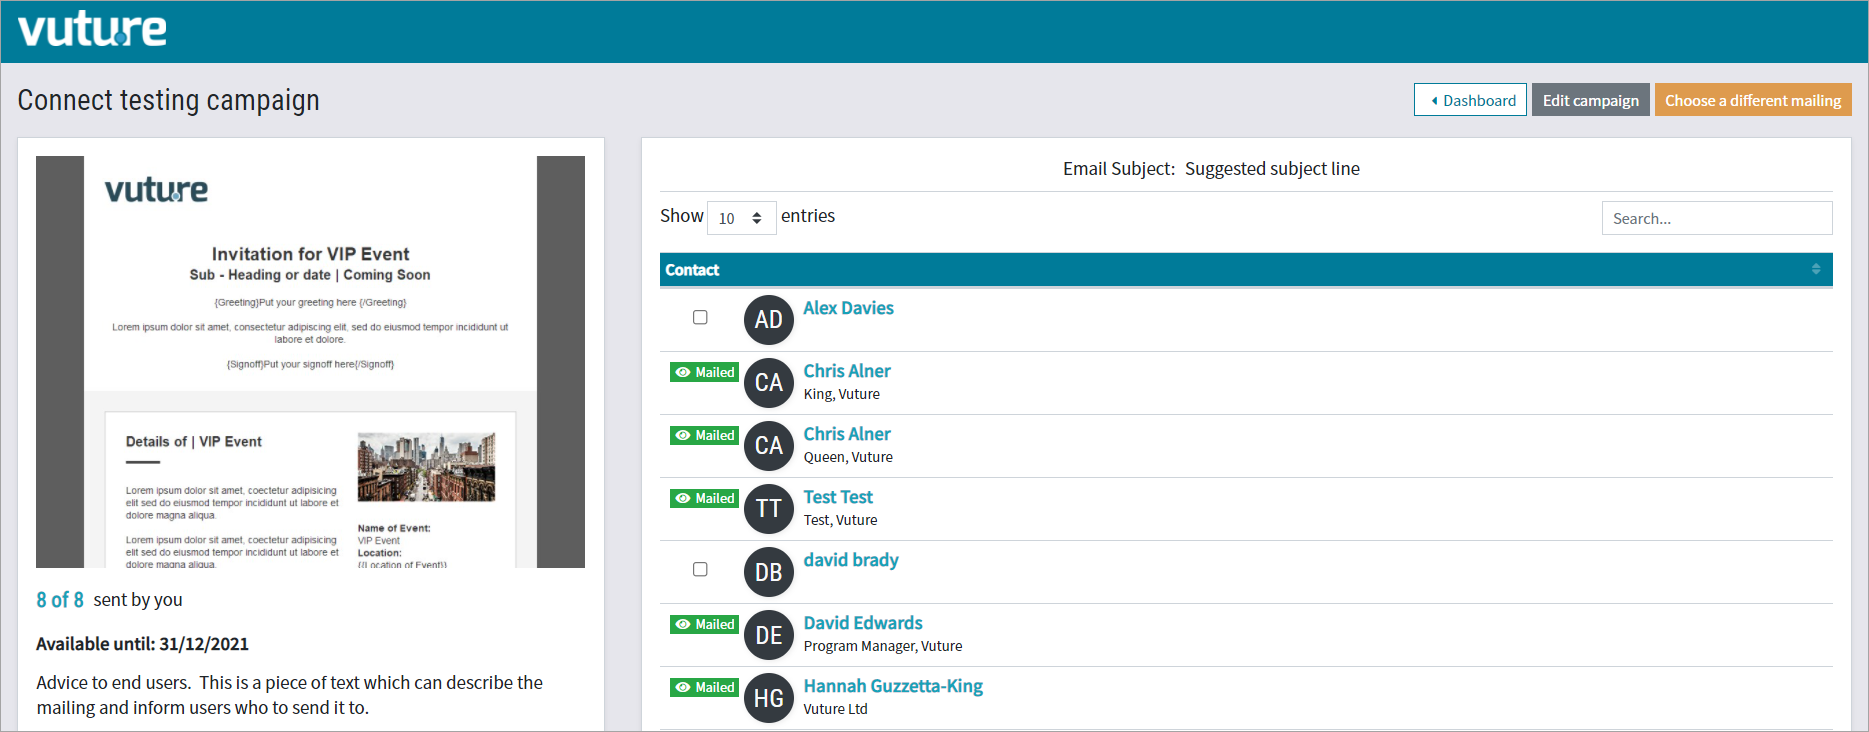
In this example, five of the contacts on the list have already received this mailing, so only the remaining contacts are shown as available to be selected.
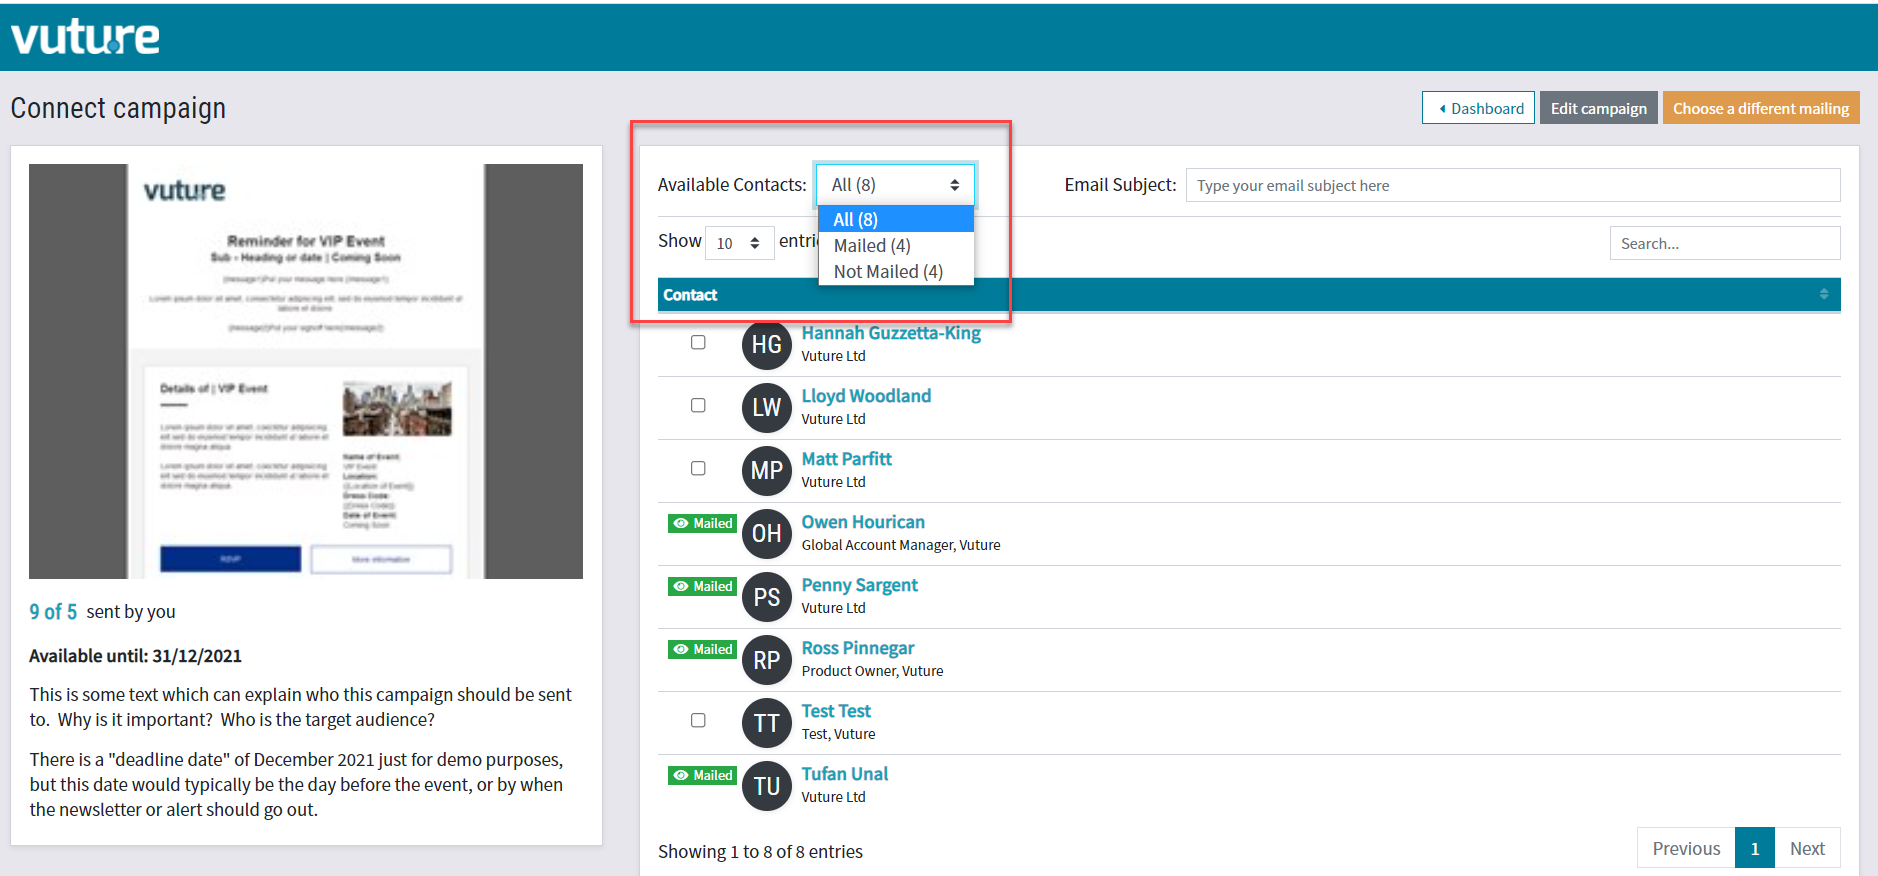
Under the thumbnail on the left, the text displayed was entered by the Admin user in the Email campaign, at Email Options.
5 of 9 sent by you means that this mailing has been sent out 9 times. Of those, 5 of them were sent by you - the logged in user.
Enter the Subject Line for the mailing, unless the Admin user has already entered it and locked the subject line. The Subject Line is entered, and can be locked, in the campaign under Email Options. The Subject Line is mandatory - you will not be able to send an email without one.
Select a person by checking the box to the left of their name, add a private message, a private sign off or as many private messages as appear in the template, Preview the result, and then Send.
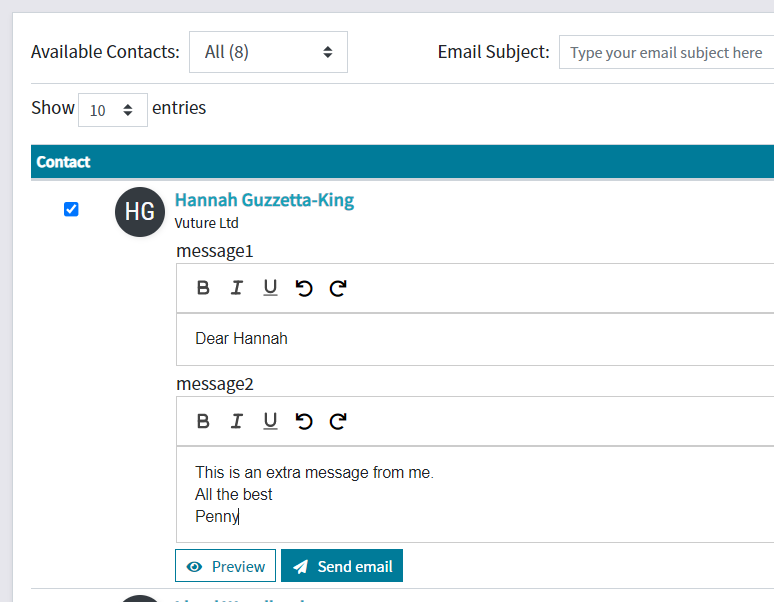
The Preview button will display the mailing exactly as it is about to be sent, including any personal messages the end user has typed.
Add each personal message and click Send individually. It is only possible to send one mailing at a time.
Once you click Send, the personalised email will be sent immediately. The email may not arrive immediately - that will depend, as usual, on the recipient's email server settings and firewall.
Unsubscribed contacts
Sometimes a user will have an unsubscribed contact on their list. This will be displayed to them like this:
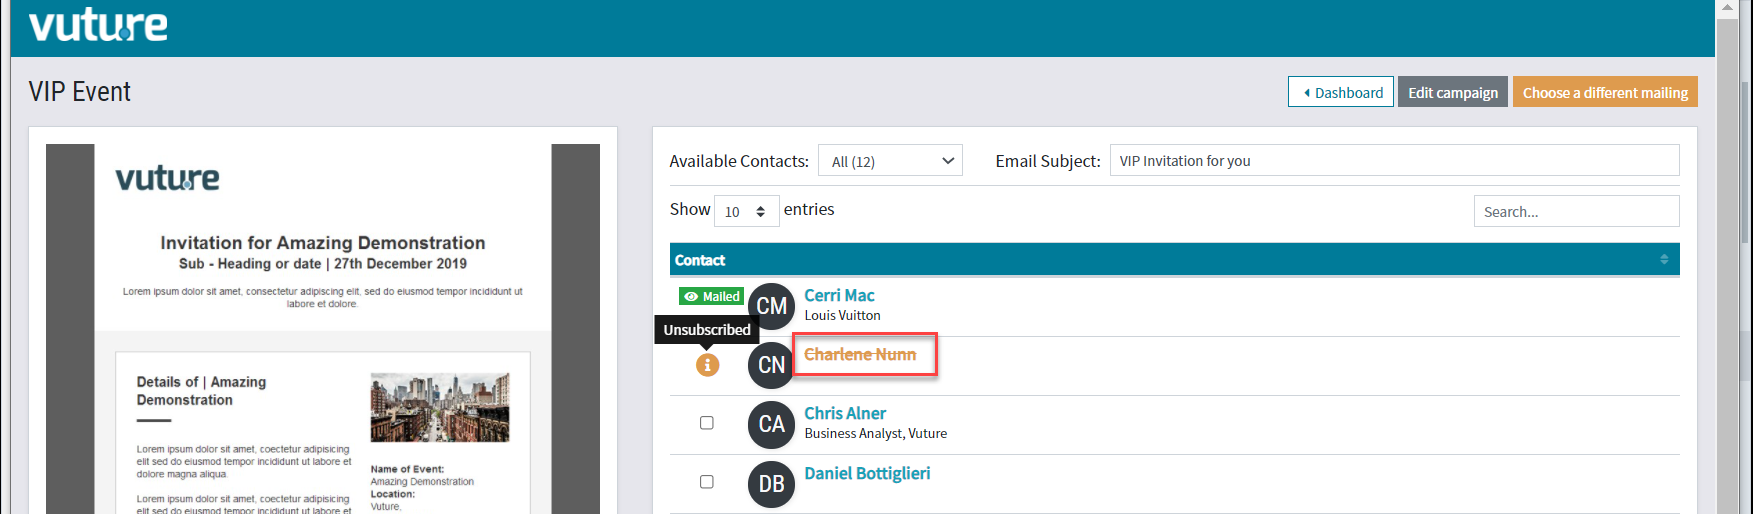
The name is a different colour, and is struck through. Hovering the mouse over the little i gives the tool tip "Unsubscribed" as the reason for the user not being able to mail this contact.
Duplicate Mailings
One user cannot send the same mailing twice to the same contact. This is standard behaviour throughout the Vuture platform. However, currently in Vuture Connect some duplication is allowed; different users can send the same mailing to a contact. This means that a popular contact could receive the same invitation (for example) from several end users.
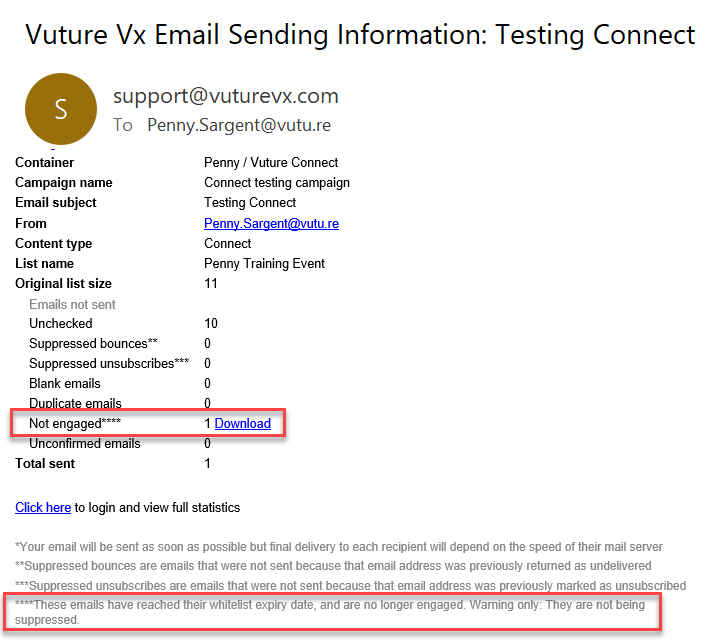
With every send the user makes, they will receive an Email Sending Information email, one for each time they click Send. If the send fails, they will also receive an Email Sending Information email, indicating the reason for the failure. If the instance is set to Warning Only, the send will go through, but the user will be notified, as in the image below:
Step 7 - Reporting
The Send will be displayed in the stats on the first Dashboard. The stats will update with Opens, as contacts interact with their emails. Refresh the screen to see the new numbers.
All sends will be recorded as normal sends in the back-end of Vuture and will be displayed in Vuture reports and reporting Dashboards, just like any other send to .csv lists.
Example Reports
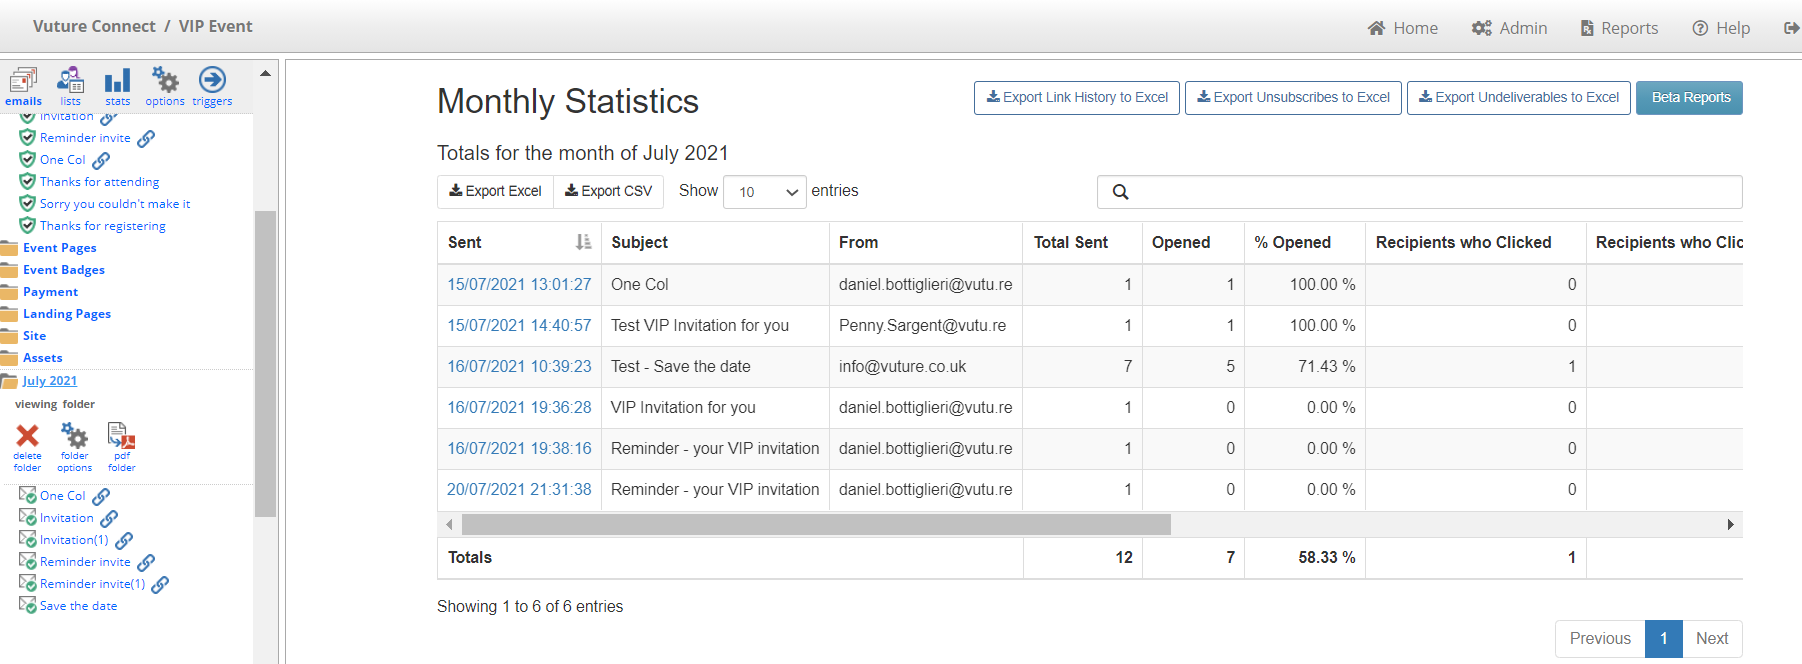
The Monthly Statistics Screen is one place in which you can easily see the mailings that have gone out from a campaign, with Opens and Clicks. It is limited to that month, and shows the end user who sent the mailing. It does not show each recipient, but it can be useful for overall numbers.
If you have used a single container for all your Connect mailings, the Business Development Dashboard - Individual can show you all the mailings sent from that container, with responses:
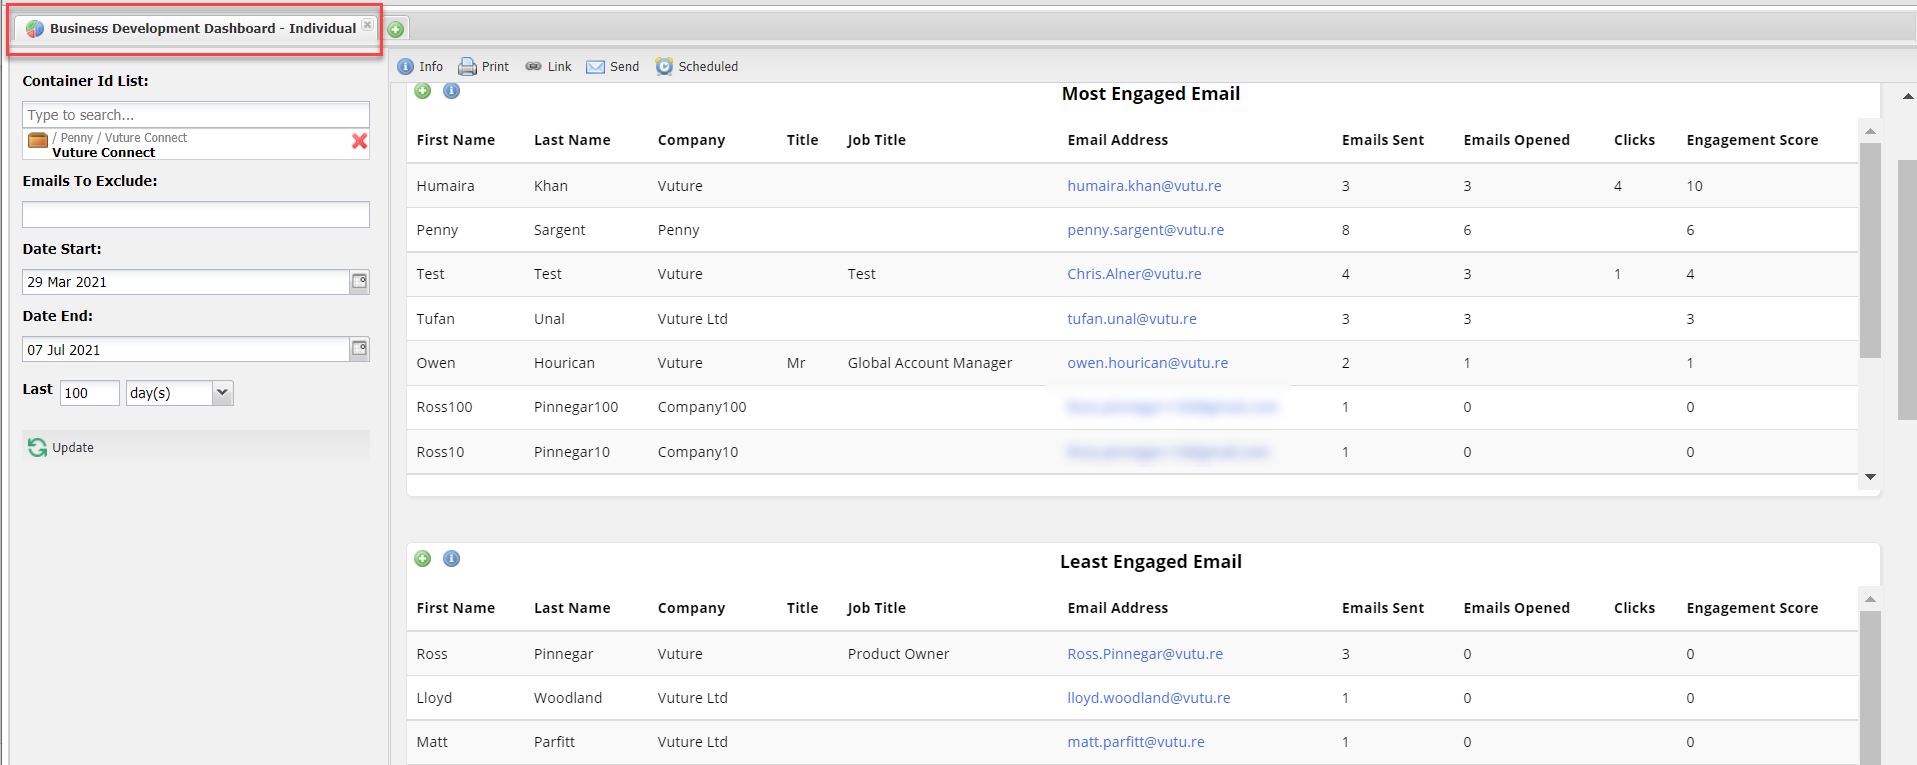
Alternatively, the Business Development Dashboard - Company can show you this information by domain rather than by individual email.
The Marketing Management Dashboard will also give you an overview of the Connect container (or any other specified container) showing, at the top of the page, the mailing statistics:
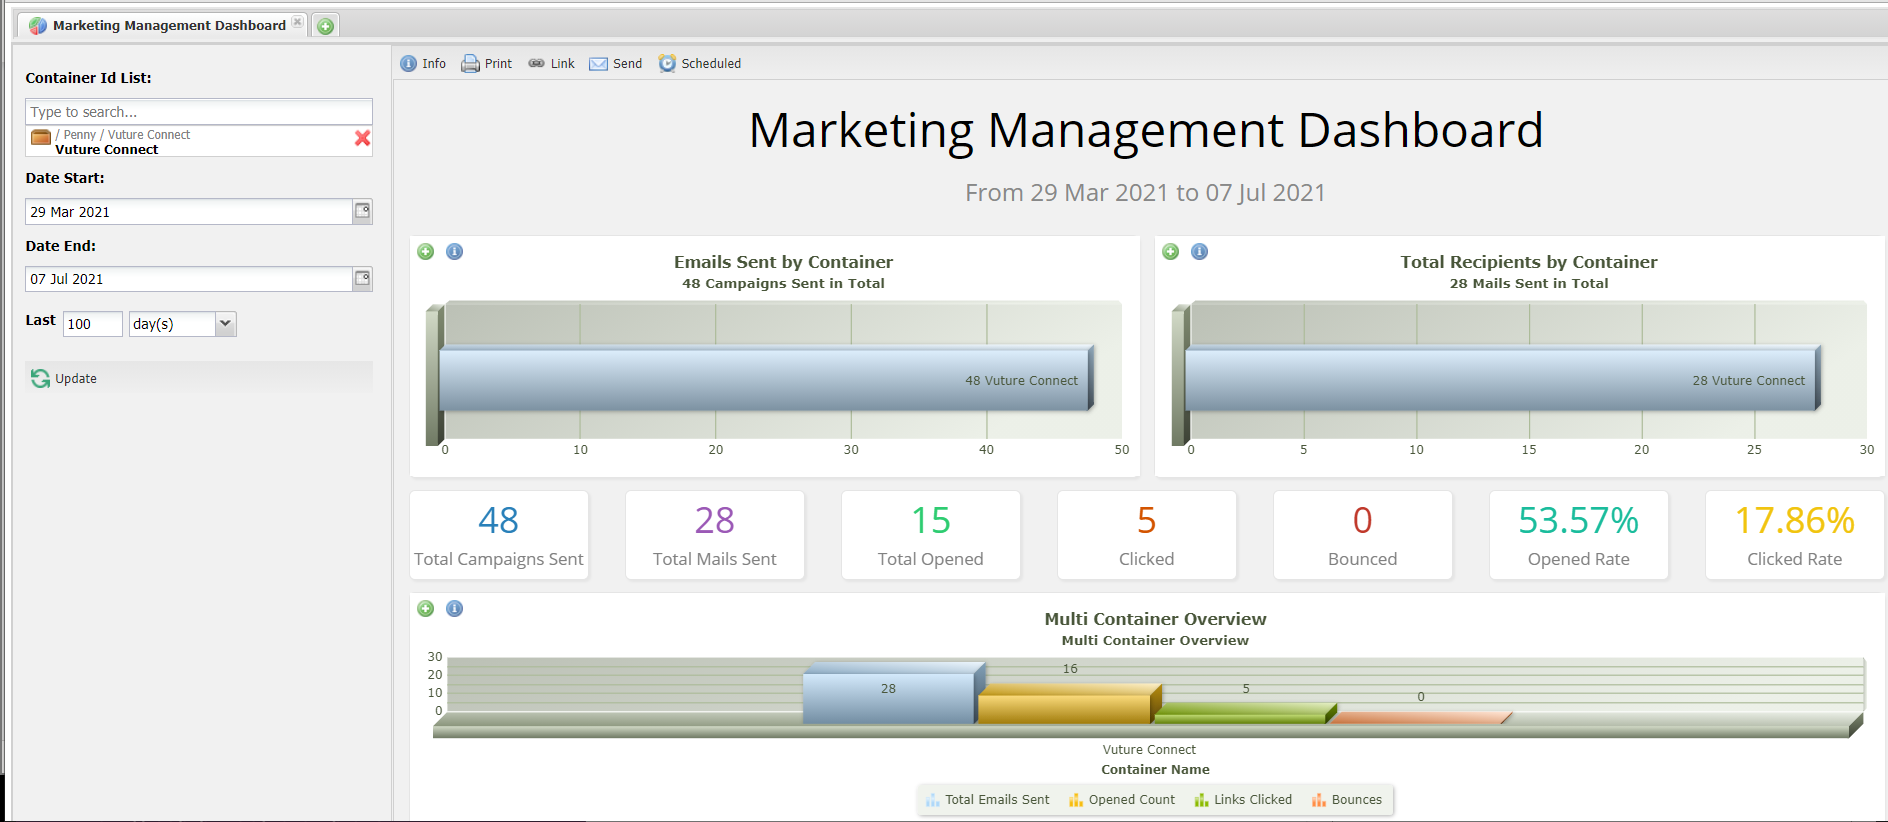
and, at the foot of the page, displaying the end users who have been sending the mailings, sorted by number of mailings sent:

The Marketing User referred to in the above report is any logged-in user who clicks Send, including end users of Vuture Connect.
Editing Connect campaigns
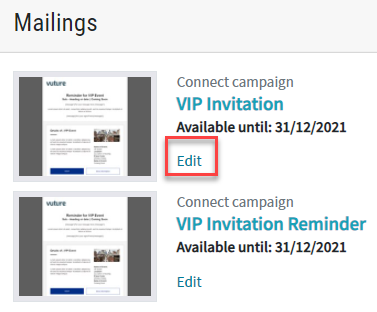
If, once the campaign has been allocated to Connect, corrections need to be made, SuperAdmin or Marketing users who have editing Roles can edit any campaign in the usual way, by navigating to the container in the Email module. Alternatively, it may be easier to jump directly back to the campaign from within Vuture Connect. There is an Edit link below the Campaign availability dates. The Edit button will only appear for Admin users who have this additional Role enabled.
The process would be: Identify the error, click the link to Edit the campaign, make the change to the email within the campaign and Save. Return to Connect and refresh the dashboard view. The change should be instantly visible.
FAQs
Q. Can you send two linked emails to different list sources? The use case this came about for was Connect - could the partner send to a standalone list and the main marketing email still go to the CRM list?
A. There is nothing stopping you sending a linked email to two different list sources but as typically emails link to forms and those forms will be CRM/Standalone-specific there might be challenges there. You will need to test the flow.
Q. If a client has open tracking disabled (but click tracking still generating opens) then would the contact's mailing history screen still show the green open activities?
A. Yes the open tracking in the mailing history screen would work, but only for clicks.
Q. A contact can appear on more than one mailing list. What happens if they are mailed from one list (list A) - will they show up as Mailed for that campaign on another list (list B)?
A. No they will not get the Mailed label on list B, because the contact was mailed from list A - which is where the Mailed label will show. However, because the Mailing History is based on email address, that will display all mailings.
Q. If I am part of the Events Team, I have sent out an invitation and want the partners to use Connect for personalised follow ups, would I have to download my list of non-responders, then split them by partner and load up a list per partner into Connect? Is it possible to load up one client list with the partners associated with their contacts on the list and it automatically show up in each partner's Connect rather than a list per partner?
A. No, you will need to create a list per partner and load up each one individually. It might be helpful to load one list per partner at the beginning, and then just tell the partner who, from their list, needs a personal reminder.
Q. Is E-Card the same as Connect?
A. No. Although the idea is similar, Connect has been completely rethought and rewritten. Also, a difference between E-Card and Connect is that currently in Connect you have to click Send individually for each person you are sending to. So if you want to send to 500 people you would have to click Send 500 times, and you will receive 500 Email Sent confirmation emails. This is because the primary use case for Connect is small, targeted lists of personal contacts.
Q. Is it possible to guarantee that partners will only send Connect mailings to contacts who have given their consent to be mailed?
A. If a contact has unsubscribed from mailings, that will be reflected in Connect.
If a contact has not unsubscribed but has also not given their consent to be mailed, the partner will still be able to mail them. This will be a one to one communication, personalised by the partner.
Q. Is there a way for the marketing team to check over what the partner has written or is the only option that the email gets sent as soon as the partner presses Send?
A. No there is no way for the marketing team to check an email from the partner before it goes. It is not likely that we will include this as a feature.
Q. Does the reply-to go to the partner or to the regular reply-to address?
A. It goes to the partner.
Q. Can the partner schedule the email to be sent, or is there only a Send Now option?
A. Just Send Now for the time being - scheduling may be an option in the future.
Q. What sort of automation exists in Connect? One of the slides in the Connect Overview deck says 'automate tailored follow up campaigns after engagements'. Would this just be the usual triggers or is there a separate automation tool in Connect?
A. Just regular triggers. For example - if a contact RSVPs, the confirmation email can be triggered.
Q. Would Connect metrics also appear in DWH stats alongside all other campaign data?
A. Yes. The Connect metrics will be recorded in the same way as other sends.
Q. Which From: address is used? Is it always the email address of the Connect user sending the email?
A. Yes, it's always the address of the logged in user.
Q. If a contact is on two lists and is emailed from List A, it says above that the Mailed label won't appear against the contact on List B. Does that mean they still can't be sent the email again?
A. No, the email can be sent multiple times. This is because Connect takes a copy of the original email and sends that, linking the new copy to the original version. So, in effect, it is a different email to another email sent to the same contact. We are planning to build in more duplicate handling rules for phase 2.
