There is a video to go with this article, here.
Filters are often used to send an email to just part of your marketing list. For example, you can use Resend, and a filter, to re-send an invitation to everyone who has not yet replied, or a different filter to send a confirmation email to everyone who has replied with Accept.
To set up a filter, go via the Send Email screen in your campaign.
First, prepare your mail for sending as if you plan to send it to the entire list. Complete the Subject, From and all other fields down as far as Filter List: then click on New Filter.
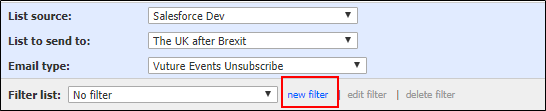
New Filter will not be an option until you have selected the List name. Clicking on New Filter will open the Filter create page. On the Filter create page, first enter your filter Title.
Naming your FilterImportant Note: Do not use just “RSVP is Yes” or similar. Use a proper naming convention to name your filter, including the name and date of the event. This will make it easy to find and re-use any filters that you build. Filters are visible across different campaigns within the container, which means that if you do not name your filters properly you could end up with RSVP is Yes, RSVP is Yes, RSVP is Yes in a long list, with no idea which RSVP is being referenced.
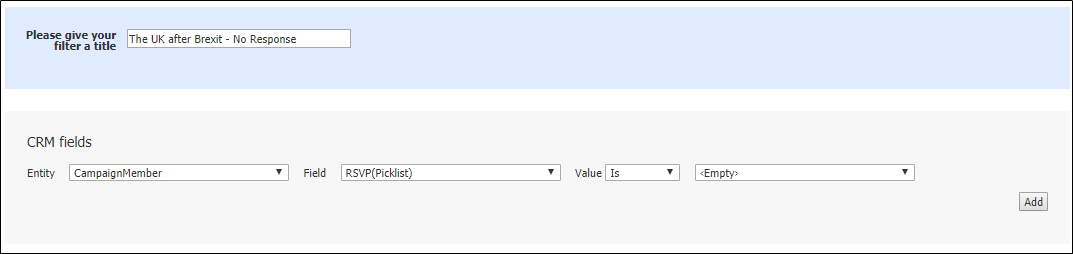
The example above is using the RSVP field to filter the "The UK after Brexit" campaign for “All people who have not yet replied” or, in other words, their RSVP field is empty. Enter the details as in the example, click on Add and then click on Filter at the foot of the page.
You will be returned to your Send Email page and the mailing list will appear, filtered by the criteria you have used. The filter does not affect the list in the crm, it only affects the people who will receive the email you are about to send.
Filtering on more than one field
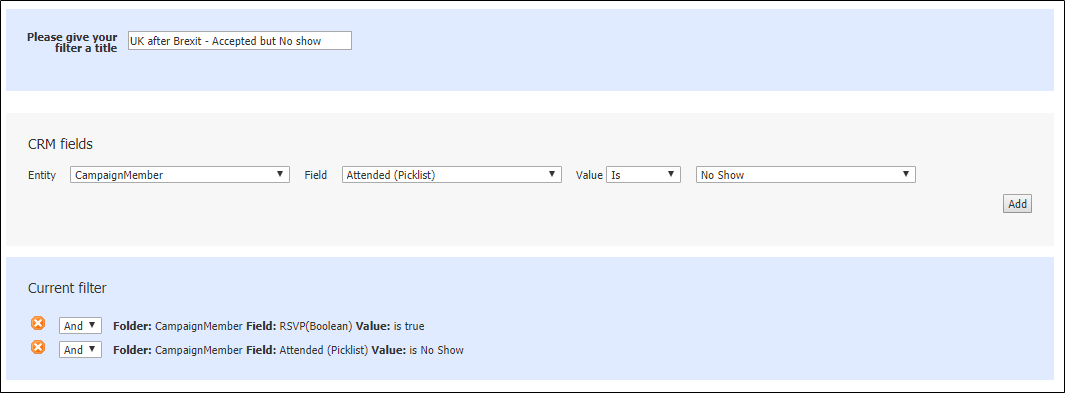
It is possible to filter on more than one field at a time. For example, to send out a Request for Feedback after an event you could filter on RSVP is Yes, AND Attended is Attended.
To work with multiple filtered fields, start on the Send Email screen by clicking on New Filter.
In the Filter Create screen, give a full Title of your new filter including the list name.
Add the criteria one at a time. As soon as you click on Add, go back to the Field choice and select the next field. If you need to, you will also be able to choose OR instead of AND when appropriate, by using the drop down.
Limitations on field filtersNote that filtering on different values for the same field works by using "OR" logic but filtering on different fields only works by using "AND" logic.
Example of Best Practice when Planning a Multi-Date or Multi-Venue EventIf you are organising an event where contacts are invited to choose options such as which date they prefer, and you know you are going to want to filter your list later – to send out Confirmations, Thank Yous or Requests for Feedback for example – try not to create multiple campaigns on Salesforce. It is preferable to manage your attendees all on one list, with their choices given as Campaign member field values. So, for example:
- Field called RSVP - Values of Accept and Decline – Used for overall “anyone who has accepted” the invitation, or declined, or ignored your invite
- Field called Attended – Values of Attended, Cancelled, No Show, Walk In
- Field called Date Choice – Values of Monday, Wednesday, Friday – Used for which date they have chosen.
It will then be simple to filter your list:
-
Confirmations can be sent to anyone who has RSVP is Accept and who has a value in the Date Choice field.
-
Reminders to register can be sent to anyone who has RSVP is Empty.
-
Event reminders can be sent to anyone who has a Date Choice.
-
Request for feedback emails afterwards can be sent to anyone who has a value of Attended.
-
Sorry you didn’t make it emails can be sent to anyone who has a value of No Show
Limitations on field filtersNote that filtering on different values for the same field works by using "OR" logic but filtering on different fields only works by using "AND" logic.
Important information on text fields
You will find that text fields in Salesforce can have multiple values. In this example, "Languages" in the contact object, will show the values as comma separated values in a text field:

To make sure the filter will pick up the contact with the correct value, you must filter using a "Partial" parameter (see image below). The parameter "Is" will look at the entire field value and would filter contacts who have that one value only. In this example, it would only filter on contacts who only have the one value "Spanish" as opposed to contacts who have many languages, one of which is "Spanish", if you don't select "partial".

Important information on Number and Date fields
When you filter on a Date or Number field you will have the option to select "More than" as a parameter. Please note, this means the contacts filtered will be those whose values are "more than" the entered number or date. It does not mean "equal and greater than". To filter on a numerical value and any greater (or lower) values you will have to enter two filters with an "OR" condition, as below (the system will ignore the top And in the image below):

