Overview
This article will walk you through how to use Form Logic to show/hide a field when someone RSVPs yes, as well as showing you how to cap a multi-session event.
Please watch this video for a full overview on how you can show another field when someone RSVP's Yes:
WARNING - When you are building forms using form logic, you will decide to display fields, or not, depending on the previous answer from the contact. You need to understand that, if you are working with a field that already has a value, and you choose not to display it, any value held in that field in IA could be deleted on Form Submit.
For example: a contact already has Monday as a session choice in an additional field in IA On a subsequent form for the same event, the contact RSVPs "No" to this event,. Therefore, by the logic established on the form, they will not see the session choices, even though Monday was prechecked. When the contact submits the form, the session choice in this related field on IA will be deleted.
This behaviour only applies to fields which are brought forward onto a form from IA and then subjected to form logic. All other IA fields are not affected, including the ability to "hide" fields on forms.
Set Up
This example event has 3 sessions - A B and C. The sessions are on the same day at the same location (and one attendee list will be required later, for filtering Reminder emails etc). Clients may elect to attend any, or all, of the sessions.
If one session is full, clients will be offered the chance to join the waiting list for that session and clients will be shown the sessions that still have a space.
It is mandatory for clients to select either Yes or No for each session - to prevent them from submitting the form with no session choices.
Step I – Create the list and additional fields in InterAction
Start by creating a list in IA. On the invite list you will need 4 additional fields:
RSVP yes/no. Put this field onto your prefilled form, as a hidden field, prechecked as Yes. You will need this later to send out Reminders. Everyone who submits the form will then automatically get RSVP=Yes written back to their record. For this reason, mark your CTA button on the invitation email clearly as Register or Accept or similar. There is no “decline” option for the event on this form.
Plus, 3 Session additional fields (list) with 3 possible values for each:
Session A - Yes, No, Waiting List
Session B - Yes, No, Waiting List
Session C - Yes, No, Waiting List
Note: A Waiting List option is not mandatory. You could instead have a “Sorry, this session is now full” message. In that case, create your Session additional fields with only Yes, No possible responses. Clients must say either Yes or No to each Session. They are not allowed to submit the form without making this choice.
Step 2 – create the invitation email and RSVP forms in Vuture
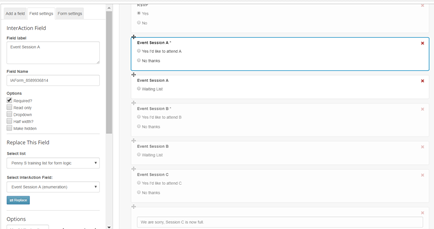
Build the RSVP form with a Waiting List option for A, B and C like this:
Add each Session field twice, deleting the Waiting List option from the first time you add the field and deleting the A and B options the second time you add the field. It will look something like this:
Please watch this video for a full overview on how to apply the count form logic with InterAction:
Please note: The count form logic will not work for options of a field. For example, if you had a field for "What session would you like to attend?" with options for Session A, Session B, and Session C and you wanted to shut down a session once it reached a specific count, you would need to separate these options out into their own fields. For each Session option, you would then have a field such as "Would you like to attend session A?" with the options of "Yes" or "No". This is the example below.
You will find it helpful to build your line of logic in Notepad and then copy it into the form when you are ready. This will prevent any formatting being introduced into the formula by mistake.
Open Notepad (or similar) and copy/paste the sample below:
{Count : 'all', Instance : '1', Field: '8589936814', Value : '8589939170'} <1
You will need the following logic:
1. Show Session A with options Yes and No, until the session is full.
To create this form logic you will need the COUNT command and three further elements, the instance number, the field ID and the Yes value.
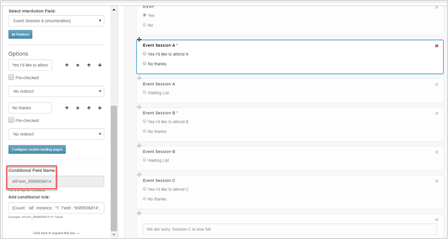
Take the instance number from your Account Manager or Support (typically a single number between 1 and 9), the field ID from the form and the Yes value from "inspect".
The Field ID you need is the Conditional Field Name for the field you are counting, so for Session A, here:
New Method: To Find the Yes Value Using Copy and Paste instead of Inspect
We wanted to make it easier for users to create Form Logic statements or Conditional Rules. Now, instead of using "Inspect" to study the underlying html of the form, there is an option to Copy and Paste the value of fields into the Conditional Rule statement.
When you use the Copy option, Vuture will find and copy the hidden Value of the field to the clipboard. From there, you can Paste it into your Conditional Rule.
The Copy option is under the two pages icon, next to each field:
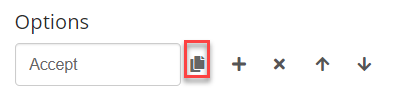
Please note, it is the "hidden value" that the feature is copying. This is not necessarily the same as the words that the client will see.
Alternatively, to find the Yes value using Inspect:
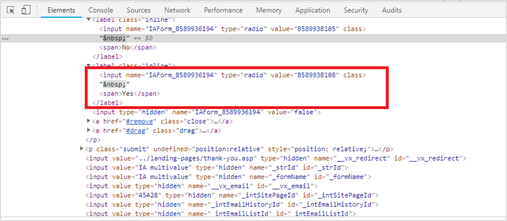
To find the Value, click on the relevant field, right click on your mouse and choose Inspect from the drop-down menu. The Value is visible in the inspect element after the Type (see image below). In InterAction it is typically a 10 digit number.
Close Inspect with the little x, at the top right of the inspect screen.
Replace the values in the Notepad sample with your own values, to create your own line of form logic.
Note on Boolean Fields: (Boolean fields are those with either/or values, so Yes or No for example). If you are using a Boolean field for RSVP, the default values that we support are True/False, Yes/No or 1/0.
For Boolean fields the values need to be either 1 or 0 instead of 'Yes' or 'No' so the value in the rule should only be either 1 or 0 where 1 is the True/Yes value and 0 is False/No.
You can change the field label within InterAction and also on the Vuture form, but the default values coming from InterAction should be either 1 or 0.
Copy this form logic line into the Add conditional rule: box for the Event Session A Yes/No field. It means this: Count the IA Session A Yes/No field and keep showing this field as long as the count is less than 1 (where 1 is the number of spaces at your event)
You now need the next bit of Form Logic:
2. When Session A is full, show Waiting list for A'
{Count : 'all', Instance : '1', Field: '8589936814', Value : '8589939170'} >=1
Because you are working with the same field ID and the same Value you don’t need to start from scratch. Go back to your Notepad and copy the same line of form logic into the Add conditional rule box for the Event Session A Waiting List field. Then at the end of the line change just the < into >= This line now means: Count the IA Session A Yes/No field and show this Waiting List field when the count gets to more than or equal to 1.
Complete Sessions B and C in the same way. The instance will always be the same. The field ID and the Value will vary.
Important Note about testing: When building forms with Count Variables and InterAction, you will need to send the form to yourself to test it. You can't just use the View Page to see how it will look. Send the email to yourself and submit the form.
The numbers signed up to your event will be affected by your internal testing process because when you submit the form with a Yes, the number of Yes responses will be recorded in IA, and in View Stats, which is showing the underlying Vx database and recording the form submissions.
For this reason, it is recommended to test until you are confident, using event numbers of only 1 or 2 spaces for example. You can track the test sends you have done using the View Stats icon – to see how many people internally have “taken a place” during the test process.
When you are finished testing, reset the form logic - from an event capacity of 2 or 3 to the full numbers. At this point you could add on any internal testing numbers. Then do Clear Form Submissions on the View Stats and send the email out to clients as a live send.
There follows an example of how to take account of any internal testing, with internal people signing up for your event:
Example of how to reset before sending live invitation:
Places at your event: 50
Number of times internal testers sign up: 7 (check this number in View Stats)
Set your final event numbers to be 57 places available in your form logic.
Alternatively, once you are finished testing you could use the Preview as Contact feature to preview the email and form as the internal tester, and reset their Yes response to No. This will mean that you can set your event numbers to the accurate figure (for example, 50) because the internal testing acceptances will be reset by changing their responses to No.
Note that you must do this through the emailed form, or using Preview as Contact. You cannot just switch the responses in IA. If you do that IA will appear that they have declined but the Vuture database will count them as Accepted and this will affect the numbers permitted to sign up for your event.
