Keywords: Filter, Filtering, Additional Fields, confirmation emails
Note: New look filter screen available from March 2023. See below.
Overview
Filters can be used to refine your list based on a certain criteria.
For example, you can use a filter to refine your list to only those who have RSVP'd Yes to send them a registration confirmation email. Or, you can apply a filter to only send to contacts who have not yet responded to the RSVP and send them a reminder to register email.
This article will walk through how to create a filter based on an additional field(s) or contact field.
Contents
How to Create a Filter
To set up a Filter, navigate to the Send Email screen in your email campaign.
First, prepare your email for sending, as if you plan to send it to the entire list. Complete the FROM, Subject, select your InterAction List Source, your InterAction List, and Email Type. Then click on New Filter, next to Filter List.
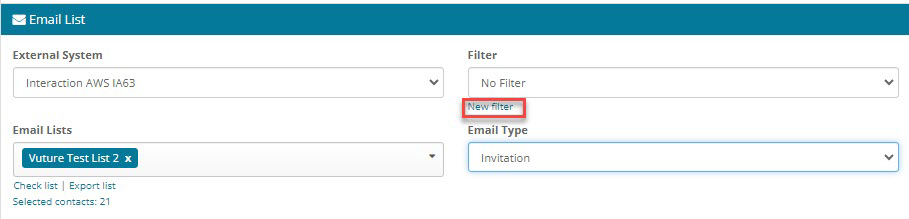
Please note: New Filter will not be an option until you have selected a List.
Clicking on New Filter will open the Add Email Filter page. On the Add Email Filter page, enter a title* for your Filter.
*Important Note: When naming your Filter, do not use just “RSVP is Yes” or something similar. Use a proper naming convention to name your filter with the name of the event or IA List, as well as, the action of the filter (i.e. RSVP is Yes). This will make it easy to find and re-use any filters that you build. Filters are visible across different campaigns within the container, which means that if you do not name your filters properly you could end up with RSVP is Yes, RSVP is Yes, RSVP is Yes in a long list, with no idea which RSVP is being referenced.
After you have named your Filter, you may then filter your list on an additional field, contact field or primary sponsor.
Update for March 2023
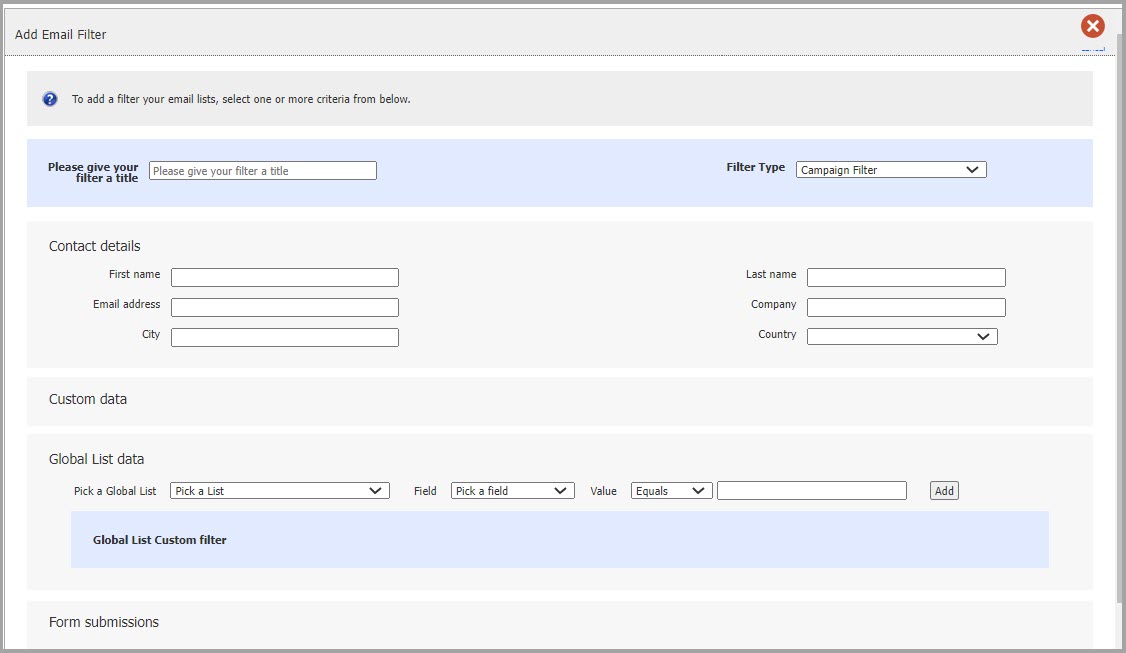
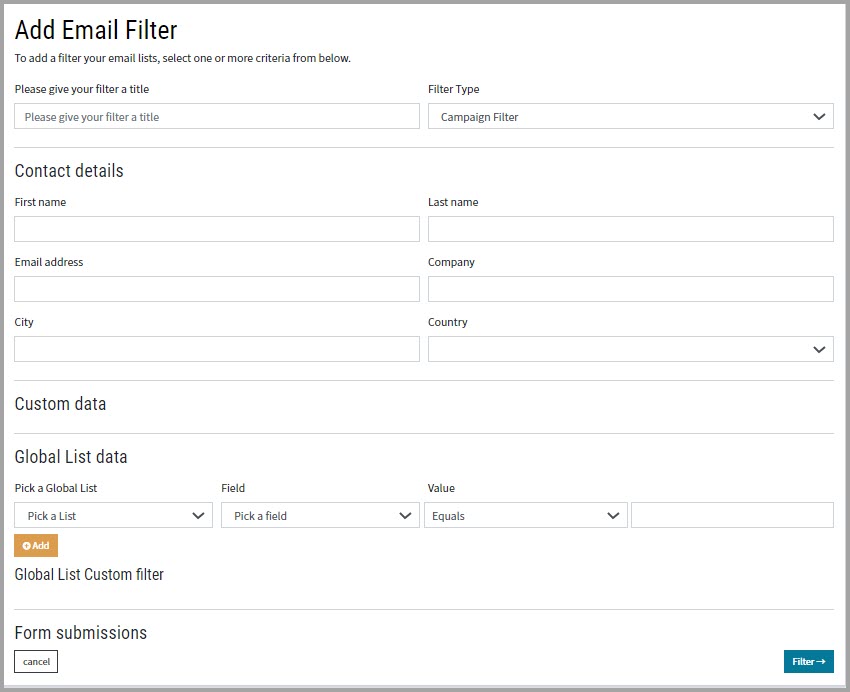
We have updated the user interface for the filters screen, so the screen is clearer and easier to read, and the page is easier to use. We have not changed any of the functionality.
Previous Filter Screen
New Filter Screen available from March 2023
Ask your CSM to enable Admin.System.Versions.FilterVersion = 2
Filtering on an Additional Field
To filter a list on an additional field, scroll down to the Additional fields section. Then, select the InterAction Folder or List you wish to filter, the Additional Field you wish to reference (i.e. RSVP), the Value (i.e. 'Is' or 'Is not') and the Additional Field Value (i.e. Yes).
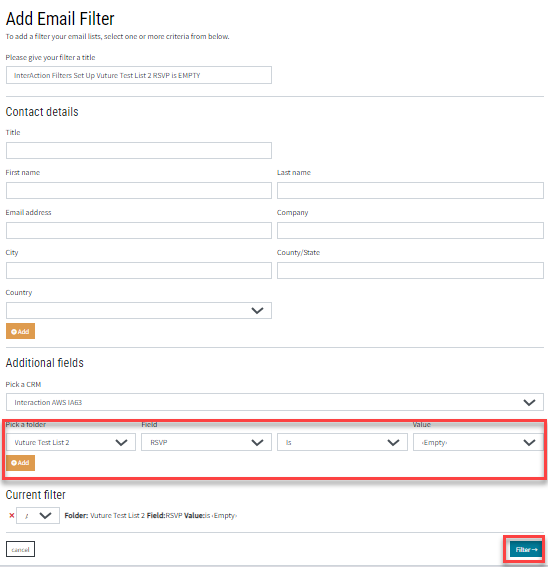
The example above is using the RSVP field to filter the InterAction Filter Set Up Campaign Vuture Test List 2 Event list, with an Additional Field Value ( RSVP) of <Empty> for “All people who have not yet replied”. This kind of filter would allow us to send a Reminder to Register email to those contacts who have not yet responded to the RSVP field.
After you've entered in your details for your filter, click on Add and then click on Filter at the bottom of the page.
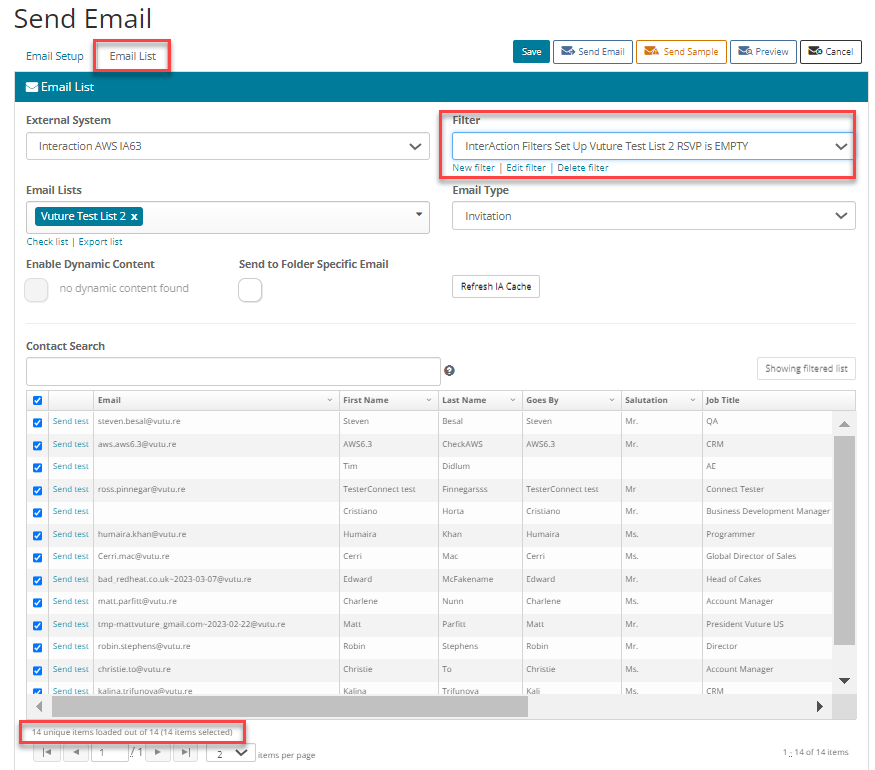
Upon clicking Filter, you will be returned to your Send Email page, click the Email List tab and the mailing list will appear, filtered by the criteria you have used. In the example below, you can see that 14 people have not replied to the invite, hey are the people, therefore, who will receive this Reminder to Register email when you click on Send. To see all the invitees click on the Filer field and select No Filter- you should see all the contacts in the list.
Filtering on more than one Additional Field
It is possible to filter on more than one Additional Field at a time. For example, to send out a Request for Feedback after an event you could filter on 'RSVP' is 'Yes', AND 'Attended' is not' 'No Show'.
To do this, start on the Send Email screen by clicking on New Filter.
In the Add Email Filter page, give a full Title of your new filter including the list name.
Add the criteria one at a time:
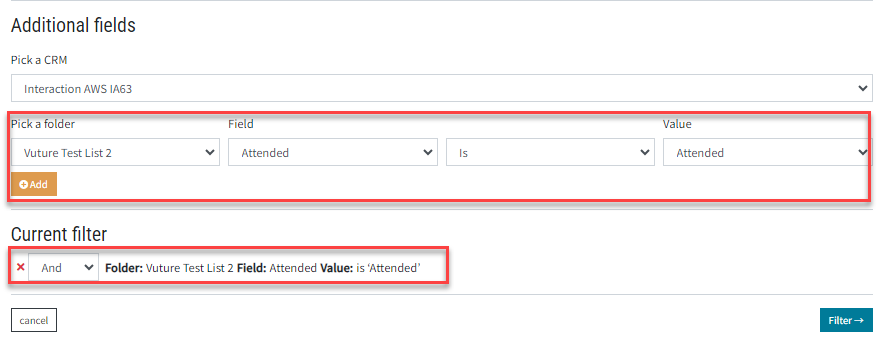
As soon as you click on Add, go back to the Field choice and select the next field. This time it is Attended:
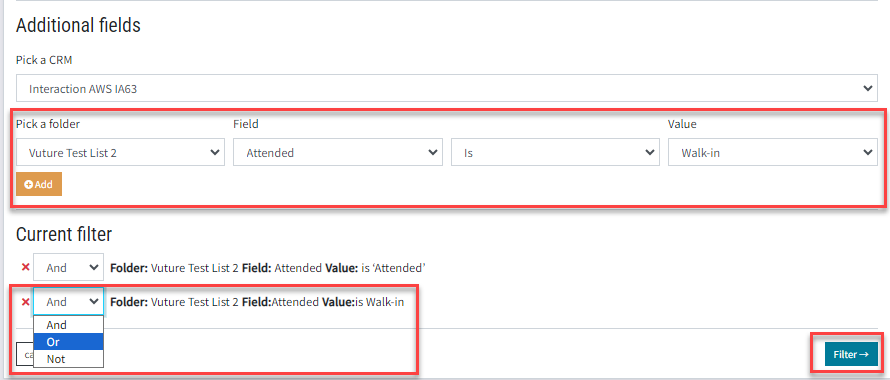
If you need to, you will also be able to choose OR instead of AND when appropriate(as the attendance value cannot be both Attended AND Walk-in but can be Attended OR Walk-in, see below for limitations on this.
Filtering on more than one List
It is also possible to filter on more than one list at a time. However, in both InterAction 6.1 and 6.2, when attempting to read or update additional fields on multiple lists at the same time, if the additional fields have the same name, then InterAction does not handle this correctly and it only either reads or updates fields in the first list and ignores the other list fields.
Current workarounds for situations where you are using multiple lists are:
- Create a single master list by combining your existing lists, with all the relevant additional fields
or
- If you have additional fields on multiple lists with the same name, edit the field names in InterAction to be different.
Example of Best Practice when Planning a Multi-Date or Multi-Venue Event
If you are organising an event where contacts are invited to choose options such as which date they prefer, and you know you are going to want to filter your list later – to send out Registration Confirmations, Thank You Emails, etc. for example – try not to create multiple lists on InterAction. It is preferable to manage your attendees all on one list, with their choices given as Additional field values. So, for example:
- Additional Field called RSVP - Values of Accept and Decline – Used for overall “anyone who has accepted” the invitation, or declined, or ignored you
- Additional Field called Attended – Values of Attended, Cancelled, No Show, Walk In
- Additional Field called Date Choice – Values of Monday, Wednesday, Friday – Used for which date they have chosen.
It will then be simple to filter your list:
Confirmations can be sent to anyone who has RSVP is Accept and has a value in the Date Choice field.
- Reminders to register can be sent to anyone who has RSVP is Empty.
- Event reminders can be sent to anyone who has a Date Choice and whose Attended value is not Cancelled.
- Request for feedback emails afterwards can be sent to anyone who has a value of Attended.
- Sorry you didn’t make it emails can be sent to anyone who has a value of Cancelled or No Show
Limitations on additional field filters
Note that filtering on different values for the same additional field works by using "OR" logic but filtering on different additional fields only works by using "AND" logic.
Additional limitations on additional field filters if IA Filtering system setting is enabled
If your Vuture instance has IA Filtering enabled, then there are further limitations on creating filters. IA Filtering is a setting "Admin.System.InterAction.Use InterAction built-in filtering", that uses built in InterAction filters to speed up the filtering process. Although this provides a speed gain, it limits the available filters.
Below is a list of known invalid filter types when IA Filtering is enabled:
- IA filtering cannot search on `NOT`, <empty>, or <not-empty> filters. We can only search ‘equals’ or ‘partial’ matches.
- InterAction cannot have multiple searches for the same core contact field. For example, you can combine first and last names, but cannot have two first name filters. IA ignores all subsequent entries.
- You cannot `OR` contact fields, these are only available as an `AND` unless it is only the first field being `OR`.
- InterAction cannot search on ‘salutation’ or ‘title’, as IA ignores these fields in the search.
- InterAction cannot search on `OR` combinations of different additional fields. It is fine to combine different fields with `AND` or the same field with `OR`.
To filter on contact fields enter one or more values into the Contact details section of the filter and click Add to add the filter. The search will look for a partial match, which means it will look for fields that start with what you have entered, e.g. typing "Bob" will find "Bob" and "Bobby"
If you enter a value into more than one field, then they will be combined as "AND”. That is, only contacts that match both values will be returned.
If you want to do an "OR" search, then add each value separately and use the operator dropdown at the beginning of the filter item to select "OR". You can also select "NOT" here to filter on contacts that don't match the criteria.
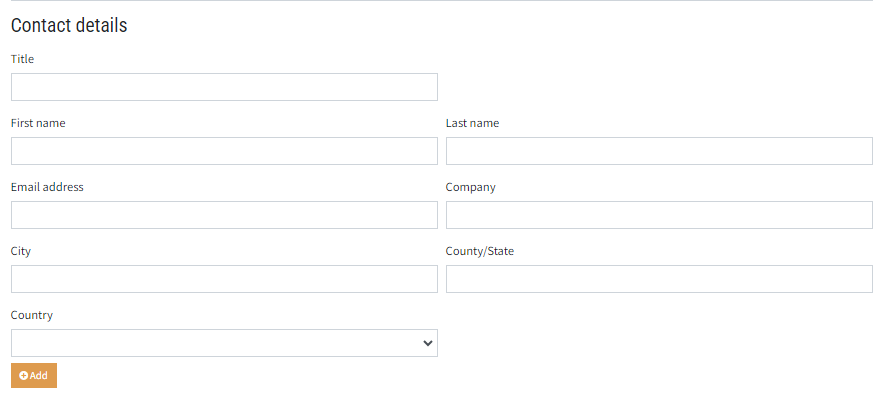
Note that filtering on list values is generally more reliable and easier to set up, than filtering on contact fields because list values are fixed. Contact fields that are “free text” may contain many variations and you would have to consider them all to get a complete list returned.
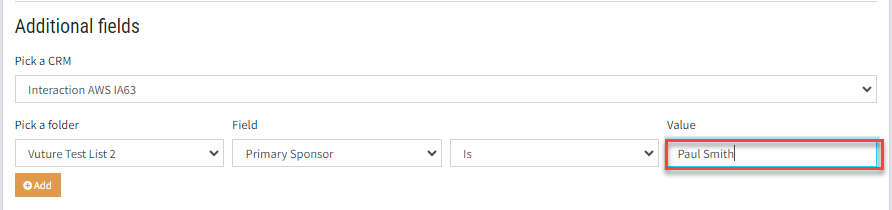
To filter on the Primary Sponsor you may need to ask your Customer Success Manager or Vuture Support to enable Admin.System.Email.filterOnPrimarySponsor. Once enabled this setting will display Primary Sponsor as an additional field in the dropdown field list:
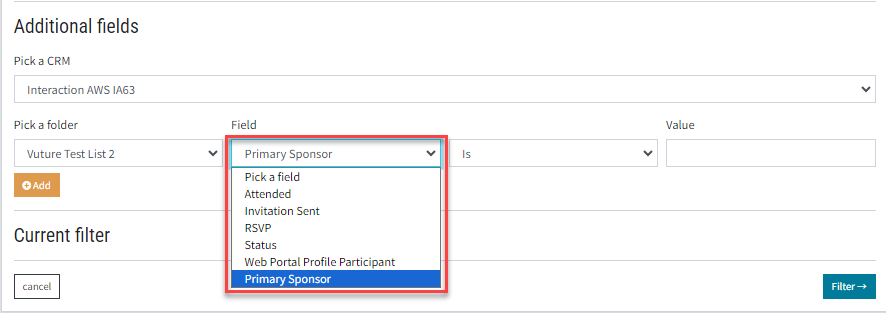
The Primary Sponsor filter uses the values in the Firstname & Lastname fields seen on the user's contact record. As an example, if the user's Contact record displays as Mr Paul W. Smith Snr, the filter value should be set to Paul Smith.