Keywords: links; redirects; email; options; broken link; hyperlink
There is an easy to use Redirect option under Select Layout. Refer to this article for a description.
Introduction
Inside the "Options" section of an email campaign is a "Manage redirects" function that allows you create redirects for any link in an email.
This is useful when you have already sent out an email and then need to change the destination of one or more links. It applies only to links within an email page. Links in landing pages do not need this feature because landing pages remain in the campaign and you can edit them even after the mailing has gone out.
Prerequisites
This option is available to all users with access to the email campaign.
Managing Redirects
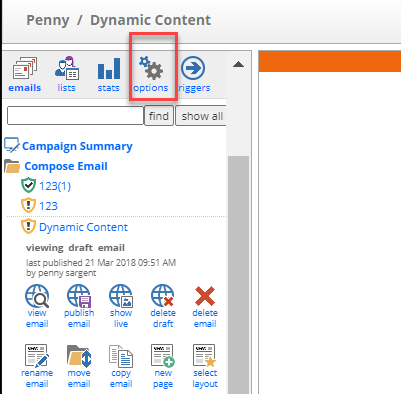
From within any email campaign click on the "Options" button at the top of the left panel.
Scroll down and click on the "Manage redirects" link:
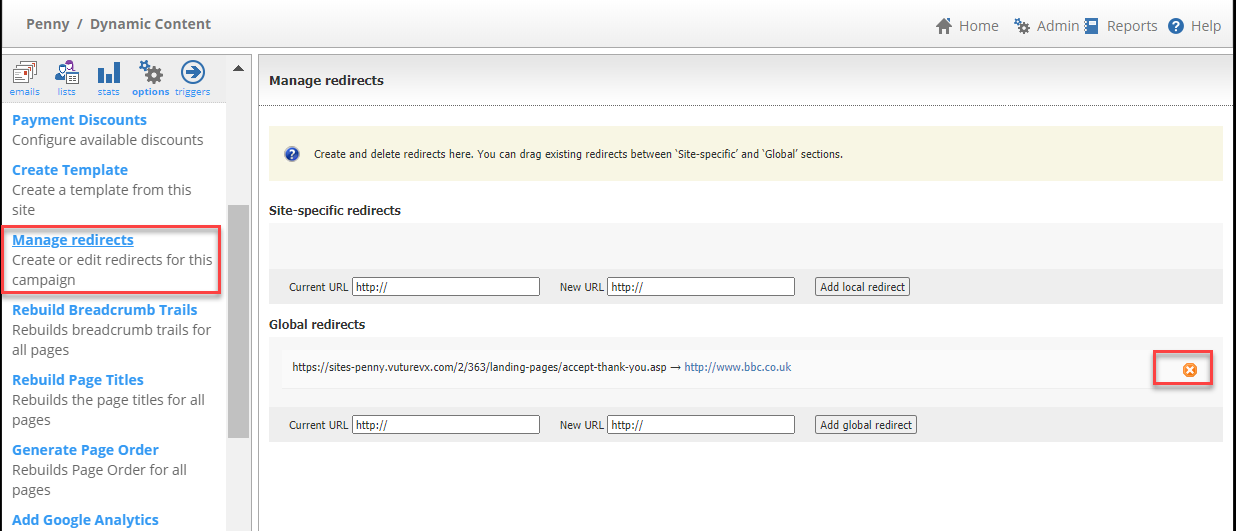
From here you can add "Site-specific redirects" which only apply to emails in this campaign or "Global redirects" which will apply across all campaigns in all containers.
Global redirects can be useful if the location of a URL you regularly link to has changed, and you want this redirect to apply everywhere (for example following a merge of firms or if a new website has been built for your firm).
To add a redirect:
1. Enter the current URL (including the leading http:// or https://) and then
2. The destination URL and then
3. Click on the Add button.
Note: To add the current URL, you will need to right click and copy the URL from the sent email. If you were not on the original email that was sent with the incorrect URL, please navigate to the sent email, click "resend email", then a "send test" to your email address.
Once received in your inbox, right click and "copy URL". Then insert this copied URL into the "Current URL" for the redirect.
To remove a redirect:
Click on the orange cross to the right of it. In the example image above, there is a "test redirect" redirecting a landing page link to the BBC instead, which I can remove with the orange cross.
You can move redirects between "Site-specific" and "Global" by dragging them.
Note that these redirects only apply to tracked links inside Sent Emails and will not work on landing pages (which can be manually changed because they remain in the container).
Manage Redirect URL Troubleshooting
If your redirect is not working then check the URL you are redirecting from by using the link picker in the text editor to get the link. If you have already sent the email you can click Resend to copy it back into the Compose Email folder from where you can get the link.
Copy the link and URL decode it using an online tool like: https://meyerweb.com/eric/tools/dencoder/
Then grab the part after redirect=
If there are any %20 encoded characters replace them with space.
If there are any %26 encoded characters replace them with &
Example for decoding a link
In this example, https://bbc.co.uk is going to https%3A%2F%2Fbbc.co.uk when clicking on the link within an email. The redirect is going to the correct destination, but an element in the encoding is stopping it from working properly.
-Step 1
Copy the encoded forwarded address into any decoder tool, such as https://meyerweb.com/eric/tools/dencoder/
-Step 2
When decoded, check for either of the %20 or %26 encoded characters above and update the text of the link to use space instead of %20 and & instead of %26.
-Step 3
Go to Options and then Manage Redirects within the email campaign (found at the top left of the screen as described in the Managing Redirects section of this article above).
Add the newly updated encoded URL into the “Current URL” and add the original URL which got encoded into the “New URL”
**Test this by checking that the original link in the email redirects properly this time**
When using a redirect function, it will always redirect to the full link rather than the shortened link, even if the link shortened is enabled.
